The Perfect Server CentOS 7.6 with Apache, PHP 7.2, Postfix, Dovecot, Pure-FTPD, BIND and ISPConfig 3.1

This tutorial shows the installation of ISPConfig 3.1 on a CentOS 7.6 (64Bit) server. ISPConfig is a web hosting control panel that allows you to configure the following services through a web browser: Apache web server, PHP 7.2, Postfix mail server, MySQL, BIND nameserver, PureFTPd, SpamAssassin, ClamAV, Mailman, and many more.

1 Requirements

To install such a system you will need the following:

  • A Centos 7.6 minimal server system. This can be a server installed from scratch as described in our Centos 7 minimal server tutorial or a virtual-server or root-server from a hosting company that has a minimal Centos 7.6 setup installed.
  • A fast Internet connection.

2 Preliminary Note

In this tutorial, I use the hostname server1.example.com with the IP address 192.168.0.100 and the gateway 192.168.0.1. These settings might differ for you, so you have to replace them where appropriate.

3 Prepare the server

Set the keyboard layout

In case that the keyboard layout of the server does not match your keyboard, you can switch to the right keyboard (in my case "de" for a German keyboard layout, with the localectl command:

localectl set-keymap de

To get a list of all available keymaps, run:

localectl list-keymaps

I want to install ISPConfig at the end of this tutorial, ISPConfig ships with the Bastille firewall script that I will use as the firewall, therefor I disable the default CentOS firewall now. Of course, you are free to leave the CentOS firewall on and configure it to your needs (but then you shouldn't use any other firewall later on as it will most probably interfere with the CentOS firewall).

Run...

yum -y install net-tools
systemctl stop firewalld.service
systemctl disable firewalld.service

to stop and disable the CentOS firewall. It is ok when you get errors here, this just indicates that the firewall was not installed.

Then you should check that the firewall has really been disabled. To do so, run the command:

iptables -L

The output should look like this:

[[email protected] ~]# iptables -L
Chain INPUT (policy ACCEPT)
target prot opt source destination
Chain FORWARD (policy ACCEPT)
target prot opt source destination
Chain OUTPUT (policy ACCEPT)
target prot opt source destination

Or use the firewall-cmd command:

firewall-cmd --state
[[email protected] ~]# firewall-cmd --state
not running
[[email protected] ~]#

Now I will install the network configuration editor and the shell based editor "nano" that I will use in the next steps to edit the config files:

yum -y install nano wget NetworkManager-tui yum-utils

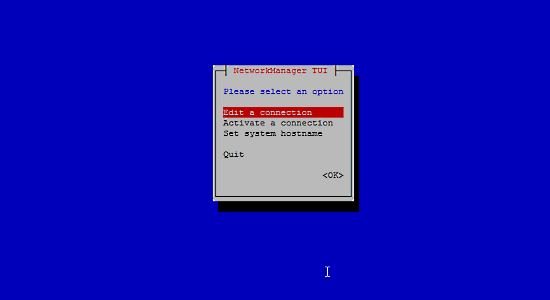
If you did not configure your network card during the installation, you can do that now. Run...

nmtui

... and go to Edit a connection:

Edit Network connection

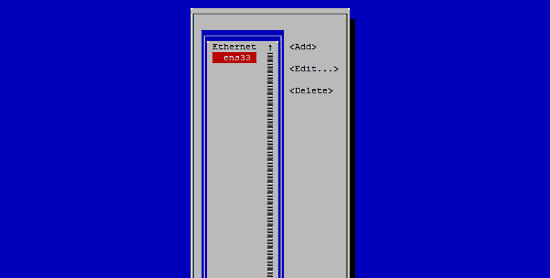
Select your network interface:

Select network interface

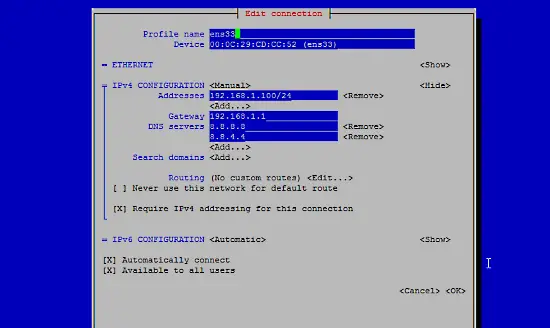
Then fill in your network details - disable DHCP and fill in a static IP address, a netmask, your gateway, and one or two nameservers, then hit Ok:

Set netmask

Next select OK to confirm the changes that you made in the network settings

Confirm network settings

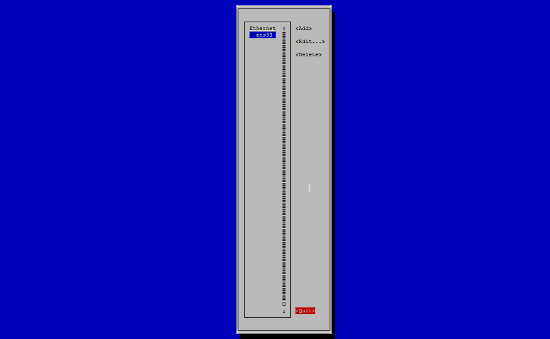
and Quit to close the nmtui network configuration tool.

Quit nmtui

You should run

ifconfig

now to check if the installer got your IP address right:

[[email protected] ~]# ifconfig
ens33: flags=4163<UP,BROADCAST,RUNNING,MULTICAST> mtu 1500
inet 192.168.0.100 netmask 255.255.255.0 broadcast 192.168.0.255
inet6 fe80::20c:29ff:fee5:5b47 prefixlen 64 scopeid 0x20<link>
inet6 2003:c2:9731:a445:20c:29ff:fee5:5b47 prefixlen 64 scopeid 0x0<global>
ether 00:0c:29:e5:5b:47 txqueuelen 1000 (Ethernet)
RX packets 227784 bytes 317714901 (302.9 MiB)
RX errors 0 dropped 0 overruns 0 frame 0
TX packets 205574 bytes 23608521 (22.5 MiB)
TX errors 0 dropped 0 overruns 0 carrier 0 collisions 0

lo: flags=73<UP,LOOPBACK,RUNNING> mtu 65536
inet 127.0.0.1 netmask 255.0.0.0
inet6 ::1 prefixlen 128 scopeid 0x10<host>
loop txqueuelen 1 (Local Loopback)
RX packets 0 bytes 0 (0.0 B)
RX errors 0 dropped 0 overruns 0 frame 0
TX packets 0 bytes 0 (0.0 B)
TX errors 0 dropped 0 overruns 0 carrier 0 collisions 0

[[email protected] ~]#

If your network card does not show up there, then it not be enabled on boot, In this case, open the file /etc/sysconfig/network-scripts/ifcfg-eth0

nano /etc/sysconfig/network-scripts/ifcfg-ens33

and set ONBOOT to yes:

[...]
ONBOOT=yes
[...]

and reboot the server.

Check your /etc/resolv.conf if it lists all nameservers that you've previously configured:

cat /etc/resolv.conf

If nameservers are missing, run

nmtui

and add the missing nameservers again.

Now, on to the configuration...

Adjusting /etc/hosts and /etc/hostname

Next, we will edit /etc/hosts. Make it look like this:

nano /etc/hosts
127.0.0.1   localhost localhost.localdomain localhost4 localhost4.localdomain4
192.168.0.100 server1.example.com server1

::1 localhost localhost.localdomain localhost6 localhost6.localdomain6

Set the hostname in the /etc/hostname file. The file shall contain the fully qualified domain name (e.g. server1.example.com in my case) and not just the short name like "server1". Open the file with the nano editor:

nano /etc/hostname

And set the hostname in the file.

server1.example.com

Save the file and exit nano.

Set SELinux to permissive

SELinux is a security extension of CentOS that should provide extended security. ISPConfig does not ship with an SELinux rule set, therefore I set it to permissive (this is a must if you want to install ISPConfig later on).

Edit /etc/selinux/config and set SELINUX=permissive:

nano /etc/selinux/config
# This file controls the state of SELinux on the system.
# SELINUX= can take one of these three values:
#     enforcing - SELinux security policy is enforced.
#     permissive - SELinux prints warnings instead of enforcing.
#     disabled - No SELinux policy is loaded.
SELINUX=permissive
# SELINUXTYPE= can take one of these two values:
#     targeted - Targeted processes are protected,
#     mls - Multi Level Security protection.
SELINUXTYPE=targeted

Afterwards we must reboot the system:

reboot

4 Enable Additional Repositories and Install Some Software

First, we import the GPG keys for software packages:

rpm --import /etc/pki/rpm-gpg/RPM-GPG-KEY*

Then we enable the EPEL repository on our CentOS system as lots of the packages that we are going to install in the course of this tutorial are not available in the official CentOS 7 repository:

yum -y install epel-release

Then we update our existing packages on the system:

yum -y update

Now we install some software packages that are needed later on:

yum -y groupinstall 'Development Tools'

5 Quota

(If you have chosen a different partitioning scheme than I did, you must adjust this chapter so that quota applies to the partitions where you need it.)

To install quota, we run this command:

yum -y install quota

Now we check if quota is already enabled for the file system where the website (/var/www) and maildir data (var/vmail) is stored. In this example setup, I have one big root partition, so I search for ' / ':

mount | grep ' / '
[[email protected] ~]# mount | grep ' / '
/dev/mapper/centos-root on / type xfs (rw,relatime,attr2,inode64,noquota)
[[email protected] ~]#

If you have a separate /var partition, then use:

mount | grep ' /var '

instead. If the line contains the word "noquota", then proceed with the following steps to enable quota.

Enabling quota on the / (root) partition

Normally you would enable quota in the /etc/fstab file, but if the filesystem is the root filesystem "/", then quota has to be enabled by a boot parameter of the Linux Kernel.

Edit the grub configuration file:

nano /etc/default/grub

search for the line that starts with GRUB_CMDLINE_LINUX and add rootflags=uquota,gquota to the commandline parameters so that the resulting line looks like this:

GRUB_CMDLINE_LINUX="crashkernel=auto rd.lvm.lv=centos/root rd.lvm.lv=centos/swap rhgb quiet rootflags=uquota,gquota"

and apply the changes by running the following command.

cp /boot/grub2/grub.cfg /boot/grub2/grub.cfg_bak
grub2-mkconfig -o /boot/grub2/grub.cfg

and reboot the server.

reboot

Now check if quota is enabled:

mount | grep ' / '
[[email protected] ~]# mount | grep ' / '
/dev/mapper/centos-root on / type xfs (rw,relatime,attr2,inode64,usrquota,grpquota)
[[email protected] ~]#

When quota is active, we can see "usrquota,grpquota" in the mount option list.

Enabling quota on a separate /var partition

If you have a separate /var partition, then edit /etc/fstab and add ,uquota,gquota to the / partition (/dev/mapper/centos-var):

nano /etc/fstab

#
# /etc/fstab
# Created by anaconda on Sun Sep 21 16:33:45 2014
#
# Accessible filesystems, by reference, are maintained under '/dev/disk'
# See man pages fstab(5), findfs(8), mount(8) and/or blkid(8) for more info
#
/dev/mapper/centos-root / xfs defaults 1 1
/dev/mapper/centos-var /var xfs defaults,uquota,gquota 1 2
UUID=9ac06939-7e43-4efd-957a-486775edd7b4 /boot xfs defaults 1 3
/dev/mapper/centos-swap swap swap defaults 0 0

Then run

mount -o remount /var
quotacheck -avugm
quotaon -avug

to enable quota. When you get an error that there is no partition with quota enabled, then reboot the server before you proceed.

6 Install Apache, PHP, MySQL and phpMyAdmin

Enable the Remi repository to get newer PHP versions:

yum install http://rpms.remirepo.net/enterprise/remi-release-7.rpm
yum-config-manager --enable remi-php72

We can install the needed packages with one single command:

yum -y install ntp httpd mod_ssl mariadb-server php php-mysql php-mbstring phpmyadmin

To ensure that the server cannot be attacked through the HTTPOXY vulnerability, we will disable the HTTP_PROXY header in apache globally. 

Add the apache header rule at the end of the httpd.conf file:

echo "RequestHeader unset Proxy early" >> /etc/httpd/conf/httpd.conf

And restart httpd to apply the configuration change.

service httpd restart
Share this page:

Suggested articles

54 Comment(s)

Add comment

Comments

By: Gecata

If someone want to use Postfix 3 /instead default Postfix 2/ here is the steps:

yum -y remove postfix ssmtp sendmail

yum -y install http://mirror.ghettoforge.org/distributions/gf/gf-release-latest.gf.el7.noarch.rpm

yum-config-manager --enable gfyum-config-manager --enable gf-plusyum -y install postfix3 postfix3-mysql ntp getmail cyrus-sasl-plainsystemctl stop sendmail.servicesystemctl disable sendmail.servicesystemctl enable postfix.servicesystemctl restart postfix.service

Now i'm testing it and it work fine already 2 weeks.

By: me

Hello. Where did you create users for using the mail services ? Thank you.

By: till

Just log into ispconfig and add a mail domain and mailbox there.

By: Vincent Meyer

 I think there's a possible error in the instructions to edit phpMyAdmin.conf.  The instructions look the same as previous versions, however the code is different and the new version (top entry) is missing the "Require all granted" line and has two extra lines commented out.

Am I missing something?

Thanks,

Vincent Meyer

<Directory /usr/share/phpMyAdmin/> <IfModule mod_authz_core.c> # Apache 2.4 # <RequireAny> # Require ip 127.0.0.1 # Require ip ::1 # </RequireAny> </IfModule> <IfModule !mod_authz_core.c> # Apache 2.2 Order Deny,Allow Deny from All Allow from 127.0.0.1 Allow from ::1 </IfModule> </Directory> <Directory /usr/share/phpMyAdmin/> <IfModule mod_authz_core.c> # Apache 2.4 <RequireAny> # Require ip 127.0.0.1 # Require ip ::1 Require all granted </RequireAny> </IfModule> <IfModule !mod_authz_core.c> # Apache 2.2 Order Deny,Allow Deny from All Allow from 127.0.0.1 Allow from ::1 </IfModule> </Directory>

By: till

Thank you for the notice. The file was fine just the text needed to be changed. I've changed the description to match the new file structure now.

By: kos

nano /etc/httpd/conf.d/phpMyAdmin.conf

add

Require all Granted

Require all granted

By: rares

For me it works only with 

# Apache 2.4

<RequireAny> #Require ip 127.0.0.1 #Require ip ::1 Require all granted </RequireAny> Otherwise when trying to connect to / phpmyadmin I received the message "Forbidden"

By: Tushar

anyone provide complete installation service as per our requirments ?

By: till

You can get remote installation support for ISPConfig here: https://www.ispconfig.org/get-support/?type=ispconfig

By: Dimitris

 Any chance of making the same tutorial for NGINX too?

By: nicholas

if enable DKIM... amavisd won't start :/ how to resolve?

By: Haris

I installed perfect server on my VPS. Its working perfectly but i only getting one issue. website harddisk quota showing unlimted, both hard limit and soft limit. I put 5000 mb web space limit for website but me and my client showing unlimited. I think its because I didn't change anything in "/etc/default/grub". If I put "rootflags=uquota,gquota" then my vps will not start and show "Unrecognized mount option uquota or missing value"please help me to install and configure "quota"

my defalut  "/etc/default/grub"GRUB_TIMEOUT=5GRUB_DISTRIBUTOR="$(sed 's, release .*$,,g' /etc/system-release)"GRUB_DEFAULT=savedGRUB_DISABLE_SUBMENU=trueGRUB_TERMINAL_OUTPUT="console"GRUB_CMDLINE_LINUX="crashkernel=auto biosdevname=0 net.ifnames=0 rhgb quiet"GRUB_DISABLE_RECOVERY="true"

my default "/etc/fstab"UUID=1b2a04a0-30db-4dcb-8577-31ed02090afa /                       ext4    defaults,noatime        1 0UUID=56a52b27-7b05-47d3-ad5b-deaa4542c70f /boot                   ext4    defaults,noatime        1 0

please help

By: adamjedgar

ifconfig command in Centos 7 may not work...my understanding is that it is obsolete?

An alternative is

[[email protected] ~]# ip addr

By: Submit

Ack, seriously? Can't put that in red or use [] to indicate that is one of the values that needs changed?

'roundcubepassword'


By: CMRazvan

Hy, i use a virtual server from DigitalOcean for testing ISPConfig, i create a droplet whit CentoS 7.6 64Bit, but sorry , this is not working can you tel me why ?? and why is so hard to install ISP Confing ? i try more den 5 times and more then 7 times , rebuild droplet for trying other ways for install , can someone explain more ? or give me an hint what linux should i use  ?  

Tks. 

By: till

The recommended Linux Distributions for ISPConfig are Debian and Ubuntu. CentOS is by far the hardest tó install, but nonetheless, a copy/paste of the above guide works, tested it again last week. So not sure where you're installation has gone wrong. Anyway, better use one of the recommended and most easy to install Distributions: https://www.howtoforge.com/tutorial/perfect-server-ubuntu-18.04-with-apache-php-myqsl-pureftpd-bind-postfix-doveot-and-ispconfig/

By: Gaston Girardi

Hi, in the fifth step Quota, after installing quota without any problem, i run mount | grep ' / 'And i get the following parameters./dev/md2 on / type ext3 (rw,noatime,seclabel,data=ordered)I try to follow the example with the premise that i have one big partition and that's all, but when i reboot the server i'm not able to connect trougth SSHand i have to reinstall the image, we have our server hosted with Ionos.

Any ideas of what i have to do?, also can i continue skipping that step and finishing at the end?, I'm new and i don't have much experience.

By: Lucas Schatz

For the users thar are experiencing forward e-mails getting DKIM failed, add SRS support in our postfix configuration, it will rewrite the header from the e-mail.

Project/tutorial:

https://github.com/roehling/postsrsd


By: Stanislav Panayotov

I'm having problems with SSL options. I successfully created a domain and site in ispconfig, but I get SSL options for it not from its file, but from the ssl.conf file. If I delete ssl.conf file then httpd open only ports 8080, 8081 and 80.

By: Ricardo Lopez

 This Configuration of Mailman , Work with Virtual User and domain , over mysql.


By: Sam Hong

Newbie question, At the beginning of this tutorial it states "ISPConfig ships with the Bastille firewall script that I will use as the firewall".  I am confused, is Bastille a firewall?  I don't see any evidence of a firewall running after installing ISP Config.  Can I just turn iptables back on?

By: till

Bastille is an iptables based firewall script. You can turn on the firewall under System in ISPConfig.

By: Ronald

Great article, very detailed. Just followed all the steps and wanted to use the ISPConfig Migration Toolkit to migrate everything from an old server, but I receive this error message when going to System > Remote Users

Access denied; you need (at least one of) the SUPER, SYSTEM_VARIABLES_ADMIN or SESSION_VARIABLES_ADMIN privilege(s) for this operation

I am pretty sure that the admin account should have these privileges granted from the start.

Any suggestion is appreciated.


Regards,

Ronald

By: Ronald

Funny thing that I did not notice is that the same error is also displayed in other parts of ISPConfig.

Any idea how to fix? Do I need to start from fresh, would that be the better option?

Regards,

Ronald

By: till

are you sure that you are logged in with the user with the name 'admin'? This is the only user which has the required permissions, if you created another user under system > cp users, even when you assigned him to admin group, he will not be able to access these settings. so you must use the original admin user for that. It might be better if you make a post in the ispconfig support forum here at howtoforge if you need further help.

By: Ronald

yeah, pretty sure, it's the only user in ISPConfig (being a fresh install). 

By: till

Ok, that's strange indeed then. Please use the forum to post your issue there.

By: _ronald_

I just did.

thanks

By: _ronald_

yeah, pretty sure, it's the only user in ISPConfig (being a fresh install). 

By: Todd B

Followed this to the letter (except for installing mailman) on centos 7.7.

My email is going to system mail /var/mail instead of to /var/vmail/<domain>.

Not sure what's going on, but it seems something is broke.

By: Todd B

Updated... ispconfig3 doesn't bother to check for in mydestination= in postfix/main.cf.

Found another post that explained this and problem finally solved... I've been fighting this for *4* days.


By: krakenest

Hi Todd - do you remember the post that had the solution? thanks

By: Alan

Great work, really helpful.

I'd like to add few comments regarding MySQL8

Disable password policy as ISPConfig generates passwords as md5 hashes

-connect to mysql and issue: 

UNINSTALL COMPONENT 'file://component_validate_password';

Also, it might be neccessary to revert authentication to classic one:

- open /etc/my.cnf and add:

default_authentication_plugin=mysql_native_password


For MySQL8 it is wise to go with true utf8 (4byte not the default 3byte one).

open /etc/my.cnf and add (line with set names is commented as I believe DSN config should handle that but if not there is a solution prepared):

collation-server = utf8mb4_unicode_ci

#init-connect='SET NAMES utf8mb4'

character-set-server = utf8mb4


By: till

Thank you for the mysql 8 steps! Just one small correction, ispconfig does not use md5 to hash passwords, it uses the mysql 'password' function for mysql user passwords.

By: manipel

I'm trying to use your perfect! guide based on the new CentOS 8. So far so good but there seems to be no dove-cot pigeonhole for CentOS 8.

What happens if I leave pigeonhole out of the installation?

By: till

That's required for sieve mailbox filters, the autoresponder and the 'send copy to' function. But maybe they put the sieve code into the main dovecot package so, so it might work nonetheless. I would try to leave it out and maybe you can report back if e.g. autoresponder or send copy to is working without that package.

By: Daren

Hi.

Do you have an idea when you are going to release the configuration doc for The Perfect Server CentOS 8 with ISPConfig ?

Thank you.

By: till

Not really as there are still some packages missing in EPEL for CentOS 8 that are needed for the setup. But I'll check EPEL from time to time and when they release the missing packages for CentOS 8, then I'll write a tutorial for it and implement CentOS 8 support in ISPConfig.

By: Daren

Thank you for your reply.My server is currently running on CentOS 6.10 with ISPConfig 3.1.15p2 and PHP 5.6.40.

I would like to update to a newer CentOS on new computer to benefit from a more recent, secure and faster version of PHP.

Do you think I should wait for the documentation to install a new CentOS 8 server or should I no longer use version 7.7 ?

The full updates for version 7 will end in August 2020. Am I better off waiting for the "EPEL missing packages" in version 8 ?

Maybe it's wise to stay with version 7.7 for stability?

Thank you.

By: Daren

HelloI ran ./certbot-auto and chose "c" to cancel because you say that the certs will be created by ISPConfig. No matter how much I follow this tutorial, in the ISPConfig panel, the Let’s Encrypt and SSL boxes checked, automatically uncheck when I save. Same thing for the connection to the ISPConfig Panel in https. During the installation I chose "yes" for the installation of Let's Encrypt. The https is activated when I connect to ISPConfig on port 8080 but the certs is not good. It's not the Let's Encrypt certs.

Thanks if you could help me.

By: till

Please use the forum to get support: https://www.howtoforge.com/community/forums/installation-configuration.27/ Ther you find also the FAQ to find out why LE will not issue a cert in your case: https://www.howtoforge.com/community/threads/lets-encrypt-error-faq.74179/

By: Drew

I've centos 7.6 and following this to install php72 as default on the system but will be using nginx instead of apache.

I noticed php-mysql is still at version 5.4.16 after enabling remi-php72. Should this actually be php-mysqlnd... or php-pecl-mysql instead of php-mysql?


Also... really glad to see that ispconfig runs on php 7.2 as well :)

By: Emir Bu?ra Köksalan

This document has some missing things. I'm making exaclty like that but when I go to login page it gives 500 error. I'm using remi repository and using php73-php-fpm. in /var/www/php-fcgi-scripts/ispconfig/.php-fcgi-starter file it tries to exec /usr/bin/php-cgi file but ther isn't file like that. in remi repository the php73-php-fpm package is putting a that file /usr/bin/php73-cgi .. after I change /usr/bin/php-cgi to /usr/bin/php73-cgi in php-fcgi-starter file then everything is fine. I think ispconfig must check that: which php package installed, find the exactly php cgi executable file.

By: till

The guide is working fine in the way it's described above, there is nothing missing. You changed parts of the guide like using a different PHP version which caused your setup to fail.

By: Fabgilette

Got same forbidden acces to phpMyAdmin, previous post is functionning, should be changes in this tutorial./etc/httpd/conf.d/phpMyAdmin.conf

   <IfModule mod_authz_core.c>     # Apache 2.4     <RequireAny>#       Require ip 127.0.0.1#       Require ip ::1Require all granted     </RequireAny>

By: James

I that you're installing/enabling/starting Amavisd-new, SpamAssassin, ClamAV, and Postgrey.  Why not configure them to be used by Postfix?  Just for example, "/etc/postfix/master.cf" needs:

smtp      inet  n       -       n       -       -       smtpd

  -o content_filter=spamassassin

By: till

Amavis, spamassasin and ClamAV get used by postfix, the whole configuration is done by the ISPConfig installer automatically during ISPConfig installation, so do not add anything besides what's described in this tutorial. Please undo what you posted in your comment in case you did that on your server as it will cause each email to get scanned twice by spamassassin.

By: devs

Hi! the hvvm for centos 7 is already distributed, quick question, how can I add it to work with ispconfig? thanks

By: Claudoir Roberto

Hello.After installing and configuring the server, when trying to access the link:http://myhost/roundcubemail/installer Just create a blank page, without errors, without any information, could you help me please.Thanks.Claudir

By: Ignacio

Excellent tutorial!

I wanted to ask if there is a step by step to configure Roudcube with SSL. In other words, IMAPS and SMPTS.

Since although webmail works for me with these basic settings, I would like to give more security to my mail server.

Thank you

By: hay min

Thank you for the guidance. it's really help me to use ISPConfig.

before using ISPConfig, I searched for many webhosting panel but there were not completed guidance. here is the perfect one.

it is running on my web server for now

By: till

The CentOS 8 guide is here: https://www.howtoforge.com/tutorial/perfect-server-centos-8-apache-mysql-php-pureftpd-postfix-dovecot-and-ispconfig/

By: petzsch

any reason this is not linked to from ispconfig.org doc section? :-)

By: Charles

Hello

can this tutorial work on centos 7.9?