There is a new version of this tutorial available for CentOS 7.6.

The Perfect Server – CentOS 7.1 with Apache2, Postfix, Dovecot, Pure-FTPD, BIND and ISPConfig 3

This tutorial shows how to install ISPConfig 3 on a CentOS 7.1 (64Bit) server. ISPConfig 3 is a web hosting control panel that allows you to configure the following services through a web browser: Apache web server, Postfix mail server, MySQL, BIND nameserver, PureFTPd, SpamAssassin, ClamAV, Mailman, and many more. Since version 3.0.4, ISPConfig comes with full support for the nginx web server in addition to Apache; this tutorial covers the setup of a server that uses Apache, not nginx.


1 Requirements

To install such a system you will need the following:

  • A Centos 7.1 minimal server system. This can be a server installed from scratch as described in our Centos 7.1 minimal server tutorial or a virtual-server or root-server from a hosting company that has a minimal Centos 7.1 setup installed.
  • A fast Internet connection.


2 Preliminary Note

In this tutorial I use the hostname server1.example.com with the IP address 192.168.1.100 and the gateway 192.168.1.254. These settings might differ for you, so you have to replace them where appropriate.

3 Set the keyboard layout

In case that the keyboard layout of the server does not match your keybord, you can switch to the right keyboard (in my case "de" for a german keyboard layout, with the localectl command:

localectl set-keymap de

To get a list of all available keymaps, run:

localectl list-keymaps

I want to install ISPConfig at the end of this tutorial, ISPConfig ships with the Bastille firewall script that Ilike to use as firewall, therefor I disable the default CentOS firewall now. Of course, you are free to leave the CentOS firewall on and configure it to your needs (but then you shouldn't use any other firewall later on as it will most probably interfere with the CentOS firewall).

Run...

yum -y install net-tools
systemctl stop firewalld.service
systemctl disable firewalld.service

to stop and disable the CentOS firewall.

Then you should check that the firewall has really been disabled. To do so, run the command:

iptables -L

The output should look like this:

[[email protected] ~]# iptables -L
Chain INPUT (policy ACCEPT)
target prot opt source destination
Chain FORWARD (policy ACCEPT)
target prot opt source destination
Chain OUTPUT (policy ACCEPT)
target prot opt source destination

Or use the firewall-cmd command:

firewall-cmd --state
[root[email protected] ~]# firewall-cmd --state
not running
[[email protected] ~]#

Now I will install the network configuration editor and the shell based editor "nano" that I will use in the next steps to edit the config files:

yum -y install nano wget NetworkManager-tui

If you did not configure your network card during the installation, you can do that now. Run...

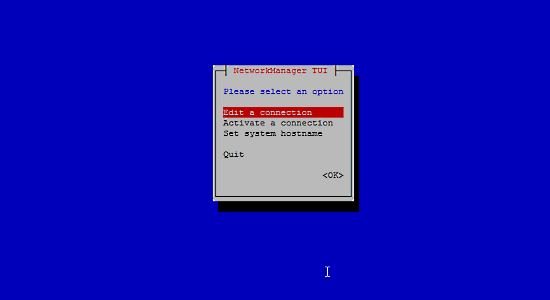
nmtui

... and go to Edit a connection:

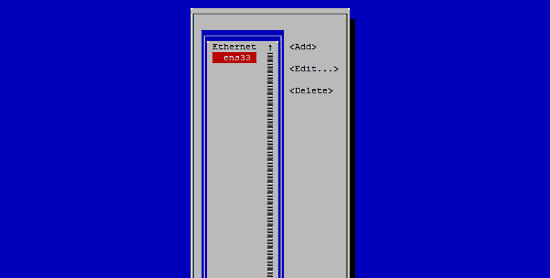
Select your network interface:

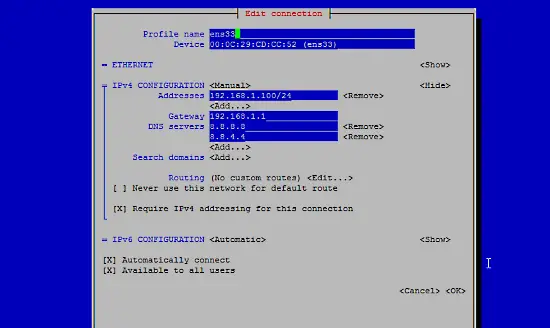
Then fill in your network details - disable DHCP and fill in a static IP address, a netmask, your gateway, and one or two nameservers, then hit Ok:

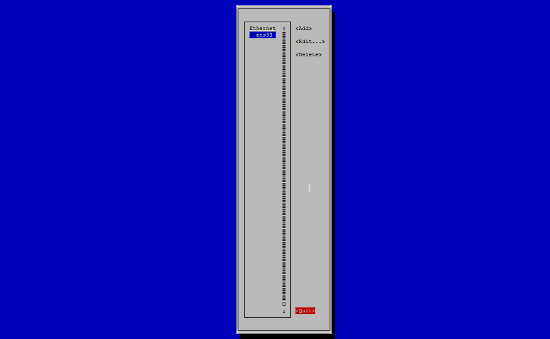
Next select OK to confirm the changes that you made in the network settings

and Quit to close the nmtui network configuration tool.

You should run

ifconfig

now to check if the installer got your IP address right:

[[email protected] ~]# ifconfig
ens33: flags=4163<UP,BROADCAST,RUNNING,MULTICAST>  mtu 1500
        inet 192.168.1.100  netmask 255.255.255.0  broadcast 192.168.1.255
        inet6 fe80::20c:29ff:fecd:cc52  prefixlen 64  scopeid 0x20

        ether 00:0c:29:cd:cc:52  txqueuelen 1000  (Ethernet)
        RX packets 55621  bytes 79601094 (75.9 MiB)
        RX errors 0  dropped 0  overruns 0  frame 0
        TX packets 28115  bytes 2608239 (2.4 MiB)
        TX errors 0  dropped 0 overruns 0  carrier 0  collisions 0

lo: flags=73<UP,LOOPBACK,RUNNING>  mtu 65536
        inet 127.0.0.1  netmask 255.0.0.0
        inet6 ::1  prefixlen 128  scopeid 0x10
        loop  txqueuelen 0  (Local Loopback)
        RX packets 0  bytes 0 (0.0 B)
        RX errors 0  dropped 0  overruns 0  frame 0
        TX packets 0  bytes 0 (0.0 B)
        TX errors 0  dropped 0 overruns 0  carrier 0  collisions 0

If your network card does not show up there, then it not be enabled on boot, In this case, open the file /etc/sysconfig/network-scripts/ifcfg-eth0

nano /etc/sysconfig/network-scripts/ifcfg-ens33

and set ONBOOT to yes:

[...]
ONBOOT=yes
[...]

and reboot the server.

Check your /etc/resolv.conf if it lists all nameservers that you've previously configured:

cat /etc/resolv.conf

If nameservers are missing, run

nmtui

and add the missing nameservers again.

Now, on to the configuration...


4 Adjust /etc/hosts

Next we edit /etc/hosts. Make it look like this:

nano /etc/hosts
127.0.0.1   localhost localhost.localdomain localhost4 localhost4.localdomain4
192.168.1.100 server1.example.com server1

::1 localhost localhost.localdomain localhost6 localhost6.localdomain6

5 Disable SELinux

SELinux is a security extension of CentOS that should provide extended security. In my opinion you don't need it to configure a secure system, and it usually causes more problems than advantages (think of it after you have done a week of trouble-shooting because some service wasn't working as expected, and then you find out that everything was ok, only SELinux was causing the problem). Therefore I disable it (this is a must if you want to install ISPConfig later on).

Edit /etc/selinux/config and set SELINUX=disabled:

nano /etc/selinux/config
# This file controls the state of SELinux on the system.
# SELINUX= can take one of these three values:
#     enforcing - SELinux security policy is enforced.
#     permissive - SELinux prints warnings instead of enforcing.
#     disabled - No SELinux policy is loaded.
SELINUX=disabled
# SELINUXTYPE= can take one of these two values:
#     targeted - Targeted processes are protected,
#     mls - Multi Level Security protection.
SELINUXTYPE=targeted

Afterwards we must reboot the system:

reboot


6 Enable Additional Repositories And Install Some Software

First we import the GPG keys for software packages:

rpm --import /etc/pki/rpm-gpg/RPM-GPG-KEY*

Then we enable the EPEL repository on our CentOS system as lots of the packages that we are going to install in the course of this tutorial are not available in the official CentOS 7 repository:

yum -y install epel-release
yum -y install yum-priorities

Edit /etc/yum.repos.d/epel.repo...

nano /etc/yum.repos.d/epel.repo

... and add the line priority=10 to the [epel] section:

[epel]
name=Extra Packages for Enterprise Linux 7 - $basearch
#baseurl=http://download.fedoraproject.org/pub/epel/7/$basearch
mirrorlist=https://mirrors.fedoraproject.org/metalink?repo=epel-7&arch=$basearch
failovermethod=priority
enabled=1
priority=10
gpgcheck=1
gpgkey=file:///etc/pki/rpm-gpg/RPM-GPG-KEY-EPEL-7
[...]

Then we update our existing packages on the system:

yum update

Now we install some software packages that are needed later on:

yum -y groupinstall 'Development Tools'


7 Quota

(If you have chosen a different partitioning scheme than I did, you must adjust this chapter so that quota applies to the partitions where you need it.)

To install quota, we run this command:

yum -y install quota

Now we check if quota is already enabled for the filesystem where the website (/var/www) and maildir data (var/vmail) is stored. In this example setup, I have one big root partition, so I search for ' / ':

mount | grep ' / '
[[email protected] ~]# mount | grep ' / '
/dev/mapper/centos-root on / type xfs (rw,relatime,attr2,inode64,noquota)
[[email protected] ~]#

If you have a separate /var partition, then use:

mount | grep ' /var '

instead. If the line contains the word "noquota", then proceed with the following steps to enable quota.

Enabling quota on the / (root) partition

Normally you would enable quota in the /etc/fstab file, but if the filesystem is the root filesystem "/", then quota has to be enabled by a boot parameter of the Linux Kernel.

Edit the grub configuration file:

nano /etc/default/grub

search fole the line that starts with GRUB_CMDLINE_LINUX and add rootflags=uquota,gquota to the commandline parameters so that the resulting line looks like this:

GRUB_CMDLINE_LINUX="rd.lvm.lv=centos/swap vconsole.font=latarcyrheb-sun16 rd.lvm.lv=centos/root crashkernel=auto  vconsole.keymap=us rhgb quiet rootflags=uquota,gquota"

and apply the changes by running the following command.

cp /boot/grub2/grub.cfg /boot/grub2/grub.cfg_bak
grub2-mkconfig -o /boot/grub2/grub.cfg

and reboot the server.

reboot

Now check if quota is enabled:

mount | grep ' / '
[[email protected] ~]# mount | grep ' / '
/dev/mapper/centos-root on / type xfs (rw,relatime,attr2,inode64,usrquota,grpquota)
[[email protected] ~]#

When quota is active, we can see "usrquota,grpquota" in the mount option list.


Enabling quota on a separate /var partition

If you have a separate /var partition, then edit /etc/fstab and add ,uquota,gquota to the / partition (/dev/mapper/centos-var):

nano /etc/fstab

#
# /etc/fstab
# Created by anaconda on Sun Sep 21 16:33:45 2014
#
# Accessible filesystems, by reference, are maintained under '/dev/disk'
# See man pages fstab(5), findfs(8), mount(8) and/or blkid(8) for more info
#
/dev/mapper/centos-root / xfs defaults 1 1
/dev/mapper/centos-var /var xfs defaults,uquota,gquota 1 2
UUID=9ac06939-7e43-4efd-957a-486775edd7b4 /boot xfs defaults 1 3
/dev/mapper/centos-swap swap swap defaults 0 0

Then run

mount -o remount /var
quotacheck -avugm
quotaon -avug

to enable quota. When you get a error that there is no oartition with quota enabled, then reboot the server before you proceed.


8 Install Apache, MySQL, phpMyAdmin

We can install the needed packages with one single command:

yum -y install ntp httpd mod_ssl mariadb-server php php-mysql php-mbstring phpmyadmin


Share this page:

39 Comment(s)

Add comment

Please register in our forum first to comment.

Comments

By: That PC Tech

I encountered errors after the following command:

     yum -y groupinstall 'Development Tools'

I was rewarded with the following error screen:

   [[email protected] ~]# yum -y groupinstall 'Development Tools'   Loaded plugins: fastestmirror, priorities   There is no installed groups file.   Maybe run: yum groups mark convert (see man yum)   Loading mirror speeds from cached hostfile    * base: mirror.keystealth.org    * epel: mirror.sfo12.us.leaseweb.net    * extras: centos-distro.cavecreek.net    * updates: mirror.lax.hugeserver.com   89 packages excluded due to repository priority protections   Warning: Group development does not have any packages to install.   Maybe run: yum groups mark install (see man yum)   No packages in any requested group available to install or update   [[email protected] ~]#

So I tried the suggestions offered:

   yum groups mark convert    yum groups mark install

But they didn't work either.

By: Izee Noo

Hi!

This tutorials have some little misunderstood. For example - with this repos, it can't install quota or webalizer.

By: till

I was able to install all packages with this repo config, you can see that in the vmware image which is the direct result of this setup.

By: Izee Noo

yum -y install webalizer

No package webalizer available.

Error: Nothing to do

By: Jurgen

Hi,


Ive run through this tutorial but seem that i have a problem with running amavisd-new 

[[email protected] ~]$ sudo systemctl start amavisd

Job for amavisd.service failed. See 'systemctl status amavisd.service' and 'journalctl -xn' for details.

[[email protected] ~]$ sudo systemctl status amavisd

amavisd.service - Amavisd-new is an interface between MTA and content checkers.

   Loaded: loaded (/usr/lib/systemd/system/amavisd.service; enabled)

   Active: failed (Result: start-limit) since ma 2015-06-08 16:13:25 CEST; 3s ago

     Docs: http://www.ijs.si/software/amavisd/#doc

  Process: 31120 ExecStart=/usr/sbin/amavisd -c /etc/amavisd/amavisd.conf (code=exited, status=255)


jun 08 16:13:25 obelix systemd[1]: amavisd.service: control process exited, code=exited status=255

jun 08 16:13:25 obelix systemd[1]: Failed to start Amavisd-new is an interface between MTA and content checkers..

jun 08 16:13:25 obelix systemd[1]: Unit amavisd.service entered failed state.

jun 08 16:13:25 obelix systemd[1]: amavisd.service holdoff time over, scheduling restart.

jun 08 16:13:25 obelix systemd[1]: Stopping Amavisd-new is an interface between MTA and content checkers....

jun 08 16:13:25 obelix systemd[1]: Starting Amavisd-new is an interface between MTA and content checkers....

jun 08 16:13:25 obelix systemd[1]: amavisd.service start request repeated too quickly, refusing to start.

jun 08 16:13:25 obelix systemd[1]: Failed to start Amavisd-new is an interface between MTA and content checkers..


jun 08 16:13:25 obelix systemd[1]: Unit amavisd.service entered failed state.


The command postqueue -p

8611054880B      552 Sun Jun  7 16:21:55  [email protected]

                   (connect to 127.0.0.1[127.0.0.1]:10024: Connection refused)


                                         [email protected]

Anybody an idea.

It is the first time i try to install a mailserver.


Jurgen

By: Mark

As stated, suPHP does not install as described.  On the configure command, you are presented with:

configure: WARNING:

!!!!!!!!!!!!!!!!!!!!!!!!!!!!!!!!!!!!!!!!!!!!!!!!!!!!!!!!!!!!!!!

!!*** APXS was not found, so mod_suphp will not be built! ***!!

!!!!!!!!!!!!!!!!!!!!!!!!!!!!!!!!!!!!!!!!!!!!!!!!!!!!!!!!!!!!!!!

And as for the other comment, it also did not work for me.


configure: WARNING: unrecognized options: --with-php, --enable-SUPHP_USE_USERGROUP

By: Cornel

When run

./configure --prefix=/usr/ --sysconfdir=/etc/ --with-apr=/usr/bin/apr-1-config --with-apache-user=apache --with-setid-mode=owner --with-logfile=/var/log/httpd/suphp_log

received the following error

checking for APR... configure: error: the --with-apr parameter is incorrect. It must specify an install prefix, abuild directory, or an apr-config file.

By: Angel

was necessary for me install patch, libtool and development tools at point 14:

I get patch command not found

so i use:

yum install patch

next i get warning: macro 'AM_PROG_LIBTOOL' not found in library

so i use:

yum install libtool

Whe i get error  g++ command not found

i solved it with:

yum groupinstall "development tools"

By: till

The development tools were already installed in step 6 of the tutorial, they contain also the patch command. So you must have left out step 6 of the guide when they were missing in step 14.

By: Anonymous

 Don't use php-mysql anymore, use php-mysqlnd instead. (this page and the next, it's installed twice in this tutorial)

By: Guillermo

Hi, with this exmple of quota, Centos display some error:

[[email protected] ~]# quotacheck -avugm quotacheck: Skipping /dev/mapper/centos-var [/var] quotacheck: Cannot find filesystem to check or filesystem not mounted with quota option.

To check if quota is configure ok, do:

[[email protected] ~]# xfs_quota -x -c 'report -h' /var

and will display this, with no errors: User quota on /var (/dev/mapper/centos-var)                         Blocks User ID      Used   Soft   Hard Warn/Grace ---------- --------------------------------- root       130,9M      0      0  00 [------] tss             0      0      0  00 [------] postfix        8K      0      0  00 [------] gruggeri        0      0      0  00 [------] Group quota on /var (/dev/mapper/centos-var)                         Blocks Group ID     Used   Soft   Hard Warn/Grace ---------- --------------------------------- root       130,9M      0      0  00 [------] mail            0      0      0  00 [------] utmp          20K      0      0  00 [------] polkitd         0      0      0  00 [------] tss             0      0      0  00 [------] postdrop        0      0      0  00 [------] postfix        4K      0      0  00 [------]


By: cwheeler33

there is a problem with this documentation/build. I am not able to complete #23Roundcube install unless I go back to step #20 and run "systemctl stop iptables.service". It looks like I only have FTP, SSH and PING. I have completed the rest of the installation, but I had to disable the firewall to complete it. Please let me know what I need o do to fix this.

Other notes for my setup: Win7 box using VMWare WKS 11. Also, to start the install I had to remove the startup script that VMWare creates (it creates an extra CDRom which I deleted). If you do not do this you will not get the option to custom install the OS. It will just install a full GUI desktop OS.

This is an output of "iptables -L"

Chain INPUT (policy ACCEPT)target     prot opt source               destinationf2b-postfix-sasl  tcp  --  anywhere             anywhere             multiport d                                            ports smtp,urd,submissionf2b-dovecot  tcp  --  anywhere             anywhere             multiport dports                                             pop3,pop3s,imap,imapsf2b-FTP    tcp  --  anywhere             anywhere             tcp dpt:ftpf2b-sshd   tcp  --  anywhere             anywhere             tcp dpt:sshACCEPT     all  --  anywhere             anywhere             state RELATED,ESTA                                            BLISHEDACCEPT     icmp --  anywhere             anywhereACCEPT     all  --  anywhere             anywhereACCEPT     tcp  --  anywhere             anywhere             state NEW tcp dpt:                                            sshREJECT     all  --  anywhere             anywhere             reject-with icmp-h                                            ost-prohibited

Chain FORWARD (policy ACCEPT)target     prot opt source               destinationREJECT     all  --  anywhere             anywhere             reject-with icmp-h                                            ost-prohibited

Chain OUTPUT (policy ACCEPT)target     prot opt source               destination

Chain f2b-FTP (1 references)target     prot opt source               destinationRETURN     all  --  anywhere             anywhere

Chain f2b-dovecot (1 references)target     prot opt source               destinationRETURN     all  --  anywhere             anywhere

Chain f2b-postfix-sasl (1 references)target     prot opt source               destinationRETURN     all  --  anywhere             anywhere

Chain f2b-sshd (1 references)target     prot opt source               destinationRETURN     all  --  anywhere             anywhere

By: Matthew Smith

I have the same problem, did you get a solution to this?

By: cwheeler33

I have found a workaround for now until the author fixes this problem. I was thinking about it and (s)he needs to add into F2B protection for PHPMYADMIN and ISPConfig off of ports 80,443, and 8080. In the meantime to just get it working I used vim to modify /etc/sysconfig/iptables and then rebooted.

I added these three lines above the existing one for port 22:

-A INPUT -p tcp -m state --state NEW -m tcp --dport 80 -j ACCEPT-A INPUT -p tcp -m state --state NEW -m tcp --dport 443 -j ACCEPT-A INPUT -p tcp -m state --state NEW -m tcp --dport 8080 -j ACCEPT

By: Tomasz

Amavis-new still using default /etc/amavisd/amavisd.conf config file.Ispconfig created /etc/amavisd.conf confile file, but not used and not working becouse permissions 640 (must be 644).Additionally change each string /etc/amavisd/amavisd.conf to /etc/amavisd.conf in /etc/systemd/system/multi-user.target.wants/amavisd.service. Then run command systemctl daemon-reload, and systemctl reload amavisd.service. Check if working: systemctl status amavisd.service.

By: Prabhakaran G

Hi,

I successfully configured as per the document, I facing issue to attach files on the roundcube webmail. How can i rectify this issue. Give me solution.


By

Prabhakaran G

By: Juan Pablo

Hi, after installing fail2ban and setting enabled iptables, web traffic stops .. by the moment, I could only flush iptables rules to continue with the tutorial. Have you any idea of what iptables rules could I use or how to configure it?

Thanks

By: till

This can happen on seome virtualisation systems like openvz containers. One option is to use route instead of iptables to block connections: http://www.faqforge.com/linux/controlpanels/ispconfig3/configure-fail2ban-to-use-route-instead-of-iptables-to-block-connections/

By: guebre ismael

Hello. I came to seek your help. I eentrain configure postfix on 7 centos but I have a concern during the test. I have a message when I execute the following command:


#echo "This is a test." | Email -s "test message" send [email protected]#-mail: can not set X509 file /usr/share/ca-certificates/mozilla/Equifax_Secure_CA.crt trust for TLS session: fichier.send-mail read error: Could not send mail (default account from /root/.msmtprc)


what should I do? thank you in advance!!!

By: andreio

Hi,

this tutorial is very well done, and the server works perfectly. I have only one problem: the mailbox folders of spam are always empty. How do I set Spamassassin and Amavis to move spam emails to the spam folder instead of deleting them?

I state that in ISPConfig I have set the configuration parameter "Move spam messages to Junk directory" for each mailbox, and all the mailboxes are set to Normal policy.

Thanks

By: till

An email is moved to the spam folder when its score is > spam tag 2 level and < spam kill level. So when your mails get deleted, then their spam level is > kill level. To avoid that spams get deleted at all, set a very high kill level like 9999 in the spamfilter policy that you selecetd for these mailboxes or domains.

By: andreio

thank you Till,

I have set the spam kill level to 9999 and the spam tag 2 level to 4.5 but nothing has changed. All the spam messages are deleted and the email spam recipients are always empty.

Also I noticed that the ISPConfig white list does not work. The false message spam that I have marked on white list never made it to the recipient because they were deleted from antispam.

Thanks

By: till

Amavis uses most likely the wrong config file. If you have a file /etc/amavisd.conf and /etc/amavisd/amavisd.conf then check which one contains the sql connection to dbispconfig, delete the other one and replace it with a symlink to the amavisd.conf with the sql connection. Then restart amavisd.

By: andreio

YES! Thank you very much Till. Now it work very well. You are great!

I had to change also the folder of the clamd.sock from /var/run/clamav/ to /var/run/clamd.amavisd/ in the amavisd.conf.

Only one last question: why there are duplicate file configuration like amavisd.conf and amavisd.conf~ ? perfectly identical. I had to change both.

Thanks

By: thenutz

for those who have UEFI boot build the grub like this

grub2-mkconfig -o /boot/efi/EFI/centos/grub.cfg

By: Emiliano

Muchas gracias HowForge por tan valioso material. Thanks, very much.

By: Byron

When you are installing fail2ban you are also starting iptables. This makes server unaccessible for the next steps of roundcube 

By: till

I installed this setup many times on servers at different datacenters in the past months and the servers never became inaccessible.

By: fred

Still... it is breaking for some of us installing. As Byron says, during the fail2ban install you instruct us to install:

This is optional but recommended, because the ISPConfig monitor tries to show the log.

yum -y install iptables-services fail2ban fail2ban-systemdsystemctl mask firewalld.servicesystemctl enable iptables.servicesystemctl enable ip6tables.servicesystemctl stop firewalld.servicesystemctl start iptables.servicesystemctl start ip6tables.service


Uninstalling the iptables-service fixes issue so what is the correct fix? 

By: Will.i.am

Top! Nice howto :)

By: John

After these commands:

./configure --prefix=/usr/ --sysconfdir=/etc/ --with-apr=/usr/bin/apr-1-config --with-apache-user=apache --with-setid-mode=owner --with-logfile=/var/log/httpd/suphp_log

make

make install

I get:

[[email protected] suphp-0.7.2]# make install

Making install in src

make[1]: ?einama ? aplank? „/usr/local/src/suphp-0.7.2/src“

Making install in apache2

make[2]: ?einama ? aplank? „/usr/local/src/suphp-0.7.2/src/apache2“

make[3]: ?einama ? aplank? „/usr/local/src/suphp-0.7.2/src/apache2“

make[3]: N?ra k? daryti su „install-exec-am“.

/usr/bin/install -c -d '/usr/lib64/httpd/modules'

/usr/bin/install -c -m 0755 .libs/mod_suphp.so '/usr/lib64/httpd/modules'/mod_suphp.so

make[3]: Išeinama iš aplanko „/usr/local/src/suphp-0.7.2/src/apache2“

make[2]: Išeinama iš aplanko „/usr/local/src/suphp-0.7.2/src/apache2“

make[2]: ?einama ? aplank? „/usr/local/src/suphp-0.7.2/src“

make[3]: ?einama ? aplank? „/usr/local/src/suphp-0.7.2/src“

 /usr/bin/mkdir -p '/usr/sbin'

  /bin/sh ../libtool   --mode=install /usr/bin/install -c suphp '/usr/sbin'

libtool: install: /usr/bin/install -c suphp /usr/sbin/suphp

make  install-exec-hook

make[4]: ?einama ? aplank? „/usr/local/src/suphp-0.7.2/src“

chmod u+s /usr/sbin/suphp

make[4]: Išeinama iš aplanko „/usr/local/src/suphp-0.7.2/src“

make[3]: N?ra k? daryti su „install-data-am“.

make[3]: Išeinama iš aplanko „/usr/local/src/suphp-0.7.2/src“

make[2]: Išeinama iš aplanko „/usr/local/src/suphp-0.7.2/src“

make[1]: Išeinama iš aplanko „/usr/local/src/suphp-0.7.2/src“

make[1]: ?einama ? aplank? „/usr/local/src/suphp-0.7.2“

make[2]: ?einama ? aplank? „/usr/local/src/suphp-0.7.2“

make[2]: N?ra k? daryti su „install-exec-am“.

make[2]: N?ra k? daryti su „install-data-am“.

make[2]: Išeinama iš aplanko „/usr/local/src/suphp-0.7.2“


make[1]: Išeinama iš aplanko „/usr/local/src/suphp-0.7.2“

And then /etc/httpd/conf.d/suphp.conf appears to be empty, this is ok?

By: Michael Yip

Hi All:

I have get the problem on amavis clamav, when I send the email to my server. I got the error log

in (!)connect to /var/run/clamd.amavisd/clamd.sock failed, attempt #1: Can't connect to a UNIX socket /var/run/clamd.amavisd/clamd.sock: No such file or directory

and I try to find the path /var/run/clamd.amavisd/ and there have no sock file inside

could I know how to fix it ?

Thanks for your help

By: Samir

You might get the following error when executing "autoreconf -if" while installing suPHP:

configure.ac:24: warning: macro 'AM_PROG_LIBTOOL' not found in libraryconfigure.ac:24: error: possibly undefined macro: AM_PROG_LIBTOOL

Then you must install libtool with:yum install libtool

By: ade

 when installing Fail2Ban my apache webserver didnt work 

By: Ole Stanstrup

Tried this manual 2 times.

1) fail2ban blocks for roundcube install unless I flush iptables

2) have to "touch /etc/mailman/aliases" not to get error "postalias: fatal: open /var/lib/mailman/data/aliases: No such file or directory" at install

3) At the end of the install I get "Failed to restart [email protected]: Unit [email protected] failed to load: No such file or directory. - does anyone know how to fix this?

By: Hernan Alvarez

No puedo conectar mis clientes Thunderbird y Outlook en otros casos a esta implementacion, alguien me podria orientar...

By: kang baster

Hi,

how can i add/open port smtps /465 ?

By: andreio

Hi, I have configured my servers with your tutorials and your advice for many years. All the servers works perfectly and I thank you for all. In the last month, after the last update, 

some incoming emails have rejected from our mail server and this is the log message: Helo command rejected: Host not found.

these emails are not spam but regular emails of our customers, and these mustn't be rejected by the server. How can I do to solve this problem? 

By: till

The error means that the sending server is misconfigured, it has no valid hostname. Current ISPConfig versions apply stricter spam rules to incoming emails, that's why you did not had that problem before. Personally, I use this stricter spam setup on my systems without issues. If you do not want to reject emails from servers without valid hostname, then take a look into the postfix main.cf file and remove settings like reject_invalid_hostname,reject_non_fqdn_hostname,reject_unknown_recipient_domain,reject_non_fqdn_recipient,reject_non_fqdn_sender,reject_unknown_sender_domain,reject_unknown_recipient_domain