There is a new version of this tutorial available for CentOS 7.6.

The Perfect Server CentOS 7.2 with Apache, Postfix, Dovecot, Pure-FTPD, BIND and ISPConfig 3.1

This tutorial shows the installation of ISPConfig 3.1 on a CentOS 7.2 (64Bit) server. ISPConfig is a web hosting control panel that allows you to configure the following services through a web browser: Apache web server, Postfix mail server, MySQL, BIND nameserver, PureFTPd, SpamAssassin, ClamAV, Mailman, and many more.

1 Requirements

To install such a system you will need the following:

  • A Centos 7.2 minimal server system. This can be a server installed from scratch as described in our Centos 7.2 minimal server tutorial or a virtual-server or root-server from a hosting company that has a minimal Centos 7.1 setup installed.
  • A fast Internet connection.


2 Preliminary Note

In this tutorial, I use the hostname server1.example.com with the IP address 192.168.1.100 and the gateway 192.168.1.1. These settings might differ for you, so you have to replace them where appropriate.

Please note that HHVM and XMPP are not supported in ISPConfig for the CentOS platform yet. If you like to manage an XMPP chat server from within ISPConfig or use HHVM (Hip Hop Virtual Machine) in an ISPConfig website, then please use Debian 8 or Ubuntu 16.04 as server OS instead of CentOS 7.2.

3 Prepare the server

Set the keyboard layout

In case that the keyboard layout of the server does not match your keyboard, you can switch to the right keyboard (in my case "de" for a german keyboard layout, with the localectl command:

localectl set-keymap de

To get a list of all available keymaps, run:

localectl list-keymaps

I want to install ISPConfig at the end of this tutorial, ISPConfig ships with the Bastille firewall script that I like to use as firewall, therefor I disable the default CentOS firewall now. Of course, you are free to leave the CentOS firewall on and configure it to your needs (but then you shouldn't use any other firewall later on as it will most probably interfere with the CentOS firewall).

Run...

yum -y install net-tools
systemctl stop firewalld.service
systemctl disable firewalld.service

to stop and disable the CentOS firewall. It is ok wnen you get errors here, this just indicates that the firewall was not installed.

Then you should check that the firewall has really been disabled. To do so, run the command:

iptables -L

The output should look like this:

[[email protected] ~]# iptables -L
Chain INPUT (policy ACCEPT)
target prot opt source destination
Chain FORWARD (policy ACCEPT)
target prot opt source destination
Chain OUTPUT (policy ACCEPT)
target prot opt source destination

Or use the firewall-cmd command:

firewall-cmd --state
[[email protected] ~]# firewall-cmd --state
not running
[[email protected] ~]#

Now I will install the network configuration editor and the shell based editor "nano" that I will use in the next steps to edit the config files:

yum -y install nano wget NetworkManager-tui

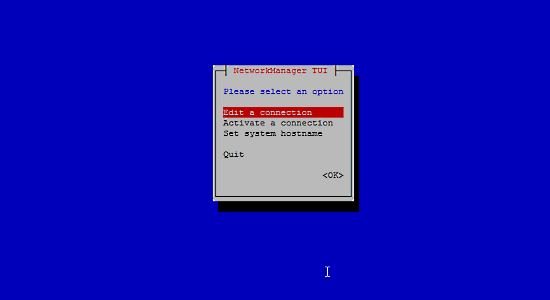
If you did not configure your network card during the installation, you can do that now. Run...

nmtui

... and go to Edit a connection:

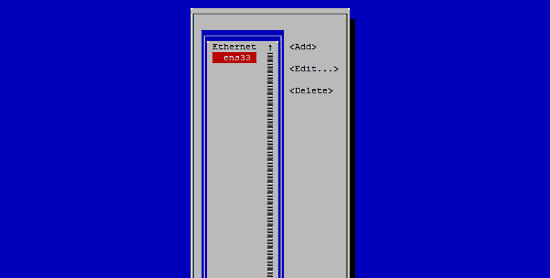
Select your network interface:

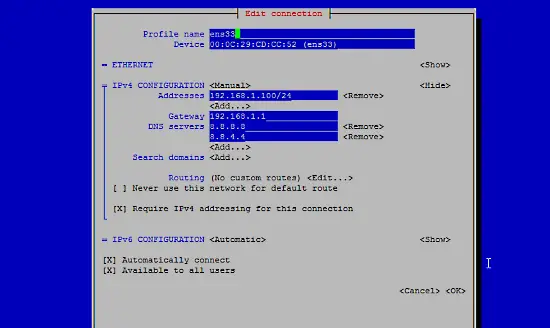
Then fill in your network details - disable DHCP and fill in a static IP address, a netmask, your gateway, and one or two nameservers, then hit Ok:

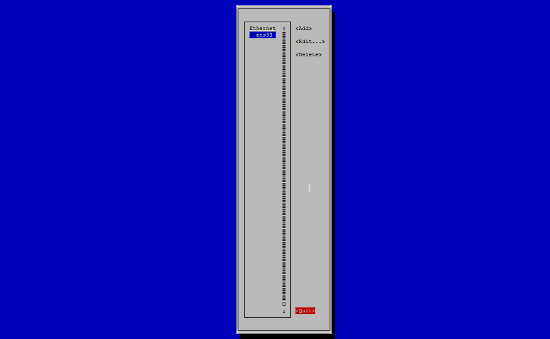
Next select OK to confirm the changes that you made in the network settings

and Quit to close the nmtui network configuration tool.

You should run

ifconfig

now to check if the installer got your IP address right:

[[email protected] ~]# ifconfig
ens33: flags=4163<UP,BROADCAST,RUNNING,MULTICAST>  mtu 1500
        inet 192.168.1.100  netmask 255.255.255.0  broadcast 192.168.1.255
        inet6 fe80::20c:29ff:fecd:cc52  prefixlen 64  scopeid 0x20

        ether 00:0c:29:cd:cc:52  txqueuelen 1000  (Ethernet)
        RX packets 55621  bytes 79601094 (75.9 MiB)
        RX errors 0  dropped 0  overruns 0  frame 0
        TX packets 28115  bytes 2608239 (2.4 MiB)
        TX errors 0  dropped 0 overruns 0  carrier 0  collisions 0

lo: flags=73<UP,LOOPBACK,RUNNING>  mtu 65536
        inet 127.0.0.1  netmask 255.0.0.0
        inet6 ::1  prefixlen 128  scopeid 0x10
        loop  txqueuelen 0  (Local Loopback)
        RX packets 0  bytes 0 (0.0 B)
        RX errors 0  dropped 0  overruns 0  frame 0
        TX packets 0  bytes 0 (0.0 B)
        TX errors 0  dropped 0 overruns 0  carrier 0  collisions 0

If your network card does not show up there, then it not be enabled on boot, In this case, open the file /etc/sysconfig/network-scripts/ifcfg-eth0

nano /etc/sysconfig/network-scripts/ifcfg-ens33

and set ONBOOT to yes:

[...]
ONBOOT=yes
[...]

and reboot the server.

Check your /etc/resolv.conf if it lists all nameservers that you've previously configured:

cat /etc/resolv.conf

If nameservers are missing, run

nmtui

and add the missing nameservers again.

Now, on to the configuration...


Adjust /etc/hosts

Next we will edit /etc/hosts. Make it look like this:

nano /etc/hosts
127.0.0.1   localhost localhost.localdomain localhost4 localhost4.localdomain4
192.168.1.100 server1.example.com server1

::1 localhost localhost.localdomain localhost6 localhost6.localdomain6

Disable SELinux

SELinux is a security extension of CentOS that should provide extended security. In my opinion you don't need it to configure a secure system, and it usually causes more problems than advantages (think of it after you have done a week of trouble-shooting because some service wasn't working as expected, and then you find out that everything was ok, only SELinux was causing the problem). Therefore I disable it (this is a must if you want to install ISPConfig later on).

Edit /etc/selinux/config and set SELINUX=disabled:

nano /etc/selinux/config
# This file controls the state of SELinux on the system.
# SELINUX= can take one of these three values:
#     enforcing - SELinux security policy is enforced.
#     permissive - SELinux prints warnings instead of enforcing.
#     disabled - No SELinux policy is loaded.
SELINUX=disabled
# SELINUXTYPE= can take one of these two values:
#     targeted - Targeted processes are protected,
#     mls - Multi Level Security protection.
SELINUXTYPE=targeted

Afterwards we must reboot the system:

reboot


4 Enable Additional Repositories and Install Some Software

First, we import the GPG keys for software packages:

rpm --import /etc/pki/rpm-gpg/RPM-GPG-KEY*

Then we enable the EPEL repository on our CentOS system as lots of the packages that we are going to install in the course of this tutorial are not available in the official CentOS 7 repository:

yum -y install epel-release
yum -y install yum-priorities

Edit /etc/yum.repos.d/epel.repo...

nano /etc/yum.repos.d/epel.repo

... and add the line priority=10 to the [epel] section:

[epel]
name=Extra Packages for Enterprise Linux 7 - $basearch
#baseurl=http://download.fedoraproject.org/pub/epel/7/$basearch
mirrorlist=https://mirrors.fedoraproject.org/metalink?repo=epel-7&arch=$basearch
failovermethod=priority
enabled=1
priority=10
gpgcheck=1
gpgkey=file:///etc/pki/rpm-gpg/RPM-GPG-KEY-EPEL-7
[...]

Then we update our existing packages on the system:

yum -y update

Now we install some software packages that are needed later on:

yum -y groupinstall 'Development Tools'


5 Quota

(If you have chosen a different partitioning scheme than I did, you must adjust this chapter so that quota applies to the partitions where you need it.)

To install quota, we run this command:

yum -y install quota

Now we check if quota is already enabled for the filesystem where the website (/var/www) and maildir data (var/vmail) is stored. In this example setup, I have one big root partition, so I search for ' / ':

mount | grep ' / '
[[email protected] ~]# mount | grep ' / '
/dev/mapper/centos-root on / type xfs (rw,relatime,attr2,inode64,noquota)
[[email protected] ~]#

If you have a separate /var partition, then use:

mount | grep ' /var '

instead. If the line contains the word "noquota", then proceed with the following steps to enable quota.

Enabling quota on the / (root) partition

Normally you would enable quota in the /etc/fstab file, but if the filesystem is the root filesystem "/", then quota has to be enabled by a boot parameter of the Linux Kernel.

Edit the grub configuration file:

nano /etc/default/grub

search fole the line that starts with GRUB_CMDLINE_LINUX and add rootflags=uquota,gquota to the commandline parameters so that the resulting line looks like this:

GRUB_CMDLINE_LINUX="crashkernel=auto rd.lvm.lv=centos/root rd.lvm.lv=centos/swap rhgb quiet rootflags=uquota,gquota"

and apply the changes by running the following command.

cp /boot/grub2/grub.cfg /boot/grub2/grub.cfg_bak
grub2-mkconfig -o /boot/grub2/grub.cfg

and reboot the server.

reboot

Now check if quota is enabled:

mount | grep ' / '
[[email protected] ~]# mount | grep ' / '
/dev/mapper/centos-root on / type xfs (rw,relatime,attr2,inode64,usrquota,grpquota)
[[email protected] ~]#

When quota is active, we can see "usrquota,grpquota" in the mount option list.


Enabling quota on a separate /var partition

If you have a separate /var partition, then edit /etc/fstab and add ,uquota,gquota to the / partition (/dev/mapper/centos-var):

nano /etc/fstab

#
# /etc/fstab
# Created by anaconda on Sun Sep 21 16:33:45 2014
#
# Accessible filesystems, by reference, are maintained under '/dev/disk'
# See man pages fstab(5), findfs(8), mount(8) and/or blkid(8) for more info
#
/dev/mapper/centos-root / xfs defaults 1 1
/dev/mapper/centos-var /var xfs defaults,uquota,gquota 1 2
UUID=9ac06939-7e43-4efd-957a-486775edd7b4 /boot xfs defaults 1 3
/dev/mapper/centos-swap swap swap defaults 0 0

Then run

mount -o remount /var
quotacheck -avugm
quotaon -avug

to enable quota. When you get an error that there is no partition with quota enabled, then reboot the server before you proceed.


6 Install Apache, MySQL, phpMyAdmin

We can install the needed packages with one single command:

yum -y install ntp httpd mod_ssl mariadb-server php php-mysql php-mbstring phpmyadmin

To ensure that the server can not be attacked trough the HTTPOXY vulnerability, we will disable the HTTP_PROXY header in apache globally. 

Add the apache header rule at the end of the httpd.conf file:

echo "RequestHeader unset Proxy early" >> /etc/httpd/conf/httpd.conf

And restart httpd to apply the configuration change.

service httpd restart


Share this page:

Suggested articles

47 Comment(s)

Add comment

Comments

By: Jay Martin

It would be cool to have this with the Horde 5 webmail front end.

By: leon

python gives a .git error  solve it by running this in the install dir

sed \ -e 's/(git describe --always)/(git describe --always 2>\/dev\/null)/g' \ -e 's/`git describe --always`/`git describe --always 2>\/dev\/null`/g' \ -i $( find . -type f -name Makefile\* -o -name version.sh )


By: Alison

Item 12 refers to "ISPConfig 3 allows you to use mod_php, mod_fcgi/PHP5, cgi/PHP5, and suPHP on a per website basis". Whereas the tutorial for 7.1 includes instruction to build suPHP the 7.2 tutorial doesn't. Is it still necessary to build it?

By: till

SuPHP should not be used anymore, that's why it was removed from this tutorial. Nevertheless, ISPConfig supports it for downwards compatibility.

By: brody

I am getting an error when I do a security check "Deprecated SSL Protocol Usage"..

how do I to SSL 2.0 and SSL 3.0, and use TLS 1.0 or newer?

By: peri0603

Why don't you edit /etc/hostname here like you do in the debian perfect server tutorials...

By: Phillip Stephens

In the second step you have us run the command "cat /dev/null > /etc/named.conf" for me this completely wipes my named.conf file. Am I getting the syntax wrong or did I miss a vital step where this data was written to /dev/null? Also, thanks for such a great tutorial!

By: till

Yes, thats the intention of the command as its easier to wipe the whole file then deleting each line inside one by one. Then in the next command you edit the file with nano and insert the content as shown in the tutorial. and proceed with the next steps of the tutorial. There is no syntax error, just follow the tutorial step by step until the end, I just tested it here again. The tutorial is finished after you installed ispconfig, the servicces are configured by ispconfig so do not try to test them in unfinished installation stabe before you installed ispconfig

By: Bayart

How to fix following error?

I can't sent mail to other mail server.

Aug 19 22:59:01 whm.server.com systemd[1]: Failed to start Amavisd-new is an interface between MTA and content checkers..

Aug 19 22:59:01 whm.server.com systemd[1]: Unit amavisd.service entered failed state.

Aug 19 22:59:01 whm.server.com systemd[1]: amavisd.service failed.

Aug 19 22:59:01 whm.server.com systemd[1]: amavisd.service holdoff time over, scheduling restart.

Aug 19 22:59:01 whm.server.com systemd[1]: start request repeated too quickly for amavisd.service

Aug 19 22:59:01 whm.server.com systemd[1]: Failed to start Amavisd-new is an interface between MTA and content checkers..

Aug 19 22:59:01 whm.server.com systemd[1]: Unit amavisd.service entered failed state.

Aug 19 22:59:01 whm.server.com systemd[1]: amavisd.service failed.


By: Christovampaynes

you need to configure the server's hostname. It needs to respond to the fqdn.

hostname -f

server.example.com


Also check in /etc/amavisd/amavisd.conf, if the variable $ mydomain is the FQDN.

$ Domain = 'server.example.com';

By: grasomega

Thanks for the (always) great tutorial!

Just wanted to note that I had to write ",usrquota,grpquota" in /etc/fstab for the /var partition. I used standard partitioning, not LVM.

By: Mars

If I don't want mail and DNS, can I just skip the install of Postfix, Dovecot and BIND? Or will I run into trouble while installing ISPConfig?

By: Caner

I received this error while installing ISPConfig

[INFO] service Postgrey not detected


By: dragosl

yum -y install postgrey; systemctl enable postgrey; systemctl start postgrey

By: CBHedricks

Thank you for a great walk thru / tutorial on CentOS server setup, I have my website running now and it works perfectly.  The downside is that Roundcube will not connect to the server no matter what I try.  I believe that I am missing something (setup wise) in the roundcube section, as when reached the "installer page" on the browser it did not match your guide at all.

Everytime I start roundcube it errors out immediately "cannot find /config.inc.php" and tells me to read installation instructions...  Strange as I have verified the file exists and is as it should be in /etc/roundcubemail/config.inc.php on my servier.

Any thoughts?


CB

By: sebastien douville

I installed that configuration server with ovh domain name and i receive :"Rejected request from RFC1918 IP to public server address".

does someone can help me to resolve that problem.

thanks..

By: dragosl

Just installed:

1. postgrey not available unless "yum install postgrey"

2. mailman installed as per howto however upon ispconfig installation i get [INFO] service Mailman not detected

although

[[email protected] install]# systemctl status mailman

? mailman.service - GNU Mailing List Manager

   Loaded: loaded (/usr/lib/systemd/system/mailman.service; enabled; vendor preset: disabled)

   Active: active (running) since Wed 2016-09-28 22:52:16 EEST; 39min ago

 Main PID: 23422 (mailmanctl)

   CGroup: /system.slice/mailman.service

           ??23422 /usr/bin/python /usr/lib/mailman/bin/mailmanctl -s start

           ??23423 /usr/bin/python /usr/lib/mailman/bin/qrunner --runner=ArchRunner:0:1 -s

           ??23424 /usr/bin/python /usr/lib/mailman/bin/qrunner --runner=BounceRunner:0:1 -s

           ??23425 /usr/bin/python /usr/lib/mailman/bin/qrunner --runner=CommandRunner:0:1 -s

           ??23426 /usr/bin/python /usr/lib/mailman/bin/qrunner --runner=IncomingRunner:0:1 -s

           ??23427 /usr/bin/python /usr/lib/mailman/bin/qrunner --runner=NewsRunner:0:1 -s

           ??23428 /usr/bin/python /usr/lib/mailman/bin/qrunner --runner=OutgoingRunner:0:1 -s

           ??23429 /usr/bin/python /usr/lib/mailman/bin/qrunner --runner=VirginRunner:0:1 -s

           ??23430 /usr/bin/python /usr/lib/mailman/bin/qrunner --runner=RetryRunner:0:1 -s


By: dragosl

The second part regarding mailman not detected by ISPconfig although it is enabled and running.. now I've reverted back to the snapshot taken right before ispconfig installation.. so until I install ISPconfig again, where should I look to ensure ispconfig will detect mailman?

By: till

ISPConfig uses the which command to find mailman. Seems as if CentOS installs mailman outside of the path so that the which command can not find it. Find out where mailman is installed and add its path to the PATH variable or alternativly place a symlink to mailman in a place that is in the path like /usr/bin.

By: dragosl

"which" indeed didn't ring any bell. Searching for a file named mailman produced the below.

/usr/lib/mailman/mail/mailman

/usr/lib/mailman/scripts/mailman

Probably the first is worth creating a link to.. I'll give it a try.

By: dragosl

To fix the Mailman issue:

ln -s /usr/lib/mailman/mail/mailman /usr/bin/mailman

By: Markus Petzsch

One addition so dnssec works:

After installing haveged we need to enable the "init" script. :-)

systemctl enable haveged

By: dragosl

@Till,

What about [INFO] service Metronome XMPP Server not detected? Can't see any info on it in the tutorial.

By: ServerDad

Hi, I'm at the step where I've added rootflags=uquota,gquota to grub and rebooted.  I can no longer log in through Putty, but I can access the server through a web console.  My server is in Emergency mode.  Here is the error that I'm receiving:

[1.444280] EXT4-fs (vda1): Unrecognized mount option "uquota" or missing value

Could someone point me in the right direction to correct this?

Thanks

By: Hunter

I've same issue. Do you resolve the issue?

I've destroy server after add rootflags=uquota,gquota to grub and rebooted. 

By: Paul

Same issue here.  As soon as I reboot after modifying grun the server goes into emergency mode.  Assuming the grub changes didn't work.  It is a dedicated server for my websites, ok to skip this entire section?

By: till

Works fine here on a dedicated server. But you can skip that of you don't want to limit web site sizes.

By: Nathan Baddon

Hi, I had the same issue. Its maybe a little late to fix your issue, but hopefully this helps others. I'm with Digital Ocean so I had them switch me out of "Emergency Mode" and into "Recovery Mode". From there I mounted my file system so I could have access to my files. I opened up the grub file "/etc/default/grub" and removed "rootflags=uquota,gquota" from one of the lines. After rebooting still the same error. I then went back into "Recovery Mode" and located the file "/boot/grub2/grub.cfg" and copied it to "/boot/grub2/grub.cfg_bak2" to create a backup for safe keeping. I then replaced "/boot/grub2/grub.cfg" with the backup file "/boot/grub2/grub.cfg_bak". After that everything worked again, YAY!!! It took a lot of faithless research to accomplish this. It saved me from having to redo my server, with my 30 hour long setup. Every other article I came across recommended starting from scratch, which was not an option. Good luck to anyone that has this problem.

By: peter klinser

hellohave installed the perfect server centos 7.2 with ispconfig.but if i want to see the webinterface there is no connection.apache is running, have firewall and NAT to the internal ip, all ports are forwarding.i always get connection timeout. putty is working with the offizial ip, so portforwarding is working correctly.have installed the vmware image ( OVA )what can i do?thanks a lot  


By: till

Please make a post in the forum so we can help you to find out what is blocking port 8080 in your setup.

By: Alex

Help.  Amavisd service status=255 when trying to start.

Are there not changes required to be made of the configuration file in order for this to start?


Thanks

By: Jon

Hi, thanks for the guide, this is really useful.

I'm trying to figure out why you choosed to place certbot in /opt/ while jailkit goes under /usr/local/src.

Thanks 

By: Randy

Great tutorial - thanks.

Freshclam also needs an edit to /etc/sysconfig/freshclam which disables Freshclam by default.

By: Christovampaynes

Hello,

I passed the error below:

 status=deferred (SASL authentication failed; cannot authenticate to server 127.0.0.1[127.0.0.1]: no mechanism available)

Fix:

yum install cyrus-sasl-sql cyrus-sasl-plain cyrus-sasl-lib

Thanks

By: JJ

Hello,

I followed the example stepp by step and I always end in the same place:


[Tue Nov 08 14:58:31.182430 2016] [mpm_prefork:notice] [pid 1393] AH00163: Apache/2.4.6 (CentOS) OpenSSL/1.0.1e-fips mod_fcgid/2.3.9 PHP/5.4.16 mod_python/3.5.0- Python/2.7.5 configured -- resuming normal operations

[Tue Nov 08 14:58:31.182464 2016] [core:notice] [pid 1393] AH00094: Command line: '/usr/sbin/httpd -D FOREGROUND'

[Tue Nov 08 14:58:46.253038 2016] [fcgid:warn] [pid 1401] (104)Connection reset by peer: [client 172.26.10.254:52818] mod_fcgid: error reading data from FastCGI server

[Tue Nov 08 14:58:46.253110 2016] [core:error] [pid 1401] [client 172.26.10.254:52818] End of script output before headers: index.php


and I got 500 error in the website. Any suggestion?


By: bp

There was an error in the tutorial. "uquota" should be "usrquota" and "gquota" should be "grpquota".

By: Rob

The part of letscert doesn't work for me. Yesterday I had my websites installed with a certificate and my browser accepted the certificate and the site as save. It had a green url. Today all the site are marked as unsafe again. Also one site is not reacheble anymore, the url is redirected to another site on the server. Any idea what might be wrong?

By: till

If your sites were working before then the letsencrypt part of this tutorial must have worked for you, otherwise, your sites would not had "green" ssl. Post your problem in the forum if you need help to find out what has been changed in your setup so that lets encrypt stopped working.

By: Paulo

I have some problems after following these instructions. The mailman gives me some errors. I'm gonna explain,

In the panel of the ISP I created a list named All-users, but when I click on the icon with the envelope the link gives me a 404 error, because it places port 8080 and the link ends in mailman, that is: https://mail.domain.com:8080/mailman If I correct the link and place https://mail.domain.com/mailman/listinfo it opens OK but it only shows the list I created when I installed mailman, ie the list called mailman, not showing the list I created in the ISPconfig panel ( The list called All-users)

Any help on this 2 errors (bad link, and bad lists)?

Thank you

By: Terry

Hi; this package does not exist...

yum -y install getmail


I tried http://repoforge.org/use/

but the archive does not seem to be available

Thanks

By: Zvonimir Buzanic

I have issues with amavisd with this tutorial (not using clamd). I managed to start amavis by adding :


"ln -s /etc/amavisd/amavisd.conf /etc/amavisd.conf"


then going to


"/etc/init.d/"


and starting manually


amavisd


but I'm not sure if it will work after server restart. How can I fix error after starting:

systemctl start amavisd.service

throws:


â amavisd.service - Amavisd-new is an interface between MTA and content checkers.

   Loaded: loaded (/usr/lib/systemd/system/amavisd.service; enabled; vendor preset: disabled)

   Active: failed (Result: start-limit) since Wed 2017-01-04 22:27:59 CET; 7s ago

     Docs: http://www.ijs.si/software/amavisd/#doc

  Process: 4781 ExecStart=/usr/sbin/amavisd -c /etc/amavisd/amavisd.conf (code=exited, status=13)

 Main PID: 21101 (code=exited, status=0/SUCCESS)


Jan 04 22:27:58 cp.weboteka.net systemd[1]: amavisd.service: control process exited, code=exited status=13

Jan 04 22:27:58 cp.weboteka.net systemd[1]: Failed to start Amavisd-new is an interface between MTA and content checkers..

Jan 04 22:27:58 cp.weboteka.net systemd[1]: Unit amavisd.service entered failed state.

Jan 04 22:27:58 cp.weboteka.net systemd[1]: amavisd.service failed.

Jan 04 22:27:59 cp.weboteka.net systemd[1]: amavisd.service holdoff time over, scheduling restart.

Jan 04 22:27:59 cp.weboteka.net systemd[1]: start request repeated too quickly for amavisd.service

Jan 04 22:27:59 cp.weboteka.net systemd[1]: Failed to start Amavisd-new is an interface between MTA and content checkers..

Jan 04 22:27:59 cp.weboteka.net systemd[1]: Unit amavisd.service entered failed state.


Jan 04 22:27:59 cp.weboteka.net systemd[1]: amavisd.service failed.


By: Armando Ventura

Hello, i don´t know, but at the finished of configuration everything seems ok, but i can not connect email server, i create a domain a an email account but through email client the SMTP and IMAP does not response.

By: Robertus

I did have the same problem with amavis, I made /etc/amavisd/amavisd.conf 755 -> chmod 755 /etc/amavisd/amavisd.conf this worked for me.

I now also have the mailproblem, I finished the tut succesfull but the mail doesn't work, I made a client, add a mail domain, add a mailaccount, roundcube doesn't let me in

By: Gar Pearce

Thank you for your very comprehensive turorial,


For the benefit of those who follow I encountered the following issues (some of which are mentioned above)

install of modphp fails.

This post outlines the error and the fix  

http://www.aboutmonitoring.com/compiling-apache-mod_python-module-centos-7-redhat-7/

mailman does not work by default. The following fixes it

ln -s /usr/lib/mailman/mail/mailman /usr/bin/mailman

heveged needs to be enabled:

systemctl enable haveged

postgrey is not installed, solution is:

yum -y install postgrey; systemctl enable postgrey; systemctl start postgrey

amavisd needed to be enabled as per above.

Will report back once I have done some more testing

Again many thanks


Gary

HP microserver Gen8

Centos 7.2

Tutorial as at 20 Jan 2017

By: Paul Hendricksen

in step 13, if you get an error with:

File "/usr/lib64/python2.7/site-packages/mod_python/version.py", line 3 version = "fatal: Not a git repository (or any of the parent directories): .git

SyntaxError: EOL while scanning string literal

Edit the dist/version.sh file

#GIT=`git describe --always`

And remove the .$PCH from the line: echo $MAJ.$MIN.$PCH

By: kyferez

I have followed this guide and everything went fine.

However when I load https://myip:8080, I was getting the Apache test page. I commented out the /etc/httpd/conf.d/welcome.conf lines and restarted Apache. Now I get a directory listing instead of any page. If I try to go to https://myip:8080/ispconfig then I get a 404 error. Ideas?

By: Abubakar

port no. 8080 is not listening.....