There is a new version of this tutorial available for CentOS 7.6.

The Perfect Server – CentOS 7 (Apache2, Dovecot, ISPConfig 3)

This tutorial shows how to prepare a CentOS 7 x86_64 server for the installation of ISPConfig 3 and how to install ISPConfig 3. ISPConfig 3 is a webhosting control panel that allows you to configure the following services through a web browser: Apache web server, Postfix mail server, MySQL, BIND nameserver, PureFTPd, SpamAssassin, ClamAV, Mailman, and many more. Since version 3.0.4, ISPConfig comes with full support for the nginx web server in addition to Apache; this tutorial covers the setup of a server that uses Apache, not nginx.


1 Requirements

To install such a system you will need the following:

  • A Centos 7 minimal server system. This can be a server installed from scratch as described in our Centos 7 minimal server tutorial or a virtual-server or root-server from a hosting company that has a minimal Centos 7 setup installed.
  • A fast Internet connection.


2 Preliminary Note

In this tutorial I use the hostname server1.example.com with the IP address 192.168.1.100 and the gateway 192.168.1.254. These settings might differ for you, so you have to replace them where appropriate.

3 Set the keyboard layout

The current CentOS 7 installer has a bug, so you might end up with a different keyboard layout on the shell then the one selected during install. If you hit that bug, then you can switch to the right keyboard (in my case "de" for a german keyboard layout, with the localectl command:

localectl set-keymap de

To get a list of all available keymaps, run:

localectl list-keymaps

I want to install ISPConfig at the end of this tutorial which comes with its own firewall. That's why I disable the default CentOS firewall now. Of course, you are free to leave it on and configure it to your needs (but then you shouldn't use any other firewall later on as it will most probably interfere with the CentOS firewall).

Run...

systemctl stop firewalld.service
systemctl disable firewalld.service

Now I will install some basic network tools and a shell based editor that we need in the next steps:

yum -y install nano wget net-tools NetworkManager-tui

If you did not configure your network card during the installation, you can do that now. Run...

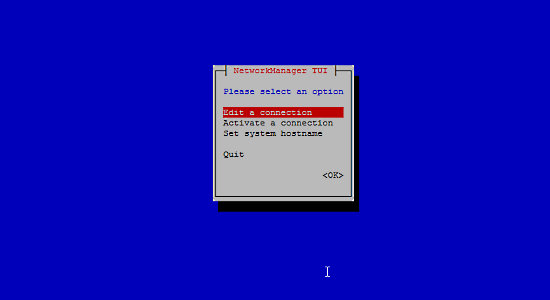
nmtui

... and go to Edit a connection:

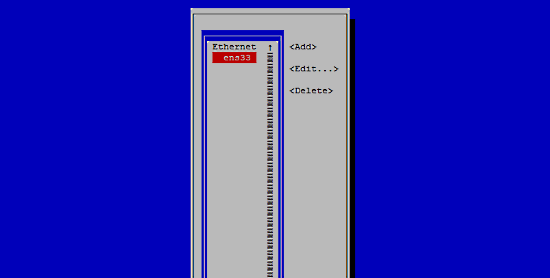
Select your network interface:

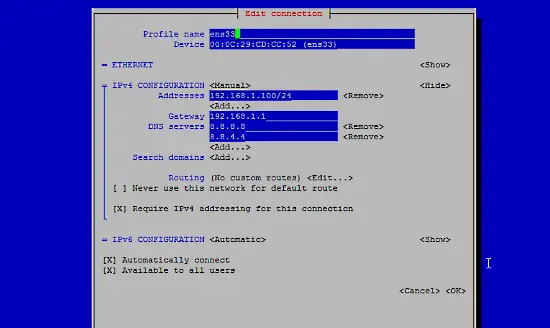
Then fill in your network details - disable DHCP and fill in a static IP address, a netmask, your gateway, and one or two nameservers, then hit Ok:

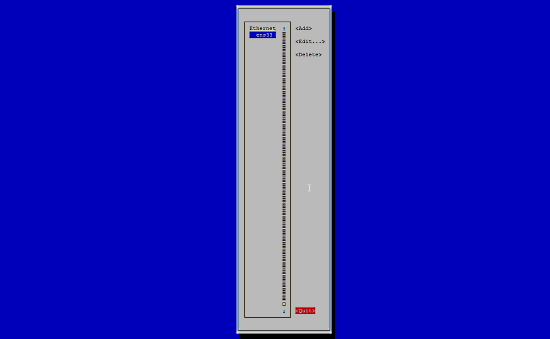
Next select OK to confirm the changes that you made in the network settings

and Quit to close the nmtui network configuration tool.

You should run

ifconfig

now to check if the installer got your IP address right:

[[email protected] ~]# ifconfig
ens33: flags=4163<UP,BROADCAST,RUNNING,MULTICAST>  mtu 1500
        inet 192.168.1.100  netmask 255.255.255.0  broadcast 192.168.1.255
        inet6 fe80::20c:29ff:fecd:cc52  prefixlen 64  scopeid 0x20

        ether 00:0c:29:cd:cc:52  txqueuelen 1000  (Ethernet)
        RX packets 55621  bytes 79601094 (75.9 MiB)
        RX errors 0  dropped 0  overruns 0  frame 0
        TX packets 28115  bytes 2608239 (2.4 MiB)
        TX errors 0  dropped 0 overruns 0  carrier 0  collisions 0

lo: flags=73<UP,LOOPBACK,RUNNING>  mtu 65536
        inet 127.0.0.1  netmask 255.0.0.0
        inet6 ::1  prefixlen 128  scopeid 0x10
        loop  txqueuelen 0  (Local Loopback)
        RX packets 0  bytes 0 (0.0 B)
        RX errors 0  dropped 0  overruns 0  frame 0
        TX packets 0  bytes 0 (0.0 B)
        TX errors 0  dropped 0 overruns 0  carrier 0  collisions 0

If your network card does not show up there, then it not be enabled on boot, In this case, open the file /etc/sysconfig/network-scripts/ifcfg-eth0

nano /etc/sysconfig/network-scripts/ifcfg-ens33

and set ONBOOT to yes:

[...]
ONBOOT=yes
[...]

and reboot the server.

Check your /etc/resolv.conf if it lists all nameservers that you've previously configured:

cat /etc/resolv.conf

If nameservers are missing, run

nmtui

and add the missing nameservers again.

Now, on to the configuration...


4 Adjust /etc/hosts

Next we edit /etc/hosts. Make it look like this:

nano /etc/hosts
127.0.0.1   localhost localhost.localdomain localhost4 localhost4.localdomain4
192.168.1.100 server1.example.com server1

::1 localhost localhost.localdomain localhost6 localhost6.localdomain6


5 Configure The Firewall

(You can skip this chapter if you have already disabled the firewall at the end of the basic system installation.)

I want to install ISPConfig at the end of this tutorial which comes with its own firewall. That's why I disable the default CentOS firewall now. Of course, you are free to leave it on and configure it to your needs (but then you shouldn't use any other firewall later on as it will most probably interfere with the CentOS firewall).

Run

systemctl stop firewalld.service
systemctl disable firewalld.service

and disable the firewall.

To check that the firewall has really been disabled, you can run

iptables -L

afterwards. The output should look like this:

[[email protected] ~]# iptables -L
Chain INPUT (policy ACCEPT)
target prot opt source destination
Chain FORWARD (policy ACCEPT)
target prot opt source destination
Chain OUTPUT (policy ACCEPT)
target prot opt source destination

Or use the firewall-cmd command:

firewall-cmd --state
[[email protected] ~]# firewall-cmd --state
not running
[[email protected] ~]#

6 Disable SELinux

SELinux is a security extension of CentOS that should provide extended security. In my opinion you don't need it to configure a secure system, and it usually causes more problems than advantages (think of it after you have done a week of trouble-shooting because some service wasn't working as expected, and then you find out that everything was ok, only SELinux was causing the problem). Therefore I disable it (this is a must if you want to install ISPConfig later on).

Edit /etc/selinux/config and set SELINUX=disabled:

nano /etc/selinux/config
# This file controls the state of SELinux on the system.
# SELINUX= can take one of these three values:
#     enforcing - SELinux security policy is enforced.
#     permissive - SELinux prints warnings instead of enforcing.
#     disabled - No SELinux policy is loaded.
SELINUX=disabled
# SELINUXTYPE= can take one of these two values:
#     targeted - Targeted processes are protected,
#     mls - Multi Level Security protection.
SELINUXTYPE=targeted

Afterwards we must reboot the system:

reboot


7 Enable Additional Repositories And Install Some Software

First we import the GPG keys for software packages:

rpm --import /etc/pki/rpm-gpg/RPM-GPG-KEY*

Then we enable the EPEL repository on our CentOS system as lots of the packages that we are going to install in the course of this tutorial are not available in the official CentOS 7 repository:

rpm -ivh http://dl.fedoraproject.org/pub/epel/7/x86_64/e/epel-release-7-2.noarch.rpm
yum -y install yum-priorities

Edit /etc/yum.repos.d/epel.repo...

nano /etc/yum.repos.d/epel.repo

... and add the line priority=10 to the [epel] section:

[epel]
name=Extra Packages for Enterprise Linux 7 - $basearch
#baseurl=http://download.fedoraproject.org/pub/epel/7/$basearch
mirrorlist=https://mirrors.fedoraproject.org/metalink?repo=epel-7&arch=$basearch
failovermethod=priority
enabled=1
priority=10
gpgcheck=1
gpgkey=file:///etc/pki/rpm-gpg/RPM-GPG-KEY-EPEL-7
[...]

Then we update our existing packages on the system:

yum update

Now we install some software packages that are needed later on:

yum -y groupinstall 'Development Tools'


8 Quota

(If you have chosen a different partitioning scheme than I did, you must adjust this chapter so that quota applies to the partitions where you need it.)

To install quota, we run this command:

yum -y install quota

Now we check if quota is already enabled for the filesystem where the website (/var/www) and maildir data (var/vmail) is stored. In this example setup, I have one big root partition, so I search for ' / ':

mount | grep ' / '
[[email protected] ~]# mount | grep ' / '
/dev/mapper/centos-root on / type xfs (rw,relatime,attr2,inode64,noquota)
[[email protected] ~]#

If you have a separate /var partition, then use:

mount | grep ' /var '

instead. If the line contains the word "noquota", then proceed with the following steps to enable quota.

Enabling quota on the / (root) partition

Normally you would enable quota in the /etc/fstab file, but if the filesystem is the root filesystem "/", then quota has to be enabled by a boot parameter of the Linux Kernel.

Edit the grub configuration file:

nano /etc/default/grub

search fole the line that starts with GRUB_CMDLINE_LINUX and add rootflags=uquota,gquota to the commandline parameters so that the resulting line looks like this:

GRUB_CMDLINE_LINUX="rd.lvm.lv=centos/swap vconsole.font=latarcyrheb-sun16 rd.lvm.lv=centos/root crashkernel=auto  vconsole.keymap=us rhgb quiet rootflags=uquota,gquota"

and apply the changes by running the following command.

cp /boot/grub2/grub.cfg /boot/grub2/grub.cfg_bak
grub2-mkconfig -o /boot/grub2/grub.cfg

and reboot the server.

reboot

Now check if quota is enabled:

mount | grep ' / '
[[email protected] ~]# mount | grep ' / '
/dev/mapper/centos-root on / type xfs (rw,relatime,attr2,inode64,usrquota,grpquota)
[[email protected] ~]#

When quota is active, we can see "usrquota,grpquota" in the mount option list.


Enabling quota on a separate /var partition

If you have a separate /var partition, then edit /etc/fstab and add ,uquota,gquota to the / partition (/dev/mapper/centos-var):

nano /etc/fstab

#
# /etc/fstab
# Created by anaconda on Sun Sep 21 16:33:45 2014
#
# Accessible filesystems, by reference, are maintained under '/dev/disk'
# See man pages fstab(5), findfs(8), mount(8) and/or blkid(8) for more info
#
/dev/mapper/centos-root / xfs defaults 1 1
/dev/mapper/centos-var /var xfs defaults,uquota,gquota 1 2
UUID=9ac06939-7e43-4efd-957a-486775edd7b4 /boot xfs defaults 1 3
/dev/mapper/centos-swap swap swap defaults 0 0

Then run

mount -o remount /var
quotacheck -avugm
quotaon -avug

to enable quota.


9 Install Apache, MySQL, phpMyAdmin

We can install the needed packages with one single command:

yum -y install ntp httpd mod_ssl mariadb-server php php-mysql php-mbstring phpmyadmin


Share this page:

Suggested articles

71 Comment(s)

Add comment

Comments

By: Anonymous

epel-release is currently 7-2

One can check this using a browser visiting

http://dl.fedoraproject.org/pub/epel/7/x86_64/e/

and searching for the file epel-release...

By:

Yes, it is now latest EPEL is 7-2.


You can use the latest path for 7-2 as

 http://dl.fedoraproject.org/pub/epel/7/x86_64/e/epel-release-7-2.noarch.rpm

But EPEL keeps on updating so better you can use 

yum install epel-release

 It will install the latest version of EPEL.


By: Ole Kristian Ek Hornnes

Is currently 7-5

http://dl.fedoraproject.org/pub/epel/7/x86_64/e/epel-release-7-5.noarch.rpm

By: alex3319

rpm -ivh http://dl.fedoraproject.org/pub/epel/7/x86_64/e/epel-release-7-5.noarch.rpm

By: Jurrien

Just use https://dl.fedoraproject.org/pub/epel/epel-release-latest-7.noarch.rpm

You always have the latest version.

By: zderep

Hello,

very nice tutorial! I have clean setup of centos 7 and everythink is working fine, but I cannot get working roundcube calendar. I have installed roundcube 1.1.0 with plugin manager and calendar plugin (also with libgpl and tasklist). When I enable calendar and go in it, the web page is like scattered. Canot add new event through web page and thrugh Thunderbird it says "MODIFICATION_FAILED - Server replied with 405". Can you help me somehow pls?

Thanks for answerig!

By: Mohammad Iskandar

need to start the mysql server

sudo yum -y install mariadb-server mariadbsudo systemctl start mariadb.servicesudo systemctl enable mariadb.service


then re run the mysql_secure_installation

By: Raymond

To get amavisd to work  edit the following file and reboot : Comment out the line below in the file named. /usr/lib/systemd/system/amavisd.service:

NoNewPrivileges=true

By: Wallis

When I compile the source for suPHP with the ./configure --prefix=/usr/ --sysconfdir=/etc/ --with-apr=/usr/bin/apr-1-config --with-apache-user=apache --with-setid-mode=owner --with-logfile=/var/log/httpd/suphp_log

I get a warning  APXS was not found, so mod_suphp will not be built!

I checked under the documentation for suPHP and I noticed that there is an extra line within the compile which states that there should be a prefix --with-apxs ??

I tried to add it into the compile (--with-apxs=/usr/sbin/apxs) statement but not sure where the Apache installation referencing the APXS is located  

Any help greatly appreciated

Cheers

By: arnold61

At part:  14 Install Amavisd-new, SpamAssassin And ClamAV

- two packages not available -> clamd & unrar?


By: arnold61

clamd and unrar not found

By: alfredo.ardito

Hello,I have a strange problem going on after installing ispconfig3 on centos 7.** All Emails are sent after 10 minutes after rebooting the server. 

This is what I did and what happens:

1) I did a fresh install of centos 7.

2) I setup a few scripts to send an email notification about the server status.   ---> one script is triggered at cron this way: @reboot root sh /usr/local/bin/reboot_report.sh

3) I followed the tutorial carefully and I installed all the services and software needed, up to roundcube, included.

At this point I rebooted the server and all emails are immediately sent regularly.I repeated this test many times and all email are immediately sent.

4) After installing ispconfig3 all emails are sent after 10 minutes.

I did this test many times getting the same result.I reinstalled the server following the tutorial very well and the same thing happens.

Has anyone gone through this king of issue?


By: Rjpserver

After installing following line:

yum -y install amavisd-new spamassassin clamav clamd clamav-update unzip bzip2 unrar perl-DBD-mysql


Should proceed as follows to activate the "clamd":

[[email protected] ~]# cp /usr/share/doc/clamav-server*/clamd.sysconfig /etc/sysconfig/clamd.amavisd 

[[email protected] ~]# vi /etc/sysconfig/clamd.amavisd

# line 1, 2: uncomment and change

CLAMD_CONFIGFILE=/etc/clamd.d/amavisd.conf

CLAMD_SOCKET=/var/run/clamd.amavisd/clamd.sock

[[email protected] ~]# vi /etc/tmpfiles.d/clamd.amavisd.conf

# create new and add

d /var/run/clamd.amavisd 0755 amavis amavis -

[[email protected] ~]# vi /usr/lib/systemd/system/[email protected]

# add follows to the end

[Install]

WantedBy=multi-user.target

[[email protected] ~]# systemctl start [email protected] 

[[email protected] ~]# systemctl enable [email protected]

By: Rjpserver

The previous post has an error


After installing following line:

yum -y install amavisd-new spamassassin clamav clamd clamav-update unzip bzip2 unrar perl-DBD-mysql

Should proceed as follows to activate the "clamd":

[[email protected] ~]# cp /usr/share/doc/clamav-server*/clamd.sysconfig /etc/sysconfig/clamd.amavisd 

[[email protected] ~]# vi /etc/sysconfig/clamd.amavisd

# line 1, 2: uncomment and change

CLAMD_CONFIGFILE=/etc/clamd.d/amavisd.conf

CLAMD_SOCKET=/var/run/clamd.amavisd/clamd.sock

[[email protected] ~]# vi /etc/tmpfiles.d/clamd.amavisd.conf

# create new and add

d /var/run/clamd.amavisd 0755 amavis amavis -

[[email protected] ~]# vi /usr/lib/systemd/system/[email protected]

# add follows to the end

[Install]

WantedBy=multi-user.target

[[email protected] ~]# systemctl start [email protected] 

[[email protected] ~]# systemctl enable [email protected]

By: Wallis Short

I fixed the "APXS was not found, so mod_suphp will not be built!" which I posted last week. The tutorial was missing the "--with-apxs=/usr/bin/apxs" It will look like this:-./configure --prefix=/usr/ --sysconfdir=/etc/ --with-apr=/usr/bin/apr-1-config --with-apxs=/usr/bin/apxs --with-apache-user=apache --with-setid-mode=owner --with logfile=/var/log/httpd/suphp_log

By: Victor

If you need PHP v5.4 ->

Only after fresh install! (if your server is on production, be carefull. no guarraty at all for stability)

rpm -Uvh https://mirror.webtatic.com/yum/el6/latest.rpm You can install php by doing: yum install php54w

If you know what you are doing (for me only upgrading was the solution), you can upgrade PHP by:

yum install yum-plugin-replace yum replace php-common --replace-with=php54w-common

By: Myungjin

What is Cubemail logging ID and PW?

By: Normand Brousseau

Webalyzer found in rpm for centos 7 here : http://li.nux.ro/download/nux/misc/el7/x86_64/webalizer-2.23_08-1.el7.nux.x86_64.rpm

I have to build CLAMAV 0.98.4 from scratch to get freshclam working. epel.repo exclude=clamav. Now I have

[[email protected] etc]# clamav -VClamAV 0.98.6/20208/Thu Mar 19 06:49:07 2015[[email protected] etc]# clamd -VClamAV 0.98.6/19995/Thu Jan 29 12:52:33 2015[[email protected] etc]# freshclamClamAV update process started at Thu Mar 19 08:50:59 2015WARNING: Your ClamAV installation is OUTDATED!WARNING: Local version: 0.98.4 Recommended version: 0.98.6DON'T PANIC! Read http://www.clamav.net/support/faqmain.cvd is up to date (version: 55, sigs: 2424225, f-level: 60, builder: neo)daily.cld is up to date (version: 20208, sigs: 1352880, f-level: 63, builder: neo)bytecode.cvd is up to date (version: 247, sigs: 41, f-level: 63, builder: dgoddard)

Normand

By: Normand Brousseau

Webaliser not available for Centos 7 because GeoIP-update6 need and not available... Waiting for this??

By: Normand Brousseau

Roundcubemail need LDAP3

wget ftp://ftp.muug.mb.ca/mirror/fedora/epel/7/x86_64/p/php-pear-Net-LDAP2-2.1.0-1.el7.noarch.rpm

wget ftp://ftp.muug.mb.ca/mirror/fedora/epel/7/x86_64/p/php-kolab-net-ldap3-1.0.2-2.el7.noarch.rpm

After download,

rpm -ivh php-pear-Net-LDAP2-2.1.0-1.el7.noarch.rpm php-kolab-net-ldap3-1.0.2-2.el7.noarch.rpm

By: Ciprian A

Hi, I use ISPCONFIG for a while.

Few days I accidently chowned all the files on the drive :( So in order to recover the email, i have copied the mail folders to a ftp server.

I have reinstalled the ISPCONFIG server but now I have problems with the emails. Copying the email from ftp to the maildir gave me headache while I tried to get the emails with imap.

Mar 30 18:54:47 hermes dovecot: imap([email protected]): Error: FETCH [] for mailbox INBOX UID 4931 got too little data: 1627 vs 16272

Mar 30 18:54:47 hermes dovecot: imap([email protected]): Error: Maildir filename has wrong W value: /var/vmail/telecomplus.ro/ciprian.arustei/Maildir/cur/1422727501.M299878P22634.hermes.vaslui.net,S=1580,W=16272,Sa

Mar 30 18:54:47 hermes dovecot: imap([email protected]): Error: Corrupted index cache file /var/vmail/telecomplus.ro/ciprian.arustei/Maildir/dovecot.index.cache: Broken virtual size for mail UID 4931


I have deleted the index files, dovecod recreated them, but that did not help me.

I have found some scripts online but that also did not help.

If any ideas, please let me know. Thanks!

By: Yasar Bayar

I followed the instructions provided here. Haven't done any single custom configuration. Using CentOS 7.

Roundcube does work (send and recieve) with no issue.However, when i use a mail client (tried with outlook and thunderbird), in my maillog i see the log as:

dovecot: pop3-login: Aborted login (no auth attempts in 0 secs): user=<>,


I tried to telnet to myserver on port 110, 25. 110 got a reply but 25 not.I have the port 25 in the firewall open port list.

Dont know where to look to resolve the issue.Any help is much appreciated.


By: Johannes Skartland

pure-ftpd expects the pure-ftpd.pem in the folder /etc/pki/pure-ftpd and not the usual /etc/ssl/private/.

By: pawel

Tut looked OK until I've got to step 6. Disabling SELinux is your solution for lack of knowledge? You should change topic to "Not-so-perfect-server-centos-7..."

By: BenGman

Apache would not start for me after the vhosts/ISPConfig install due to not binding to sockets. Disabling SELinux solved that issue for me but I will be willing to configure an SELinux policy to get Apache working with ISPConfig.

By: Ole Kristian Ek Hornnes

 Under the heading: **7 Enable Additional Repositories And Install Some Software**


rpm -ivh http://dl.fedoraproject.org/pub/epel/7/x86_64/e/epel-release-7-2.noarch.rpm


should be changed to: 


rpm -ivh http://dl.fedoraproject.org/pub/epel/7/x86_64/e/epel-release-7-5.noarch.rpm


as the 7-2 does not exists. 7-5 does. 

By: pete

Thank you for the effort you put in to this post ,it took a while but I got there with your help.

By: Anony

Er zit een heel vervelend foutje in waar ik 2x over ben gestruikeld en aangezien ik niet bij de console kon maakte dat ik 2x een reinstall moest vragen. Normaal kon dat via het control panel maar niet met raid ... foutje van het datacenter.

Het foutje hier is dat in de zin:

GRUB_CMDLINE_LINUX="rd.lvm.lv=centos/swap vconsole.font=latarcyrheb-sun16 rd.lvm.lv=centos/root crashkernel=auto vconsole.keymap=us rhgb quiet rootflags=uquota,gquota"

gqouta pquota moet zijn. Ik weet niet waarom het een p ipv een g moet zijn maar met een p reboot de server wel en met een g niet.

Mogelijk een idee dit aan te passen :-)

By: vinoth

OMG.. This is the first time am installating a linux machine with out any issue.. Thanks for your Awesome tutorial :-)

By: Liam

The only problem I have is with amavisd. It does not start via the script, I must manually start it by running amavisd otherwise mail won't flow. Any ideas? 

By: Prashant

Hello,

I did the same for each step and i create a new reseller account in ispconfig for any website, but i am not able to upload file more than 2MB i try to change file upload size in '/etc/php.ini' and restart httpd with command 'systemctl restart httpd.service' but it does not reflect on phpinfo(); other things are working great only this file upload size in not working can you expalin how i can increase upload file size.Thanks


By: tamimh

Hi

I am a total noob in this. can someone explain what should i do with this:

Job for amavisd.service failed. See 'systemctl status amavisd.service' and 'journalctl -xn' for details.

Job for httpd.service failed. See 'systemctl status httpd.service' and 'journalctl -xn' for details.

PHP Warning:  date(): It is not safe to rely on the system's timezone settings. You are *required* to use the date.timezone setting or the date_default_timezone_set() function. In case you used any of those methods and you are still getting this warning, you most likely misspelled the timezone identifier. We selected the timezone 'UTC' for now, but please set date.timezone to select your timezone. in /tmp/ispconfig3_install/install/install.php on line 683

Installation completed.


By: BenGman

The Apache httpd.service failed because you did not disable SELinux. I had that same error. Also, you did not set the timezone in your PHP Configuration file.

By: thoys

Kudos Till, great howto, gave me a nice working ISPConfig configuration. :)

By: LaxSlash1993

Note about 'quota':

- If you don't have a grub bootloader on your VPS, you can still do this through /etc/fstab. However, the parameter is not uquota and uquota - it's usrquota and grpquota. You will also need to reboot and not just do a remount if you do this on the root partition. If you did it wrong and you got locked out from writing to the filesystem, simply run the command: " sudo mount -o remount,rw /partition/identifier /mount/point ". If you don't know the information needed for that, simply run " mount -v | grep "^/" | awk '{print "\nPartition identifier: " $1  "\n Mountpoint: "  $3}' " in order to get it.

By: Tyler

Hi, 

Awesome tutorial, had very little issues with the exception of self inflicted ones LOL... 

I have one issue I cannot resolve however. 

I cannot access phpmyadmin - I open the page and the server knows it is there as I am simply getting a blank page, all other PHP works on the server, it is just phpmyadmin that is not opening. I have run the php script from the site and it works fine. I know I have seen this issue before and have fixed it, for the life of me can't remember what I done. 

Any advice would be appreciated!

By: dongbak cha

 I thank you for your instruction.I installed step by step in my CentOS 7.I met the following error message in step [systemctl restart httpd.service].I have tried several times.Plase  let me know how I can solve it.


By: John Doe

I'm very confused about something that should be very simple I'm sure. In the tutorial when you write, "change the error reporting (so that notices aren't shown any longer)". What specifically do you mean by that, please? Am I supposed to throw in the following exactly as follows? 


;error_reporting = E_ALL & ~E_DEPRECATED error_reporting = E_ALL & ~E_NOTICE & ~E_DEPRECATED

OR... should I simply set it to:  error_reporting = off ?

It sounds like I'm supposed to turn it off or maybe comment it off...but based on the rest of your tutorial, the user usually copies what you have as an example, and in this area you don't specify exactly "how" to 'disable error reporting' (in my oppinion).

Could you please clarify?

Currently my php.ini read this within the "common values" section:


; Common Values:

;   E_ALL (Show all errors, warnings and notices including coding standards.)

;   E_ALL & ~E_NOTICE  (Show all errors, except for notices)

;   E_ALL & ~E_NOTICE & ~E_STRICT  (Show all errors, except for notices and coding standards warnings.)

;   E_COMPILE_ERROR|E_RECOVERABLE_ERROR|E_ERROR|E_CORE_ERROR  (Show only errors)

; Default Value: E_ALL & ~E_NOTICE & ~E_STRICT & ~E_DEPRECATED

; Development Value: E_ALL

; Production Value: E_ALL & ~E_DEPRECATED & ~E_STRICT

; http://php.net/error-reporting

error_reporting = E_ALL & ~E_DEPRECATED & ~E_STRICT


Thank you very much in advance, to whoever may reply to this.

By: till

Change the error reporting to:

error_reporting = E_ALL & ~E_NOTICE & ~E_DEPRECATED

as shown in the tutorial.

By: Alexander

Have same problem with clamd unrar and webalizer not available. Any suggestions?

By: Matthew Hunt

In part 15, the make install threw an error when doing the byte-compile on mod_python/version.py.  Hopefully this won't be a serious issue later on, but I'm posting it here just in case it is.

byte-compiling /usr/lib64/python2.7/site-packages/mod_python/version.py to version.pyc  File "/usr/lib64/python2.7/site-packages/mod_python/version.py", line 3    version = "fatal: Not a git repository (or any of the parent directories): .git                                                                                  ^SyntaxError: EOL while scanning string literalwriting byte-compilation script '/tmp/tmpFG758H.py'/usr/bin/python -OO /tmp/tmpFG758H.py  File "/usr/lib64/python2.7/site-packages/mod_python/version.py", line 3    version = "fatal: Not a git repository (or any of the parent directories): .git                                                                                  ^SyntaxError: EOL while scanning string literalremoving /tmp/tmpFG758H.py

By: Matthew Hunt

To get this to send to Google's mail servers, you need to do a bit more configuring. Installing IPv6, setting an AAAA MX record, and adding in the IPv4/6 addresses for relaying if you have non-local machine clients. I've outlined all the steps I had to take here:Enabling IPV6 in CentOS (for sending and receiving mail)You also might need to call your ISP, mine had a layer-7 block on SMTP.

By: Hung

I get errors with this command:

/usr/lib/mailman/bin/newlist mailman

Traceback (most recent call last):

  File "/usr/lib/mailman/bin/newlist", line 100, in <module>

    from Mailman import MailList

  File "/usr/lib/mailman/Mailman/MailList.py", line 51, in <module>

    from Mailman.Archiver import Archiver

  File "/usr/lib/mailman/Mailman/Archiver/__init__.py", line 17, in <module>

    from Archiver import *

  File "/usr/lib/mailman/Mailman/Archiver/Archiver.py", line 37, in <module>

    from Mailman.i18n import _

  File "/usr/lib/mailman/Mailman/i18n.py", line 36, in <module>

    _ctype_charset = _get_ctype_charset()

  File "/usr/lib/mailman/Mailman/i18n.py", line 31, in _get_ctype_charset

    old = locale.setlocale(locale.LC_CTYPE, '')

  File "/usr/lib64/python2.7/locale.py", line 547, in setlocale


    return _setlocale(category, locale)

By: George Georgakakos

For the 'autoreconf -if' issue you may install prior libtool

yum install libtool

This will correct the error.

By: George Georgakakos

For webanal

You may run the following:

cd /tmp

wget http://li.nux.ro/download/nux/misc/el7/x86_64/webalizer-2.23_05-10.el7.nux.x86_64.rpm

yum install webalizer-2.23_05-10.el7.nux.x86_64.rpm

By: govind

Hello,

     I am using centos 7 and install samba as PDC active directory work fine and File Share work properly.but i want to login centos 7(PDC system) by Domain Users but failed. it can be possible ?

wbinfo -u return domain user properly

wbinfo -g return domain groups properly.

shares Folder open by domain user properly.

but login failed by domain user .error user does not exist.

if any idea please help me.

By: dogu

can you update the roundcube install for 1.2? or since its yum installed, we just have to wait?

By: doug

clamav gives errors using this guide, its missing the .sock file. use this to configure clamav

https://www.adminsys.ch/2015/08/21/installing-clamav-epel-centosred-hat-7-nightmare/

By: Josh

Wow. This is a very detailed installation guide. Everything works perfect. Right now I am in a test environment but plan on using this same method when I am ready to go live. Thank you for this. It is extremely helpful.

By: milan

Everything was super fine until the end. Now I can't start httpd. 

Please enter the following 'extra' attributes

to be sent with your certificate request

A challenge password []:

An optional company name []:

writing RSA key

Configuring DBServer

Installing ISPConfig crontab

no crontab for root

no crontab for getmail

Restarting services ...

Job for httpd.service failed because the control process exited with error code. See "systemctl status httpd.service" and "journalctl -xe" for details.

Installation completed.


By: yavuz

I am getting error when configuring suphp.

Error is :

checking for APR... configure: error: the --with-apr parameter is incorrect. It must specify an install prefix, a

Would you help me to solve the problem?

btw: I am using php 7


By: n

I had to compile apxs in suphp, so added --with-apxs=/usr/bin/apxs. 

By: Maurits

As others mentioned, there's no package clamd in Centos 7. The clamd server is probably supposed to come with clamav but I get no clamd binary, and during ISPConfig installation I get:

Failed to restart [email protected]: Unit [email protected] failed to load: No such file or directory.

Since "yum -y install clamd" doesn't make sense in Centos 7 I can't possibly be the only one with this problem surely? :)

By: Maurits

Ok, I just noticed there is a revised version where exactly the clamd problem is fixed, lol..

By: Randall Allen

I'm a bit lost.  In step 8 Quota it says, "Now we check if quota is already enabled for the filesystem where the website (/var/www)"

I don't understand how this can be done when these instructions don't install apache until the following step, step 9.  I thought /var/www is created with the installation of apache, so how can we check if quota is already enabled for the filesystem where the website (/var/www) it /var/www hasn't yet been created?

By: wUFr

if you're having problem with let's encrypt not getting certificate after clickin on checkbox in ISPconfig, just download "certbot" somewhere aside, run ./certbot-auto, wait till it installs some python packages and press "Cancel" after blue popup asking for domains will show.Then you should be able to get certificates by clicking that checkbox in ISPconfig.... took me a whole to figure it out, hope it helps :)

By: Pasha

 for today it's a new epel-release

rpm -ivh http://dl.fedoraproject.org/pub/epel/7/x86_64/Packages/e/epel-release-7-11.noarch.rpm

By: Nate

I got stuck at the part where you compile the patch for suphp (garbage input...). The link listed in this guide is no longer maintained/available. Instead I used the following command to create the patch.

wget -O patchingsuphp.patch https://www.webhostinghero.com/downloads/php/suphp.patch patch -Np1 -d suphp-0.7.2 < patchingsuphp.patch cd suphp-0.7.2 autoreconf -if

By: Sam

When trying to patch apache-2.4 with suphp, at the time of compile (make) I get:

[[email protected] suphp-0.7.2]# make

Making all in src

make[1]: Entering directory `/usr/local/src/suphp-0.7.2/src'

make  all-recursive

make[2]: Entering directory `/usr/local/src/suphp-0.7.2/src'

Making all in apache

make[3]: Entering directory `/usr/local/src/suphp-0.7.2/src/apache'

/bin/sh ../../libtool  --tag=CC   --mode=compile gcc -DHAVE_CONFIG_H -I. -I../../src    -I/usr/include/httpd -O2 -g -pipe -Wall -Wp,-D_FORTIFY_SOURCE=2 -fexceptions -fstack-protector-strong --param=ssp-buffer-size=4 -grecord-gcc-switches -m64 -mtune=generic -DSUPHP_PATH_TO_SUPHP=\"/usr/sbin/suphp\"  -g -O2 -MT mod_suphp.lo -MD -MP -MF .deps/mod_suphp.Tpo -c -o mod_suphp.lo mod_suphp.c

libtool: compile:  gcc -DHAVE_CONFIG_H -I. -I../../src -I/usr/include/httpd -O2 -g -pipe -Wall -Wp,-D_FORTIFY_SOURCE=2 -fexceptions -fstack-protector-strong --param=ssp-buffer-size=4 -grecord-gcc-switches -m64 -mtune=generic -DSUPHP_PATH_TO_SUPHP=\"/usr/sbin/suphp\" -g -O2 -MT mod_suphp.lo -MD -MP -MF .deps/mod_suphp.Tpo -c mod_suphp.c  -fPIC -DPIC -o .libs/mod_suphp.o

In file included from /usr/include/httpd/ap_config.h:25:0,

                 from /usr/include/httpd/httpd.h:44,

                 from mod_suphp.c:24:

/usr/include/httpd/ap_hooks.h:39:17: fatal error: apr.h: No such file or directory

 #include "apr.h"

                 ^

compilation terminated.

make[3]: *** [mod_suphp.lo] Error 1

make[3]: Leaving directory `/usr/local/src/suphp-0.7.2/src/apache'

make[2]: *** [all-recursive] Error 1

make[2]: Leaving directory `/usr/local/src/suphp-0.7.2/src'

make[1]: *** [all] Error 2

make[1]: Leaving directory `/usr/local/src/suphp-0.7.2/src'

make: *** [all-recursive] Error 1


[[email protected] suphp-0.7.2]#

I don't know why the path doesn't work!

By: till

You can leave out suphp install part if it does not compile, it is an old PHP mode and you probably will use php-fpm for your websites later anyway.

this tutorial completely crashed my centos system once i got to the reboot after "section 8 quota" .


I have a vultr centos 7 vps


I spent over an hour getting to this point...now i have to start over.

By: till

There is no issue in the guide. It might be that Vultr VPS does not support quota or they used a filesystem like btrfs which does not support normal Linux quota, you should contact their support and ask them how to enable Linux quota for their VPS. Besid ethat, you are using an old version of the CentOS tutorials as mentioned at the beginning of this page, better use the most recent version (link is at the beginning at well: https://www.howtoforge.com/tutorial/perfect-server-centos-7-apache-mysql-php-pureftpd-postfix-dovecot-and-ispconfig/).

By: D Maity

Step-15: As  marsching.com list server has been shut down the below code will not work

wget -O suphp.patch https://lists.marsching.com/pipermail/suphp/attachments/20130520/74f3ac02/attachment.patchpatch -Np1 -d suphp-0.7.2 < suphp.patchcd suphp-0.7.2autoreconf -if

Solution: Use the following code- 

wget -O patchingsuphp.patch https://www.webhostinghero.com/downloads/php/suphp.patch patch -Np1 -d suphp-0.7.2 < patchingsuphp.patch cd suphp-0.7.2 autoreconf -if

By: till

You are using an old version of this guide. If you would use the latest version as recommended at the top of this guide (https://www.howtoforge.com/tutorial/perfect-server-centos-7-apache-mysql-php-pureftpd-postfix-dovecot-and-ispconfig/), then you would see that the suphp patch from that server is not used anymore.

By: notesgooroo

This entire how-to is one giant wild goose chase. DO NOT USE. I don't know what happened to HTF but this document either needs a revision or deletion. Failure after failure. Needs an update to the current version of CentOS. To much has changed over the last few minors. 

By: till

Sorry, your comment just documents that you have not read the guide from the beginning and you request new(er) guides which exist for years incl. a recent one for CentOS 7.6, where we pointed you at the beginning of the text to. Scroll up, then read the tutorial again, it starts with this text in a yellow text box to ensure that no reader can miss it:

There is a new version of this tutorial available for CentOS 7.6.

Instead of reading and using the recent guide for CentOS 7.6, you decided to use the old guide from the archive which is for CentOS 7.0. To sum it up, the guide works perfectly for the CentOS version it has been written for and we provide different tutorials for the different CentOS versions, all of them are linked at the top of the tutorial and you did not follow our suggestions to use a recent guide. You caused the trouble yourself by not using the guide that matches your OS version from the selector, don't blame us for that.

By: Zoe

Section 15 .patch file fix


wget -O patchingsuphp.patch https://www.webhostinghero.com/downloads/php/suphp.patch patch -Np1 -d suphp-0.7.2 < patchingsuphp.patch cd suphp-0.7.2 autoreconf -if

By: Green

Hello Everyone, Special greetings and congratulations about the wonderful work done by Till Brehm and his associates.Till, do you plan to integrate openlitespeed in ispconfig?As for me that would be really wonderful.King regards,

Moses

By: Emmanuel

This tutorial is amazing you're doing a great job thank you very much for this.


I have installed my perfect centos 7 server but i was looking to make my server and all the sites on it accessible to the internet trought my domaine.name like site1.mydomaine.com so i followed the tuto for own my dns but when i try to enter slave server it doeso't resolve hosname and ip adresse are not accepted  i realise that i can only ping my virtual machine with ip . Can you help me fix it please

By: till

Please post your issue in the iSPConfig forum here at howtoforge so we can help you to figure out what's wrong or missing in the DNS setup.

By: Temo

What does it wants? made everything using your guide...cannot get it.. same with 'make install'

the folder it tries to access is empty (/usr/include). there is no httpd in it....

[[email protected] suphp-0.7.2]# make

Making all in src

make[1]: Entering directory `/usr/local/src/suphp-0.7.2/src'

make  all-recursive

make[2]: Entering directory `/usr/local/src/suphp-0.7.2/src'

Making all in apache

make[3]: Entering directory `/usr/local/src/suphp-0.7.2/src/apache'

/bin/sh ../../libtool  --tag=CC   --mode=compile gcc -DHAVE_CONFIG_H -I. -I../../src    -I/usr/include/httpd -O2 -g -pipe -Wall -Wp,-D_FORTIFY_SOURCE=2 -fexceptions -fstack-protector-strong --param=ssp-buffer-size=4 -grecord-gcc-switches -m64 -mtune=generic -DSUPHP_PATH_TO_SUPHP=\"/usr/sbin/suphp\"  -g -O2 -MT mod_suphp.lo -MD -MP -MF .deps/mod_suphp.Tpo -c -o mod_suphp.lo mod_suphp.c

libtool: compile:  gcc -DHAVE_CONFIG_H -I. -I../../src -I/usr/include/httpd -O2 -g -pipe -Wall -Wp,-D_FORTIFY_SOURCE=2 -fexceptions -fstack-protector-strong --param=ssp-buffer-size=4 -grecord-gcc-switches -m64 -mtune=generic -DSUPHP_PATH_TO_SUPHP=\"/usr/sbin/suphp\" -g -O2 -MT mod_suphp.lo -MD -MP -MF .deps/mod_suphp.Tpo -c mod_suphp.c  -fPIC -DPIC -o .libs/mod_suphp.o

In file included from /usr/include/httpd/ap_config.h:25:0,

                 from /usr/include/httpd/httpd.h:44,

                 from mod_suphp.c:24:

/usr/include/httpd/ap_hooks.h:39:17: fatal error: apr.h: No such file or directory

 #include "apr.h"

                 ^

compilation terminated.

make[3]: *** [mod_suphp.lo] Error 1

make[3]: Leaving directory `/usr/local/src/suphp-0.7.2/src/apache'

make[2]: *** [all-recursive] Error 1

make[2]: Leaving directory `/usr/local/src/suphp-0.7.2/src'

make[1]: *** [all] Error 2

make[1]: Leaving directory `/usr/local/src/suphp-0.7.2/src'

make: *** [all-recursive] Error 1