ISP Server Setup - OpenSUSE 10 - Page 5
Apache/PHP5
yast2 -i apache2 apache2-devel apache2-mod_perl apache2-mod_php5 apache2-prefork libapr0 perl-HTML-Parser perl-HTML-Tagset perl-Tie-IxHash perl-URI perl-libwww-perl php5 php5-devel zlib zlib-devel
yast2 -i php5-bcmath php5-bz2 php5-calendar php5-ctype php5-curl php5-dbase php5-dbx php5-debuginfo php5-dio php5-dom php5-fam php5-filepro php5-ftp php5-gd php5-gettext php5-gmp php5-iconv php5-imap php5-ldap php5-mbstring php5-mcrypt php5-mhash php5-mysql php5-mysqli php5-ncurses php5-odbc php5-openssl php5-pcntl php5-pgsql php5-posix php5-shmop php5-snmp php5-soap php5-sockets php5-sqlite php5-sysvsem php5-tokenizer php5-wddx php5-xmlrpc php5-xsl php5-yp php5-zlib php5-exif php5-fastcgi php5-pear php5-sysvmsg php5-sysvshm ImageMagick curl (1 line!)
chkconfig --add apache2
ISPConfig configures the perl and PHP mimetypes on a per vhost basis, so we comment them out in the global setup.
Edit /etc/mime.types. Comment out the following 2 lines:
# application/x-httpd-php phtml pht php |
Edit /etc/apache2/httpd.conf and change
DirectoryIndex index.html index.html.var
to
DirectoryIndex index.html index.htm index.shtml index.cgi index.php index.php5 index.php4 index.php3 index.pl index.html.var index.aspx default.aspx
Edit /etc/sysconfig/apache2 and add rewrite to the APACHE_MODULES line:
APACHE_MODULES="access actions alias auth [...] setenvif ssl suexec userdir php4 php5 rewrite" |
Also add SSL to the APACHE_SERVER_FLAGS line:
APACHE_SERVER_FLAGS="SSL" |
Then run
SuSEconfig
/etc/init.d/apache2 start
Proftpd
I want to use Proftpd instead of vsftpd which is SUSE's default FTP server because the control panel software I am going to install on this server (ISPConfig) requires Proftpd on SUSE 10.0 (on other distributions this is different). Since there are no SUSE packages for Proftpd I have to compile it manually:
cd /tmp/
wget --passive-ftp ftp://ftp.proftpd.org/distrib/source/proftpd-1.2.10.tar.gz
tar xvfz proftpd-1.2.10.tar.gz
cd proftpd-1.2.10/
./configure --sysconfdir=/etc
make
make install
cd ../
rm -fr proftpd-1.2.10*
Now create the file /etc/init.d/proftpd:
#! /bin/sh |
chmod 755 /etc/init.d/proftpd
chkconfig --add proftpd
/etc/init.d/proftpd start
For security reasons you can add the following lines to /etc/proftpd.conf:
DefaultRoot ~
IdentLookups off
ServerIdent on "FTP Server ready."
Be sure to comment out the following lines in order to allow ftp users to CHMOD:
# Bar use of SITE CHMOD by default |
and restart Proftpd:
/etc/init.d/proftpd restart
Webalizer
To install webalizer, just run
yast2 -i webalizer
Synchronize the System Clock
If you want to have the system clock synchronized with an NTP server do the following:
yast2 -i xntp
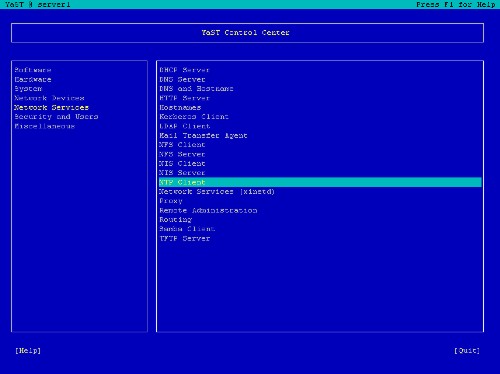
Add an NTP server
yast2
Select Network Services -> NTP Client:
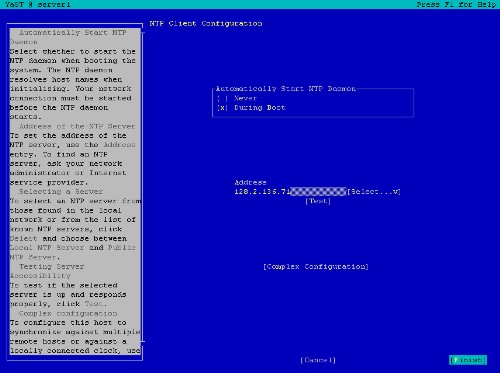
Then select Automatically Start NTP Daemon During Boot and enter the address of the NTP server. I used public the Server with the IP address 192.43.244.18. Then select Finish, Quit.
Install some Perl Modules needed by SpamAssassin (comes with ISPConfig)
yast2 -i perl-HTML-Parser perl-Net-DNS perl-Digest-SHA1
On To The Next Step...
The configuration of the server is now finished, and we go on by installing ISPConfig on it.

