How to Install Elgg Social Network on Ubuntu 18.04 LTS
This tutorial exists for these OS versions
- Ubuntu 22.04 (Jammy Jellyfish)
- Ubuntu 20.04 (Focal Fossa)
- Ubuntu 18.04 (Bionic Beaver)
On this page
Elgg is a free, open source and self-hosted social networking application that can be used to create your own social networking website. You can easily create social networks for your university, organization, school and college using Elgg. Elgg is simple, easy to use and highly customizable. You can extend Elgg functionality with built-in plugins and themes.
In this tutorial, we will show you how to install Elgg with Apache web server on Ubuntu 18.04 server.
Requirements
- A server running Ubuntu 18.04.
- A non-root user with sudo privileges.
Getting Started
First, update your system with the latest version by running the following command:
sudo apt-get update -y
sudo apt-get upgrade -y
Once your system is updated, restart your system to apply the changes.
Install LAMP Server
Elgg is written in PHP and uses MariaDB to store their database. So, you will need to install Apache, PHP and MariaDB server to your system.
You can install all the packages by running the following command:
sudo apt-get install apache2 mariadb-server php7.2 libapache2-mod-php7.2 php7.2-common php7.2-sqlite3 php7.2-curl php7.2-intl php7.2-mbstring php7.2-xmlrpc php7.2-mysql php7.2-gd php7.2-xml php7.2-cli php7.2-zip unzip wget -y
Once all the packages are installed, open the PHP default configuration file and make some changes:
sudo nano /etc/php/7.2/apache2/php.ini
Make the following changes:
memory_limit = 256M
upload_max_filesize = 100M
max_execution_time = 360
date.timezone = Asia/Kolkata
Save and close the file. Then, start Apache and MariaDB service and enable them to start on boot time:
sudo systemctl start apache2
sudo systemctl start mariadb
sudo systemctl enable apache2
sudo systemctl enable mariadb
Configure Database
By default, MariaDB is not secure. So, you will need to secure it first. You can secure it by running the following command:
sudo mysql_secure_installation
Answer all the questions as shown below:
    Enter current password for root (enter for none):
    Set root password? [Y/n]: N
    Remove anonymous users? [Y/n]: Y
    Disallow root login remotely? [Y/n]: Y
    Remove test database and access to it? [Y/n]:  Y
    Reload privilege tables now? [Y/n]:  Y
Once the MariaDB is secured, log in to MariaDB shell:
mysql -u root -p
Enter your root password, then create a database and user for Elgg:
MariaDB [(none)]> CREATE DATABASE elggdb;
MariaDB [(none)]> CREATE USER 'elgg'@'localhost' IDENTIFIED BY 'howtoforge';
Replace the word 'howtoforge' in the command above with a secure password. Next, grant all the privileges to the Elgg database:
MariaDB [(none)]> GRANT ALL ON elggdb.* TO 'elgg'@'localhost' IDENTIFIED BY 'howtoforge' WITH GRANT OPTION;
Replace the word 'howtoforge' in the command above with a secure password. Next, flush the privileges and exit from the MariaDB shell:
MariaDB [(none)]> FLUSH PRIVILEGES;
MariaDB [(none)]> \q
Install Elgg on Ubuntu
First, download the latest version of Elgg with the following command:
cd /tmp
wget https://elgg.org/download/elgg-2.3.9.zip
Next, unzip the downloaded file with the following command:
unzip elgg-2.3.9.zip
Next, copy the extracted directory to the Apache root directory:
sudo cp -r elgg-2.3.9 /var/www/html/elgg
Next, create a data directory for Elgg:
sudo mkdir /var/www/html/elgg/data
Next, give proper permissions to the Elgg:
sudo chown -R www-data:www-data /var/www/html/elgg/
sudo chmod -R 755 /var/www/html/elgg/
Configure Apache for Elgg
Next, create an Apache virtual host file for Elgg with the following command:
sudo nano /etc/apache2/sites-available/elgg.conf
add the following lines:
<VirtualHost *:80>
ServerAdmin [email protected]
DocumentRoot /var/www/html/elgg/
ServerName example.com
<Directory /var/www/html/elgg/>
Options FollowSymLinks
AllowOverride All
</Directory>
ErrorLog /var/log/apache2/elgg-error_log
CustomLog /var/log/apache2/elgg-access_log common
</VirtualHost>
Replace example.com with your domain name. Save and close the file. Then, enable Apache virtual host file with the following command:
sudo a2ensite elgg.conf
Next, enable Apache rewrite module and restart Apache web service with the following command:
sudo a2enmod rewrite
sudo systemctl restart apache2
Access Elgg Web Interface
Now, open your web browser and type the URL http://example.com. You will be redirected to the following page:
Click on the Next button. You should see the following page:
Once all the Elgg requirements are satisfies. Click on the Next button. You should see the following page:
Provide your database details and click on the Next button. You should see the following page:
Now, provide your site name, data directory '/var/www/html/elgg/data', site URL. Then, click on the Next button. You should see the following page:
Now, provide your admin username and password. Then, click on the Next button. Once the installation has been finished, you should see the following page:
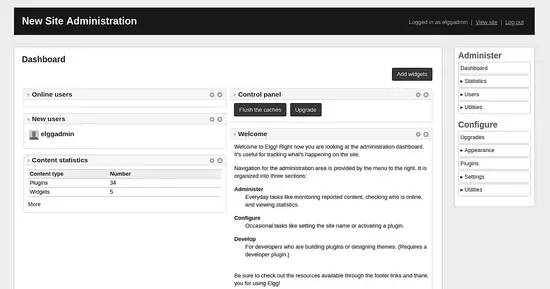
Now, click on the Go to site button. You should see the Elgg dashboard in the following page:
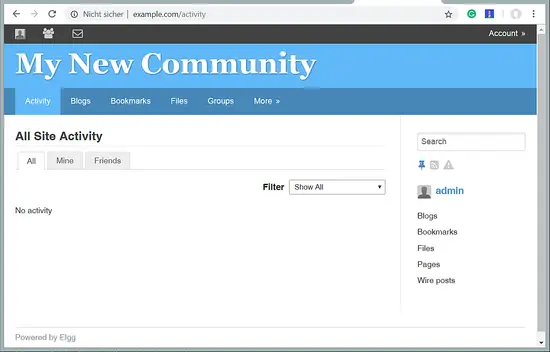
An this is how the Elgg frontend looks like:
Virtual machine image download of this tutorial
This tutorial is available as ready to use virtual machine image in ovf/ova format that is compatible with VMWare and Virtualbox for HowtoForge subscribers. The virtual machine image uses the following login details:
SSH / Shell Login
Username: administrator
Password: howtoforge
This user has sudo rights.
Elgg Login
Username: admin
Password: howtoforge
MySQL Login
Username: root
Password: howtoforge
and
Username: elgg
Password: howtoforge
The IP of the VM is 192.168.1.100, it can be changed in the file /etc/netplan/01-netcfg.yaml. Please change all the above passwords to secure the virtual machine. The Download-Link for the VM is in the menu on the right side, near the top.


