There is a new version of this tutorial available for Ubuntu 22.04 (Jammy Jellyfish).

Ubuntu 16.04 (LTS) LAMP server tutorial with Apache, PHP 7, and MySQL

LAMP is short for Linux, Apache, MySQL, PHP. This tutorial shows how you can install an Apache web server on an Ubuntu 16.04 LTS (Xenial Xerus) server with PHP 7 (mod_php) and MySQL / MariaDB support and how to setup an SSL certificate with Let's encrypt. Additionally, I will install PHPMyAdmin to make MySQL administration easier. A LAMP setup is a perfect basis for popular CMS systems like Joomla, Wordpress or Drupal.

Preliminary Note

In this tutorial, I will use the hostname server1.example.com with the IP address 192.168.1.100. These settings might differ for you, so you have to replace them where appropriate.

I recommend to use a minimal Ubuntu server setup as basis for the tutorial, that can be a virtual- or root server image with an Ubuntu 16.04 minimal install from a web hosting company or you use our minimal server tutorial to install a server from scratch.

I'm running all the steps in this tutorial with root privileges, so make sure you're logged in as root:

sudo su

1. Installing MySQL or MariaDB Database

There are currently two widely used MySQL database systems available, the classic "MySQL" server which is developed by Oracle and is available in version 5.7 now and the MySQL fork named MariaDB which is developed by the original MySQL developer Monty Widenius.

I will show you how to install both alternatives below. Just follow either chapter 1.1 or 1.2 but not both. I will use MySQL 5.7 for the virtual machine image that can be downloaded from Howtoforge.

1.1 Install MySQL 5.7

To install MySQL 5.7, execute this command:

apt-get -y install mysql-server mysql-client

The packages mysql-server and mysql-client are so called 'meta-packages', they install always the latest MySQL version that is available from Ubuntu. Th latest version is currently MySQL 5.7.

We have set the root password for MySQL already during installation, but I would like to remove the anonymous user and test database for security reasons. Run the mysql_secure_installation command below to achieve that.

mysql_secure_installation

You will be asked these questions:

Securing the MySQL server deployment.
Enter password for user root: <-- Enter the MySQL root password
VALIDATE PASSWORD PLUGIN can be used to test passwords
and improve security. It checks the strength of password
and allows the users to set only those passwords which are
secure enough. Would you like to setup VALIDATE PASSWORD plugin?
Press y|Y for Yes, any other key for No:
Using existing password for root.
Change the password for root ? ((Press y|Y for Yes, any other key for No) : <-- Choose 'y' here if you like to enable the password validation, I don't need that function, so I choose 'n' here.
... skipping.
By default, a MySQL installation has an anonymous user,
allowing anyone to log into MySQL without having to have
a user account created for them. This is intended only for
testing, and to make the installation go a bit smoother.
You should remove them before moving into a production
environment.
Remove anonymous users? (Press y|Y for Yes, any other key for No) : <-- y
Success.

Normally, root should only be allowed to connect from
'localhost'. This ensures that someone cannot guess at
the root password from the network.
Disallow root login remotely? (Press y|Y for Yes, any other key for No) : <-- y
Success.
By default, MySQL comes with a database named 'test' that
anyone can access. This is also intended only for testing,
and should be removed before moving into a production
environment.

Remove test database and access to it? (Press y|Y for Yes, any other key for No) : <-- y
- Dropping test database...
Success.
- Removing privileges on test database...
Success.
Reloading the privilege tables will ensure that all changes
made so far will take effect immediately.
Reload privilege tables now? (Press y|Y for Yes, any other key for No) : <-- y
Success.
All done!

The MySQL setup has been secured now.

1.2 Install MariaDB 10

Run the following command to install MariaDB-server and client:

apt-get -y install mariadb-server mariadb-client

Now we set a root password for MariaDB.

mysql_secure_installation

You will be asked these questions:

Enter current password for root (enter for none): <-- press enter
Set root password? [Y/n] <-- y
New password: <-- Enter the new MariaDB root password here
Re-enter new password: <-- Repeat the password
Remove anonymous users? [Y/n] <-- y
Disallow root login remotely? [Y/n] <-- y
Reload privilege tables now? [Y/n] <-- y

Test the login to MariaDB with the "mysql command"

mysql -u root -p

and enter the MariaDB root password that you've set above. The result should be similar to the screenshot below:

MariaDB Login on Ubuntu 16.04.

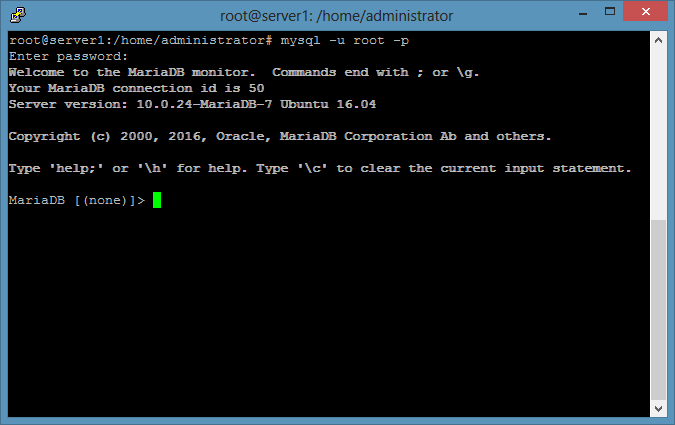
To leave the MariaDB shell, enter the command "quit" and press enter.

2. Install Apache Web Server

Apache 2 is available as an Ubuntu package, therefore we can install it like this:

apt-get -y install apache2

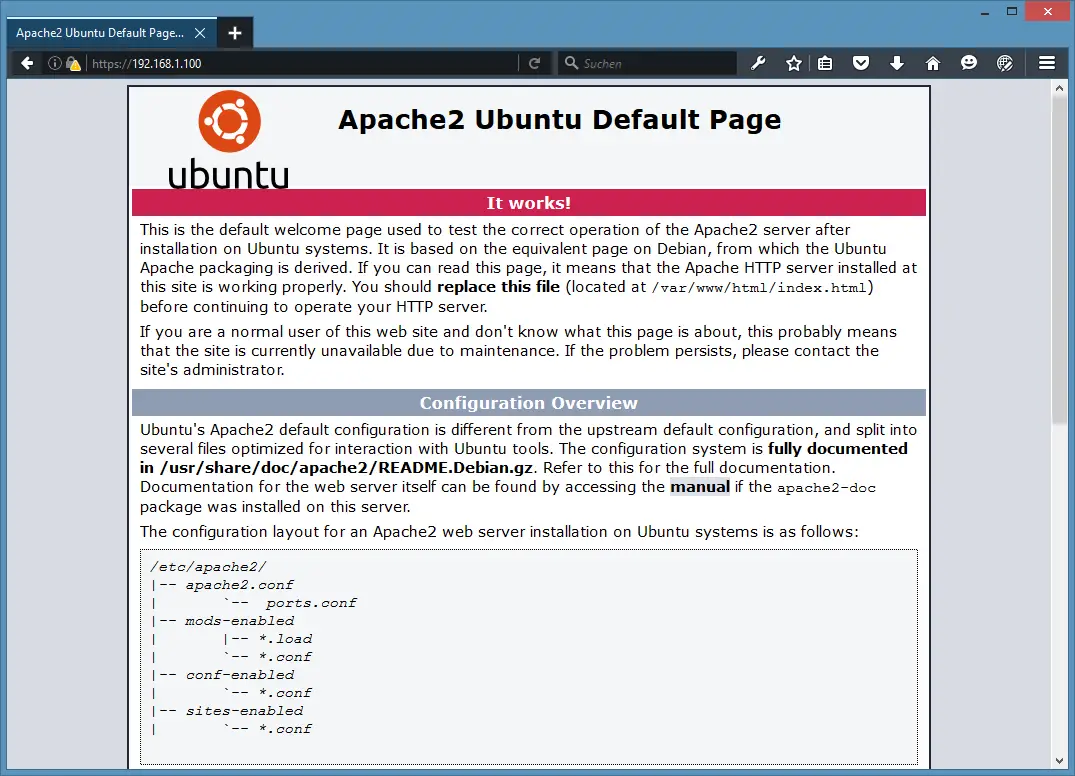
Now direct your browser to http://192.168.1.100, and you should see the Apache2 default page (It works!):

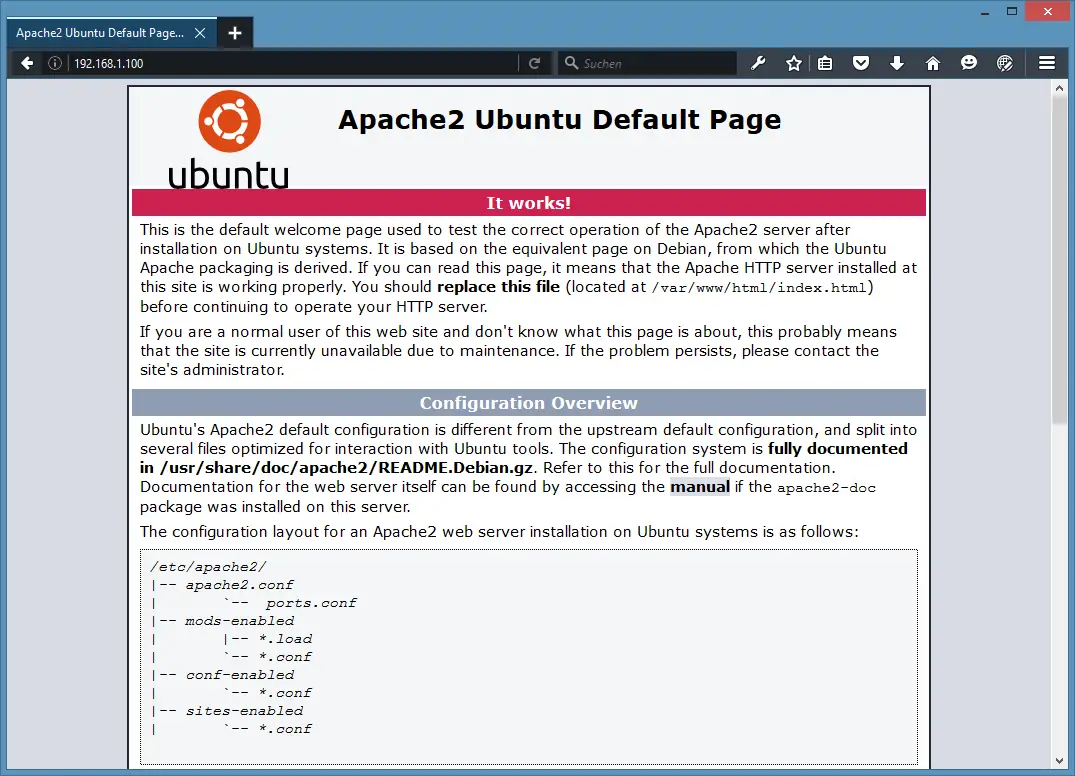
The document root of the apache default vhost is /var/www/html on Ubuntu and the main configuration file is /etc/apache2/apache2.conf. The configuration system is fully documented in /usr/share/doc/apache2/README.Debian.gz.

3. Install PHP 7

We can install PHP 7 and the Apache PHP module as follows:

apt-get -y install php7.0 libapache2-mod-php7.0

Then restart Apache:

systemctl restart apache2

4. Test PHP and get details about your PHP installation

The document root of the default web site is /var/www/html. We will now create a small PHP file (info.php) in that directory and call it in a browser. The file will display lots of useful details about our PHP installation, such as the installed PHP version.

nano /var/www/html/info.php
<?php
phpinfo();
?>

Then change the owner of the info.php file to the www-data user and group.

chown www-data:www-data /var/www/html/info.php

Now we call that file in a browser (e.g. http://192.168.1.100/info.php):

PHPINFO output from PHP 7.

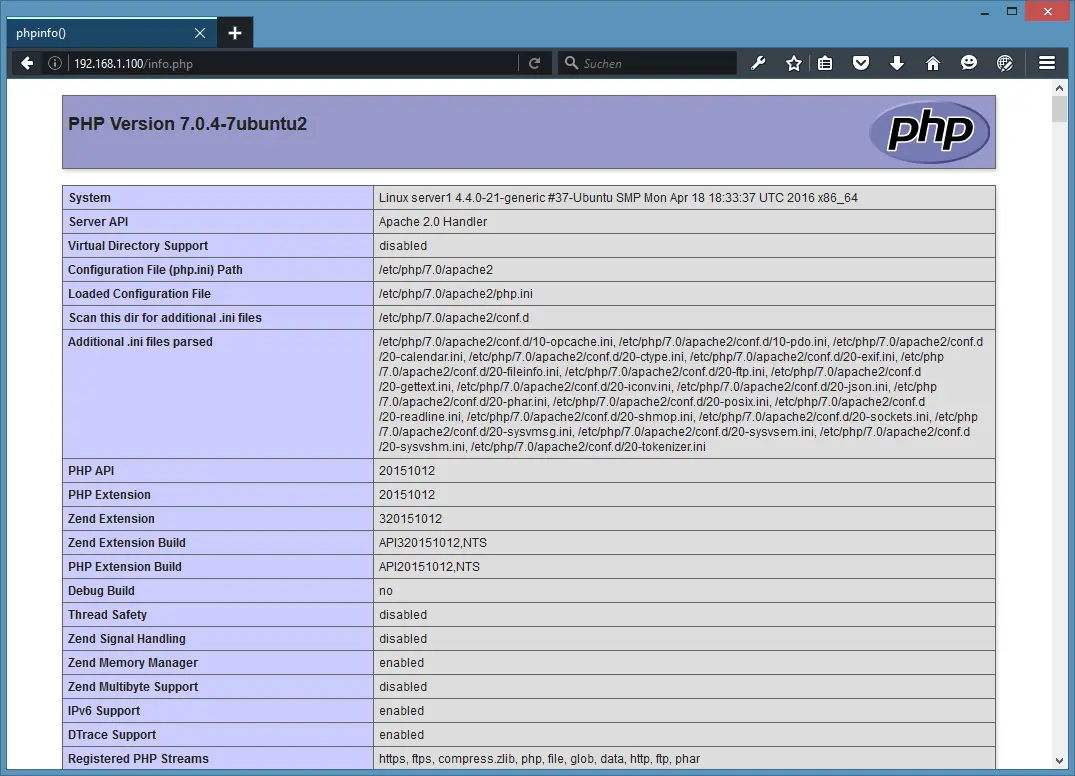
As you see, PHP 7.0 is working, and it's working through the Apache 2.0 Handler, as shown in the Server API line. If you scroll further down, you will see all modules that are already enabled in PHP5. MySQL is not listed there which means we don't have MySQL / MariaDB support in PHP yet.

5. Get MySQL / MariaDB support in PHP

To get MySQL support in PHP, we can install the php7.0-mysql package. It's a good idea to install some other PHP modules as well as you might need them for your applications. You can search for available PHP modules like this:

apt-cache search php7.0

Pick the ones you need and install them like this:

apt-get -y install php7.0-mysql php7.0-curl php7.0-gd php7.0-intl php-pear php-imagick php7.0-imap php7.0-mcrypt php-memcache  php7.0-pspell php7.0-recode php7.0-sqlite3 php7.0-tidy php7.0-xmlrpc php7.0-xsl php7.0-mbstring php-gettext

Now restart Apache2:

systemctl restart apache2

PHP with MySQL / MariaDB support.

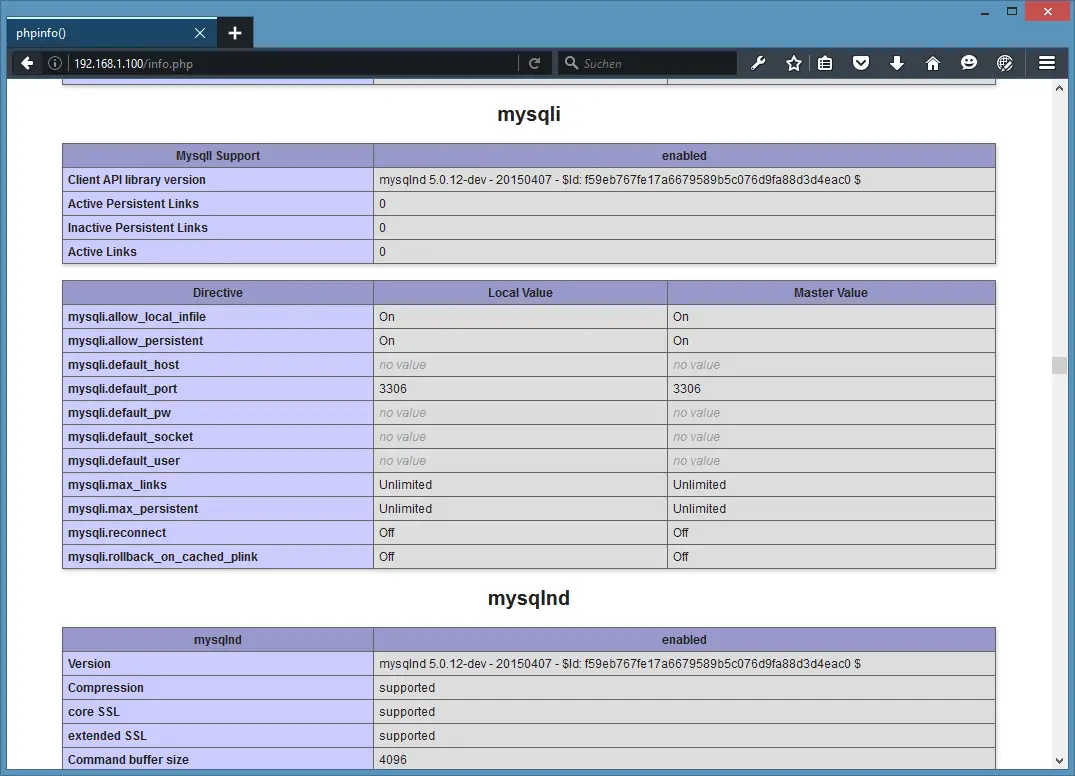
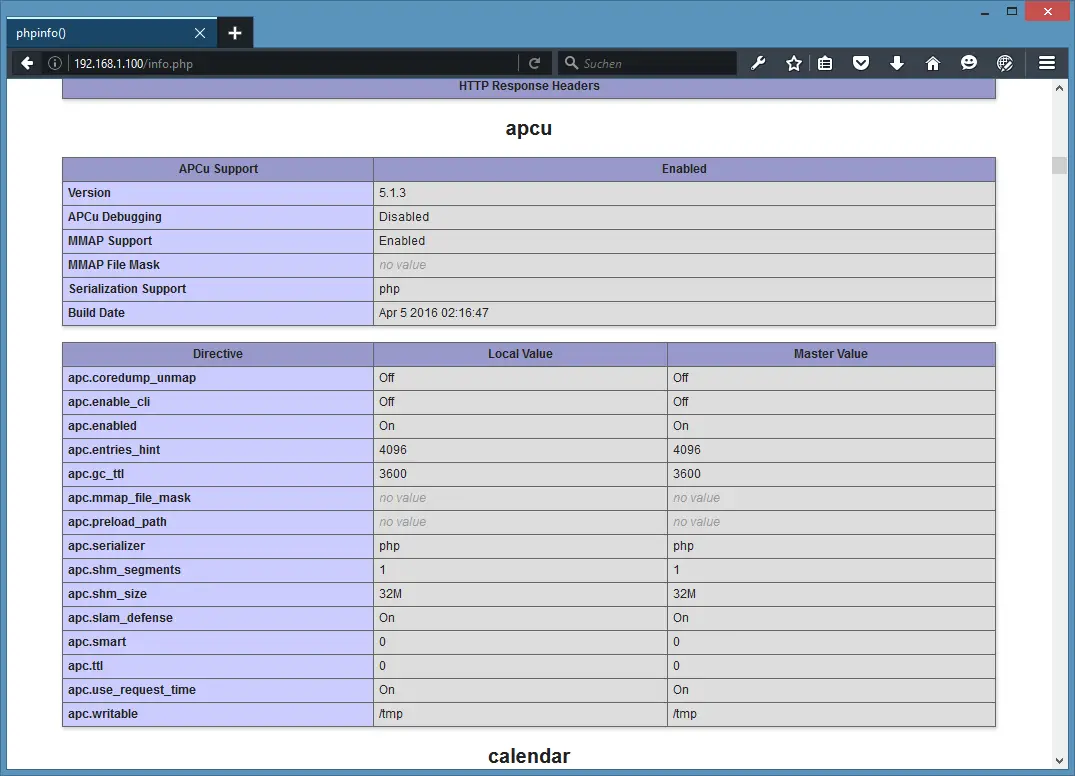
PHP 7 has now MySQL / MariaDB support as shown in phpinfo() above.

6. Install the Opcache + APCu PHP cache to speed up PHP

PHP 7 ships with a built-in opcode cacher for caching and optimizing PHP intermediate code, it has the name 'opcache' and is available in the package php7.0-opcache. It is strongly recommended to have an Opcache installed to speed up your PHP page. Besides opcache, I will install APCu which is a compatibility wrapper for opcache to provide the functions of the APC cache, an often used caching system in PHP 5.x versions and many CMS systems still use it.

Opcache and APCu can be installed as follows:

apt-get -y install php7.0-opcache php-apcu

Don't worry if it shows that Opcache is already installed.

Now restart Apache:

systemctl restart apache2

Now reload http://192.168.1.100/info.php in your browser and scroll down to the modules section again. You should now find lots of new modules there:

APCu installed in PHP.

Please don't forget to delete the info.php file when you don't need it anymore as it provides sensitive details of your server. Run the following command to delete the file.

rm -f /var/www/html/info.php

7. Enable the SSL website in apache

SSL/ TLS is a security layer to encrypt the connection between the web browser and your server. Most web browsers start to show sites as insecure today when the connection between the server and the web browser is not encrypted with SSL. In this chapter, I will show you how to secure your website with SSL.

Execute the following commands on your server to enable SSL (https://) support. Run:

a2enmod ssl
a2ensite default-ssl

which enables the SSL module and adds a symlink in the /etc/apache2/sites-enabled folder to the file /etc/apache2/sites-available/default-ssl.conf to include it into the active apache configuration. Then restart apache to enable the new configuration:

systemctl restart apache2

Now test the SSL connection by opening https://192.168.1.100 in a web browser.

Accept SSL Warning in Firefox

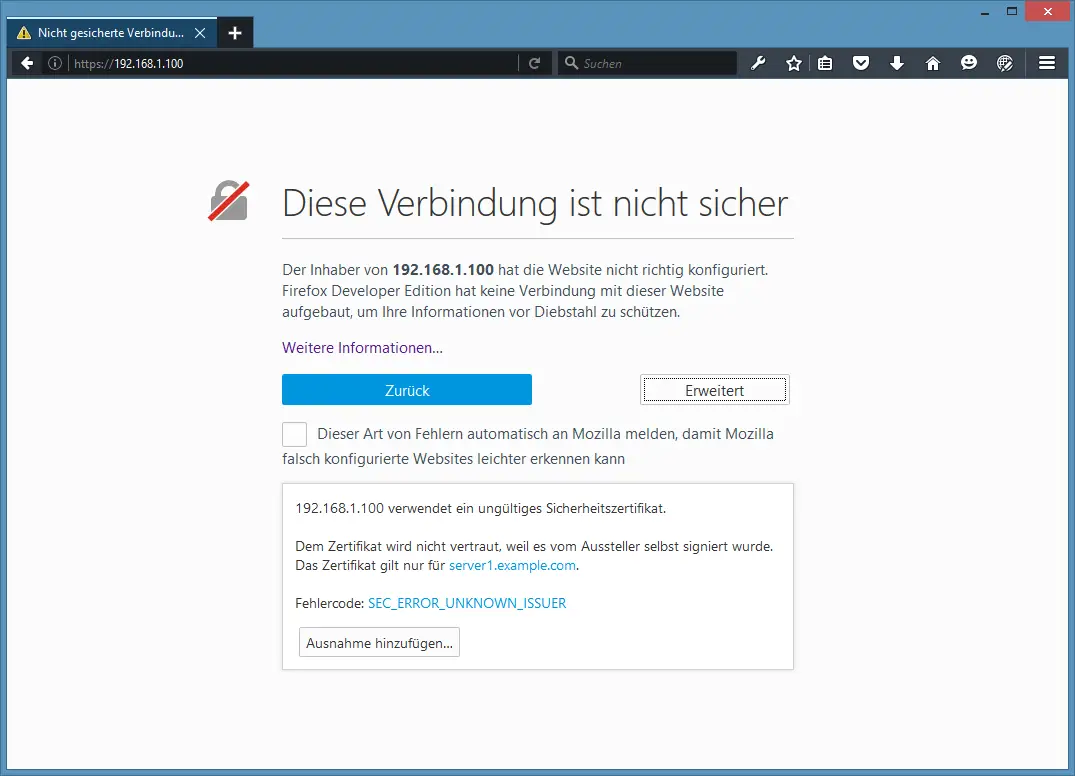
You will receive an SSL warning as the SSL certificate of the server is a "self-signed" SSL certificate, this means that the browser does not trust this certificate by default and you have to accept the security warning first. After accepting the warning, you will see the apache default page.

Apache default page in https mode.

The closed "Green Lock" in front of the URL in the browser shows that the connection is encrypted.

There are two ways to get rid of the SSL warning, either replace the self-signed SSL certificate /etc/ssl/certs/ssl-cert-snakeoil.pem with an officially signed SSL certificate that you buy from an SSL Authority or you get a free SSL certificate from Let's encrypt, which I will describe in chapter 8.

8. Get a free SSL Certificate from Let's Encrypt

The first step to secure the website with a Let's Encrypt SSL Certificate is to install the python-letsencrypt-apache package. Run the following command:

apt-get -y install python-letsencrypt-apache

In the next step, we will request an SSL cert from Let's Encrypt, during this process, the Let's Encrypt server tries to connect to your server trough the domain name that you provide to the letsencrypt command. It is important that this domain name points to your server in DNS already so that the website is reachable by its domain name on port 80 (http) already. If the website is not reachable from the internet, then the creation of the Let's Encrypt SSL certificate will fail.

Before we can start to create the SSL cert, set the domain name in the vhost configuration file. Open the default vhost file with an editor:

nano /etc/apache2/sites-available/000-default.conf

and add the line:

ServerName example.com

Right below the 'DocumentRoot' line. Replace example.com with the domain name of your own website.

Then create the SSL Certificate with this command:

letsencrypt --apache -d example.com

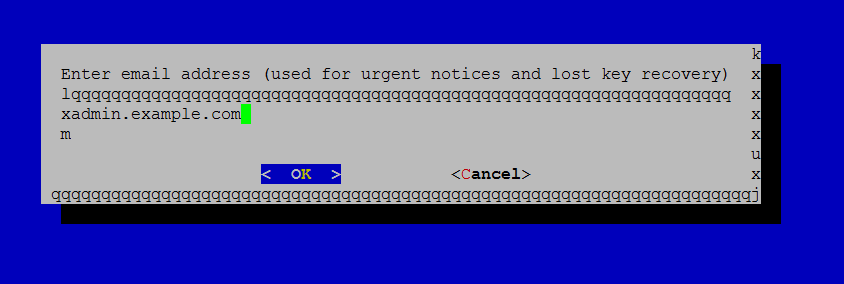
Replace example.com with your domain name here again. The command will start a wizard that asks you several questions.

Enter the email address where the administrator who is responsible for this website can be reached.

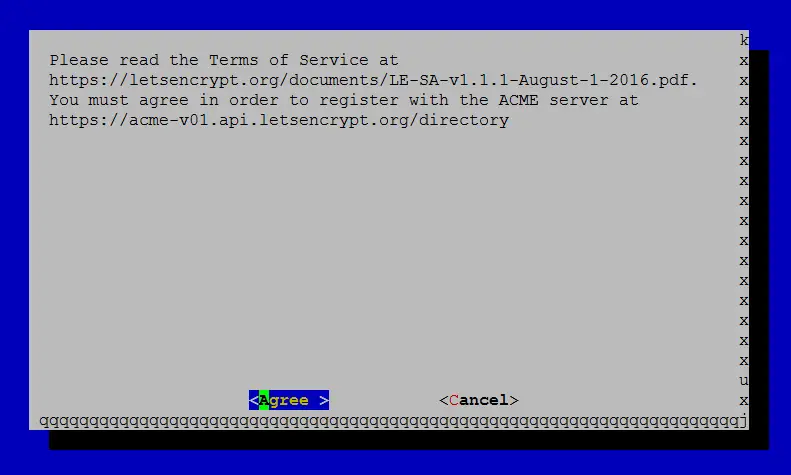
Accept the terms and conditions of the Let's Encrypt SSL authority.

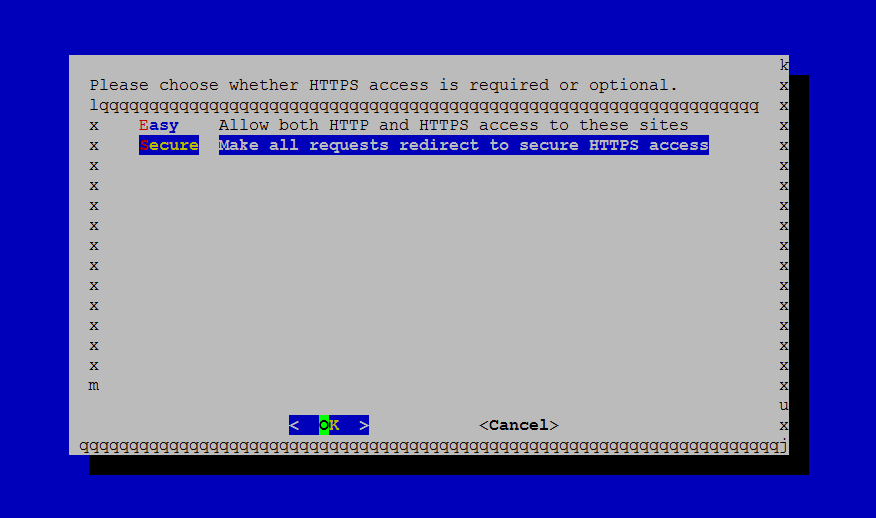
Choose if you want to redirect non-SSL requests to https:// automatically. I'll select yes here to avoid duplicate content problems when the website is available as http:// and https:// version.

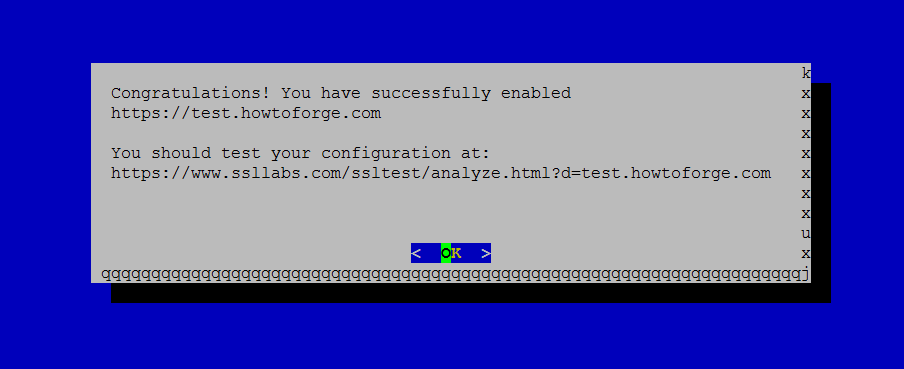
The SSL certificate has been issued successfully.

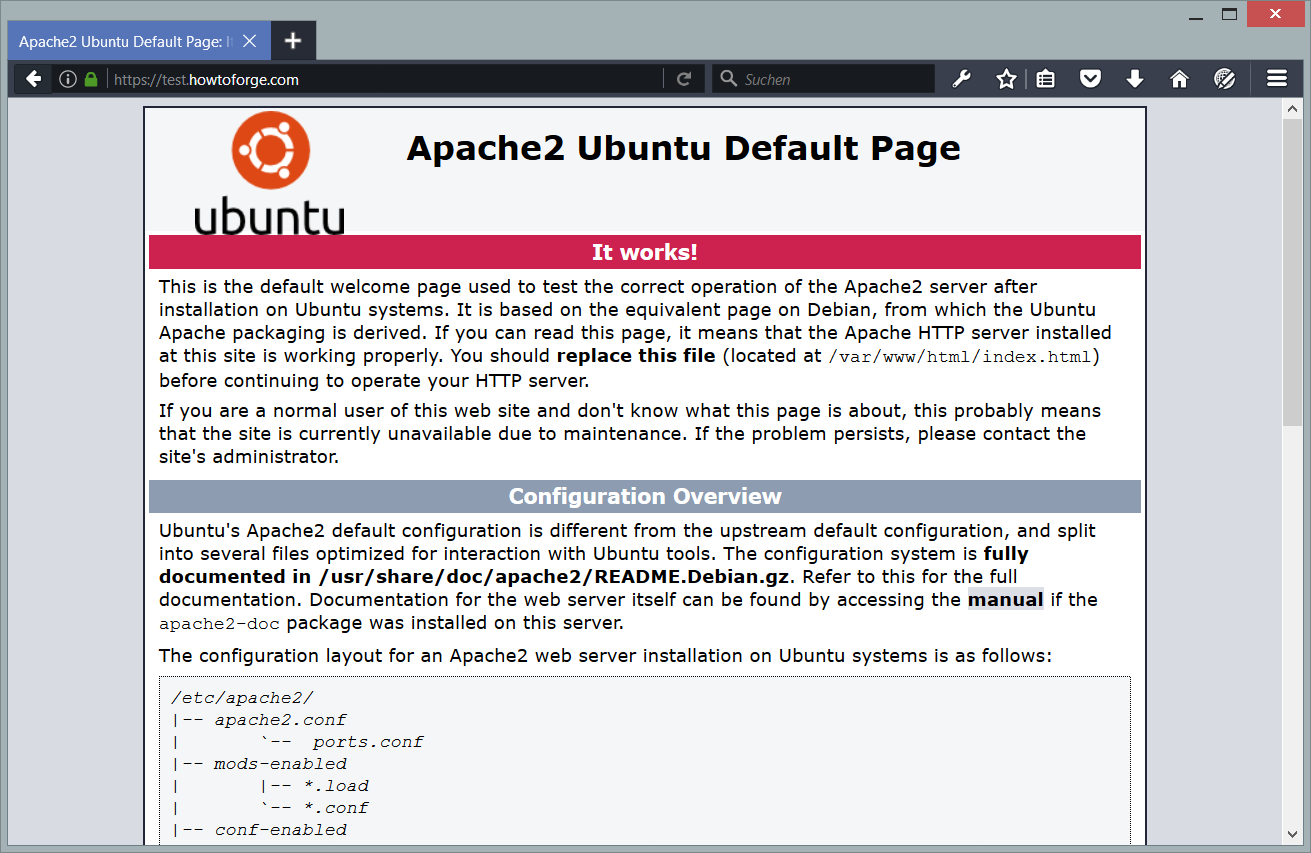
When you access the website now with a browser, you will get redirected automatically to SSL and the green lock in front of the URL bar in the browser shows that we are using a trusted SSL certificate now.

8.1 Let's encrypt Auto Renewal

Let's Encrypt SSL certificates are valid for a short period of 80 days only. Therefore we will setup a cronjob now to auto-renew the SSL certificate when necessary. The command is 'letsencrypt renew'.

Setup a cronjob for LE auto renewal. Run:

crontab -e

to open the root crontab in an editor. Insert the following line at the end of the file:

0 1 * * * /usr/bin/letsencrypt renew &> /dev/null

save the file, this will activate the cronjob. This cronjob will call the Let's Encrypt renew command every night at 1 am. The command will renew the SSL cert only when necessary (30 days before it expires), there is no problem to run it every night.

9. Install phpMyAdmin

phpMyAdmin is a web interface through which you can manage your MySQL databases. It's a good idea to install it:

apt-get -y install phpmyadmin

IMPORTANT: The apt installer will ask you several questions now, one of them is to select the web server type. A common mistake is that the web server type is just highlighted but not selected. To select an item in a apt menu you have to press the space bar on the keyboard after you navigated to the item with tab or cursor keys. Just highlighting it is not ennough!

You will see the following questions:

Web server to configure automatically: <-- Select the option: apache2
Configure database for phpmyadmin with dbconfig-common? <-- Yes
MySQL application password for phpmyadmin: <-- Press enter, apt will create a random password automatically.

9.1 Root access to PHPMyAdmin with MariaDB

The following step is required for MariaDB installations only, if you use MySQL 5.7, then skip this step.

MariaDB enables a plugin called "unix_socket" for the root user by default, this plugin prevents that the root user can log into PHPMyAdmin and that TCP connections to MySQL are working for the root user. To get a user with privileges to create other users and databases in PHPMyAdmin, I will create a new MySQL user with the name "admin" with the same privileges than the root user.

Login to the MySQL database as root user on the shell:

mysql -u root

Create a new user with the name "admin" and password "howtoforge". Replace the password "howtoforge" with a secure password in the commands below!

CREATE USER 'admin'@'localhost' IDENTIFIED BY 'howtoforge';
GRANT ALL PRIVILEGES ON *.* TO 'admin'@'localhost' WITH GRANT OPTION;
FLUSH PRIVILEGES;
exit

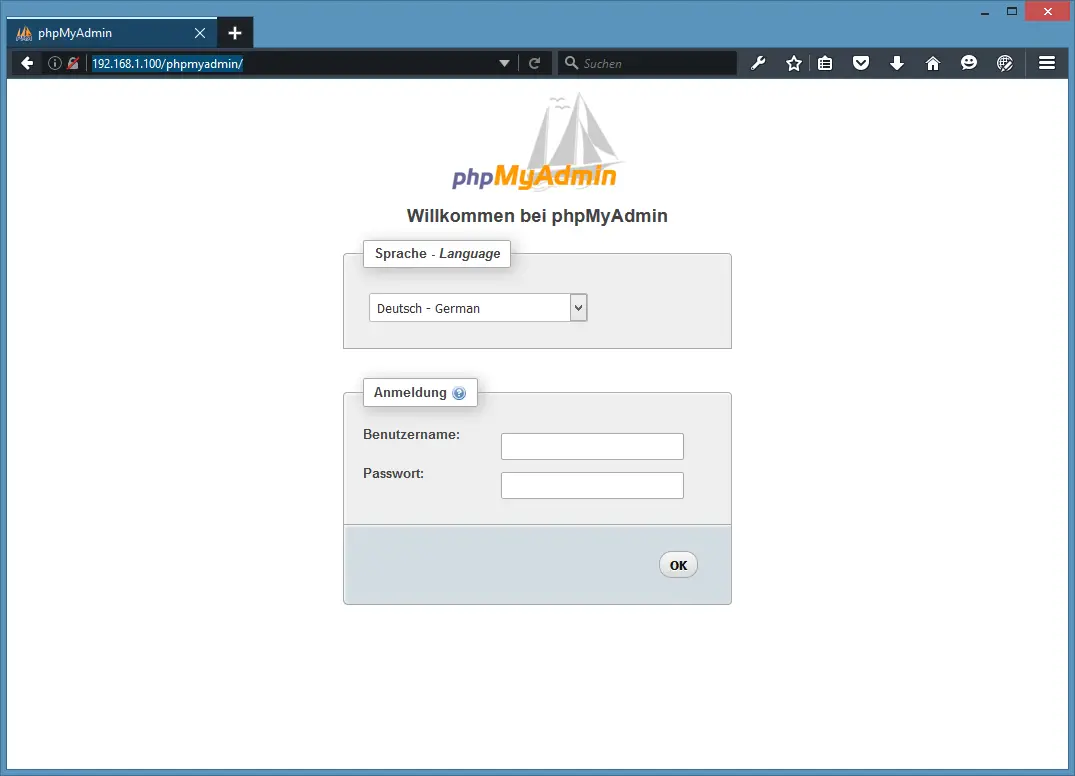
Afterward, you can access phpMyAdmin under http://192.168.1.100/phpmyadmin/:

Login to phpmyadmin

PHPMyAdmin

10 Virtual machine image download of this tutorial

This tutorial is available as ready to use virtual machine image in ovf/ova format that is compatible with VMWare and Virtualbox. The virtual machine image uses the following login details:

SSH / Shell Login

Username: administrator
Password: howtoforge

This user has sudo rights.

MySQL Login

Username: root
Password: howtoforge

The IP of the VM is 192.168.1.100, it can be changed in the file /etc/network/interfaces. Please change all the above passwords to secure the virtual machine.

Share this page:

163 Comment(s)

Add comment

Please register in our forum first to comment.

Comments

By: GainS

Thank you so much. Works perfectly.

By: J

Nice work, complete and worked perfectly first time.

By: Jeff Beam

excellent work thanks

By: Allen

WWWonderfuull!!!! :-)

By: christ noel

hello thanks for your tuto its works without problems thanks for the time spent by writting it its help someone like me

By: Tuan Anh Ha

Thank you very much! Vielen Dank für Ihre Hilfe!  

By: J.L. Barbry

Thank you to you for this tutorial which is very easy to use.Unfortunately, I get an error in the last step, after the installation of phpMyAdmin:The requested URL /phpmyadmin/ was not found on this server.

The same error with 127.0.1/phpmyadmin or localhost/phpmyadmin.

I tried 3 times to uninstall and reinstall without success.Pity that Ubuntu does not offer a LAMP package !

Best regards

By: till

Try to run:


dpkg-reconfigure phpmyadmin


and ensure that you select apache2 as config option. If no webserver config option is selected during phpmyadmin installation, then the alias to accessphpmyadmin does not get added to the apache config.

By: Gareth

Hi

You probably missed the fact that you need to put a mark in the selection of apache2 in the config. It definitely looks like it's selected it when the red box is in the selection thing, but unless you press space it won't mark it as selected and it won't configure it it for apache. Hope that makes sense?!

Cheers

Gareth

By: Sanros

Hi this work's for me, 

sudo cp /etc/phpmyadmin/apache.conf /etc/apache2/conf-enabled/phpmyadmin.conf


the solution comes from here: https://www.digitalocean.com/community/questions/i-cannot-access-phpmyadmin-on-ubuntu-14-04

By: Bob W

Followed the instructions with 16_04 and everything worked great up to phpMyAdmin.

I get the message:

ERROR 1045 (28000): Access denied for user 'root'@'localhost' (using         ? password: NO)

Uninstalled and tried again.

Still at a loss????

Other Ubuntu forum posts were for password: YES.

What should I check to solve this?

By: Daniel Whitney

I encountered the same issue, did you find a solution?

By: Adjustinthings

Also having this issue!

By: sruj

try this http://askubuntu.com/a/763359

By: abhijeet

Use this 

dpkg-reconfigure phpmyadmin

This is used for reconfiguring phpmyadmin, while reconfiguring  it will ask you for a username and password. This will be used for logging in.

By: Ness

This Works for me, only in the reconfigure question :

Configure database for phpmyadmin with dbconfig-common? <-- No

And it Phpmyadmin works with the MariaDB user and password. 

By: Seb

Try this. Fixed my issue in Ubuntu 16.10

http://askubuntu.com/questions/387062/how-to-solve-the-phpmyadmin-not-found-issue-after-upgrading-php-and-apache

By: DSmidge

Installing APCu is not necessary.

As it states on http://php.net/manual/en/intro.apcu.php: "APCu is APC stripped of opcode caching."

By: till

And that's exactly why we install APCu. For Opcode caching, we have already "Opcache" installed. But many software relies on the APC specific caching functions e.g. as a page cache and that's why we install APCu on top of Opcache, it adds the APC functions to PHP when Opcache is installed.

By: Simon Zalar

But in the article you wrote: "APCu is a free PHP opcode cacher for caching and optimizing PHP intermediate code. It is strongly recommended to have an Opcache installed to speed up your PHP page."

Which IMHO is not true. 

By: till

Did you ever benchmark PHP without an opcode cache (and yes, the Opcache extension in PHP 7 is also an opcode cache, so disable it when you want to test without an opcache) with a PHP version that runs an Opcode cache? And if yes, did you do that in real life scenarios like a WordPress website with caching plugins enabled? I did that for different PHP versions and that's why I recommend to install it. But you don't have to believe me of course, leave it out, your server will work without it. As a side note, many caching plugins in websites recognize APC and use its specific functions as internal cache, APCu emulates this for newer PHP versions, so just installing opcache without APCu will not make these options available for your site.

By: Simon Zalar

I think we all agree that opcode caches are great. The thing DSmidge pointed out is: "APCu is APC stripped of opcode caching." and I said that this page claims "APCu is a free PHP opcode cacher". 

By: FranzS

Thank you for the Tutorial! It is very awesome.

On Unbuntu 16.04 i get a failure message in /var/syslog if i take a closer look.

It seems that setting a secure password for root user will do create problems with mysqlcheck because the password ist not updated in /etc/mysql/debian.cnf

For details see:

http://askubuntu.com/questions/772785/16-04-mariadb-error-in-syslog-mysqlcheck

By: Clark

Thanks a lot spent hours trying to get my lamp running. I used mysql though :)

By: tom

Thanks, this helped getting my new dev server up and running :)

By: steve

I wonder if you can help. I have followed all you tutorial which is well presented. but I cannot access phpmyadmin. I also did not know where to add the last line in you tutorial about unix_socket.

i have reinstalled the phpmyadmin and ensure apache2 is the server to use. i have checked and included the following line to apache2.conf

Include /etc/phpmyadmin/apache.conf

but still no access. any help would be great thankyou

By: Dante Camacho

Thank you so much for this pice of cake!

By: Stephanie

Hi

I managed to install everything fine butwhen I tried to run info.php I got the following message:

Forbidden

You don't have permission to access / on this server.

Apache/2.4.18 (Ubuntu) Server at localhost Port 80 Here are the document root file permissions:[email protected]:/var/www/html# ls -ltotal 16-rw-r--r-- 1 root     root     11321 May 20 00:56 index.html-rw-r--r-- 1 www-data www-data    35 May 20 01:55 [email protected]:/var/www/html#


By: Andriy

Amazing! Thank you for this great tutorial.

By: stefano giacomini

excellent work thanks!

By: Bibot

It says "ERROR 1046(3D000) at line 1: No database selected"

By: otis

Not Found

The requested URL /phpmyadmin was not found on this server.

Apache/2.4.18 (Ubuntu) Server at localhost Port 80  i have a problem to access on phpmyadmin i don't know why, i've followed perfectly this tuto, please could you help me?

By: till

You missed to enable phpmyadmin for apache (as described in the tutorail). You can redo the step by running:


dpkg-reconfigure phpmyadmin


then ensure that apache 2 is selected, there must show a cross for the apache option which gets enabled with the whitespace key of your keyboard. If no cross is shown there, then apache is not active for phpmyadmin and you wont be able to reach it then!

By: Ed

Hi,


Thanks, but Apache 2.4 is valuable with the event module enabled, and ISPConfig won't work with it - it insists on using morker right?  Can't you change this so we can use the much better event, please? Thanks

By: till

ISPConfig does not depend on a specific apache mode, you just will not be able to use the mod_php mode in ispconfig in worker mode.

By: Carlos Guena

Thank you for this great tutorial! Everything works perfect but phpmyadmin. I got:

"Not FoundThe requested URL /phpmyadmin was not found on this server.Apache/2.4.18 (Ubuntu) Server at 104.154.46.68 Port 80"

Could you help me? Any idea? Thanks.


By: Carlos Guena

 Solved "The requested URL /phpmyadmin/ was not found on this server." :

sudo ln -s /etc/phpmyadmin/apache.conf /etc/apache2/conf-available/phpmyadmin.conf

sudo ln -s /usr/share/phpmyadmin /var/www/html/phpmyadmin

sudo service apache2 restart

By: edmar

Você é o melhor perfeito funcionando redondo.

Obrigado

By: Luis

At last, thanks...

By: Rafael

Muitissimo obrigado.

thx!!!

By: Wolfgang Bartsch

Vielen Dank für dieses Howto. Es hat mir sehr geholfen, da ich wirklich Probleme hatte phpmyadmin zum laufen zu kriegen. Aber nun ist wieder alles so wie sein soll


Many thanks

wolfgang

By: Wolfgang Bartsch

Thank you this howto is perfect. I used it on Linux Mint 18

greets wolfgang


By: carlos moreno


muchas gracias después de estar buscando como un loco y no poder andar el phpmyadmin, parece ser que por este método no da problemas.


solo quedaría para terminar tu tutorial agregar al final


/etc/apache2/apache2.conf agregando: Include /etc/phpmyadmin/apache.conf


para que funcione phpmyadmin


y nada mas. muy buen tutorial


By: Paul

Excellent guide, thank you very much!

Just one remark, with a local install on Xubuntu the address 192.168.1.100 does not work, but http://localhost does (and consequently localhost/info.php and localhost/phpmyadmin)

Suggestion: tell the user that the inlog name for the phpmyadmin page is root and the password is the one for MariaDB. That was not clear to me at first sight, because we just installed several software packages!

Thanks again for your work,

Paul.

By: Jrarr

Thanks for this comment Paul, it didn't work on 16.04 until I typed this. Just not sure how to interpret your fix for this.

By: James

Whole installation went fine except as others I had issues with the phpmyadmin install: The requested URL /phpmyadmin/ was not found on this server.

It was the firewall with me the command to fix was sudo ufw allow in "Apache Full"

By: Sven

Supppper!

By: Michael Cooper

Hello Guys,

       Everything works except the https: (SSL) not sure why I followed it to the letter, I will be troubleshooting until I figure it out.


Thanks,

By: ladjailia

Thanks

By: Mikiya

Nice tutorial, thanks ^_^

By: AdminOnmint

 Thank you mate for this post.... I upgraded my system to Mint 18 and had some buggs. after reviewing this post, it has solved the issue I had.

By: Larry Robinson

I have followed your instruction, and rechecked all, but can not get any responce for info.php...All I get is a blank page...I have the ports 80 and 443 open in firewalld...Hope you can help.

By: zcong

thanks very mych , it makes work easily!!

By: Marco

Impeccabile, installazione perfetta, semplice e funzionale

Grazie per il VS ottimo lavoro

By: Benedict Poppe

Very nice article, works perfectly :)

By: Pablo Menezes

Perfect Tutorial , Thanks!!!

By: DanielS

Flawless Victory!

By: Ram

Thanks so much.  This has helped me a lot!

By: Lennon Castro

It works fine!

By: William Vasquez

Excelente post. todo funciona casi a la perfeccion, me gusto la colaboracion colocada, me falta hace multiple dominios para diferentes hosting hay ire dandome golpes de pecho.!

By: cong nguyen

wow. it's work ! thanks so much

By: Juan carlos

muy valiosa la información, gracias por este aporte

By: vic

Thank you!!

By: natzdc

Tnx for a very detailed STEPS: just need help

: I got everything done, but I just got some few errors:

1. [email protected]:/home/hive# a2ensite dafault-ssl    ERROR: Site dafault-ssl does not exist!

- https not working

2.  "Connection for controluser as defined in your configuration failed."


By: Sidi4

This is really gtate tutorial - the that you can folow and it works.

Even I had an issues with phpmyadmin, but was able quicly to fix it with

sudo ln -s /etc/phpmyadmin/apache.conf /etc/apache2/conf-available/phpmyadmin.conf sudo a2enconf phpmyadmin.conf sudo service apache2 reload

If I may request to make a tutoreal or just explain (anyone) how to "Install PHP 7 with zts."

I'm really having a hard time to find any information about it.

I need ZTS for "pecl install pthreads".


By: Sidi4

This is really great tutorial - the that you can follow and it works.

Even I had an issue with phpmyadmin, but was able quickly to fix it with

sudo ln -s /etc/phpmyadmin/apache.conf /etc/apache2/conf-available/phpmyadmin.conf sudo a2enconf phpmyadmin.conf sudo service apache2 reload

If I may request to make a tutoreal or just explain (anyone) how to "Install PHP 7 with zts."

I'm really having a hard time to find any information about it.

I need ZTS for "pecl install pthreads".


By: shijin

Wonderfull Document... helped me a lot....

Only one issue faced: phpmyadmin is not working after I installed it . I did following and its woked like a charm!!!..

vi  /etc/apache2/apache2.conf

Then add the following line to the end of the file.

Include /etc/phpmyadmin/apache.conf

Then restart apache

/etc/init.d/apache2 restart


By: erama

It is possible add SpeedPage module to this configuration, and this is convenient?Thank you so much!. 

By: kevin

so where do i find the bind-address so I can let my remote server connect to the database? can this be done in phpmyadmin?  

By: peter

Excellent tutorial. Did the install in less than 10 mins.

Danke

By: Per Löwgren

Excellent! Thanks!

By: Gabor

Thank you for your great article, helped me to a lot. Now I have a fast development computer.

In my case http://localhost worked instead of IP address, and I also get an 404 Error on phpmyadmin but as Carlos Guena suggested, this three line of command solved the problem:

ln -s /etc/phpmyadmin/apache.conf /etc/apache2/conf-available/phpmyadmin.confln -s /usr/share/phpmyadmin /var/www/html/phpmyadminservice apache2 restart


By: Renato Leal

Thanks! You are man!

By: netto

OMG! Perfectly Documented! Thanks a lot!

By: Eric Wood

I receive an error message when trying to access 192.168.0.230/php.info, the browser will not access the page. What am I doing wrong? 

By: Eric W

I am having issues accessing php.info and the echo command involving disabling the unix_socket. It is showing an issue with the word priviledges.

By: John Perczyk

Absolutely perfect and just what I was looking for.

Much easier than most other websites that take you through convulted twists and turns to get this to work.

By: Eric W

Still having issues with php.info but figured out unix_socket. Whenever I try to access phpmyadmin I get nothing but a bunch of text. Why does it appear I'm getting code and not phpmyadmin?


By: Raimehn Roger

It Works perfectly thanks..

By: Chato

Excellent tutorial bro, It works!

By: Yudi Andela

Thanks for this excellent article.

And it works very well

By: JuanGuillermo

Thank you so much. Works perfectly....

Buen tutorial funciona perfectamente ... muchas gracias

By: GreyWolf

Great tutorial, thank you. I did get stuck trying to log in to phpMyAdmin however the comment from till was spot on. It might be worth editing the guide to ensure a password is entered and not randomly generated or add a section for adding a mysql user to avoid being locked out of mysql completely.

By: charlie

Thank you very much , awesome tutorial great job

By: DanB

Just a not that these directions also work well on 16-10!

By: jay

The title says that this tutorial is for 16.04 and not for Ubuntu 16.10. But I'm sure that howtoforge will post a tutorial for 16.10 soon as usual. For servers it is better to use a LTS version like Ubuntu 16.04 anyway.

By: Kasalop

Hi,

the new package names are:

php7.0-memcached instead of php-memcache (btw: the d is missing in the statement above)

php7.0-imagick instead of php-imagick


thanks for this very well tutorial!

regards, Kasalop

By: Jan

Great tutorial, if someone would make a script for this, it would be amazing! And just a note about the last part of the tutorial - phpmyadmin. If you cant reach the phpmyadmin after you've done all the steps,  then you should add Include /etc/phpmyadmin/apache.conf to  the /etc/apache2/apache2.conf file and restart the service.

By: John

Thank you so much. Clearly explained.

By: Yon

I had so many issues, untill I came accross this, worked flawlessly. Thank you for making the world a better place!

By: avanerie

I have followed your instructions, but after:

> Now we set a root password for MariaDB.


mysql_secure_installation


> You will be asked these questions:

> Enter current password for root (enter for none): <-- press enter

I can't set a root password. After pressing enter it says:

>  Access denied for user 'root'@'localhost' (using password: NO)

So I can't make changes.

Can anyone help?


By: Jorge

Thank you, all steps worked perfectly.

By: Yann Lehmann

Thank you so much for this tutorial.

I have been using it on several servers, and it worked every time.

By: Alain Bex

Great manual.

One of the few manuals where everything works as explained.And where the explanations is complete! Fantastic job.

1 improvement : to lging in phpadmin : to use the username root

By: John (almostgem)

 Great tutorial. I too had the issue where phpmyadmin wasn't found, but going through the comments helped me resolve. I swear it "looks" like apache2 is selected. Pressing the spacebar showed my what I was missing. Thanks everyone, and once again, thanks for a great tutorial !

By: Ahmet

Excellent!!!

By: Hector

hi, 

i'm work whith ubuntu server 16.10 and I have problems when I want to login to phpmyadmin I get that the page was not found

what can i do?

please help

By: Dennis Holmes

Great guide! Got everything set up in less than 10 mins. THANK YOU!

By: fryser

In 10 years of bullshit, this is one of the most well written tutorial.

Good job bro!!

By: Chris G

Probably not the best solution but it worked for me..

I removed the root password,

SET PASSWORD FOR [email protected]=PASSWORD('');

dpkg-reconfigure phpmyadmin

then reset the root password.

By: Manelma

Execellent tutoriual!!!

Only is necessary to add the simbolic link from phpmyadmin to apache2

sudo /etc/init.d/apache2 reload


Thanks you 

By: Thaalinda

Thank you very much for this tutorial and some time we can't goto the phpmyadmin so have to create a link 

sudo ln -s /usr/share/phpmyadmin /var/www/html/ 

By: till

I'll cite the comment from Gareth which explains what you did wrong during installation:


Hi

You probably missed the fact that you need to put a mark in the selection of apache2 in the config. It definitely looks like it's selected it when the red box is in the selection thing, but unless you press space it won't mark it as selected and it won't configure it it for apache. Hope that makes sense?!

Cheers

Gareth

By: Felix Schilling

Such a nice job.

Thanks so much

Best tutorial i ever read

By: Drew

Very clear and precise - terminal commands worked perfect

Hope loading Wordpress goes as smooth 

Thank you  

By: carlos

Very useful!! Congra.! . I had a problem after installed phpmyadmin and I solved with the following command: sudo ln -s /usr/share/phpmyadmin/ /var/www/html/phpmyadmin

By: till

This has been explained several times in the comments, you missed to enable the apache option during PHPMyAdmin install when the PHPMyAdmin installer asked for which server the program shall be enabled (as explained in the tutorial).

By: Stantoch

Thanks Sidi4. You're a god among men. May your days be long.

Gracias

By: Ashlee

Had an issue with 404 error trying to connect to phpmyadmin.  Was fixed with a symlink:

ln -s /usr/share/phpmyadmin /var/www/html/phpmyadmin

after that it worked but I am not sure if this would be considered best practice or if there is a better way to fix the issue.


By: Sydul Islam Mazumder

Really you saved my day. Thanks mam. I love you. May Allah be with you. :)

By: Jeff Conno

Hi, This is my first time using linux. when following your tutorial (which is great btw) I have noticed that when you open up info.php for the first time you have a gui type interface. I am only getting a txt read out. I have tried googling the issue but It must be something basic ive missed becuase I can't find anything close to an answer. any help would be great. thanks

By: joaquim

Thanks very much, it works great...

By: Jahaziel Ojeda

Gracias por tu aporte, por los paquetes actualizados que manejas....espero publiques mas articulos sobre linux...me fue de gran utilidad...thanks

By: Thomas

Thanks, It works, thanks for sharing

By: Chuy

Thanks, it works like a charm!

By: jim

Thanks :)

By: Rootfuchs

After installing phpmyadmin i get 404.Solution:$ nano /etc/apache2/apache2.conf and add this line:

Include /etc/phpmyadmin/apache.conf

By: Jan

I must say - PERFECT, thanks a lot.

By: Jaba1a

Hello very good description, thank you.

Is it possible to extend this description about to: How can use virtual hosts by using Lets Encrypt to set up multiple web pages, such as Joomla and Wordpress on the same Webserver?

That would be great.

Thank You

By: argy

It s a wonderful article for us that we are trying to start with ubuntu!

By: Erik

Everything went well up to point 9.1

I can't get the root acces to work. And when I'm logged in phpmyadmin I've got no privileges to create a DB.

Ideas anyone?

By: George

Geat Job.Thanks so much.

By: Eduardo

Excelente!!!

By: Matt

Awesome tutuorial

Where can I get the virtual machine image of this?

By: till

The download link is in the upper right menu.

By: freemoth

Such a great tutorial. Thank you for such clear instructions!

I did have an issue accessing phpmyadmin but http://askubuntu.com/questions/387062/how-to-solve-the-phpmyadmin-not-found-issue-after-upgrading-php-and-apache from comments fixed that.

Thanks again!

By: Ely

Thank you! It works like a charm!

By: Remo

Cool work....... everything works like a charme....

many thanks for your help

By: Matt

This was a fantastic tutorial. Thank you for you time and effor it took to get this up!!!

My system is working fantastic now.

By: Anthony Britton

Thank you

By: Bruno

Great work man...thanks and keep going!!

By: Bappy

How can I remove everything and start over the entire process? 

By: Bernie

Brilliant tutorial! The only missing thing is in section 8 right after installing a certificate, one have to restart service in order to be able to see with browser successfully SSLized ubuntu default page. The rest is just awesome piece of work and helps flawlessly install everything. Many thanks!

By: Amr Bedair

Thank you for this great detaild step by step, this is my first time to config a server, and it really reall helped alot

Thanks again

,

Amr

By: Eric Wheeler

I have followed this tutuorial and get this error message after completing step 4 

Error establishing a database connection (http://localhost/index.php)

I'm trying to setup an LAMP environment to view websites I built that are no longer online

I'm on Peppermintos 4.4.0-97-generic

By: develop

It works!

By: Queryn

PERFECT! NICE!

By: Javier

 Good ... How are you where I can download the virtual machine?


Thank you so much


regards

By: till

By clicking on the download link right below the big red download icon in the menu, left side at the top.

By: matt

QUALITY MY SON

By: Vinoth C

Can we directly proceed with step 1.2?

By: A.vann

Thanks mate, very helpful and very well explained ;)

By: Jerson Martínez

Excelente documentación. Agradecido contigo. ¡Saludos!

By: Robert

Inciiailmente parece muito bom! Obrigado!!

By: MIchael Coyle

Always the best tutorials. I just did this on Ubuntu 17.10 and the only change I needed to make was changing the php version from 7.0 to 7.1.  Thanks for the hard work.

By: Pedro

Perfect! thank you so much

By: LordWard

Simplemente perfecto. Sencillo y muy bien explicado. Gracias!!

By: LordWard

Se deben añadir permisos a /var/www/html

sudo chown root:root -R /var/www/sudo chmod 777 -R /var/www/

Gracias de nuevo

By: Jimmy Enriquez

Hi, I need change the default port for MySQL or MariaDB, how to this change, I try editing /etc/mysql/my.cnf but no view the options.

By: Ivan Ivanov

Wow bro well done well done ,perfect work works without a glich :)

By: Yuri Madou

I followed your tutorial and i get the following error when i want to get the certificate from letsencrypt:

Client does not support any combination of challenges that will satisfy the CA.

Can you help me please?

Thanks in advance,Yuri Madou

By: camoay

Excellent tutorial, clear, tested and that works the first time. Many thanks

By: Rafael Ferri

THANK YOU! You guys saved my life. I was getting PDOException error and I figured out that nothing I had done worked, so I followed your tutorial and instead of mariaDB I used mySql. Works like a charm! Lov ya

By: Jimit Shah

Thanks a lot , Its works perfectly on ubuntu 16.04 LTS.One of the best article in the internet !!!

By: RD

how can i do this with the DB server is separate from the rest of them? how is the configuration?

By: lzy

Use these commands:

sudo mysql -p -u root

SET GLOBAL validate_password_policy = 0;//where always be ignored.

CREATE USER 'admin'@'localhost' IDENTIFIED BY 'howtoforge';

GRANT ALL PRIVILEGES ON *.* TO 'admin'@'localhost' WITH GRANT OPTION;

FLUSH PRIVILEGES;

exit

By: AshM

Clear and precise instructions, works perfectly from start to end! I got HTTPS:// working. Many thanks!   

By: vijay

Thanx man been stuck in for a while serving the data from db using php. This tutorila helped a lot....Appreciated

By: john

how did you get the HTTPS://  working ?

By: Abhijeet

How I can get ready to use a virtual machine image for ubuntu?

By: till

The download link is in the menu on the right side of the page, near the top, right below the big red download icon.

By: cristian aguayo

Gracias super claro...!