How to Install Snipe-IT Asset Management Software on Debian 9
Snipe-IT is a free and open source IT assets management web application that can be used for tracking licenses, accessories, consumables, and components. It is written in PHP language and uses MySQL to store its data. It is a cross-platform application that works on all the major operating system like, Linux, Windows and Mac OS X. It easily integrates with Active Directory, LDAP and supports two-factor authentication with Google Authenticator.
In this tutorial, we will learn how to install Snipe-IT on Debian 9 server.
Requirements
- A server running Debian 9.
- A non-root user with sudo privileges.
Getting Started
Before installing any packages, it is recommended to update the system package with the latest version. You can do this by running the following command:
sudo apt-get update -y
sudo apt-get upgrade -y
Next, restart the system to apply all the updates. Then install other required packages with the following command:
sudo apt-get install git curl unzip wget -y
Once all the packages are installed, you can proceed to the next step.
Install LAMP Server
Snipe-IT runs on Apache web server, so you will need to install LAMP (Apache, MariaDB, PHP) to your system.
First, install Apache, PHP and other PHP libraries with the following command:
sudo apt-get install apache2 libapache2-mod-php php php-pdo php-mbstring php-tokenizer php-curl php-mysql php-ldap php-zip php-fileinfo php-gd php-dom php-mcrypt php-bcmath -y
Once all the packages are installed, start Apache service and enable it to start on boot with the following command:
sudo systemctl start apache2
sudo systemctl enable apache2
Install and Configure MariaDB
Snipe-IT uses MariaDB to store its data. So you will need to install MariaDB to your system. By default, the latest version of the MariaDB is not available in the Debian 9 repository. So you will need to install MariaDB repository to your system.
First, add the APT key with the following command:
sudo apt-get install software-properties-common dirmngr -y
sudo apt-key adv --recv-keys --keyserver keyserver.ubuntu.com 0xF1656F24C74CD1D8
Next, add the MariaDB repository using the following command:
sudo add-apt-repository 'deb [arch=amd64,i386,ppc64el] http://ftp.hosteurope.de/mirror/mariadb.org/repo/10.1/debian stretch main'
Next, update the repository with the following command:
sudo apt-get update -y
Once the repository is updated, you can install MariaDB with the following command:
sudo apt-get install mariadb-server mariadb-client -y
Next, start the MariaDB service and enable it to start on boot time with the following command:
sudo systemctl start mysql
sudo systemctl enable mysql
You can check the status of MariaDB server with the following command:
sudo systemctl status mysql
If everything is fine, you should see the following output:
? mariadb.service - MariaDB database server
   Loaded: loaded (/lib/systemd/system/mariadb.service; enabled; vendor preset: enabled)
   Active: active (running) since Mon 2017-12-25 08:41:25 EST; 29min ago
  Process: 618 ExecStartPost=/bin/sh -c systemctl unset-environment _WSREP_START_POSITION (code=exited, status=0/SUCCESS)
  Process: 615 ExecStartPost=/etc/mysql/debian-start (code=exited, status=0/SUCCESS)
  Process: 436 ExecStartPre=/bin/sh -c [ ! -e /usr/bin/galera_recovery ] && VAR= ||   VAR=`/usr/bin/galera_recovery`; [ $? -eq 0 ]   && systemc
  Process: 429 ExecStartPre=/bin/sh -c systemctl unset-environment _WSREP_START_POSITION (code=exited, status=0/SUCCESS)
  Process: 418 ExecStartPre=/usr/bin/install -m 755 -o mysql -g root -d /var/run/mysqld (code=exited, status=0/SUCCESS)
 Main PID: 574 (mysqld)
   Status: "Taking your SQL requests now..."
    Tasks: 27 (limit: 4915)
   CGroup: /system.slice/mariadb.service
           ??574 /usr/sbin/mysqld

Dec 25 08:41:07 debian systemd[1]: Starting MariaDB database server...
Dec 25 08:41:14 debian mysqld[574]: 2017-12-25  8:41:14 140488893776448 [Note] /usr/sbin/mysqld (mysqld 10.1.26-MariaDB-0+deb9u1) starting as p
Dec 25 08:41:25 debian systemd[1]: Started MariaDB database server.
Next, secure your MariaDB by running the following script:
sudo mysql_secure_installation
Answer all the questions as shown below:
Set root password? [Y/n] n
Remove anonymous users? [Y/n] y
Disallow root login remotely? [Y/n] y
Remove test database and access to it? [Y/n] y
Reload privilege tables now? [Y/n] y
Once MariaDB is secured, log in to MariaDB shell with the following command:
mysql -u root -p
Enter your root password when prompt, then create a database for Snipe-IT with the following command:
MariaDB [(none)]> create database snipeitdb character set utf8;
Next, create a user for Snipe-IT and grant all privileges to the Snipe-IT with the following command:
MariaDB [(none)]> GRANT ALL PRIVILEGES ON snipeitdb.* TO 'snipeit'@'localhost' IDENTIFIED BY 'password';
Next, flush the privileges with the following command:
MariaDB [(none)]> flush privileges;
Finally, exit from the MariaDB console using the following command:
MariaDB [(none)]> quit
Install Snipe-IT
You can download the latest version of the Snipe-IT from Git repository with the following command:
git clone https://github.com/snipe/snipe-it snipe-it
Next, move the downloaded directory to the apache root directory with the following command:
sudo mv snipe-it /var/www/
Next, you will need to install Composer to your system. You can install it with the following command:
curl -sS https://getcomposer.org/installer | php
sudo mv composer.phar /usr/local/bin/composer
Next, change the directory to snipe-it and Install PHP dependencies using Composer with the following command:
cd /var/www/snipe-it
sudo composer install --no-dev --prefer-source
Next, generate the "APP_Key" with the following command:
sudo php artisan key:generate
You should see the following output:
**************************************
*     Application In Production!     *
**************************************

 Do you really wish to run this command? (yes/no) [no]:
 > yes

Application key [base64:uWh7O0/TOV10asWpzHc0DH1dOxJHprnZw2kSOnbBXww=] set successfully.
Next, you will need to populate MySQL with Snipe-IT's default database schema. You can do this by running the following command:
sudo php artisan migrate
Type yes, when prompted to confirm that you want to perform the migration:
**************************************
*     Application In Production!     *
**************************************

 Do you really wish to run this command? (yes/no) [no]:
 > yes

Migration table created successfully.
Next, copy sample .env file and make some changes in it:
sudo cp .env.example .env
sudo nano .env
Change the following lines:
APP_URL=http://example.com
APP_TIMEZONE=US/Eastern
APP_LOCALE=en

# --------------------------------------------
# REQUIRED: DATABASE SETTINGS
# --------------------------------------------
DB_CONNECTION=mysql
DB_HOST=localhost
DB_DATABASE=snipeitdb
DB_USERNAME=snipeit
DB_PASSWORD=password
DB_PREFIX=null
DB_DUMP_PATH='/usr/bin'
Save and close the file when you are finished.
Next, provide the appropriate ownership and file permissions with the following command:
sudo chown -R www-data:www-data storage public/uploads
sudo chmod -R 755 storage public/uploads
Configure Apache For Snipe-IT
Next, you will need to create an apache virtual host directive for Snipe-IT. You can do this by creating snipeit.conf file inside /etc/apache2/sites-available directory:
sudo nano /etc/apache2/sites-available/snipeit.conf
Add the following lines:
<VirtualHost *:80>
ServerAdmin [email protected]
<Directory /var/www/snipe-it/public>
        Require all granted
        AllowOverride All
   </Directory>
    DocumentRoot /var/www/snipe-it/public
    ServerName example.com
        ErrorLog /var/log/apache2/snipeIT.error.log
        CustomLog /var/log/apache2/access.log combined
</VirtualHost>
Save and close the file when you are finished. Then, enable virtual host with the following command:
sudo a2ensite snipeit.conf
Next, enable PHP mcrypt, mbstring module and Apache rewrite module with the following command:
sudo phpenmod mcrypt
sudo phpenmod mbstring
sudo a2enmod rewrite
Finally, restart apache web server to apply all the changes:
sudo systemctl restart apache2
Configure Firewall
By default, Snipe-IT runs on port 80, so you will need to allow port 80 through the firewall. By default, UFW firewall is not installed in Debian 9, so you will need to install it first. You can install it by just running the following command:
sudo apt-get install ufw -y
Once UFW is installed, enable it to start on boot time with the following command:
sudo ufw enable
Next, allow port 80 using the following command:
sudo ufw allow 80
Next, reload the UFW firewall rule with the following command:
sudo ufw reload
Access Snipe-IT
Everything is now installed and configured, it's time to access Snipe-IT web interface.
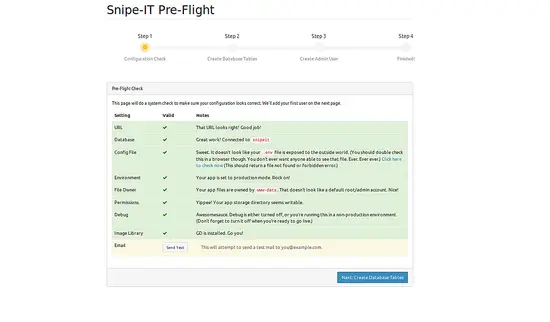
Open your web browser and type the http://example.com URL, you will be redirected to the following page:
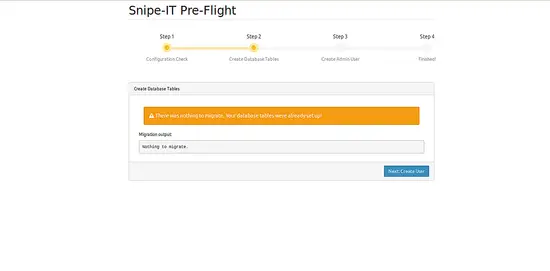
The above page will do a system check to make sure your configuration looks correct. Next, click on the Create Database Table button you should see the following page:
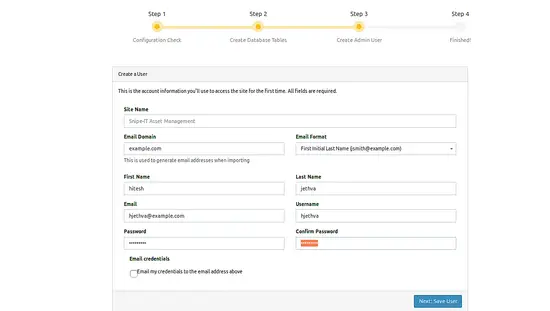
Here, click on the Create User page, you should see the following page:
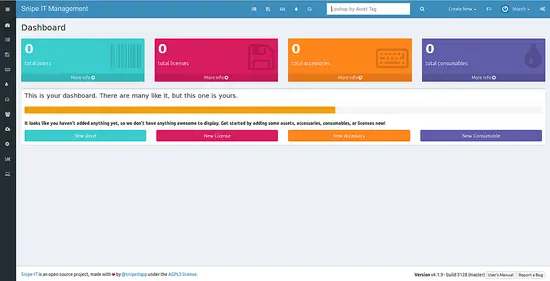
Here, provide your Site name, Domain name, Admin username, and password, then click on the Save User button, you should see the Snipe-IT default dashboard as below:
Conclusion
In the above tutorial, we have learned to install Snipe-IT on Debian 9 server. We have also learned to configure Snipe-IT through web interface.I hope you have now enough knowledge to deploy Snipe-IT in your production environment. For more information you can refer Snipe-IT Documentation Page.


