How to Install OpenVPN Server and Client with Easy-RSA 3 on CentOS 8
This tutorial exists for these OS versions
- CentOS 8
- CentOS 7.6
- CentOS 7
On this page
OpenVPN is an open-source application that allows you to create a secure private network over the public internet. OpenVPN implements a virtual private network (VPN) to create a secure connection. OpenVPN uses the OpenSSL library to provide encryption and it provides several authentication mechanisms, such as certificate-based, pre-shared keys, and username/password authentication.
In this tutorial, we will show you how to step-by-step install and configure OpenVPN on CentOS 8 Server. And we will implement the certificate-based OpenVPN authentication.
Prerequisites
- CentOS 8 Server
- Root privileges
What we will do?
- Install OpenVPN and Easy-RSA
- Configure Easy-RSA 3 Vars
- Build OpenVPN Keys
- Configure OpenVPN Server
- Configure Firewalld and Enable Port Forwarding
- Client Setup
- Testing
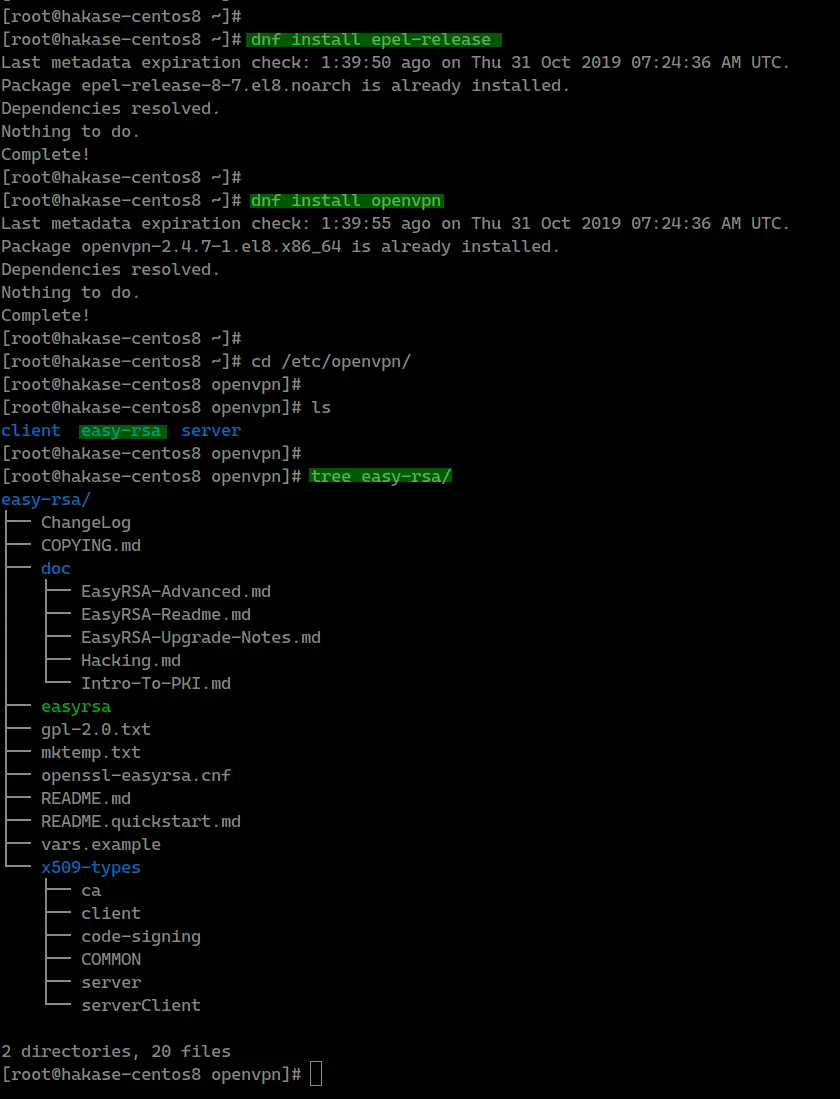
Step 1 - Install OpenVPN and Easy-RSA
Firstly, we're going to add the EPEL (Extra Package for Enterprise Linux) repository and install the latest OpenVPN package and download the easy-rsa script to the CentOS 8 system.
Install the EPEL repository using the dnf command below.
dnf install epel-release
After that, install the latest OpenVPN package 2.4.7.
dnf install openvpn
Once the installation is complete, go to the '/etc/openvpn' and download the easy-rsa script using the wget command below.
cd /etc/openvpn/
wget https://github.com/OpenVPN/easy-rsa/releases/download/v3.0.6/EasyRSA-unix-v3.0.6.tgz
Now extract the 'EasyRSA-unix-v3.0.6.tgz' file and rename the directory to 'easy-rsa'.
tar -xf EasyRSA-unix-v3.0.6.tgz
mv EasyRSA-v3.0.6/ easy-rsa/; rm -f EasyRSA-unix-v3.0.6.tgz
The OpenVPN package and easy-rsa script have been installed on the CentOS 8 system.
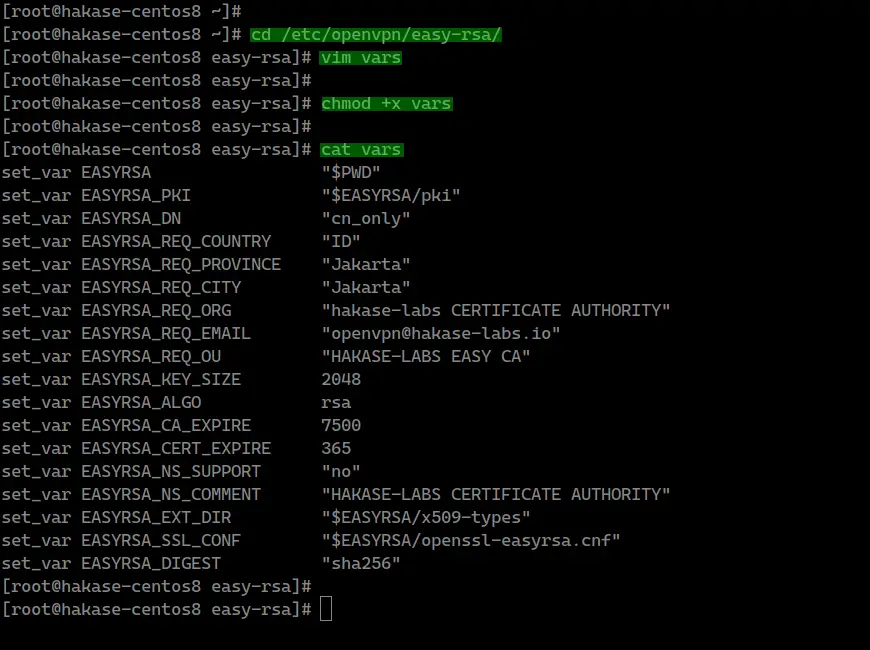
Step 2 - Configure Easy-RSA 3
In this step, we will configure easy-rsa 3 by creating a new 'vars' file. The 'vars' file contains the Easy-RSA 3 settings.
Go to the '/etc/openvpn/easy-rsa/' directory and create a new vars script using the vim editor.
cd /etc/openvpn/easy-rsa/
vim vars
Paste the vars easy-rsa 3 configurations below.
set_var EASYRSA                 "$PWD"
set_var EASYRSA_PKI             "$EASYRSA/pki"
set_var EASYRSA_DN              "cn_only"
set_var EASYRSA_REQ_COUNTRY     "ID"
set_var EASYRSA_REQ_PROVINCE    "Jakarta"
set_var EASYRSA_REQ_CITY        "Jakarta"
set_var EASYRSA_REQ_ORG         "hakase-labs CERTIFICATE AUTHORITY"
set_var EASYRSA_REQ_EMAIL       "[email protected]"
set_var EASYRSA_REQ_OU          "HAKASE-LABS EASY CA"
set_var EASYRSA_KEY_SIZE        2048
set_var EASYRSA_ALGO            rsa
set_var EASYRSA_CA_EXPIRE       7500
set_var EASYRSA_CERT_EXPIRE     365
set_var EASYRSA_NS_SUPPORT      "no"
set_var EASYRSA_NS_COMMENT      "HAKASE-LABS CERTIFICATE AUTHORITY"
set_var EASYRSA_EXT_DIR         "$EASYRSA/x509-types"
set_var EASYRSA_SSL_CONF        "$EASYRSA/openssl-easyrsa.cnf"
set_var EASYRSA_DIGEST          "sha256"
Save and exit.
Note:
- Change the values of the variables as you need.
- Increase the 'EASYRSA_KEY_SIZE' for better security.
- Change 'EASYRSA_CA_EXPIRE' and 'EASYRSA_CERT_EXPIRE'.
Now make the 'vars' file executable by changing the permission of the file.
chmod +x vars
The easy-rsa 3 configuration has been completed.
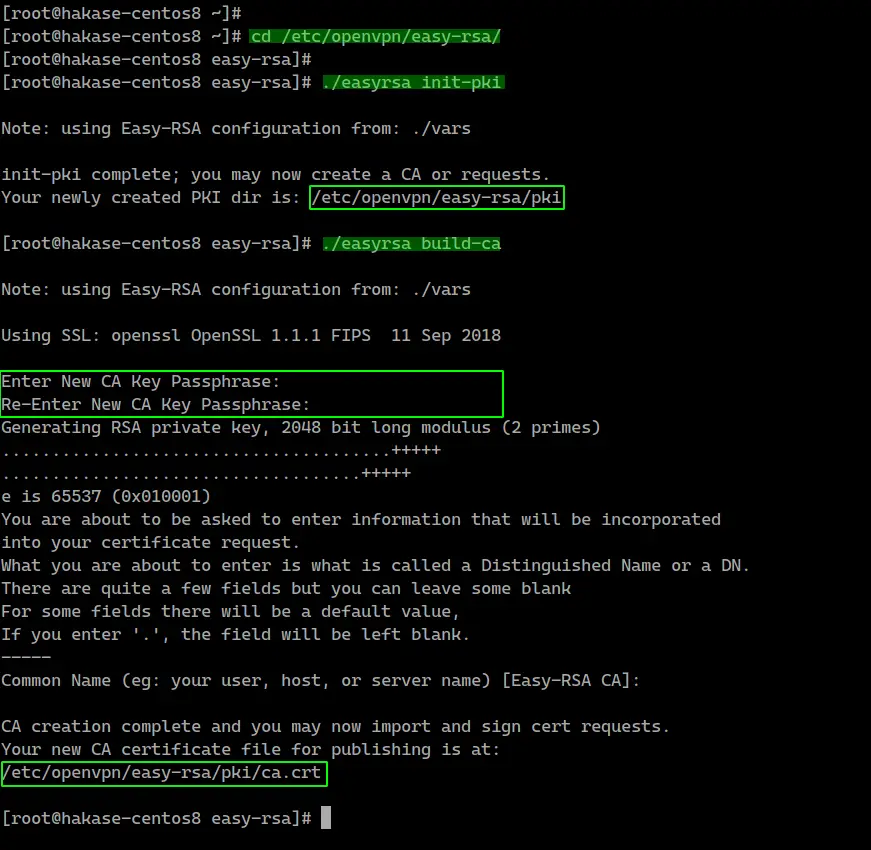
Step 3 - Build OpenVPN Keys
In this step, we will build the OpenVPN keys based on the easy-rsa 3 'vars' file that we've created. We will build the CA key, Server and Client keys, DH and CRL PEM file.
We will build all those keys using the 'easyrsa' command line. Go to the '/etc/openvpn/easy-rsa/' directory.
cd /etc/openvpn/easy-rsa/3/
- Initialization and Build CA
Before building the server and client key, we need to initialize the PKI (Public Key Infrastructure) directory and build the CA key.
Initiate the PKI directory and build the CA key using the command below.
./easyrsa init-pki
./easyrsa build-ca
Now type the password for your CA key and you will get your 'ca.crt' and 'ca.key' files under the 'pki' directory.
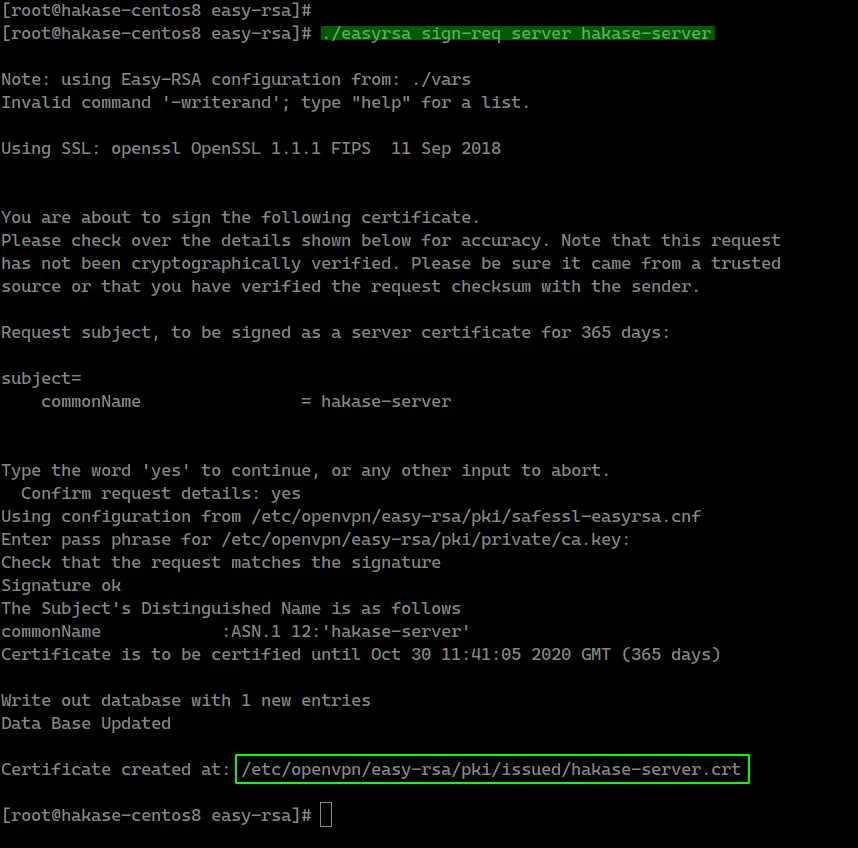
- Build Server Key
Now we want to build the server key, and we will build the server key named 'hakase-server'.
Build the server key 'hakase-server' using the command below.
./easyrsa gen-req hakase-server nopass

Note:
- nopass = option for disables password for the 'hakase-server' key.
And sign the 'hakase-server' key using our CA certificate.
./easyrsa sign-req server hakase-server
You will be asked for the 'CA' password, type the password and press Enter. And you will get the 'hakase-server.crt' certificate file under the 'pki/issued/' directory.
Verify the certificate file using the OpenSSL command and make sure there is no error.
openssl verify -CAfile pki/ca.crt pki/issued/hakase-server.crt
All server certificate keys have been created. The server private key is located at the 'pki/private/hakase-server.key', and the server certificate on the 'pki/issued/hakase-server.crt'.

- Build Client Key
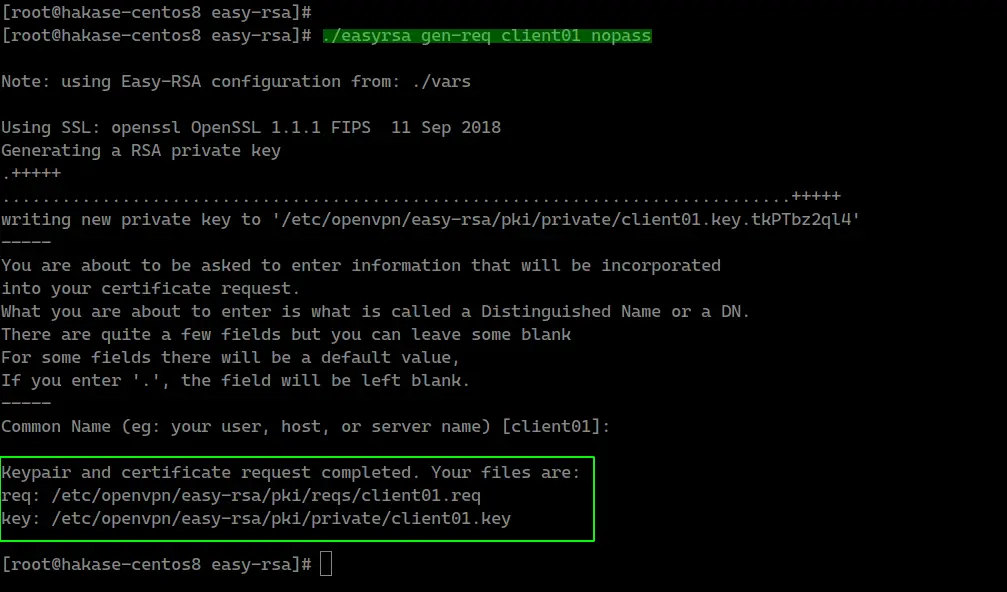
Now we need to build keys for the client. We will generate a new client key named 'client01'.
Generate the 'client01' key using the command below.
./easyrsa gen-req client01 nopass
Now sign the 'client01' key using our CA certificate as below.
./easyrsa sign-req client client01
Type 'yes' to confirm the client certificate request, then type the CA password.
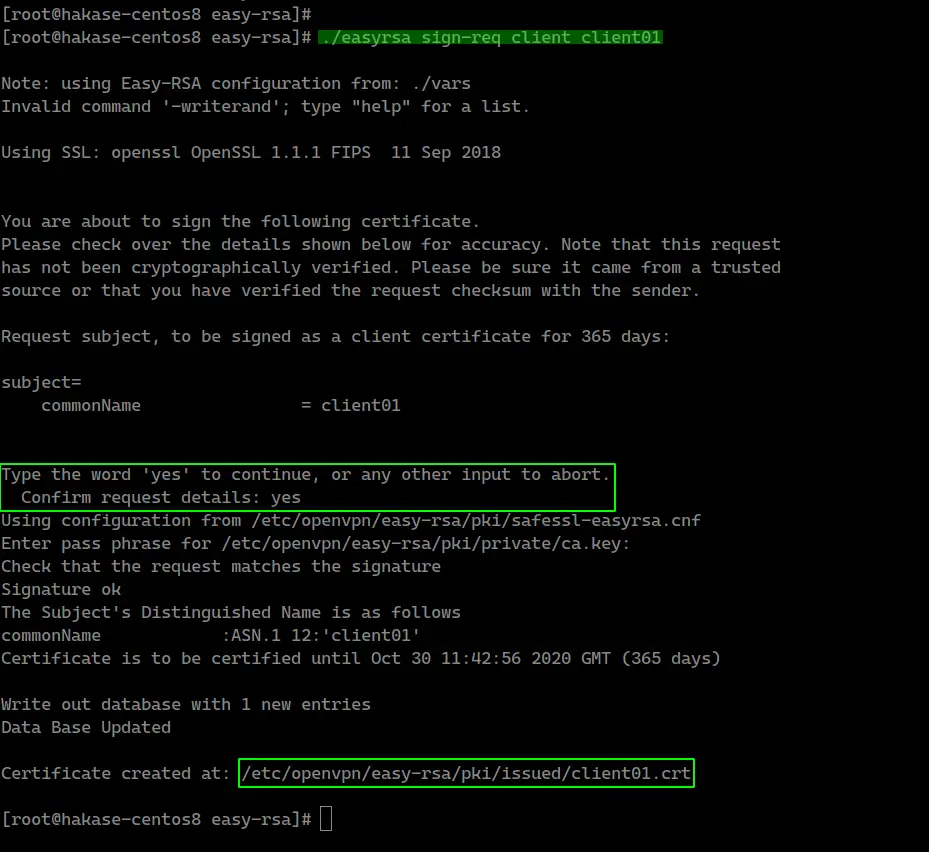
The client certificate named 'client01' has been generated, verify the client certificate using the openssl command.
openssl verify -CAfile pki/ca.crt pki/issued/client01.crt
Make sure there is no error.

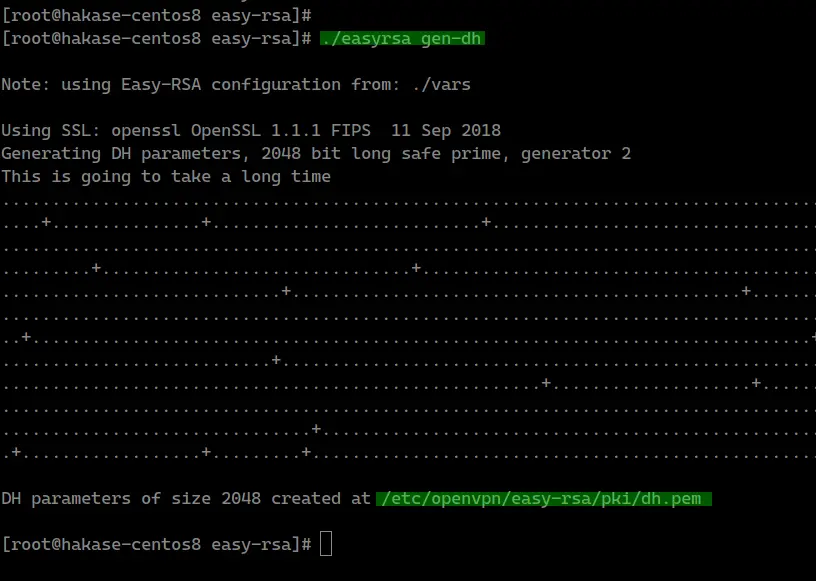
- Build Diffie-Hellman Key
The Diffie-Hellman key is needed for better security. And we're going to generate the '2048' DH key based on the 'vars' configuration file that has created on top.
Generate the Diffie-Hellman key using the command below.
./easyrsa gen-dh
And the DH key has been generated, located at the 'pki' directory.
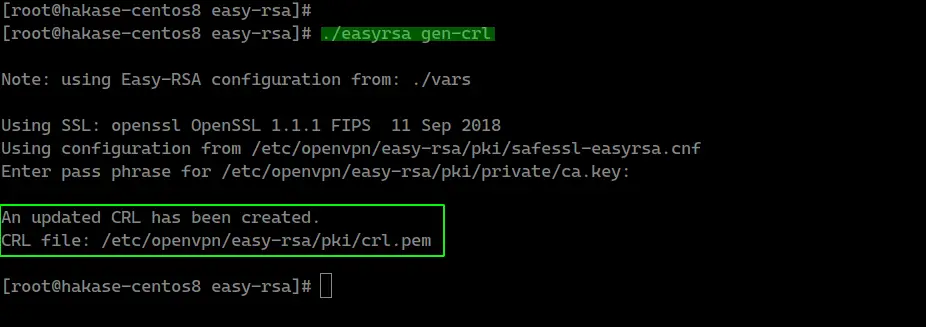
- Optional: Generate the CRL Key
The CRL (Certificate Revoking List) key will be used for revoking the client key. If you have multiple client certificates of clients on your VPN server, and you want to remove someone key, you just need to revoke using the easy-rsa command.
If you want to revoke some key, run the command below.
./easyrsa revoke someone
And then generate the CRL key.
./easyrsa gen-crl
The CRL PEM file has been generated under the 'pki' directory - the following is an example on my server.
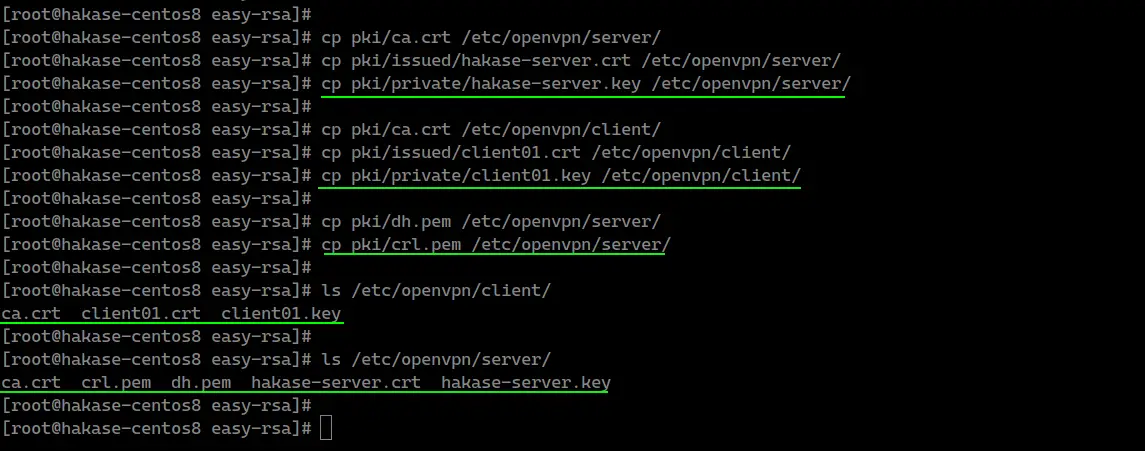
- Copy Certificate Files
All certificates have been generated, now copy the certificate files and PEM files.
Copy Server Key and Certificate.
cp pki/ca.crt /etc/openvpn/server/
cp pki/issued/hakase-server.crt /etc/openvpn/server/
cp pki/private/hakase-server.key /etc/openvpn/server/
Copy client01 Key and Certificate.
cp pki/ca.crt /etc/openvpn/client/
cp pki/issued/client01.crt /etc/openvpn/client/
cp pki/private/client01.key /etc/openvpn/client/
Copy DH and CRL Key.
cp pki/dh.pem /etc/openvpn/server/
cp pki/crl.pem /etc/openvpn/server/
All certificates for server and client have been copied to each directory.
Step 4 - Configure OpenVPN
In this step, we will create a new configuration 'server.conf' for the OpenVPN server.
Go to the '/etc/openvpn/server/' directory and create new configuration file 'server.conf' using vim.
cd /etc/openvpn/server/
vim server.conf
Paste the following OpenVPN server configuration there.
# OpenVPN Port, Protocol, and the Tun
port 1194
proto udp
dev tun

# OpenVPN Server Certificate - CA, server key and certificate
ca /etc/openvpn/server/ca.crt
cert /etc/openvpn/server/hakase-server.crt
key /etc/openvpn/server/hakase-server.key

#DH and CRL key
dh /etc/openvpn/server/dh.pem
crl-verify /etc/openvpn/server/crl.pem

# Network Configuration - Internal network
# Redirect all Connection through OpenVPN Server
server 10.5.0.0 255.255.255.0
push "redirect-gateway def1"

# Using the DNS from https://dns.watch
push "dhcp-option DNS 84.200.69.80"
push "dhcp-option DNS 84.200.70.40"

#Enable multiple clients to connect with the same certificate key
duplicate-cn

# TLS Security
cipher AES-256-CBC
tls-version-min 1.2
tls-cipher TLS-DHE-RSA-WITH-AES-256-GCM-SHA384:TLS-DHE-RSA-WITH-AES-256-CBC-SHA256:TLS-DHE-RSA-WITH-AES-128-GCM-SHA256:TLS-DHE-RSA-WITH-AES-128-CBC-SHA256
auth SHA512
auth-nocache

# Other Configuration
keepalive 20 60
persist-key
persist-tun
compress lz4
daemon
user nobody
group nobody

# OpenVPN Log
log-append /var/log/openvpn.log
verb 3
Save and exit.
And the OpenVPN server configuration has been created.
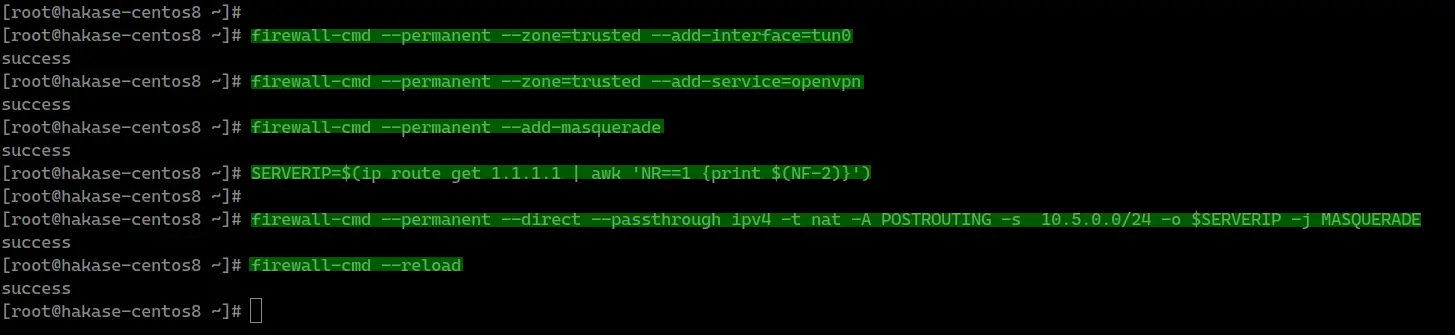
Step 5 - Enable Port-Forwarding and Configure Routing in Firewalld
In this step, we will enable the Port-forwarding kernel module and configure routing 'Firewalld' for OpenVPN.
Enable the port-forwarding kernel module by running the following commands.
echo 'net.ipv4.ip_forward = 1' >> /etc/sysctl.conf
sysctl -p
Next, configure routing using the Firewalld for OpenVPN.

Add the OpenVPN service to the 'public' and 'trusted' firewall zone.
firewall-cmd --permanent --add-service=openvpn
firewall-cmd --permanent --zone=trusted --add-service=openvpn
After that, add the 'tun0' to the 'trusted' zone.
firewall-cmd --permanent --zone=trusted --add-interface=tun0
Now Enable 'MASQUERADE' on the default 'public' zone firewalld.
firewall-cmd --permanent --add-masquerade
Enable NAT for OpenVPN internal IP address '10.5.0.0/24' to the external IP address 'SERVERIP'.
SERVERIP=$(ip route get 1.1.1.1 | awk 'NR==1 {print $(NF-2)}')
firewall-cmd --permanent --direct --passthrough ipv4 -t nat -A POSTROUTING -s  10.5.0.0/24 -o $SERVERIP -j MASQUERADE
And reload firewalld.
firewall-cmd --reload
The Port-forwarding and the Firewalld routing configuration has been completed, start the OpenVPN service and enable it to launch automatically every time at system boot.
systemctl start openvpn-server@server
systemctl enable openvpn-server@server

After that, check the OpenVPN service using commands below.
netstat -plntu
systemctl status openvpn-server@server
And you will get the result as below.
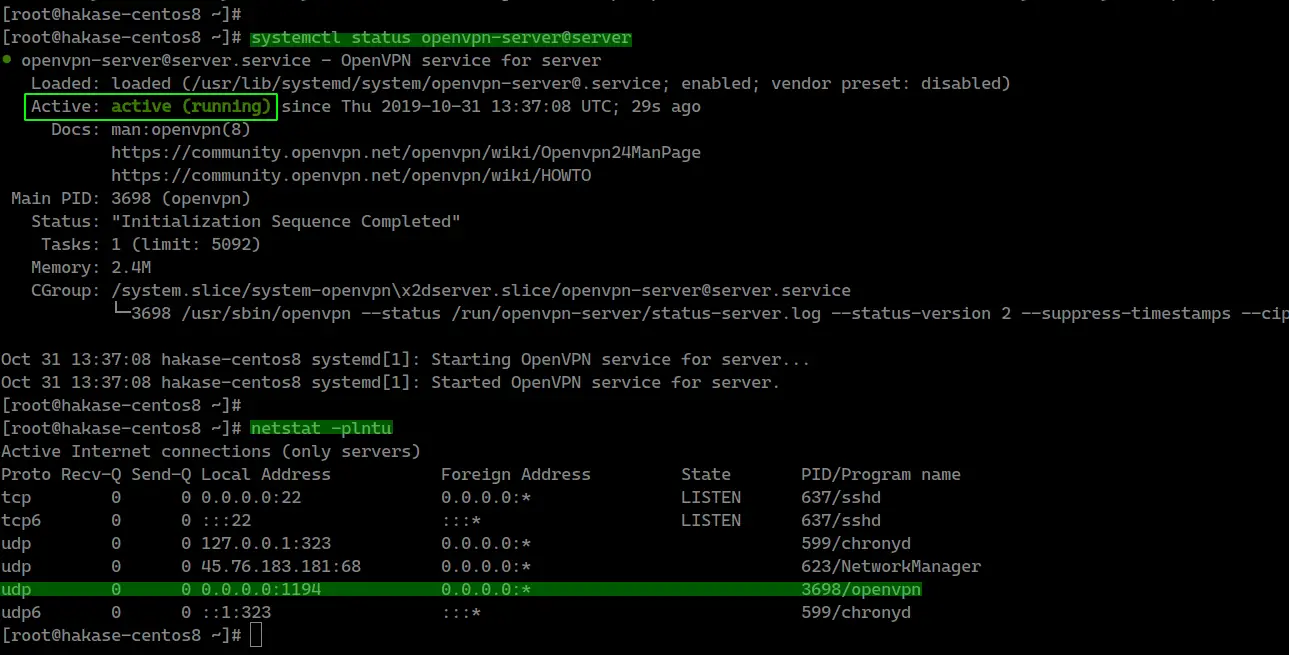
As a result, the OpenVPN service is up and running on the UDP protocol with default port '1194'.
Step 6 - OpenVPN Client Setup
Go to the '/etc/openvpn/client' directory and create a new openvpn client configuration file 'client01.ovpn' using vim.
cd /etc/openvpn/client
vim client01.ovpn
Paste the following OpenVPN client configuration there.
client
dev tun
proto udp

remote xxx.xxx.xxx.xxx 1194

ca ca.crt
cert client01.crt
key client01.key

cipher AES-256-CBC
auth SHA512
auth-nocache
tls-version-min 1.2
tls-cipher TLS-DHE-RSA-WITH-AES-256-GCM-SHA384:TLS-DHE-RSA-WITH-AES-256-CBC-SHA256:TLS-DHE-RSA-WITH-AES-128-GCM-SHA256:TLS-DHE-RSA-WITH-AES-128-CBC-SHA256

resolv-retry infinite
compress lz4
nobind
persist-key
persist-tun
mute-replay-warnings
verb 3
Save and exit.
Now compress the '/etc/openvpn/client' directory to 'zip' or 'tar.gz' file and download the compressed file using SCP from your local computer.
Compress the '/etc/openvpn/client' directory to the 'client01.tar.gz' file.
cd /etc/openvpn/
tar -czvf client01.tar.gz client/*
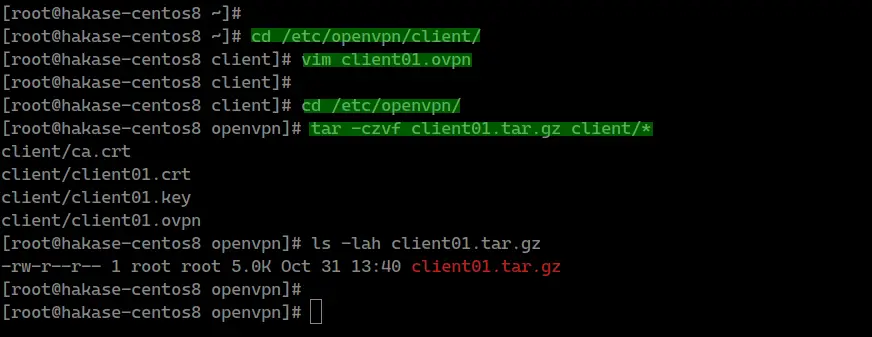
Now you can download the compressed OpenVPN file using the FTP server or scp command as below.
scp [email protected]:/etc/openvpn/client01.tar.gz .
Step 7 - Connect to the OpenVPN
Testing on the Clients.
- On Linux
Install OpenVPN package and if you want a GUI configuration, install OpenVPN network-manager.
sudo apt install openvpn network-manager-openvpn network-manager-openvpn-gnome -y
If you want to connect using a terminal shell, run the OpenVPN command below.
openvpn --config client01.ovpn
When you're connected to OpenVPN, open a new terminal tab and check the connection using curl command.
curl ifconfig.io
And you will get the OpenVPN server IP address.
- On Mac OS
Download Tunnelblick and install it.
Extract the 'client01.tar.gz' file and rename the 'client' directory to the 'client01.tblk'.
tar -xzvf client01.tar.gz
mv client client01.tblk
Double-click the 'client01.tblk' and the Tunnelblick will automatically detect OpenVPN configuration and then import.
Now connect through the Tunnelblick on the Top bar.
- On Windows
Download the openvpn client for windows and import the configuration.

