How To Install a Mumble Server on CentOS 7
Mumble is a free application primarily intended for use by gamers which allows users to talk to each other while gaming. Mumble uses a client-server architecture which consists of a client program that consumes services provided by the Murmur server program. Mumble server or Murmur has a root channel and a hierarchical tree of channels beneath it. The Mumble Client is used to requests services from the server by calling functions in the server application. It is a very popular application as it provides high-quality audio at low latency. The best thing about murmur is that it can stay backward compatible until there is a notable amount of user base with the older version. Murmur is highly personalized and can be configured according to the usage.
The following steps will help you in installing the Murmur onto your CentOS 7 very easily.
Configuring Firewalld
The CentOS firewall will prevent that clients can connect to the Murmur default port 64738, therefore, we will have to allow that port in the firewall before we install Murmur. If you plan to use a different port for Murmur, then opne that port in the firewall instead of port 64738. To open the default port in the firewall settings run this command.
sudo vi /etc/firewalld/services/murmur.xml
After that add the following lines in it.
<?xml version=”1.0″ encoding=”utf-8″?>
 <service>
 <short>Murmur</short>
 <description>Mumble Server</description>
 <port protocol=”tcp” port=”64738″ />
 <port protocol=”udp” port=”64738″ />
 </service>
Add Murmur firewall file to firewalld and reload it.
sudo firewall-cmd --permanent --add-service=murmur
sudo firewall-cmd --reload
Download Murmur Tarball
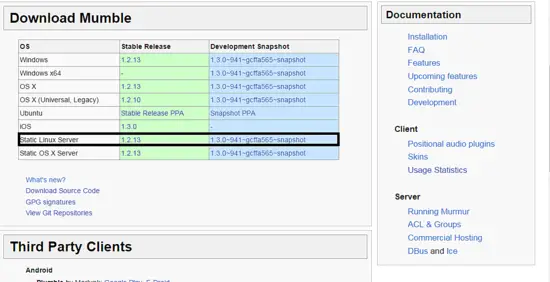
The first step is to go to http://wiki.mumble.info/wiki/Main_Page and download the latest stable release of the Mumble Static Linux Server.
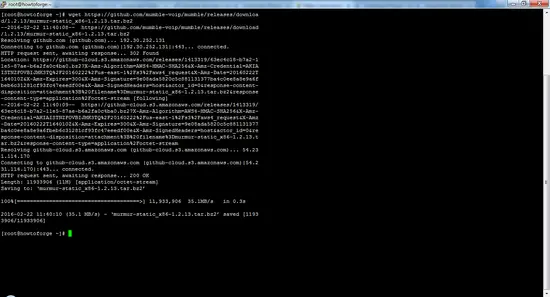
As we are using the CentOS 7 operating system, we have to use the wget command to download it. We can do this by right-clicking on the direct link and select 'Copy Link Adress' and then paste it to the command line after the wget command.
wget https://github.com/mumble-voip/mumble/releases/download/1.2.13/murmur-static_x86-1.2.13.tar.bz2
--2016-02-22 11:40:08-- https://github.com/mumble-voip/mumble/releases/download /1.2.13/murmur-static_x86-1.2.13.tar.bz2
Resolving github.com (github.com)... 192.30.252.131
Connecting to github.com (github.com)|192.30.252.131|:443... connected.
HTTP request sent, awaiting response... 302 Found
Location: https://github-cloud.s3.amazonaws.com/releases/1413319/63ec4c18-b7a2-1 1e5-87ae-b6a2fa0c4ba0.bz2?X-Amz-Algorithm=AWS4-HMAC-SHA256&X-Amz-Credential=AKIA ISTNZFOVBIJMK3TQ%2F20160222%2Fus-east-1%2Fs3%2Faws4_request&X-Amz-Date=20160222T 164010Z&X-Amz-Expires=300&X-Amz-Signature=9e08ada5820c5c881131377ba4c0ee8a8e9a6f beb6c31281cf93fc47eeedf00e&X-Amz-SignedHeaders=host&actor_id=0&response-content- disposition=attachment%3B%20filename%3Dmurmur-static_x86-1.2.13.tar.bz2&response -content-type=application%2Foctet-stream [following]
--2016-02-22 11:40:09-- https://github-cloud.s3.amazonaws.com/releases/1413319/ 63ec4c18-b7a2-11e5-87ae-b6a2fa0c4ba0.bz2?X-Amz-Algorithm=AWS4-HMAC-SHA256&X-Amz- Credential=AKIAISTNZFOVBIJMK3TQ%2F20160222%2Fus-east-1%2Fs3%2Faws4_request&X-Amz -Date=20160222T164010Z&X-Amz-Expires=300&X-Amz-Signature=9e08ada5820c5c881131377 ba4c0ee8a8e9a6fbeb6c31281cf93fc47eeedf00e&X-Amz-SignedHeaders=host&actor_id=0&re sponse-content-disposition=attachment%3B%20filename%3Dmurmur-static_x86-1.2.13.t ar.bz2&response-content-type=application%2Foctet-stream
Resolving github-cloud.s3.amazonaws.com (github-cloud.s3.amazonaws.com)... 54.23 1.114.170
Connecting to github-cloud.s3.amazonaws.com (github-cloud.s3.amazonaws.com)|54.2 31.114.170|:443... connected.
HTTP request sent, awaiting response... 200 OK
Length: 11933906 (11M) [application/octet-stream]
Saving to: ‘murmur-static_x86-1.2.13.tar.bz2’
100%[======================================>] 11,933,906 35.1MB/s in 0.3s
2016-02-22 11:40:10 (35.1 MB/s) - ‘murmur-static_x86-1.2.13.tar.bz2’ saved [1193 3906/11933906]
Extract the Murmur Tarball
After downloading the latest version of Murmur onto our system, we now have to extract all the files from the tarball. Execute the command given below to extract the tarball.
tar -vxjf ./murmur-static_x86-1.2.13.tar.bz2
If you get the error while extracting the file as shown below.
tar (child): bzip2: Cannot exec: No such file or directory
tar (child): Error is not recoverable: exiting now
tar: Child returned status 2
tar: Error is not recoverable: exiting now
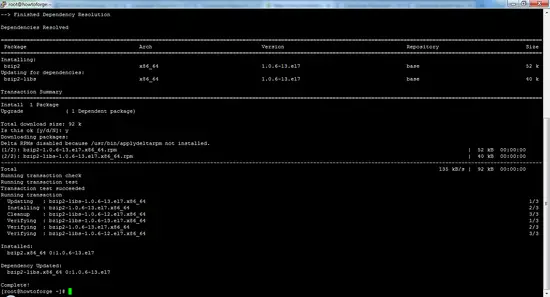
This can be fixed by simply installing the bzip2 package. After installing again try running the above command to extract all the files.
sudo yum install bzip2
Loaded plugins: fastestmirror
base | 3.6 kB 00:00:00
extras | 3.4 kB 00:00:00
updates | 3.4 kB 00:00:00
........................
Install 1 Package
Upgrade ( 1 Dependent package)
Total download size: 92 k
Is this ok [y/d/N]:
Press Y then enter to process
Downloading packages:
Delta RPMs disabled because /usr/bin/applydeltarpm not installed.
(1/2): bzip2-1.0.6-13.el7.x86_64.rpm | 52 kB 00:00:00
(2/2): bzip2-libs-1.0.6-13.el7.x86_64.rpm | 40 kB 00:00:00
------------------------------------------------------------------------------------------------------------------------------------------------------------------------
Total 135 kB/s | 92 kB 00:00:00
Running transaction check
Running transaction test
Transaction test succeeded
Running transaction
 Updating : bzip2-libs-1.0.6-13.el7.x86_64 1/3
 Installing : bzip2-1.0.6-13.el7.x86_64 2/3
 Cleanup : bzip2-libs-1.0.6-12.el7.x86_64 3/3
 Verifying : bzip2-libs-1.0.6-13.el7.x86_64 1/3
 Verifying : bzip2-1.0.6-13.el7.x86_64 2/3
 Verifying : bzip2-libs-1.0.6-12.el7.x86_64 3/3
 Installed:
 bzip2.x86_64 0:1.0.6-13.el7
 Dependency Updated:
 bzip2-libs.x86_64 0:1.0.6-13.el7
Then execute the command to extract tarball again.
murmur-static_x86-1.2.13/
murmur-static_x86-1.2.13/murmur.x86
murmur-static_x86-1.2.13/LICENSE
murmur-static_x86-1.2.13/dbus/
murmur-static_x86-1.2.13/dbus/weblist.pl
murmur-static_x86-1.2.13/dbus/murmur.pl
murmur-static_x86-1.2.13/ice/
murmur-static_x86-1.2.13/ice/icedemo.php
murmur-static_x86-1.2.13/ice/Murmur.ice
murmur-static_x86-1.2.13/ice/weblist.php
murmur-static_x86-1.2.13/murmur.ini
murmur-static_x86-1.2.13/README
Create a directory /usr/local/murmur. In this directory copy all the extracted files from the package to /usr/local/murmur/.
sudo mkdir /usr/local/murmur
sudo cp -r ./murmur-static_x86-1.2.13/* /usr/local/murmur/
Then copy the murmur configuration file to etc/murmur.ini.
sudo cp ./murmur-static_x86-1.2.9/murmur.ini /etc/murmur.ini
How to Fix Ownership and Permission
Now, we have to create a murmur user under murmur group with the home directory assigned as /var/lib/murmur/. Run the following command to do so:
sudo groupadd -r murmur
sudo useradd -r -g murmur -m -d /var/lib/murmur -s /sbin/nologin murmur
To store the logs from murmur, we have to create a log directory. After that, we have to assign the ownership of that directory to murmur.
sudo mkdir /var/log/murmur $
sudo chown murmur:murmur /var/log/murmur
Now, we will set stricter permissions of the log directory to protect the log files.
sudo chmod 0770 /var/log/murmur
Configuring Murmur
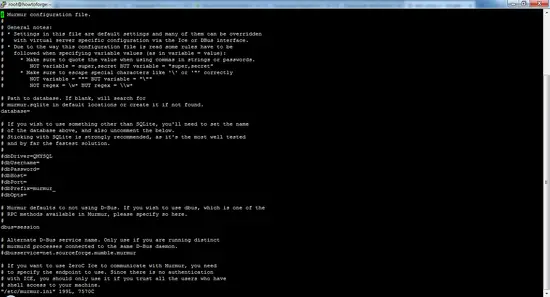
The file /etc/murmur.ini is the default configuration file for murmur. Now we will add following lines to the file /etc/murmur.ini with the help of a text editor. I'll use vi here, but other editors like nano or joe will work as well.
sudo vi /etc/murmur.ini
Change or add the following 2 lines:
pidfile=/var/run/murmur/murmur.pid
logfile=/var/log/murmur/murmur.log
We are using vim editor, press "i" to open the insert mode, then insert two lines above
Type :wq and press enter to write the file to disk and quit vi.
Creating the Mumble Service
To manage and start the murmur service with systemd, we have to create a systemd unit file. To do that, we will create a new file /etc/system/system/murmur.service by using the text editor. This operation has to be done as root user or with sudo as shown below.
sudo vi /etc/systemd/system/murmur.service
After that, copy and paste the following lines into the file.
[Unit]
 Description=Mumble Server (Murmur)
 Requires=network-online.target
 After=network-online.target mariadb.service time-sync.target
[Service]
 User=murmur
 Type=forking
 PIDFile=/var/run/murmur/murmur.pid
 ExecStart=/usr/local/murmur/murmur.x86 -ini /etc/murmur.ini
[Install]
 WantedBy=multi-user.target
On modern systems, /var/run is discarded after a re-boot. To regenerate the pid directory, we simply have to create the configuration file /etc/tmpfiles.d/murmur.conf.
sudo vi /etc/tmpfiles.d/murmur.conf
Insert the following line into the file and save it.
d /var/run/murmur 775 murmur murmur
Now let systemd create the temp files for Murmur and reload the systemd configuration.
sudo systemd-tmpfiles --create /etc/tmpfiles.d/murmur.conf
sudo systemctl daemon-reload
To enable the server to start alongside the system boot, execute this command to make it happen:
sudo systemctl enable murmur.service
Disabling SELinux
SELinus will prevent that Murmur can start. To run Murmur properly, we have to disable it. To disable SELinux permanently, you have to edit /etc/sysconfig/selinux and select SELINUX as disable:
sudo vi /etc/sysconfig/selinux
SELINUX=disabled
Then reboot the server.
Starting the Murmur Server
Now we can start the murmur service by using this command
sudo systemctl start murmur.service
Conclusion
If all the steps are followed and completed properly, you should be able to connect to the Murmur server by using a domain or IP address of the CentOS 7 system with the default port 64738. You can download the Mumble client from the official mumble page or from Github. These simple steps to install mumble will enable the gamers to connect on the same server.


