Securing Your ISPConfig 3 Installation With A Free Class1 SSL Certificate From StartSSL
This tutorial shows how you can use a free Class1 SSL Certificate from StartSSL to secure your ISPConfig 3 installation and get rid of self-signed certificate warnings. The guide covers using the SSL certificate for the ISPConfig web interface (both Apache2 and nginx), Postfix (for TLS connections), Courier and Dovecot (for POP3s and IMAPs), and PureFTPd (for TLS/FTPES connections). If you've installed monit and use HTTPS for its web interface, I will show you how to use the StartSSL certificate for it as well. This guide assumes you use Debian or Ubuntu; the principle is the same for other distributions supported by ISPConfig 3, but paths might differ.
UPDATE 12/20/2017
The StartSSL CA is not trusted by Browsers anymore and will stop issuing SSL certs on January 1st, 2018. There is a good alternative available today, use Let's Encrypt instead of StartSSL to get a free SSL certificate. Here you can find instructions on how to use a Let's encrypt SSL certificate for ISPConfig, Postfix, Dovecot, Courier, Monit, and PureFTPD:
1 Preliminary Note
I assume you have used one of the guides from http://www.ispconfig.org/ispconfig-3/documentation/ to set up your system. As I've mentioned before, I will concentrate on Debian/Ubuntu in this guide, but it should work for other distributions supported by ISPconfig 3 as well (you might have to adjust some paths though).
I will use the hostname server1.example.com here; StartSSL allows you to create the Class1 certificate for the main domain and one subdomain, so I will create the certificate for example.com and server1.example.com. This means that you must tell your users to use the main domain example.com or the subdomain server1.example.com for all services (ISPConfig web interface, Postfix, Courier/Dovecot, PureFTPD, etc.) because otherwise they will get certificate warnings.
If you prefer to use different hostnames for your services (e.g. mail.example.com for Postfix, ispconfig.example.com for ISPConfig, etc.), I suggest you get a Class2 certificate from StartSSL. It isn't free, but allows you to create it for multiple subdomains (you can even use *.example.com to create it for all subdomains) and even multiple domains. The instructions are the same, except that when I use StartSSL's sub.class1.server.ca.pem intermediate certificate, you must use sub.class2.server.ca.pem instead. I will outline this difference throughout the tutorial.
I'm running all the steps in this tutorial with root privileges, so make sure you're logged in as root. If you use Ubuntu, run...
sudo su
... to get root privileges.
2 Creating A Certificate Signing Request (CSR)
We need a Certificate Signing Request (CSR) to get an SSL certificate from StartSSL. Since the ISPConfig installer (for versions >= 3.0.4) creates this anyway, I will use this CSR as the basis for encrypting all services (ISPConfig, Postfix, etc.).
Since ISPConfig version 3.0.4, the ISPConfig installer offers the option to use SSL encryption for the ISPConfig web interface, it creates a self-signed certificate (4096bits) including a CSR if you answer the following question with ENTER or y:
Do you want a secure (SSL) connection to the ISPConfig web interface (y,n) [y]: <-- ENTER
To make the ISPConfig installer create the CSR with the correct data, you must enter the correct details when you see these questions:
Generating RSA private key, 4096 bit long modulus
............................................................++
.....................................................................++
e is 65537 (0x10001)
You are about to be asked to enter information that will be incorporated
into your certificate request.
What you are about to enter is what is called a Distinguished Name or a DN.
There are quite a few fields but you can leave some blank
For some fields there will be a default value,
If you enter '.', the field will be left blank.
-----
Country Name (2 letter code) [AU]: <-- DE
State or Province Name (full name) [Some-State]: <-- Niedersachsen
Locality Name (eg, city) []: <-- Lueneburg
Organization Name (eg, company) [Internet Widgits Pty Ltd]: <-- My Company Ltd.
Organizational Unit Name (eg, section) []: <-- IT
Common Name (eg, YOUR name) []: <-- example.com
Email Address []: <-- [email protected]
Please enter the following 'extra' attributes
to be sent with your certificate request
A challenge password []: <-- ENTER
An optional company name []: <-- ENTER
writing RSA key
If you have initially created the certificate with the wrong data, you can either update ISPConfig by running...
ispconfig_update.sh
..., or, if you have the latest version installed already, run the following commands:
cd /tmp
wget http://www.ispconfig.org/downloads/ISPConfig-3-stable.tar.gz
tar xvfz ISPConfig-3-stable.tar.gz
cd ispconfig3_install/install
php -q update.php
This will allow you to create a new certificate for your ISPConfig 3 web interface by answering the following question with yes:
Create new ISPConfig SSL certificate (yes,no) [no]: <-- yes
If you use an ISPConfig version prior to 3.0.4, you should now upgrade to the latest stable version by running...
ispconfig_update.sh
This will also allow you to create an SSL connection for your ISPConfig 3 web interface by answering the following question with yes:
Create new ISPConfig SSL certificate (yes,no) [no]: <-- yes
As outlined above, make sure you enter the correct details.
Afterwards, you should have an SSL key, a CSR, and a self-signed certificate in the /usr/local/ispconfig/interface/ssl/ directory:
ls -l /usr/local/ispconfig/interface/ssl/
root@server1:~# ls -l /usr/local/ispconfig/interface/ssl/
total 16
-rwxr-x--- 1 ispconfig ispconfig 2423 Jan 16 13:29 ispserver.crt
-rwxr-x--- 1 ispconfig ispconfig 1777 Jan 16 13:29 ispserver.csr
-rwxr-x--- 1 ispconfig ispconfig 3243 Jan 16 13:29 ispserver.key
-rwxr-x--- 1 ispconfig ispconfig 3311 Jan 16 13:28 ispserver.key.secure
root@server1:~#
All we need in this tutorial is the private key (ispserver.key) and the CSR (ispserver.csr); we will replace ispserver.crt with the Class1 certificate from StartSSL. You can ignore ispserver.key.secure.
It is also possible to create ispserver.key and ispserver.csr on the command line as follows:
cd /usr/local/ispconfig/interface/ssl/
openssl req -new -newkey rsa:4096 -days 365 -nodes -keyout ispserver.key -out ispserver.csr
(This will give you no ispserver.crt which doesn't matter as we will get our signed certificate from StartSSL.)
Your ispserver.csr should be similar to this one (I've x'ed out big parts of it because this is a real CSR I use):
cat /usr/local/ispconfig/interface/ssl/ispserver.csr
-----BEGIN CERTIFICATE REQUEST----- MIIC7TCCAdUCAQAwgacxCzAJBgxxxxxxAkRFMRYwFAYDVQQIDA1OaWVkZXJzYWNo xxxxxxxxxxxxxxxxxxxxxxxxxxxxxxxxxxxxxxxxxxxxxxxxxxxxxxxxxxxxxxxx xxxxxxxxxxxxxxxxxxxxxxxxxxxxxxxxxxxxxxxxxxxxxxxxxxxxxxxxxxxxxxxx xxxxxxxxxxxxxxxxxxxxxxxxxxxxxxxxxxxxxxxxxxxxxxxxxxxxxxxxxxxxxxxx xxxxxxxxxxxxxxxxxxxxxxxxxxxxxxxxxxxxxxxxxxxxxxxxxxxxxxxxxxxxxxxx xxxxxxxxxxxxxxxxxxxxxxxxxxxxxxxxxxxxxxxxxxxxxxxxxxxxxxxxxxxxxxxx xxxxxxxxxxxxxxxxxxxxxxxxxxxxxxxxxxxxxxxxxxxxxxxxxxxxxxxxxxxxxxxx xxxxxxxxxxxxxxxxxxxxxxxxxxxxxxxxxxxxxxxxxxxxxxxxxxxxxxxxxxxxxxxx xxxxxxxxxxxxxxxxxxxxxxxxxxxxxxxxxxxxxxxxxxxxxxxxxxxxxxxxxxxxxxxx xxxxxxxxxxxxxxxxxxxxxxxxxxxxxxxxxxxxxxxxxxxxxxxxxxxxxxxxxxxxxxxx xxxxxxxxxxxxxxxxxxxxxxxxxxxxxxxxxxxxxxxxxxxxxxxxxxxxxxxxxxxxxxxx xxxxxxxxxxxxxxxxxxxxxxxxxxxxxxxxxxxxxxxxxxxxxxxxxxxxxxxxxxxxxxxx xxxxxxxxxxxxxxxxxxxxxxxxxxxxxxxxxxxxxxxxxxxxxxxxxxxxxxxxxxxxxxxx xxxxxxxxxxxxxxxxxxxxxxxxxxxxxxxxxxxxxxxxxxxxxxxxxxxxxxxxxxxxxxxx xxxxxxxxxxxxxxxxxxxxxxxxxxxxxxxxxxxxxxxxxxxxxxxxxxxxxxxxxxxxxxxx 9Z5RhXTfOz8F2wsNH5yP9eqkVlkYKpIwyUHoZtUSp+xz -----END CERTIFICATE REQUEST----- |
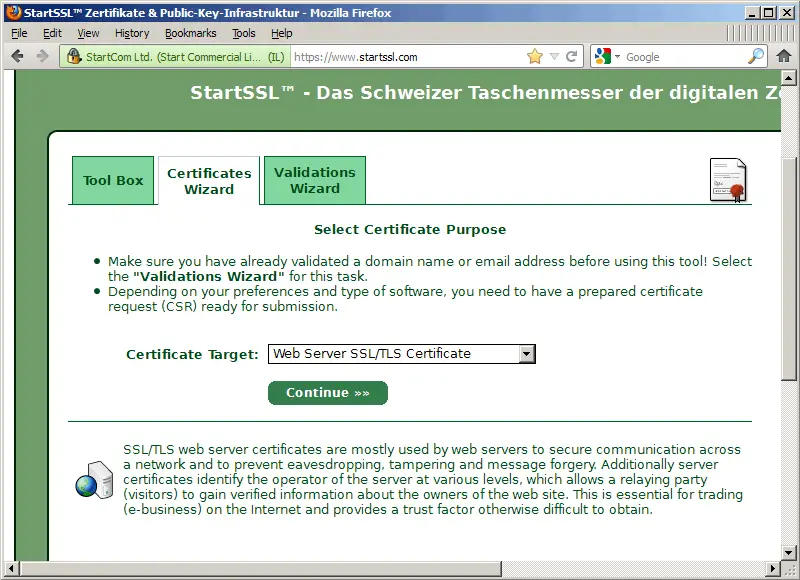
3 Getting Your Free Class1 Certificate From StartSSL
Now go to http://www.startssl.com/ and create an account. After you have validated your domain (on the Validations Wizard tab), you can request your certificate on the Certificates Wizard tab - select Web Server SSL/TLS Certificate from the Certificate Target drop-down field:
Since we already have a private key and a CSR, we can skip the next step - click on Skip >>:

On the next page, you fill in your CSR, i.e., the contents of the /usr/local/ispconfig/interface/ssl/ispserver.csr file (beginning with -----BEGIN CERTIFICATE REQUEST----- and ending with -----END CERTIFICATE REQUEST-----):
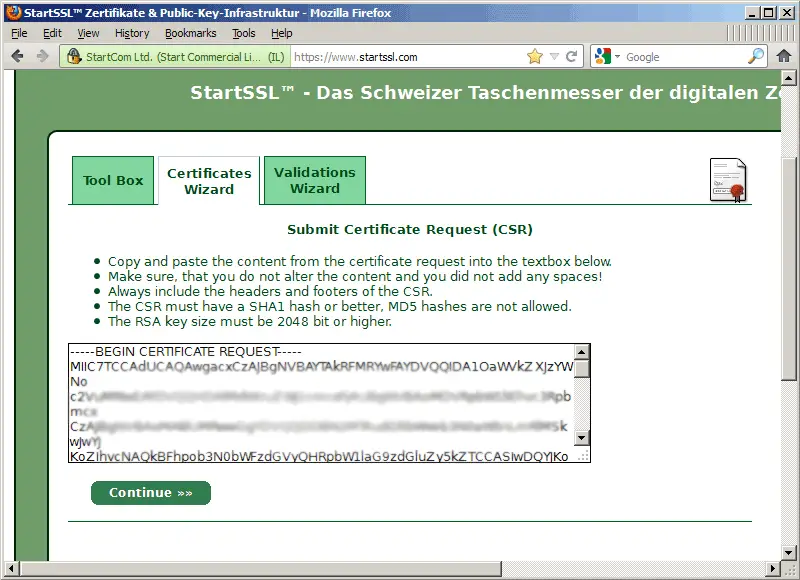
Then follow the rest of the wizard - it will ask you for a domain and one subdomain for which the certificate will be created. If you use server1.example.com for all your services, fill in example.com as the domain and server1 as the subdomain.
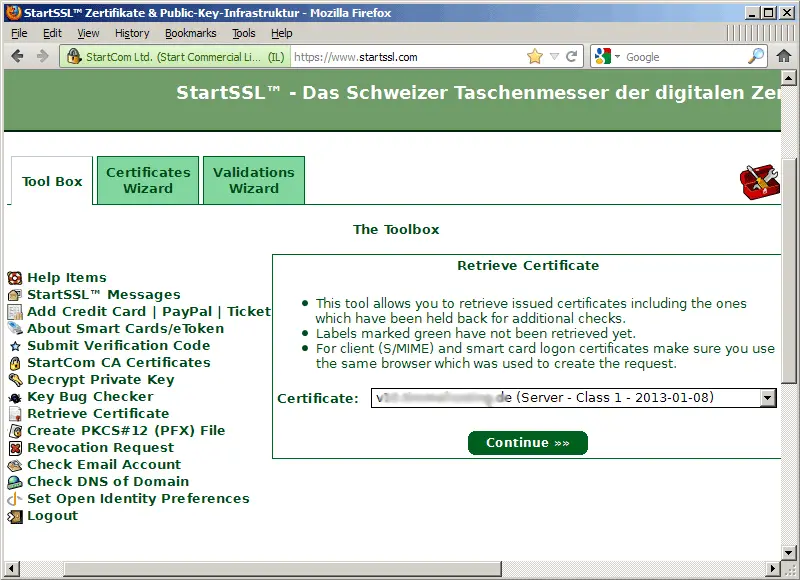
After a few minutes, you will receive an email that your new certificate is ready. Go to Toolbox > Retrieve Certificate and select your certificate:
Copy the certificate from StartSSL's web interface...
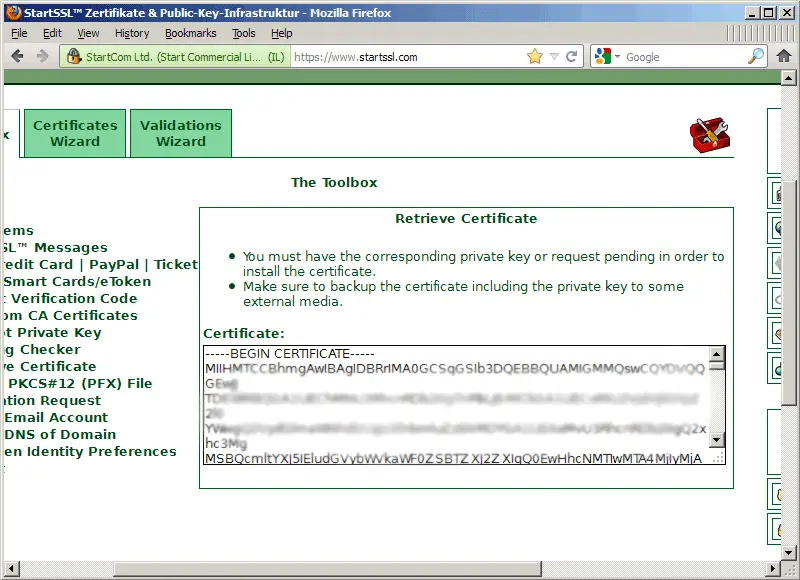
... and make a backup of your original ispserver.crt file and paste the StartSSL Class1 certificate into the (empty) ispserver.crt file:
mv /usr/local/ispconfig/interface/ssl/ispserver.crt /usr/local/ispconfig/interface/ssl/ispserver.crt_bak
vi /usr/local/ispconfig/interface/ssl/ispserver.crt
-----BEGIN CERTIFICATE----- MIIHMTCCBhmgAwIBAgIDxxxxxx0GCSqGSIb3DQEBBQUAMIGMMQswCQYDVQQGEwJJ xxxxxxxxxxxxxxxxxxxxxxxxxxxxxxxxxxxxxxxxxxxxxxxxxxxxxxxxxxxxxxxx xxxxxxxxxxxxxxxxxxxxxxxxxxxxxxxxxxxxxxxxxxxxxxxxxxxxxxxxxxxxxxxx xxxxxxxxxxxxxxxxxxxxxxxxxxxxxxxxxxxxxxxxxxxxxxxxxxxxxxxxxxxxxxxx xxxxxxxxxxxxxxxxxxxxxxxxxxxxxxxxxxxxxxxxxxxxxxxxxxxxxxxxxxxxxxxx xxxxxxxxxxxxxxxxxxxxxxxxxxxxxxxxxxxxxxxxxxxxxxxxxxxxxxxxxxxxxxxx xxxxxxxxxxxxxxxxxxxxxxxxxxxxxxxxxxxxxxxxxxxxxxxxxxxxxxxxxxxxxxxx xxxxxxxxxxxxxxxxxxxxxxxxxxxxxxxxxxxxxxxxxxxxxxxxxxxxxxxxxxxxxxxx xxxxxxxxxxxxxxxxxxxxxxxxxxxxxxxxxxxxxxxxxxxxxxxxxxxxxxxxxxxxxxxx xxxxxxxxxxxxxxxxxxxxxxxxxxxxxxxxxxxxxxxxxxxxxxxxxxxxxxxxxxxxxxxx xxxxxxxxxxxxxxxxxxxxxxxxxxxxxxxxxxxxxxxxxxxxxxxxxxxxxxxxxxxxxxxx xxxxxxxxxxxxxxxxxxxxxxxxxxxxxxxxxxxxxxxxxxxxxxxxxxxxxxxxxxxxxxxx xxxxxxxxxxxxxxxxxxxxxxxxxxxxxxxxxxxxxxxxxxxxxxxxxxxxxxxxxxxxxxxx xxxxxxxxxxxxxxxxxxxxxxxxxxxxxxxxxxxxxxxxxxxxxxxxxxxxxxxxxxxxxxxx xxxxxxxxxxxxxxxxxxxxxxxxxxxxxxxxxxxxxxxxxxxxxxxxxxxxxxxxxxxxxxxx xxxxxxxxxxxxxxxxxxxxxxxxxxxxxxxxxxxxxxxxxxxxxxxxxxxxxxxxxxxxxxxx xxxxxxxxxxxxxxxxxxxxxxxxxxxxxxxxxxxxxxxxxxxxxxxxxxxxxxxxxxxxxxxx xxxxxxxxxxxxxxxxxxxxxxxxxxxxxxxxxxxxxxxxxxxxxxxxxxxxxxxxxxxxxxxx xxxxxxxxxxxxxxxxxxxxxxxxxxxxxxxxxxxxxxxxxxxxxxxxxxxxxxxxxxxxxxxx xxxxxxxxxxxxxxxxxxxxxxxxxxxxxxxxxxxxxxxxxxxxxxxxxxxxxxxxxxxxxxxx xxxxxxxxxxxxxxxxxxxxxxxxxxxxxxxxxxxxxxxxxxxxxxxxxxxxxxxxxxxxxxxx xxxxxxxxxxxxxxxxxxxxxxxxxxxxxxxxxxxxxxxxxxxxxxxxxxxxxxxxxxxxxxxx xxxxxxxxxxxxxxxxxxxxxxxxxxxxxxxxxxxxxxxxxxxxxxxxxxxxxxxxxxxxxxxx xxxxxxxxxxxxxxxxxxxxxxxxxxxxxxxxxxxxxxxxxxxxxxxxxxxxxxxxxxxxxxxx xxxxxxxxxxxxxxxxxxxxxxxxxxxxxxxxxxxxxxxxxxxxxxxxxxxxxxxxxxxxxxxx xxxxxxxxxxxxxxxxxxxxxxxxxxxxxxxxxxxxxxxxxxxxxxxxxxxxxxxxxxxxxxxx xxxxxxxxxxxxxxxxxxxxxxxxxxxxxxxxxxxxxxxxxxxxxxxxxxxxxxxxxxxxxxxx xxxxxxxxxxxxxxxxxxxxxxxxxxxxxxxxxxxxxxxxxxxxxxxxxxxxxxxxxxxxxxxx xxxxxxxxxxxxxxxxxxxxxxxxxxxxxxxxxxxxxxxxxxxxxxxxxxxxxxxxxxxxxxxx xxxxxxxxxxxxxxxxxxxxxxxxxxxxxxxxxxxxxxxxxxxxxxxxxxxxxxxxxxxxxxxx xxxxxxxxxxxxxxxxxxxxxxxxxxxxxxxxxxxxxxxxxxxxxxxxxxxxxxxxxxxxxxxx xxxxxxxxxxxxxxxxxxxxxxxxxxxxxxxxxxxxxxxxxxxxxxxxxxxxxxxxxxxxxxxx xxxxxxxxxxxxxxxxxxxxxxxxxxxxxxxxxxxxxxxxxxxxxxxxxxxxxxxxxxxxxxxx xxxxxxxxxxxxxxxxxxxxxxxxxxxxxxxxxxxxxxxxxxxxxxxxxxxxxxxxxxxxxxxx xxxxxxxxxxxxxxxxxxxxxxxxxxxxxxxxxxxxxxxxxxxxxxxxxxxxxxxxxxxxxxxx xxxxxxxxxxxxxxxxxxxxxxxxxxxxxxxxxxxxxxxxxxxxxxxxxxxxxxxxxxxxxxxx xxxxxxxxxxxxxxxxxxxxxxxxxxxxxxxxxxxxxxxxxxxxxxxxxxxxxxxxxxxxxxxx xxxxxxxxxxxxxxxxxxxxxxxxxxxxxxxxxxxxxxxxxxxxxxxxxxxxxxxxxxxxxxxx c2x1wonVRVmKovt2OuM1ZqZw0Ynk -----END CERTIFICATE----- |
Next download StartSSL's Root CA and the Class1 Intermediate Server CA:
cd /usr/local/ispconfig/interface/ssl
wget https://www.startssl.com/certs/ca.pem
wget https://www.startssl.com/certs/sub.class1.server.ca.pem
(If you use a Class2 certificate, please download sub.class2.server.ca.pem instead of sub.class1.server.ca.pem).
Rename both files:
mv ca.pem startssl.ca.crt
mv sub.class1.server.ca.pem startssl.sub.class1.server.ca.crt
(Adjust the second command if you use a Class2 certificate.)
Some services require a .pem file which we create as follows (again, make sure you adjust the commands if you use a Class2 certificate):
cat startssl.sub.class1.server.ca.crt startssl.ca.crt > startssl.chain.class1.server.crt
cat ispserver.{key,crt} startssl.chain.class1.server.crt > ispserver.pem
chmod 600 ispserver.pem

