The Perfect Setup - White Box Linux / Red Hat Enterprise Linux 3.0 - Page 4
Postfix
We have to configure Postfix in order to enable SMTP-AUTH and TLS.
First, we generate the certificate files needed for TLS:
mkdir /etc/postfix/ssl
cd /etc/postfix/ssl/
openssl genrsa -des3 -rand /etc/hosts -out smtpd.key 1024
<- Enter a password for smtpd.key.
chmod 600 smtpd.key
openssl req -new -key smtpd.key -out smtpd.csr
<- Again, enter your password for smtpd.key.
<- Enter your Country Name (e.g., "DE").
<- Enter your State or Province Name.
<- Enter your City.
<- Enter your Organization Name (e.g., the name of your company).
<- Enter your Organizational Unit Name (e.g. "IT Department").
<- Enter the Fully Qualified Domain Name of the system (e.g. "server1.example.com").
<- Enter your Email Address.
The following information is optional:
<- Enter a challenge password.
<- Enter an optional company name.
openssl x509 -req -days 3650 -in smtpd.csr -signkey smtpd.key -out smtpd.crt
<- Again, enter your password for smtpd.key.
openssl rsa -in smtpd.key -out smtpd.key.unencrypted
<- Again, enter your password for smtpd.key.
mv -f smtpd.key.unencrypted smtpd.key
openssl req -new -x509 -extensions v3_ca -keyout cakey.pem -out cacert.pem -days 3650
<- Again, enter your password for smtpd.key.
<- Enter your Country Name (e.g., "DE").
<- Enter your State or Province Name.
<- Enter your City.
<- Enter your Organization Name (e.g., the name of your company).
<- Enter your Organizational Unit Name (e.g. "IT Department").
<- Enter the Fully Qualified Domain Name of the system (e.g. "server1.example.com").
<- Enter your Email Address.
Run the following commands in order to enable SMTP-AUTH and TLS in /etc/postfix/main.cf:
postconf -e 'mydomain = example.com'
postconf -e 'myhostname = server1.$mydomain'
postconf -e 'mynetworks = 127.0.0.0/8'
postconf -e 'smtpd_sasl_local_domain ='
postconf -e 'smtpd_sasl_auth_enable = yes'
postconf -e 'smtpd_sasl_security_options = noanonymous'
postconf -e 'broken_sasl_auth_clients = yes'
postconf -e 'smtpd_recipient_restrictions = permit_sasl_authenticated,permit_mynetworks,reject_unauth_destination'
postconf -e 'inet_interfaces = all'
postconf -e 'alias_maps = hash:/etc/aliases'
postconf -e 'smtpd_tls_auth_only = no'
postconf -e 'smtp_use_tls = yes'
postconf -e 'smtpd_use_tls = yes'
postconf -e 'smtp_tls_note_starttls_offer = yes'
postconf -e 'smtpd_tls_key_file = /etc/postfix/ssl/smtpd.key'
postconf -e 'smtpd_tls_cert_file = /etc/postfix/ssl/smtpd.crt'
postconf -e 'smtpd_tls_CAfile = /etc/postfix/ssl/cacert.pem'
postconf -e 'smtpd_tls_loglevel = 1'
postconf -e 'smtpd_tls_received_header = yes'
postconf -e 'smtpd_tls_session_cache_timeout = 3600s'
postconf -e 'tls_random_source = dev:/dev/urandom'
mv -f /etc/pam.d/smtp.postfix /etc/pam.d/smtp
/etc/init.d/postfix restart
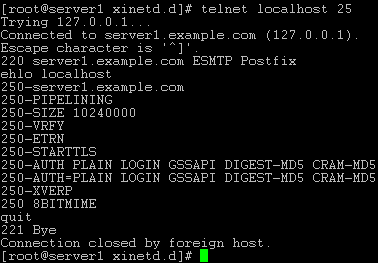
To see if SMTP-AUTH and TLS work properly now run the following command:
telnet localhost 25
After you have established the connection to your postfix mail server type
ehlo localhost
If you see the lines
250-STARTTLS
and
250-AUTH
everything is fine.
Type
quit
to return to the system's shell.
Synchronize the System Clock
If you want to have the system clock synchronized with an NTP server you can add the following lines to /var/spool/cron/root (if the file does not exist, create it by running
touch /var/spool/cron/root):
# update time with ntp server
0 3,9,15,21 * * * /usr/bin/rdate 128.2.136.71 | logger -t NTP
Then run
chmod 600 /var/spool/cron/root
/etc/init.d/crond restart
Install the 42go ISP-Manager
If you want to install the 42go ISP-Manager on the system you have to do the following steps because the 42go ISP-Manager does not support White Box Linux / Red Hat Enterprise Linux 3.0 out of the box. But because all paths/settings are similar to those on Red Hat 9 (which is supported by the 42go ISP-Manager) you can make the installer of the 42go ISP-Manager believe that the system is running Red Hat 9:
rm -f /etc/redhat-release
Now create a new file /etc/redhat-release with the following contents:
Red Hat Linux release 9 (Shrike) |
Now you can install the 42go ISP-Manager on the system as described here: http://www.projektfarm.com/downloads/manual/installation_en.pdf
Links
White Box Linux: http://www.whiteboxlinux.org/
Red Hat: http://www.redhat.com/
42go ISP-Manager: http://www.projektfarm.com/en/


