The Perfect Setup - SuSE 10.1 (32-bit) - Page 4
2 Adding Installation Sources
To make package installation easier, I will add a network installation source. If you want to install all packages from CD / DVD, you can skip this step. Start yast2:
yast2
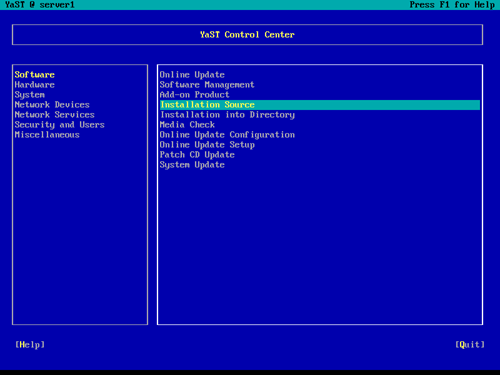
Go to Software -> Installation Source:
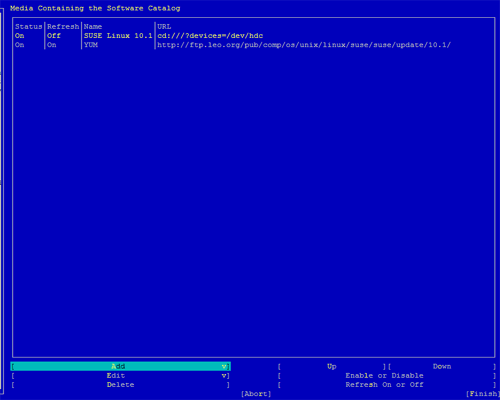
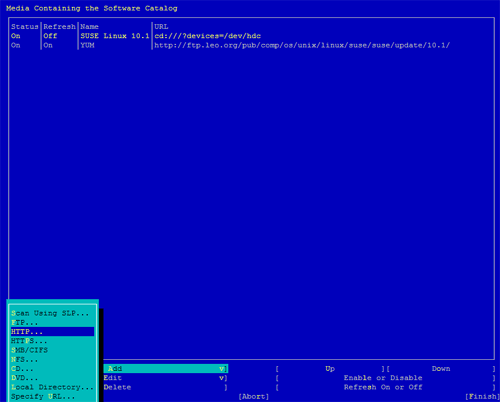
Select Add and enter a mirror near you. You can find a list of mirrors here: http://www.opensuse.org/Mirrors_Development_Build.
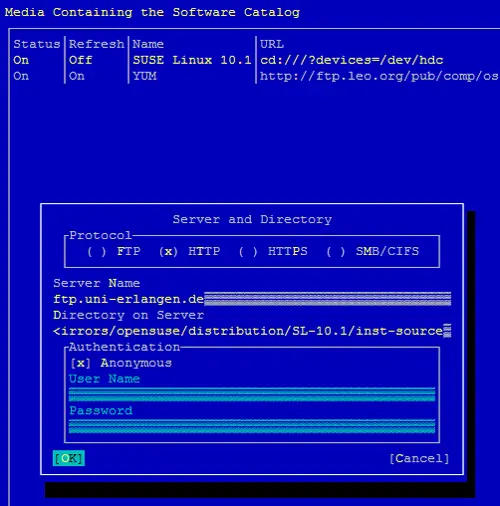
I selected this http mirror ( yes, it is an http mirror even though the URL starts with ftp :-) ):
ftp.uni-erlangen.de/pub/mirrors/opensuse/distribution/SL-10.1/inst-source
As Server Name, I enter ftp.uni-erlangen.de, and as Directory on Server I fill in /pub/mirrors/opensuse/distribution/SL-10.1/inst-source:
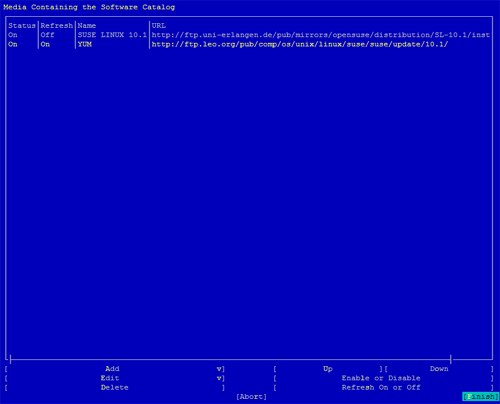
Finally I move my new installation source to the top of the list so that it will be the preferred location to fetch software packages from. At the same time I delete my SuSE CDs from the list (normally it would be enough to move the CDs down the list, but YaST seems to be buggy - whenever I moved the CDs down, they were back at the top when I entered YaST the next time...).
Hit Finish afterwards. You have to be patient now, in my tests it took about ten minutes(!) until YaST updated the installation sources. During that period, it seems as if YaST was hanging, but in fact it is working. You can check that in a second shell windows with the command
tail -f /var/log/YaST2/y2log
I don't know what the SuSE developers did to YaST, but it's a change for the worse for sure...
3 Install Some Software
Now we install a few packages that are needed later on. Run
yast -i findutils readline libgcc glibc-devel findutils-locate gcc flex lynx compat-readline4 db-devel wget gcc-c++
If you're on a 64-bit system (only then!), you must also install openssl-devel-32bit:
yast -i openssl-devel-32bit
4 Quota
To install quota, run
yast -i quota
Edit /etc/fstab to look like this (I added ,usrquota,grpquota to partition /dev/sda3 (mount point /; your device name might be /dev/hda2 or similar):
vi /etc/fstab
/dev/sda3 / ext3 acl,user_xattr,usrquota,grpquota 1 1 |
Then run:
touch /aquota.user /aquota.group
chmod 600 /aquota.*
and reboot the system:
shutdown -r now
After the system has come up again, enable quota like this:
quotacheck -avugm
quotaon -avug
5 DNS Server
Run
yast -i bind bind-chrootenv bind-devel bind-utils
Then we add the system startup links for BIND and start it:
chkconfig --add named
/etc/init.d/named start
Bind will run in a chroot jail under /var/lib/named.

