How to install the WiKID Strong Authentication Server - Community Edition - Page 2
Initial installation page
Setting up the WiKID authentication server is quick and easy. You create an intermediate Certificate Authority (CA), install the CA, create a localhost cert, and enable protocol modules. Once this is done, you can add domains, network clients and users.
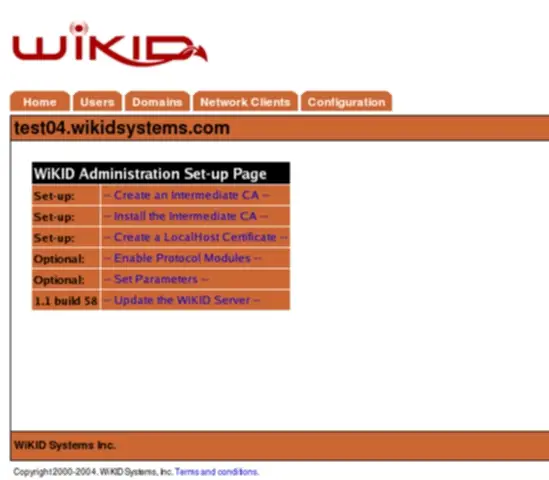
Figure 3 - The Initial Administration Page
Setting Up the Certificate Chain
The WiKID system uses certificate authentication internally in several important ways:
- Each authentication server is also an intermediate certificate authority
- Each authentication server uses certificate authentication to identify and authorize network clients
These functions require that a certificate be generated before the server is fully functional. This process is accomplished via the server’s administration interface. Select the – Creating an Intermediate CA - tab to access the certificate functions.
Step 1: Generate the Intermediate CA
The first step in the process is to generate the Public/Private keys that will be used to identify this server and to asymmetrically encrypt data via SSL. The server ships with a copy of the WiKID corporate CA certificate. This process will generate your keys and produce a certificate signing request or CSR. Select Generate and complete the form as described below.
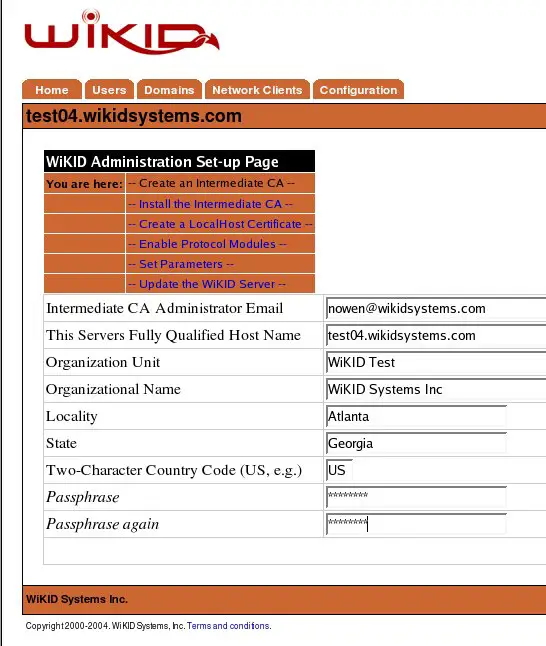
Figure 4 - Create Intermediate Certificate Authority Screen
This form collects the information needed to generate a Certificate Signing Request (CSR) for this server. NOTE: All fields are required.
Field definitions:
Intermediate CA Administrator Email: This value provides a contact for delivery of the signed certificate. Please ensure this is a valid working email address.
Servers Fully Qualified Domain Name: This should be the server’s official registered name in DNS. SSL clients will expect the name given here to match the hostname that they use to connect to this server.
Organization Unit: Usually the department or division name. Used for identification only.
Organization Name: The name of the company operating this server. This should match the sales or evaluation unit records at WiKID to speed processing of the certificate issuance.
Locality: Generally the city name.
State: The state or province name. By convention this is not abbreviated.
Country Code: The official two-character code for the country. For the United States, this code is US.
Passphrase: This passphrase will be used to secure the private key in a PKCS12 armored file. It will be needed each time you start the server (it replaces ‘passphrase’ as the default passphrase to start the WiKID Server) to ensure the security and integrity of the server credentials. This value is never stored anywhere and cannot be recovered if lost. Select a strong and memorable passphrase and do not lose it.
Select generate to create the keys and the CSR. You should be presented with a screen similar to Figure 5.
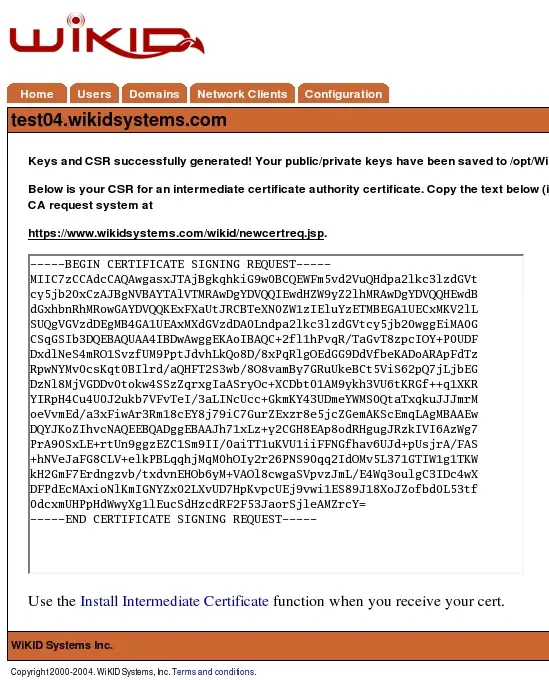
Figure 5 - The CSR
The Certificate Signing Request will be provided in base64 DER encoding. Select all of the text in the textbox and copy it to the clipboard.
Step 2: Submit the CSR for Signing
Click on the link to https://www/wikidsystems.com/wikid/newcertreq.jsp immediately above the text box. This will open the Certificate Signing Request submission page for the WiKID Systems CA.
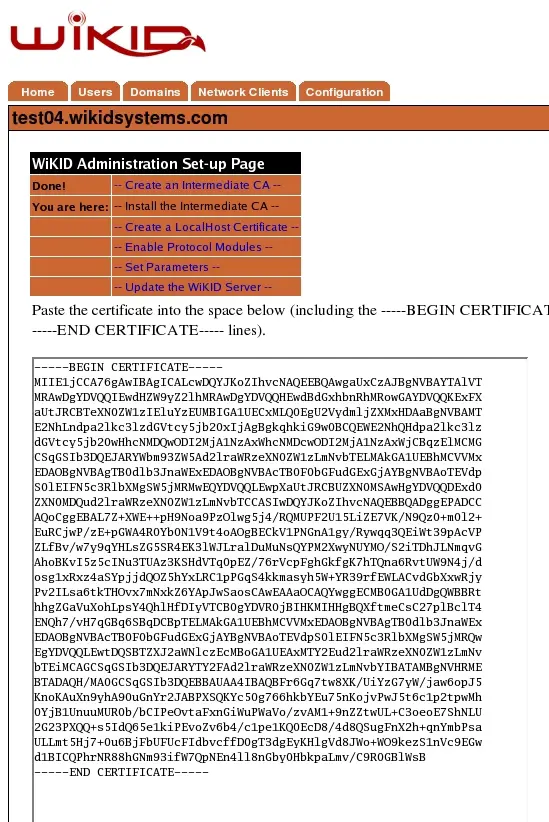
Figure 6 - CSR Submission Screen
Paste your Certificate Signing Request text (including ---- lines) into the area provided and submit for processing. You will be given a request number for tracking and the WiKID CA administrator will be notified of your submission.

Figure 7 - CSR Acknowledgment Screen
The WiKID CA administrator will process your request. You will receive your certificate via email to the address you provided in step 1. This process usually takes less than 1 business day. Your emailed certificate will be similar to that shown in Figure 8.
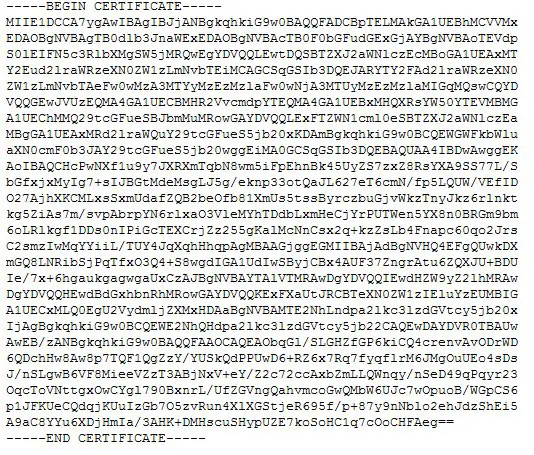
Figure 8 – Certificate Block
Note: Please remember that the certificate is useless without the private key generated and secured in step 1. Also, be sure to cut-and-paste the certificate as plain text. Outlook and Gmail will often convert text to UTF-8.
Step 3: Install the Certificate
Once the certificate has been received, return to the certificate management screen via the – Install Intermediate CA - tab. Select the Install option.
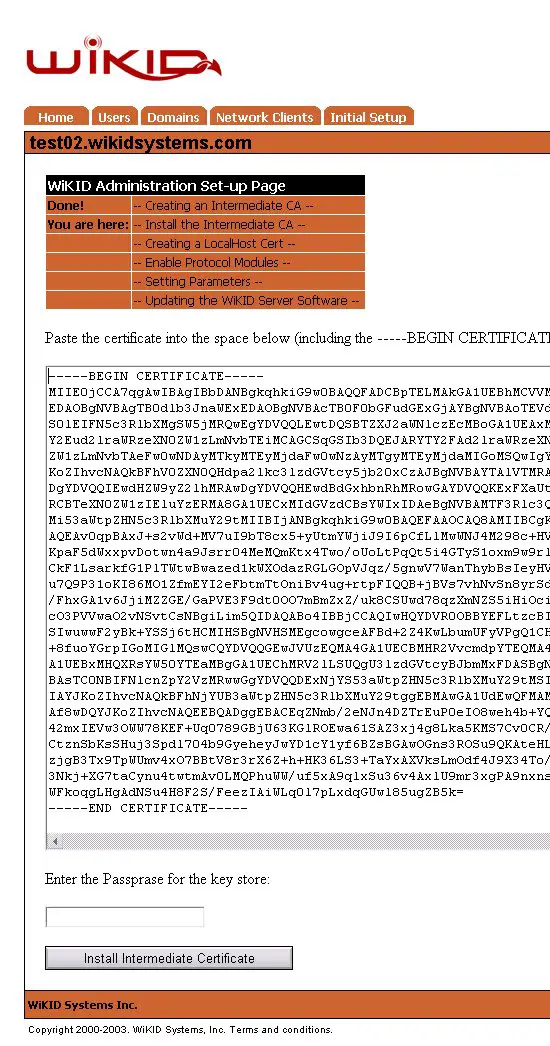
Figure 9 – Certificate Installation Screen
Paste the certificate text from the email into the text area provided as shown in Figure 9. Enter the passphrase you used to secure the private key in step 1 and install the intermediate certificate. Note: If you receive an error, double check that the passphrase is correct and make sure you are cutting and pasting as plain text. If you have forgotten the passphrase you will need to return to step 1 and complete the process again.
Step 4: Generate a Localhost Certificate
All systems that communicate directly with the authentication server require a valid certificate issued by that server. Before these clients can access the server you must create a certificate signed by this intermediate CA. This prevents any unauthorized systems from communicating with the authentication server.
It is important to understand that some protocols such as RADIUS (for the Enterprise version), LDAP, wAuth, etc. do not provide facilities for certificate authentication or transport encryption. The WiKID Strong Authentication Server provides protocol modules that transparently convert these protocols into the secure communications required. This in turn means that the LDAP interface on the WiKID Strong Authentication serve requires a certificate to validate credentials even though RADIUS has no concept of certificates.
The protocol modules that run locally on the WiKID Strong Authentication Server itself may share a single certificate for localhost. You can create this certificate by specifying “localhost” as the fully qualified domain name at the generate certificate screen. It must be called “localhost”. This is illustrated in Figure 10.
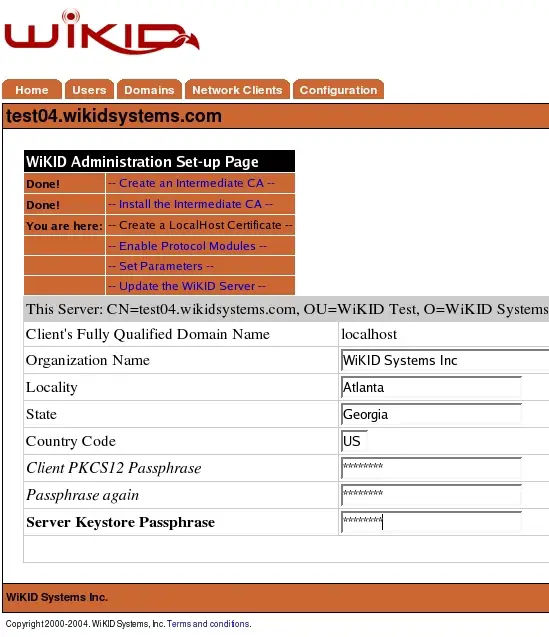
Figure 10 – Certificate Generation Screen
The values in this form signify the following:
Client’s Fully Qualified Domain Name: This is the name that the server will resolve when a client connection is made using this certificate. For local services it must be “localhost”.
Organization Name: The name of the company operating this client.
Locality: Generally the city name.
State: The state or province name. By convention this is not abbreviated.
Country Code: The official two character code for the country.
Client PKCS12 Passphrase: This is the passphrase that will armor the generated certificate.
Passphrase again: Repeat the Client PKCS12 Passphrase for verification.
Server Keystore Passphrase: This is the passphrase for the intermediate certificate authority that was created in step 1.
Select Generate and you should be presented with a screen similar to Figure 11.
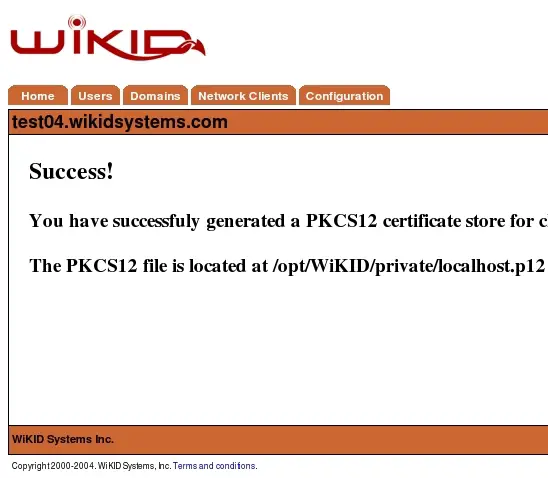
Figure 11 – PKCS Delivery Screen
This message provides the location of the generated certificate. If this certificate is for the localhost services. It is already installed in the appropriate location.
Step 5: Restart the wAuth Server
Login to the authentication server as root and type:
wikidctl restart
This will shutdown the WiKID Strong Authentication services. You will be prompted for the wAuth passphrase. This is the passphrase you created in step 1 for the intermediate certificate. Entering the correct passphrase will allow the server to begin using the new certificate for client authentication. If you would like to avoid entering a passphrase each time, you can create a file call /etc/WiKID/security with one line: WAUTH_PASSPHRASE=yourpassprase.

