How to manage an AWS RDS instance using aws-cli
You can easily create and manage RDS resources using aws-cli commands. In this article, we will see the commands to create an RDS MySql Instance and how to make a snapshot of the database. We will also see commands to tag the RDS Instance, delete the Instance, and do asnapshot.
Here are the commands that we have covered in this article.
- describe-db-instances: Get details of RDS instance.
- describe-db-snapshots: Get details of Snapshots.
- describe-db-clusters: Get details of Aurora DB clusters.
- create-db-instance: Create a new RDS instance.
- add-tags-to-resource: Add metadata to an RDS instance.
- list-tags-for-resource: List metadata of an RDS instance.
- create-db-snapshot: Take a snapshot of an RDS instance.
- delete-db-snapshot: Delete an existing RDS snapshot.
- delete-db-instance: Delete an RDS instance.
Go to the official page here to know all the commands available for managing RDS using aws-cli.
Pre-requisites
- AWS Account (Create if you don’t have one).
- Basic understanding of AWS RDS.
- AWS IAM user with AdministratorAccess policy attached to it and its access and secret keys (Click here to learn to create an IAM User).
- AWS CLI installed on your local machine.
What will we do?
- Check aws cli and export the AWS access & secret key on your local machine.
- Manage Cloudwatch using aws-cli
Check aws cli and export the AWS access & secret key on your local machine.
Let's start with checking the version of aws-cli installed on your local server.
aws --verson #aws-cli/2.0.0 Python/3.8.2 Darwin/19.2.0 botocore/2.0.0dev7
Now, export the IAM user access and secret key on the terminal.
export AWS_ACCESS_KEY_ID=<your-iam-user-access-key-here>
export AWS_SECRET_ACCESS_KEY=<your-iam-user-secret-key-here>
Once the keys are exported to the terminal, we can first check the identity of the user by using the following command.
aws sts get-caller-identity
You will see my access and secret keys in the above screenshot. You will not be able to use these keys as I have already deactivated them. Also, make a note that you never share your keys with anyone as they can be misused.
Manage RDS Instance using aws-cli
Now, we are ready to manage RDS using aws-cli.
We can proceed by checking existing RDS instances, clusters, snapshots. Since I don't have these resources in my account, the output does not return any information.
aws rds describe-db-instances
aws rds describe-db-snapshots
aws rds describe-db-clusters
Let's try creating an RDS MySql instance using the following command. You can specify instance-name, type, size as per your choice. You can also change username and password, make sure that the password you specify is greater than 8 characters.
aws rds create-db-instance --db-instance-identifier my-test-rds-mysql-instance --db-instance-class db.t3.micro --engine mysql --master-username rahul --master-user-password rahul123 --allocated-storage 5
Go to the AWS RDS console to see if the instance has been created or not.
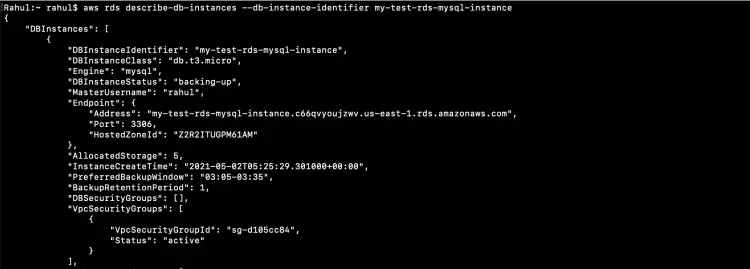
After you create an RDS instance, you can describe it and check its details.
aws rds describe-db-instances --db-instance-identifier my-test-rds-mysql-instance
Adding a tag to the RDS instance is also very simple. You can use the following command and specify Tag key:value as per your choice.
aws rds add-tags-to-resource --resource-name <rds-instance-arn> --tags "[{\"Key\": \"Env\",\"Value\": \"Test\"}]"
Check if the tag has been added or not by listing tags.
aws rds list-tags-for-resource --resource-name <rds-instance-arn>
Once the RDS instance is ready and you want to take its snapshot, you can do so by simply using the following command.
aws rds create-db-snapshot --db-instance-identifier my-test-rds-mysql-instance --db-snapshot-identifier my-test-snapshot
You can even describe the snapshot and check its status.
aws rds describe-db-snapshots --db-snapshot-identifier my-test-snapshot
You can also check the Snapshot you created in the AWS RDS console.
It is better to delete the resources you just created if you were just getting started and wanted to test the above command.
Let's start by deleting the snapshot first.
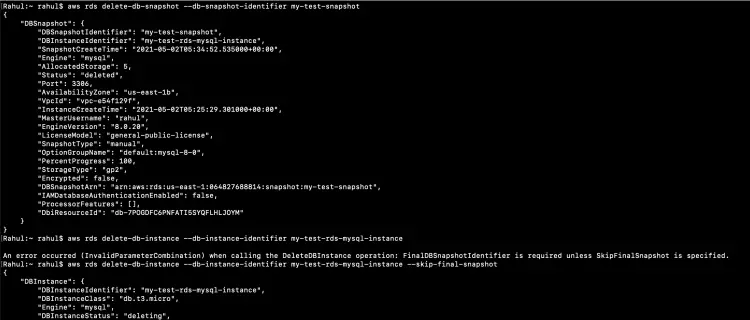
aws rds delete-db-snapshot --db-snapshot-identifier my-test-snapshot
To delete the instance, specify --skip-final-snapshot option to the command else the instance will not be terminated. This option skips the final snapshot which can be taken before deleting the RDS instance.
aws rds delete-db-instance --db-instance-identifier my-test-rds-mysql-instance --skip-final-snapshot
Verify if the snapshot and RDS instance are really deleted.
aws rds describe-db-snapshots
aws rds describe-db-instances
Conclusion
In this article, we saw the aws-cli commands to create an RDS MySql Instance and take its Snapshot. We also tagged the instance and saw how to delete the instance and snapshot we created. This guide helps to get started with aws-cli to manage RDS, you can try various options and commands on your own and get familiar with aws-cli.


