How to Install Outline Knowledgebase Wiki on Ubuntu using Docker
On this page
- Prerequisites
- Step 1 - Configure Firewall
- Step 2 - Install Docker
- Step 3 - Install Docker Compose
- Step 4 - Create Environment File for Docker
- Step 5 - Create Docker Compose File for Outline
- Step 6 - Install Outline
- Step 7 - Install SSL
- Step 8 - Install Nginx
- Step 9 - Configure Nginx
- Step 10 - Access Outline
- Step 11 - Update Outline
- Conclusion
Outline is an open-source, collaborative, knowledge base software. You can use it to host the documentation and fan pages or even use it for note sharing. It includes a markdown editor and integrates with multiple services such as Slack, Figma, Airtable, Google Docs, Trello, Zapier, Codepen, Spotify, Youtube, etc. It has security features like user groups with separate read and write permissions, allows public sharing and has RTL support with translations in 13 languages. It is built using React and Node.js. There are two ways of using Outline. One is their cloud-hosted version, or you can host it on your server.
This tutorial will teach you how to install Outline Wiki on a Ubuntu-based server using Docker.
Prerequisites
-
A server running Ubuntu 20.04 with a minimum of 1GB of RAM.
-
A non-root user with sudo privileges.
-
A domain name pointing to the server. We will use
https://outline.example.comfor our tutorial. -
Few essential apps to get started.
$ sudo apt install nano curl wget unzip gnupg
Step 1 - Configure Firewall
The first step is to configure the firewall. Ubuntu comes with ufw (Uncomplicated Firewall) by default.
Check if the firewall is running.
$ sudo ufw status
You should get the following output.
Status: inactive
Allow SSH port so that the firewall doesn't break the current connection on enabling it.
$ sudo ufw allow OpenSSH
Allow HTTP and HTTPS ports as well.
$ sudo ufw allow 80
$ sudo ufw allow 443
Enable the Firewall.
$ sudo ufw enable
Command may disrupt existing ssh connections. Proceed with operation (y|n)? y
Firewall is active and enabled on system startup
Check the status of the firewall again.
$ sudo ufw status
You should see a similar output.
Status: active

To                         Action      From
--                         ------      ----
OpenSSH                    ALLOW       Anywhere
80                         ALLOW       Anywhere
443                        ALLOW       Anywhere
OpenSSH (v6)               ALLOW       Anywhere (v6)
80 (v6)                    ALLOW       Anywhere (v6)
443 (v6)                   ALLOW       Anywhere (v6)
Step 2 - Install Docker
We will need to install Docker using its official repository. Add Docker's official GPG key.
$ curl -fsSL https://download.docker.com/linux/ubuntu/gpg | sudo gpg --dearmor -o /usr/share/keyrings/docker-archive-keyring.gpg
Add the Docker repository to the system.
$ echo \
"deb [arch=$(dpkg --print-architecture) signed-by=/usr/share/keyrings/docker-archive-keyring.gpg] https://download.docker.com/linux/ubuntu \
$(lsb_release -cs) stable" | sudo tee /etc/apt/sources.list.d/docker.list > /dev/null
Update the APT repository list and install Docker.
$ sudo apt update
$ sudo apt install docker-ce
Verify if the Docker engine is installed correctly.
$ docker --version
Docker version 20.10.14, build a224086
Execute the following commands so that you don't need to use sudo to run Docker commands.
$ sudo usermod -aG docker ${USER}
$ su - ${USER}
Step 3 - Install Docker Compose
Run the following command to install Docker compose. Docker Compose was updated to v2.0 recently, which introduced many breaking changes. We will use the latest 1.x version available from its Github releases page.
$ sudo curl -L "https://github.com/docker/compose/releases/download/1.29.2/docker-compose-$(uname -s)-$(uname -m)" -o /usr/local/bin/docker-compose
Apply the executable permission to the Docker compose binary.
$ sudo chmod +x /usr/local/bin/docker-compose
Verify if Docker Compose is installed correctly.
$ docker-compose --version
docker-compose version 1.29.2, build 5becea4c
Install Command completion for Docker compose.
$ sudo curl \
	-L https://raw.githubusercontent.com/docker/compose/1.29.2/contrib/completion/bash/docker-compose \
    -o /etc/bash_completion.d/docker-compose
$ source ~/.bashrc
This completes the Docker and Docker compose installation section of the tutorial.
Step 4 - Create Environment File for Docker
Configure Slack Authentication
Outline requires you to configure an authentication provider. For our tutorial, we will configure Slack based login.
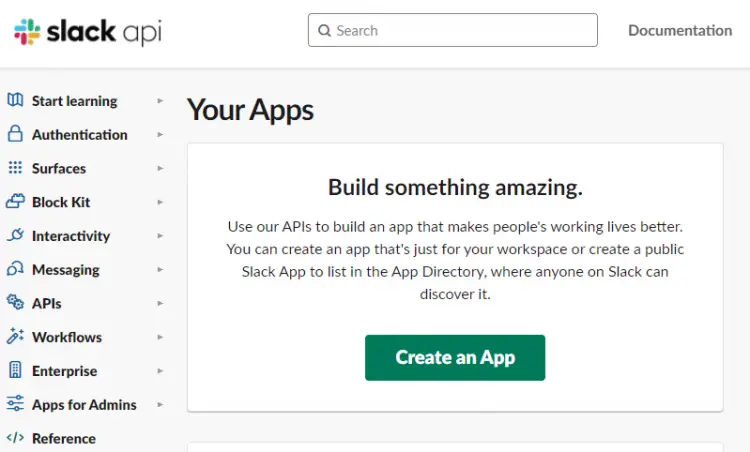
Sign in with your Slack account and visit Slack's API Apps page.
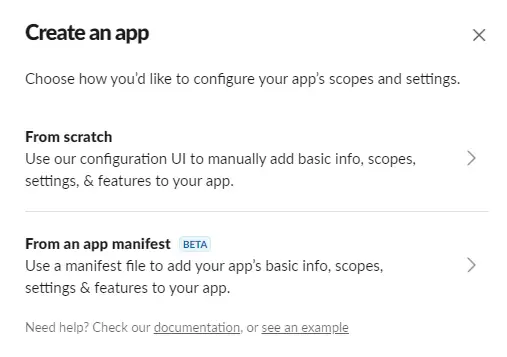
Click on the Create an App button to proceed. Click on From Scratch link to create the app.
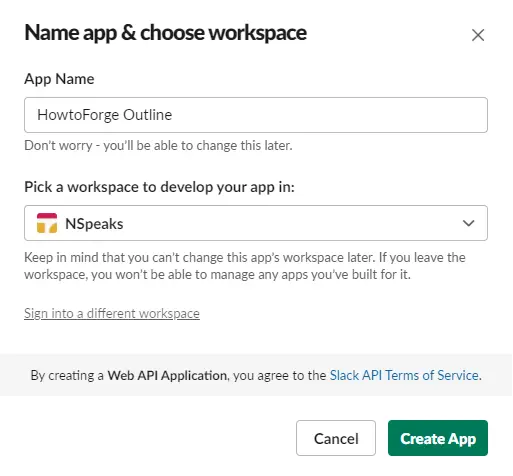
Select a name for your app and choose the workspace where you want your App to appear. If you don't want to associate your app with the existing workspace, you can create another one and come back to this step.
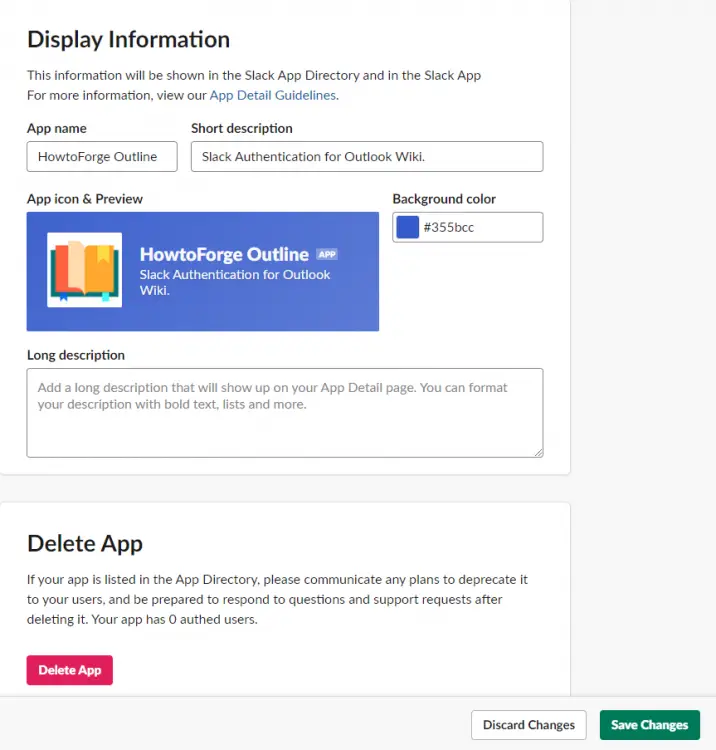
Click on the Create App button once you are finished. Next, scroll down to the bottom of the page and give your app a description, an icon, and a background color.
Click on the Save Changes button once you are finished. Select OAuth and Permissions option from the left sidebar.
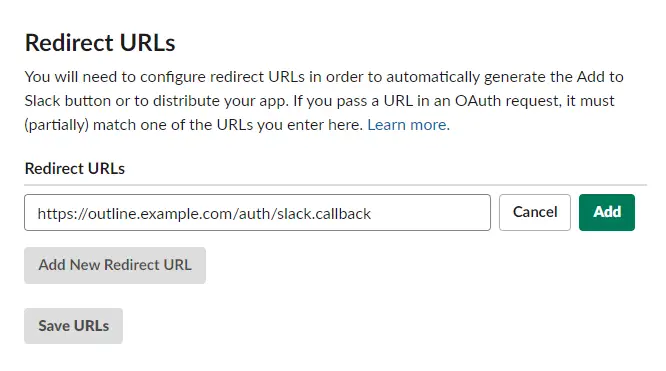
Add the redirect URL https://outline.example.com/auth/slack.callback in the box provided and click on the Add button.
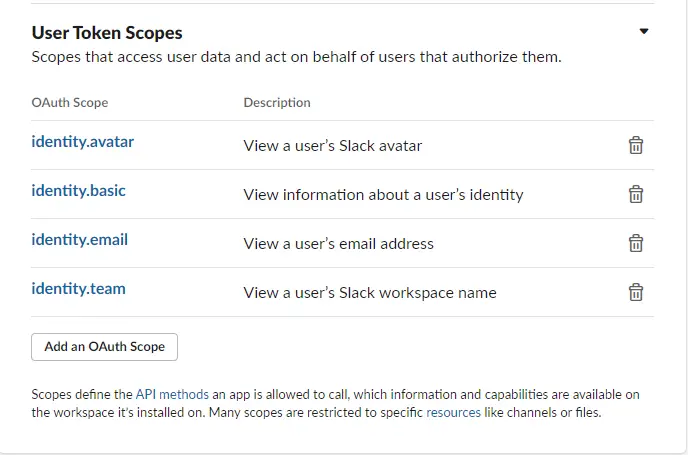
Click on the Save URLs button to proceed. Scroll down to the User Token Scopes section of the page and select the following scopes from the dropdown menu.
identity.avataridentity.basicidentity.emailidentity.team
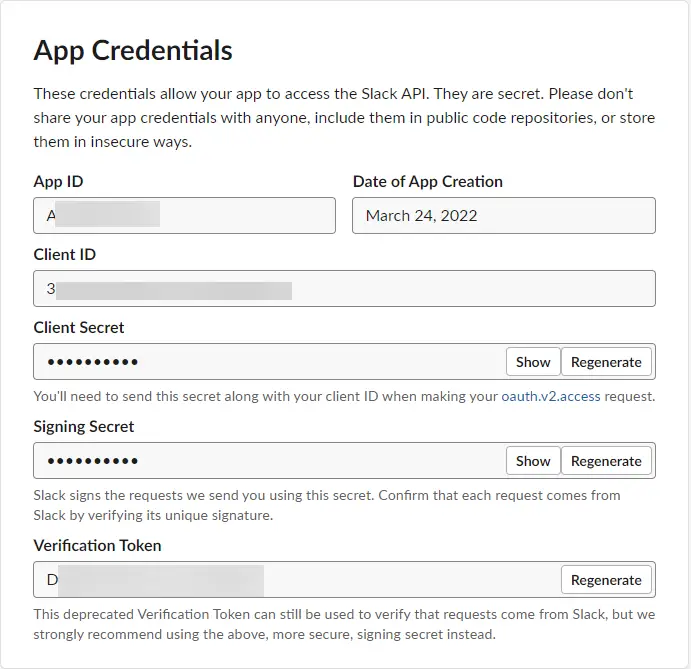
Go back to the Basic Information page from the left sidebar. Copy the values Client ID and Client Secret from their boxes under App Credentials.
Configure Slack Integration
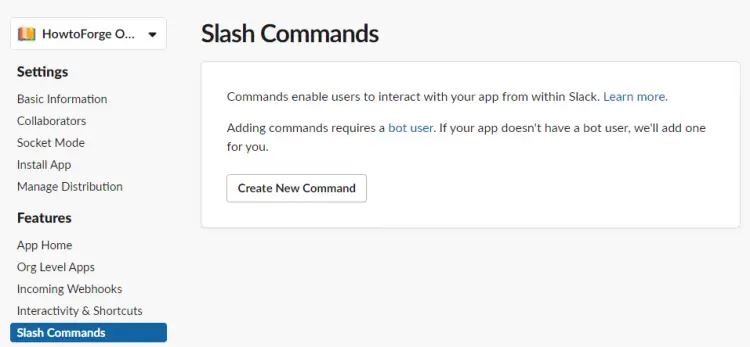
Visit the Slash Commands option from the left sidebar.
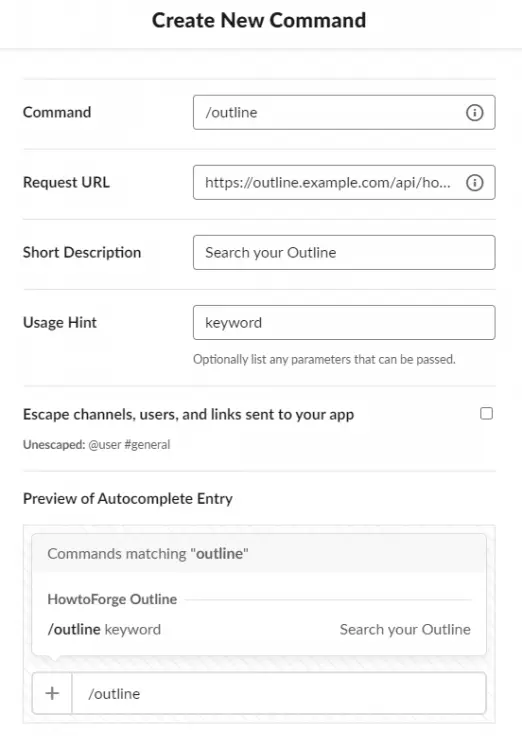
Click the New Command button on the resulting page. Enter /outline as the command. Enter https://outline.example.com/api/hooks.slack as the Request URL. Enter a description for your command and a word as a hint. Click the Save button at the bottom when finished.
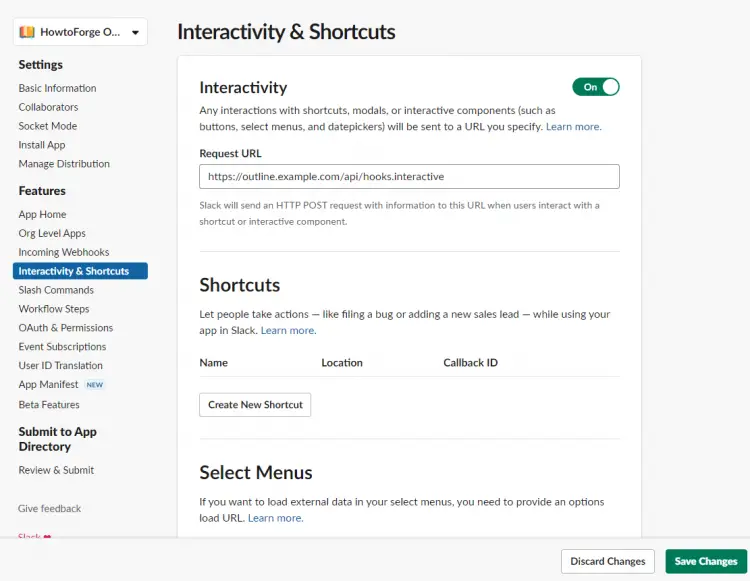
Open the menu Features >> Interactivity and Shortcuts from the left sidebar. Enable Interactivity by switching the toggle button and paste https://outline.example.com/api/hooks.interactive as the Request URL. Click the Save Changes button to finish.
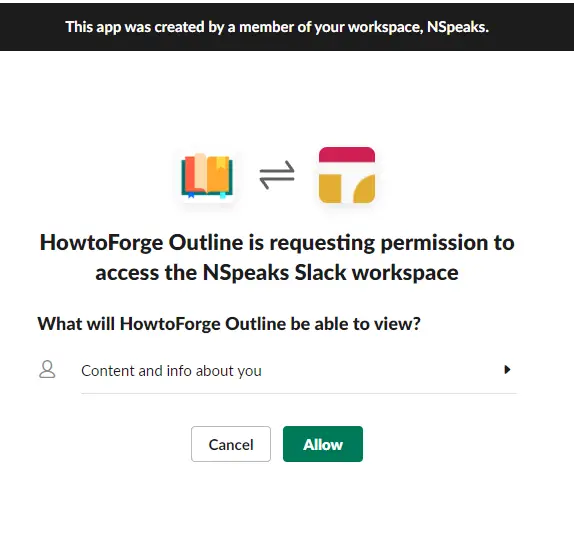
Open the Settings >> Install App page from the left sidebar and click on the Install to WorkSpace button to install the App for your Slack workspace.
Visit the Basic Information page from the left sidebar and copy App ID and Verification Token values for the slack app integration.
Create S3 Credentials
Create an S3 bucket for your Outline installation on AWS or any S3 compatible service. After creating the bucket, add the following policy JSON for configuring Cross-origin resource sharing (CORS). Replace the value of AllowedOrigins with your Outline URL.
[
    {
        "AllowedHeaders": [
            "*"
        ],
        "AllowedMethods": [
            "PUT",
            "POST"
        ],
        "AllowedOrigins": [
            "https://docs.mycompany.com"
        ],
        "ExposeHeaders": []
    },
    {
        "AllowedHeaders": [],
        "AllowedMethods": [
            "GET"
        ],
        "AllowedOrigins": [
            "*"
        ],
        "ExposeHeaders": []
    }
]
Create an IAM user with the following policy. Replace the my-bucket-name with the actual name of your Outline S3 bucket.
{
    "Version": "2012-10-17",
    "Statement": [
        {
            "Sid": "VisualEditor",
            "Effect": "Allow",
            "Action": [
                "s3:GetObjectAcl",
                "s3:DeleteObject",
                "s3:PutObject",
                "s3:GetObject",
                "s3:PutObjectAcl"
            ],
            "Resource": "arn:aws:s3:::my-bucket-name/*"
        }
    ]
}
Now that you have created your IAM user generate an access key and secret for your bucket user.
Create Secret Keys
The environment file requires a secret key and a utility secret. Run the following command twice to generate both keys.
$ openssl rand -hex 32
Copy and save these values.
Create and Edit the Environment File
Create a directory for the docker settings for Outline.
$ mkdir ~/outline
Switch to the directory.
$ cd ~/outline
Create the docker.env file and open it for editing. This file will store all the environment variables required for the installation.
$ nano docker.env
Paste the following code in it. Enter the secret key and utils secret created before. Copy the Slack credentials created earlier for the authentication and app integration. Enter your Amazon S3 credentials as specified below.
If you want to use Google Analytics to track the stats of your Outline application, enter your Analytics ID in the field below. For now, Outline doesn't support GA4 tags, so you will have to enter your old tracking ID.
For the WEB_CONCURRENCY variable, divide your system ram by 512 and enter the approximate value. The FORCE_HTTPS variable is set to false since we are using Nginx as a proxy server.
# –––––––––––––––– REQUIRED ––––––––––––––––
SECRET_KEY=generate_a_new_key
UTILS_SECRET=generate_a_new_key

POSTGRES_USER=outlinepg
POSTGRES_PASSWORD=yourpassword
POSTGRES_DB=outline
DATABASE_URL=postgres://outlinepg:yourpassword@localhost:5432/outline
DATABASE_URL_TEST=postgres://outlinepg:yourpassword@localhost:5432/outline-test
PGSSLMODE=disable
REDIS_URL=redis://localhost:6379

URL=https://docs.example.com
PORT=3000

AWS_ACCESS_KEY_ID=get_a_key_from_aws
AWS_SECRET_ACCESS_KEY=get_the_secret_of_above_key
AWS_REGION=us-east-2
AWS_S3_UPLOAD_BUCKET_URL=https://my-bucket-name.s3.us-east-2.amazonaws.com
AWS_S3_UPLOAD_BUCKET_NAME=my-bucket-name
AWS_S3_UPLOAD_MAX_SIZE=26214400
AWS_S3_FORCE_PATH_STYLE=true

# –––––––––––––– AUTHENTICATION ––––––––––––––
SLACK_KEY=<slackclientid>
SLACK_SECRET=<slackclientsecret>

# –––––––––––––––– OPTIONAL ––––––––––––––––
GOOGLE_ANALYTICS_ID=UA-XXXXXXX-1

SLACK_VERIFICATION_TOKEN=your_token
SLACK_APP_ID=A0XXXXXXX
SLACK_MESSAGE_ACTIONS=true

FORCE_HTTPS=false
ENABLE_UPDATES=true
WEB_CONCURRENCY=2
The above file is based on the sample file from Outline's Github repository. If you need to configure any additional settings, you can copy them from it to your file.
Save the file by pressing Ctrl + X and entering Y when prompted.
Step 5 - Create Docker Compose File for Outline
Create the docker-compose.yml file and open it for editing.
$ nano docker-compose.yml
Paste the following code in it.
version: "3"
services:

  outline:
    image: outlinewiki/outline:latest
    restart: always
    command: sh -c "yarn sequelize:migrate --env=production-ssl-disabled && yarn start --env=production-ssl-disabled"
    env_file: ./docker.env
    ports:
      - "3000:3000"
    depends_on:
      - postgres
      - redis

  redis:
    image: redis
    restart: always
    env_file: ./docker.env
    ports:
      - "6379:6379"
    volumes:
      - ./redis.conf:/redis.conf
    command: ["redis-server", "/redis.conf"]

  postgres:
    image: postgres
    restart: always
    env_file: ./docker.env
    ports:
      - "5432:5432"
    volumes:
      - database-data:/var/lib/postgresql/data

volumes:
  database-data:
Save the file by pressing Ctrl + X and entering Y when prompted.
Step 6 - Install Outline
Install Outline by starting the containers.
$ docker-compose up -d
Check the status of the containers.
$ docker ps
Step 7 - Install SSL
To install an SSL certificate using Let's Encrypt, we need to download the Certbot tool. We will use the Snapd package installer for that.
Install Snap installer.
$ sudo apt install snapd
Ensure that your version of Snapd is up to date.
$ sudo snap install core && sudo snap refresh core
Install Certbot.
$ sudo snap install --classic certbot
Use the following command to ensure that the Certbot command can be run by creating a symbolic link to the /usr/bin directory.
$ sudo ln -s /snap/bin/certbot /usr/bin/certbot
Generate an SSL certificate.
$ sudo certbot certonly --standalone --agree-tos --no-eff-email --staple-ocsp --preferred-challenges http -m [email protected] -d outline.example.com
The above command will download a certificate to the /etc/letsencrypt/live/outline.example.com directory on your server.
Generate a Diffie-Hellman group certificate.
$ sudo openssl dhparam -out /etc/ssl/certs/dhparam.pem 2048
Create a challenge webroot directory for Let's Encrypt auto-renewal.
$ sudo mkdir -p /var/lib/letsencrypt
Create a Cron Job to renew the SSL. It will run every day to check the certificate and renew it if needed. For that, first, create the file /etc/cron.daily/certbot-renew and open it for editing.
$ sudo nano /etc/cron.daily/certbot-renew
Paste the following code.
#!/bin/sh
certbot renew --cert-name outline.example.com --webroot -w /var/lib/letsencrypt/ --post-hook "systemctl reload nginx"
Save the file by pressing Ctrl + X and entering Y when prompted.
Change the permissions on the task file to make it executable.
$ sudo chmod +x /etc/cron.daily/certbot-renew
Step 8 - Install Nginx
Ubuntu ships with an older version of Nginx. You need to download the official Nginx repository to install the latest version.
Import Nginx's signing key.
$ curl https://nginx.org/keys/nginx_signing.key | gpg --dearmor \
	| sudo tee /usr/share/keyrings/nginx-archive-keyring.gpg >/dev/null
Add the repository for Nginx's stable version.
$ echo "deb [signed-by=/usr/share/keyrings/nginx-archive-keyring.gpg arch=amd64] \
http://nginx.org/packages/ubuntu `lsb_release -cs` nginx" \
    | sudo tee /etc/apt/sources.list.d/nginx.list
Update the system repositories.
$ sudo apt update
Install Nginx.
$ sudo apt install nginx
Verify the installation.
$ nginx -v
nginx version: nginx/1.20.2
Enable the Nginx service.
$ sudo systemctl enable nginx
Step 9 - Configure Nginx
Until now, Shlink has been running on the local system via port 8080. We will use Nginx to act as a reverse proxy to run on its domain.
Create a configuration file for the Shlink server in the /etc/nginx/conf.d directory.
$ sudo nano /etc/nginx/conf.d/outline.conf
Paste the following code in it.
server {
        server_name outline.example.com;

        listen 443 ssl http2;
        listen [::]:443 ssl http2;

        access_log /var/log/nginx/outline.access.log;
        error_log /var/log/nginx/outline.error.log;

        ssl_certificate /etc/letsencrypt/live/outline.example.com/fullchain.pem;
        ssl_certificate_key /etc/letsencrypt/live/outline.example.com/privkey.pem;
        ssl_trusted_certificate /etc/letsencrypt/live/outline.example.com/chain.pem;
        ssl_session_timeout 1d;
        ssl_session_cache shared:MozSSL:10m;
        ssl_session_tickets off;

        ssl_protocols TLSv1.2 TLSv1.3;
        ssl_ciphers ECDHE-ECDSA-AES128-GCM-SHA256:ECDHE-RSA-AES128-GCM-SHA256:ECDHE-ECDSA-AES256-GCM-SHA384:ECDHE-RSA-AES256-GCM-SHA384:ECDHE-ECDSA-CHACHA20-POLY1305:ECDHE-RSA-CHACHA20-POLY1305:DHE-RSA-AES128-GCM-SHA256:DHE-RSA-AES256-GCM-SHA384;

        ssl_stapling on;
        ssl_stapling_verify on;
        ssl_dhparam /etc/ssl/certs/dhparam.pem;

        location / {
                proxy_pass http://localhost:3000;

                proxy_set_header Upgrade $http_upgrade;
                proxy_set_header Connection "Upgrade";
                proxy_set_header Host $host;

                proxy_set_header X-Forwarded-For $proxy_add_x_forwarded_for;proxy_set_header Host $host;
                proxy_set_header Host $http_host;
                proxy_set_header X-Real-IP $remote_addr;
                proxy_set_header X-Scheme $scheme;
                proxy_set_header X-Forwarded-Proto $scheme;
                proxy_redirect off;
        }
}

## HTTPS Redirect
server {
        listen 80;
        listen [::]:80;
        server_name outline.example.com;
        return 301 https://$host$request_uri;
}
Once you are finished, save the file by pressing Ctrl + X and entering Y when prompted.
Open the file /etc/nginx/nginx.conf for editing.
$ sudo nano /etc/nginx/nginx.conf
Add the following line before the line include /etc/nginx/conf.d/*.conf;.
server_names_hash_bucket_size 64;
Save the file by pressing Ctrl + X and entering Y when prompted. Validate Nginx again.
Verify the Nginx configuration file syntax.
$ sudo nginx -t
nginx: the configuration file /etc/nginx/nginx.conf syntax is ok
nginx: configuration file /etc/nginx/nginx.conf test is successful
Start the Nginx server.
$ sudo systemctl start nginx
Step 10 - Access Outline
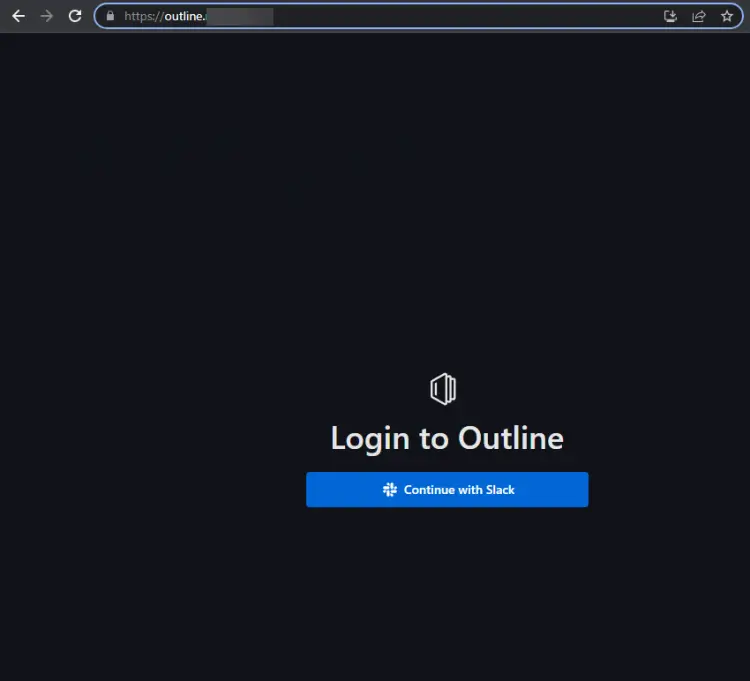
Launch the domain https://outline.example.com in your browser, and you will be greeted with the following page.
Click on the Continue with Slack button to log in with Slack and connect your workspace.
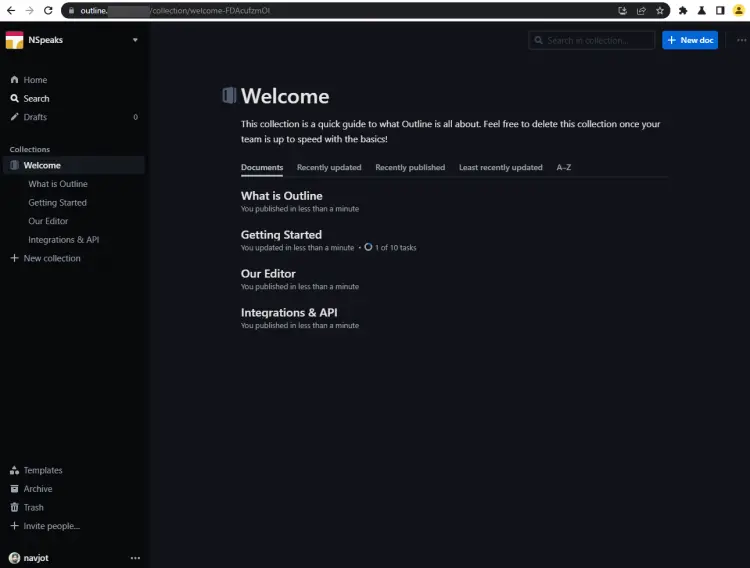
Once logged in, the Outline homepage will open, and you can start working on it.
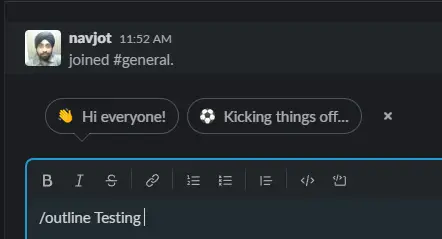
The Outline App for Slack allows you to search and paste the link to any document from inside your workspace. To do so, Open your slack workspace and type /outline <searchterm> in the messages and post them.
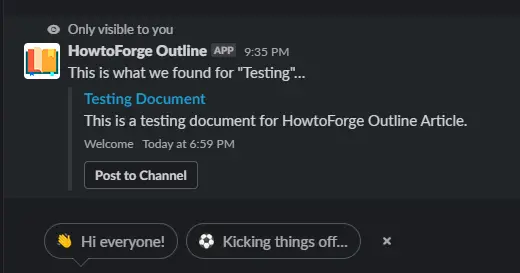
It will automatically locate the document related to the search term and post it in your messages.
Step 11 - Update Outline
To update the Outline wiki, run the following commands. The first command shuts down and removes the containers. The second one pulls the latest version of Docker images for Outline and other tools. You can run the same commands if you need to make any changes in the Docker compose file or the environment file.
$ docker-compose down --remove-orphans
$ docker-compose pull
Run the following command to upgrade the database.
$ docker-compose run --rm outline yarn db:migrate --env=production-ssl-disabled
Start the new container with fresh images while maintaining your data intact.
$ docker-compose up -d
Conclusion
This concludes our tutorial on installing Outline Knowledgebase Wiki on a Ubuntu 20.04 server using Docker. If you want to learn more about Outline, you can follow its official documentation. If you have any questions, post them in the comments below.

