How to Install Gitea Code Hosting using Docker on Rocky Linux 8
On this page
- Prerequisites
- Step 1 - Configure Firewall
- Step 2 - Install Docker
- Step 3 - Install Docker Compose
- Step 4 - Configure and Install Gitea
- Step 5 - Install SSL
- Step 6 - Install Nginx
- Step 7 - Access and Set up Gitea
- Step 8 - Create First Repository
- Step 9 - Set up SSH
- Step 10 - Clone Repository using SSH
- Step 11 - Testing First Commit
- Step 12 - Upgrade Gitea
- Conclusion
Gitea is a self-hosted code hosting service similar to Github, Bitbucket, and Gitlab. It is written in Go language and can be installed on multiple operating systems, including Linux, macOS, Windows, and architectures like amd64, i386, ARM, and others. Being a lightweight application, it can be installed with minimal hardware requirements. It includes a repository file editor, OpenSSH server, issue tracking, pull requests, user management, notifications, built-in wiki, LFS support, Git hooks, and much more.
In this article, you will learn to install Gitea using Docker on a Rocky Linux 8 server.
Prerequisites
-
A Server running Rocky Linux 8.5.
-
A non-root user with sudo privileges.
-
Disable SELinux.
-
Update everything.
$ sudo dnf update
-
Install essential packages.
$ sudo dnf install yum-utils nano curl
-
A fully qualified domain name(FQDN) pointing to the server like
gitea.example.com.
Step 1 - Configure Firewall
The first step is to configure the firewall. Rocky Linux uses Firewalld Firewall. Check the firewall's status.
$ sudo firewall-cmd --state
running
The firewall works with different zones, and the public zone is the default one that we will use. List all the services and ports active on the firewall.
$ sudo firewall-cmd --permanent --list-services
It should show the following output.
cockpit dhcpv6-client ssh
Allow HTTP and HTTPS ports.
$ sudo firewall-cmd --permanent --add-service=http
$ sudo firewall-cmd --permanent --add-service=https
Open port 2221 for SSH.
$ sudo firewall-cmd --permanent --add-port=2221/tcp
List all the services being enabled by the firewall.
$ sudo firewall-cmd --permanent --list-all
You should see a similar output.
public
  target: default
  icmp-block-inversion: no
  interfaces:
  sources:
  services: cockpit dhcpv6-client http https ssh
  ports: 2221/tcp
  protocols:
  forward: no
  masquerade: no
  forward-ports:
  source-ports:
  icmp-blocks:
  rich rules:
Reload the firewall to enable the changes.
$ sudo firewall-cmd --reload
Step 2 - Install Docker
Rocky Linux ships with an older version of Docker. To install the latest version, first, install the official Docker repository.
$ sudo yum-config-manager \
    --add-repo \
    https://download.docker.com/linux/centos/docker-ce.repo
Install the latest version of Docker.
$ sudo dnf install docker-ce docker-ce-cli containerd.io
Enable and run the Docker daemon.
$ sudo systemctl enable docker --now
Verify that it is running.
? docker.service - Docker Application Container Engine
   Loaded: loaded (/usr/lib/systemd/system/docker.service; enabled; vendor preset: disabled)
   Active: active (running) since Sat 2022-04-02 13:26:08 UTC; 2s ago
     Docs: https://docs.docker.com
 Main PID: 21152 (dockerd)
    Tasks: 7
   Memory: 30.9M
   CGroup: /system.slice/docker.service
           ??21152 /usr/bin/dockerd -H fd:// --containerd=/run/containerd/containerd.sock
...
By default, Docker requires root privileges. If you want to avoid using sudo every time you run the docker command, add your username to the docker group.
$ sudo usermod -aG docker $(whoami)
You will need to log out of the server and back in as the same user to enable this change.
Step 3 - Install Docker Compose
Download the latest stable release of Docker Compose.
$ sudo curl -L "https://github.com/docker/compose/releases/download/1.29.2/docker-compose-$(uname -s)-$(uname -m)" -o /usr/local/bin/docker-compose
Apply executable permissions to the Docker Compose binary file.
$ sudo chmod +x /usr/local/bin/docker-compose
Test the installation.
$ docker-compose --version
docker-compose version 1.29.2, build 5becea4c
Install the Docker-compose Bash Completion script.
$ sudo curl \
    -L https://raw.githubusercontent.com/docker/compose/1.29.2/contrib/completion/bash/docker-compose \
    -o /etc/bash_completion.d/docker-compose
Reload your profile settings to make the bash-completion work.
$ source ~/.bashrc
Step 4 - Configure and Install Gitea
Configure System Timezone
You can check your system's current timezone by the following command.
$ timedatectl
  Local time: Mon 2022-05-02 06:38:36 UTC
           Universal time: Mon 2022-05-02 06:38:36 UTC
                 RTC time: Mon 2022-05-02 06:38:36
                Time zone: Etc/UTC (UTC, +0000)
System clock synchronized: yes
              NTP service: active
          RTC in local TZ: no
You can see that the system is set to GMT or UTC timezone. If you live in an area with a different timezone or want to change it, use the following command to do that.
$ sudo timedatectl set-timezone Asia/Kolkata
Check the timezone again.
$ timedatectl
Local time: Mon 2022-05-02 12:09:23 IST
           Universal time: Mon 2022-05-02 06:39:23 UTC
                 RTC time: Mon 2022-05-02 06:39:22
                Time zone: Asia/Kolkata (IST, +0530)
System clock synchronized: yes
              NTP service: active
          RTC in local TZ: no
You can see that the timezone has been updated to IST, which is GMT+5:30.
Create Gitea Directories
Create the directory for Gitea.
$ mkdir ~/gitea-docker
Switch to the Gitea directory.
$ cd ~/gitea-docker
Create directories for storing Gitea data and PostgreSQL databases.
$ mkdir {gitea,postgres}
Configure Gitea Docker Compose File
Get the UID (User Identifier) and GID (Group Identifier) values for the currently logged-in user. The first command generates the UID, while the second one generates the GID. Copy both the values as they will be required to configure the Docker compose file.
$ echo $(id -u)
1000
$ echo $(id -g)
1000
Create and open the Docker Compose file for editing.
$ nano docker-compose.yml
Paste the following code in it. Paste the UID and GID values generated earlier.
version: "3"

networks:
  gitea:
    external: false

services:
  server:
    image: gitea/gitea:1.16.6
    container_name: gitea
    environment:
      - USER_UID=1000
      - USER_GID=1000
      - GITEA__database__DB_TYPE=postgres
      - GITEA__database__HOST=db:5432
      - GITEA__database__NAME=gitea
      - GITEA__database__USER=gitea
      - GITEA__database__PASSWD=gitea
    restart: always
    networks:
      - gitea
    volumes:
      - ./gitea:/data
      - /etc/timezone:/etc/timezone:ro
      - /etc/localtime:/etc/localtime:ro
    ports:
      - "3000:3000"
      - "2221:22"
    depends_on:
      - db

  db:
    image: postgres:14
    restart: always
    environment:
      - POSTGRES_USER=gitea
      - POSTGRES_PASSWORD=gitea
      - POSTGRES_DB=gitea
    networks:
      - gitea
    volumes:
      - ./postgres:/var/lib/postgresql/data
Save the file by pressing Ctrl + X and entering Y when prompted.
The above Docker Compose file deploys two containers - one for Gitea and one for PostgreSQL. We have added a few environment variables to configure the database details. To connect the PostgreSQL database to the Gitea container, we have specified the host as the name of the PostgreSQL service in the file.
The port parameters "3000:3000" and "2221:22" specifies the port mapping where the left port denotes the host port and the right port denotes the container port. Gitea uses port 3000 for its web service, which is what we have exposed to the server too. For SSH, our system is already using port 22 for logging purposes. Therefore, we specify a custom port to perform SSH operations. In our case, we are using port 2221. This port also needs to be opened via your firewall, which we already did in step 1 of this tutorial.
Both, Gitea and the PostgreSQL containers are connected via a common internal Docker network named gitea. The volume mounts will automatically create gitea and postgres directories in the current folder when you start your Docker installation. The user ID specified in the compose file is what the Gitea container will use to create the gitea directory. On the other hand, the PostgreSQL container will be managed by the user systemd-coredump which is the default behavior. You can change that behavior, but it is not necessary.
Customize your Gitea Installation
You can customize your Gitea installation by adding an app.ini file to the ~/gitea-docker/gitea/gitea/conf directory. After the installation, this file can be edited from inside the container from the /data/gitea/conf/app.ini location. You can use the sample ini file from Gitea's Github repository for reference.
Install Gitea
Run the following command to launch Gitea containers.
$ docker-compose up -d
Check the status of the containers to ensure they are running properly.
$ docker ps
CONTAINER ID   IMAGE                COMMAND                  CREATED             STATUS             PORTS                                                                              NAMES
bd06e370c46b   gitea/gitea:1.16.6   "/usr/bin/entrypoint…"   19 minutes ago   Up 19 minutes   0.0.0.0:3000->3000/tcp, :::3000->3000/tcp, 0.0.0.0:2221->22/tcp, :::2221->22/tcp   gitea
3fc6c4bce810   postgres:14          "docker-entrypoint.s…"   19 minutes ago   Up 19 minutes   5432/tcp                                                                           gitea_db_1
You can also use the following command to check the status.
$ docker-compose ps
   Name                 Command               State                                       Ports
------------------------------------------------------------------------------------------------------------------------------------
gitea        /usr/bin/entrypoint /bin/s ...   Up      0.0.0.0:2221->22/tcp,:::2221->22/tcp, 0.0.0.0:3000->3000/tcp,:::3000->3000/tcp
gitea_db_1   docker-entrypoint.sh postgres    Up      5432/tcp
Step 5 - Install SSL
To install an SSL certificate using Let's Encrypt, we need to install the Certbot tool.
Firstly, you need to download and install the EPEL repository.
$ sudo dnf install epel-release
Run the following commands to install Certbot.
$ sudo dnf install certbot
Generate the SSL certificate.
$ sudo certbot certonly --standalone --agree-tos --no-eff-email --staple-ocsp --preferred-challenges http -m [email protected] -d gitea.example.com
The above command will download a certificate to the /etc/letsencrypt/live/gitea.example.com directory on your server.
Generate a Diffie-Hellman group certificate.
$ sudo openssl dhparam -out /etc/ssl/certs/dhparam.pem 4096
Create a challenge web root directory for Let's Encrypt auto-renewal.
$ sudo mkdir -p /var/lib/letsencrypt
Create a Cron Job to renew the SSL. It will run every day to check the certificate and renew it if needed. For that, first, create the file /etc/cron.daily/certbot-renew and open it for editing.
$ sudo nano /etc/cron.daily/certbot-renew
Paste the following code.
#!/bin/sh
certbot renew --cert-name gitea.example.com --webroot -w /var/lib/letsencrypt/ --post-hook "systemctl reload nginx"
Save the file by pressing Ctrl + X and entering Y when prompted.
Change the permissions on the task file to make it executable.
$ sudo chmod +x /etc/cron.daily/certbot-renew
Step 6 - Install Nginx
We will be installing the latest version of Nginx. Create and open the file /etc/yum.repos.d/nginx.repo for editing.
$ sudo nano /etc/yum.repos.d/nginx.repo
Paste the following lines in it.
[nginx-stable]
name=nginx stable repo
baseurl=http://nginx.org/packages/centos/$releasever/$basearch/
gpgcheck=1
enabled=1
gpgkey=https://nginx.org/keys/nginx_signing.key
module_hotfixes=true

[nginx-mainline]
name=nginx mainline repo
baseurl=http://nginx.org/packages/mainline/centos/$releasever/$basearch/
gpgcheck=1
enabled=0
gpgkey=https://nginx.org/keys/nginx_signing.key
module_hotfixes=true
Save the file by pressing Ctrl + X and entering Y when prompted.
Install Nginx.
$ sudo dnf install nginx
Verify the installation.
$ nginx -v
nginx version: nginx/1.20.2
Enable and start the Nginx service.
$ sudo systemctl enable nginx --now
Create and open the file /etc/nginx/conf.d/gitea.conf for editing.
$ sudo nano /etc/nginx/conf.d/gitea.conf
Paste the following code in it.
# Redirect all non-encrypted to encrypted
server {
    listen 80;
    listen [::]:80;
    server_name gitea.example.com;
    return 301 https://$host$request_uri;
}

server {
    listen 443 ssl http2;
    listen [::]:443 ssl http2;

    server_name gitea.example.com;

    ssl_certificate     /etc/letsencrypt/live/gitea.example.com/fullchain.pem;
    ssl_certificate_key /etc/letsencrypt/live/gitea.example.com/privkey.pem;
    ssl_trusted_certificate /etc/letsencrypt/live/gitea.example.com/chain.pem;
    ssl_session_timeout 1d;
    ssl_session_cache shared:MozSSL:10m;
    ssl_session_tickets off;
    ssl_stapling on;
    ssl_stapling_verify on;
    ssl_dhparam /etc/ssl/certs/dhparam.pem;

    ssl_protocols TLSv1.2 TLSv1.3;
    ssl_ciphers ECDHE-ECDSA-AES128-GCM-SHA256:ECDHE-RSA-AES128-GCM-SHA256:ECDHE-ECDSA-AES256-GCM-SHA384:ECDHE-RSA-AES256-GCM-SHA384:ECDHE-ECDSA-CHACHA20-POLY1305:ECDHE-RSA-CHACHA20-POLY1305:DHE-RSA-AES128-GCM-SHA256:DHE-RSA-AES256-GCM-SHA384;

    access_log /var/log/nginx/gitea.example.com.access.log main;
    error_log  /var/log/nginx/gitea.example.com.error.log;

    location / {
        client_max_body_size 100M;
        proxy_pass  http://localhost:3000;
        proxy_set_header Host $host;
        proxy_set_header X-Real-IP $remote_addr;
        proxy_set_header X-Forwarded-For $proxy_add_x_forwarded_for;
        proxy_set_header X-Forwarded-Proto $scheme;
    }
}
Once finished, save the file by pressing Ctrl + X and entering Y when prompted. The above configuration allows Nginx to act as a proxy server and bind to the port 3000 on localhost. To enable the uploading of large files for Git LFS, you can change the value of the client_max_body_size variable as per requirement. For our tutorial, we are using 100 MB as the limit.
Open the file /etc/nginx/nginx.conf for editing.
$ sudo nano /etc/nginx/nginx.conf
Add the following line before the line include /etc/nginx/conf.d/*.conf;.
server_names_hash_bucket_size 64;
Save the file by pressing Ctrl + X and entering Y when prompted.
Verify the Nginx configuration file syntax.
$ sudo nginx -t
nginx: the configuration file /etc/nginx/nginx.conf syntax is ok
nginx: configuration file /etc/nginx/nginx.conf test is successful
Restart the Nginx service to enable the new configuration.
$ sudo systemctl restart nginx
Step 7 - Access and Set up Gitea
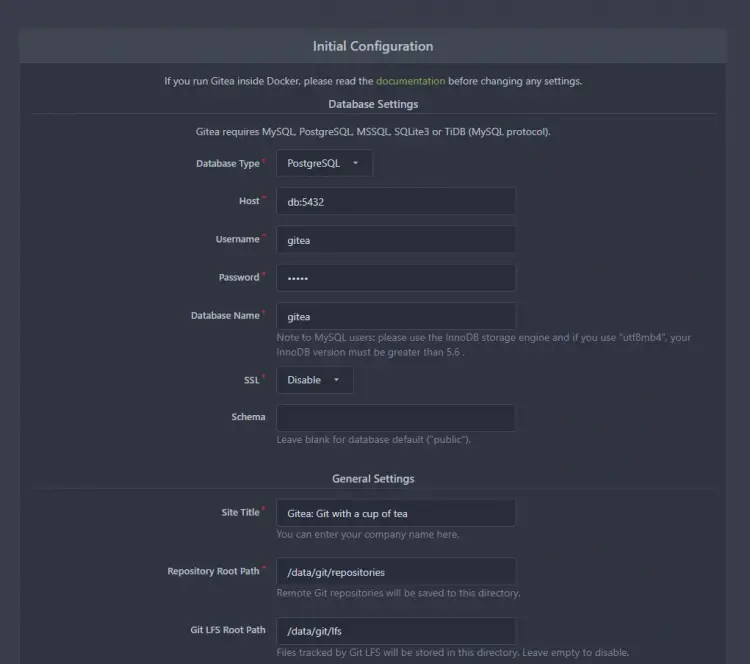
Visit the URL https://gitea.example.com in your browser, and the following installation screen shall appear.
Most of the fields will be pre-filled for you based on the values from the Docker compose file.
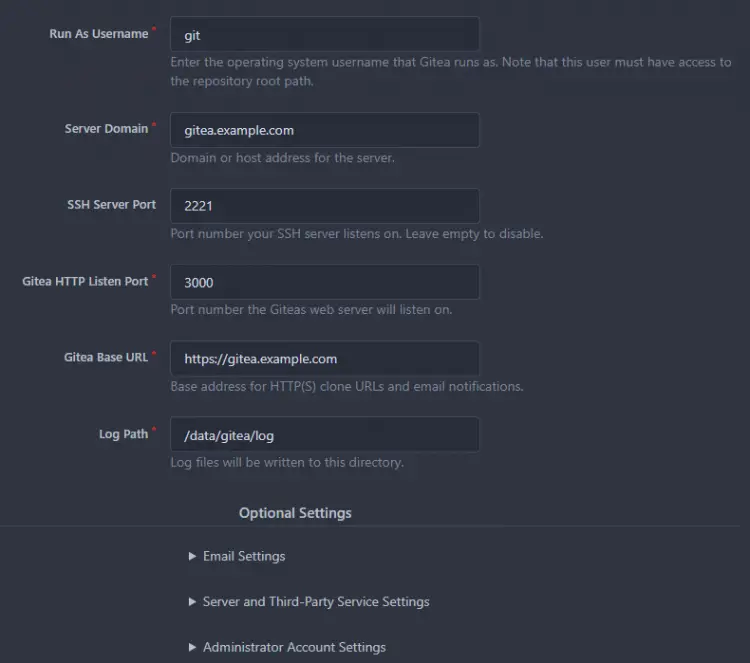
Enter gitea.example.com as the Server Domain and https://gitea.example.com as the Gitea Base URL. Change the value for the SSH Server Port from 22 to 2221. Leave the remaining settings as it is.
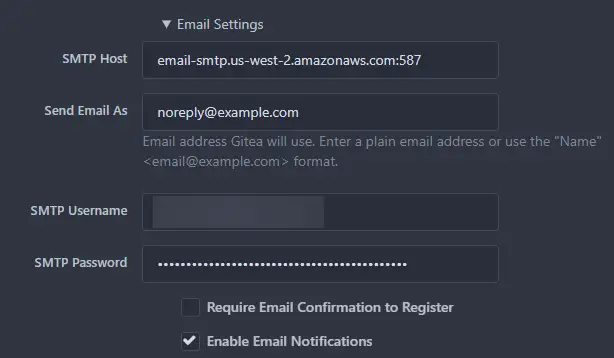
If you want to use mail features, you can add your SMTP server details. Expand the Email Settings section of the page and enter values as shown in the screenshot. Make sure to include your SMTP port with the hostname as shown. For our tutorial, we are using the Amazon SES service. You can use any SMTP service of your choice.
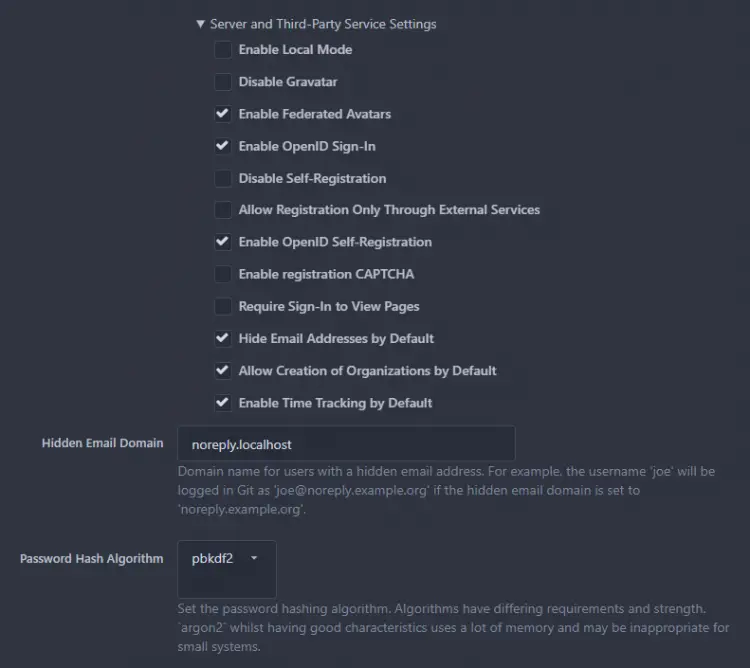
There are a few more settings you should check out before installing. To change them, expand the Server and Third-Party Service Settings section of the page.
Change the settings as per your requirement. We have enabled the option Hide Email Addresses by Default to ensure greater privacy. If you don't want people to register an account, enable the Disable Self-Registration option.
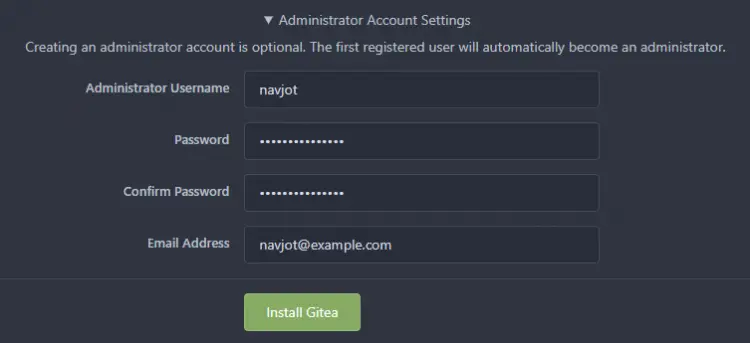
Last but not the least, set up your administrator account. Expand the Administrator Account Settings section of the page and fill in the required values.
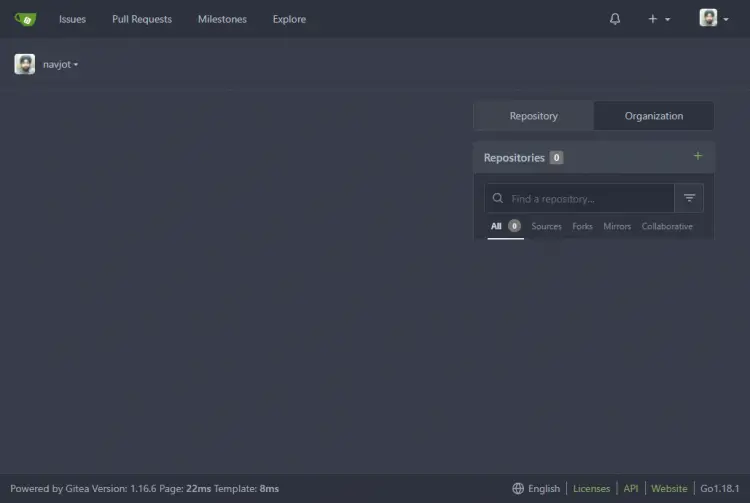
Click the Install Gitea button when finished to complete the installation. You will be redirected to the Gitea dashboard. If, for some reason, you get a 502 error, refresh the page.
Step 8 - Create First Repository
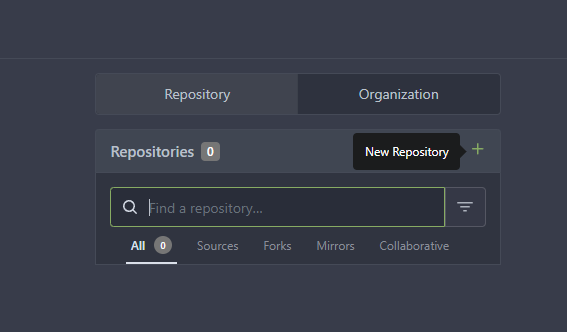
Let us create our first repository. To do that, click the + sign on the dashboard.
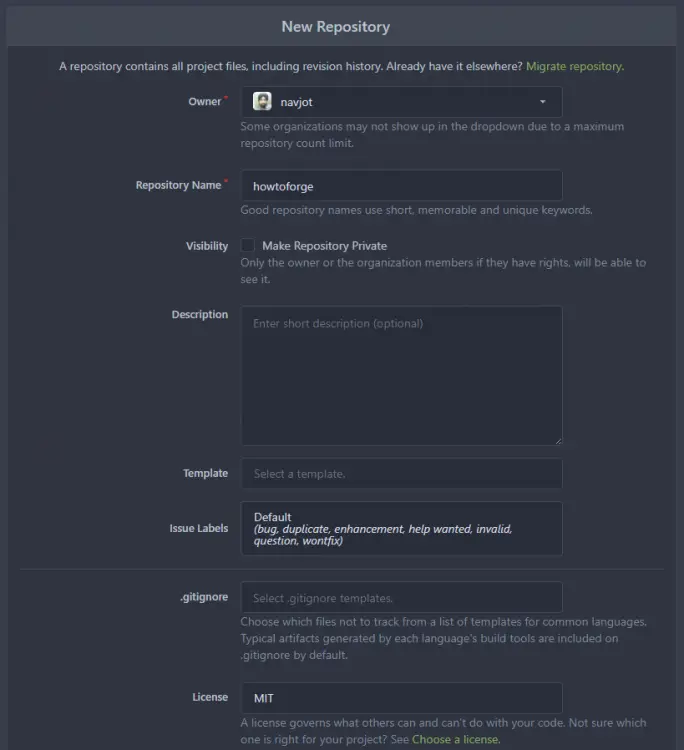
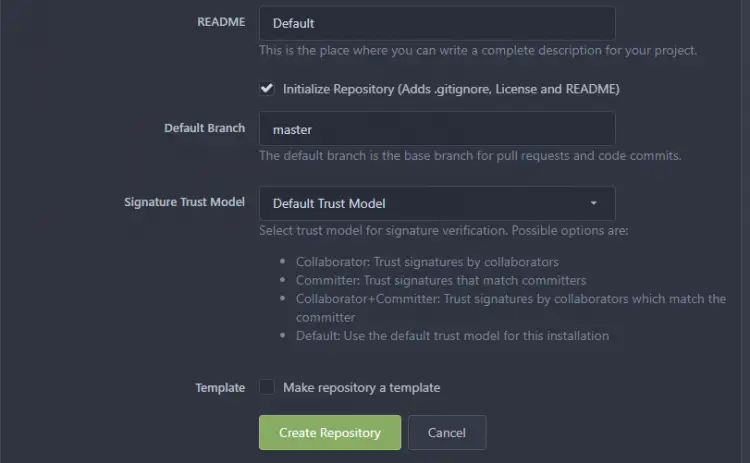
Enter the repository details. Select the Default Issue label by choosing from the dropdown menu. Select an appropriate license for your repository.
Select the default branch for your repository.
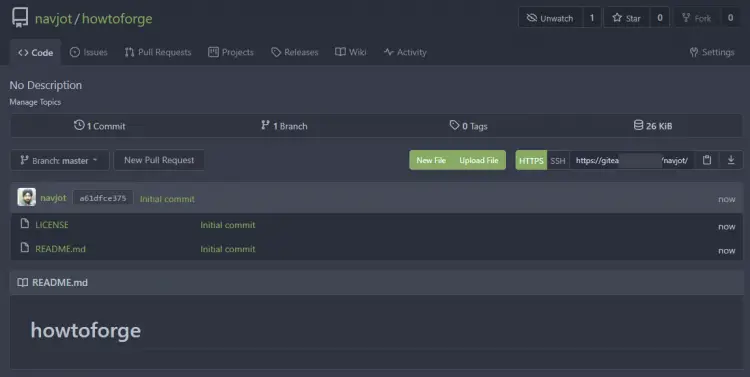
Once satisfied, click the Create repository button to create your first repository on your Gitea installation. You will be redirected to your repository home.
Step 9 - Set up SSH
Let us set up SSH to use with our newly created repository.
For our tutorial, we will use a local PC with Ubuntu pre-installed. However, the commands should work on any OS terminal without much change.
Create a new SSH key to use with Gitea on your local PC.
$ ssh-keygen -f ~/.ssh/gitea-demo -t rsa -b 4096 -C "HowtoForge Gitea Demo" -q -N "yourpassphrase"
Enter a strong passphrase in place of the placeholder in the command above. This will create an SSH key at ~/.ssh/gitea-demo location.
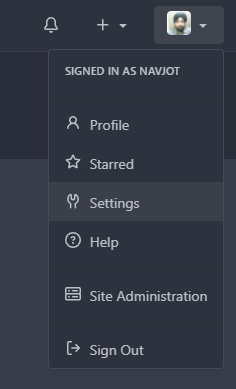
Next, open your Gitea profile settings as shown by clicking the dropdown menu on your profile image and selecting the Settings option.
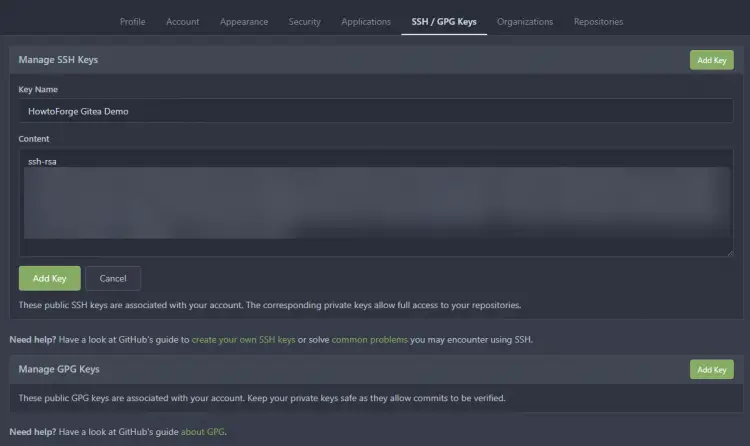
Next, switch to the SSH/GPG Keys tab on the page.
Add a name for your SSH key. Go back to the terminal on your local PC and run the following command to output the public key for Gitea.
$ cat ~/.ssh/gitea-demo.pub
Copy the resulting output and paste it back into the Content box on the SSH keys page of Gitea.
Click the Add Key button to finish adding the key.
Go back to your local PC and set up the SSH agent to remain active for 1 hour.
$ eval $(ssh-agent -t 3600)b
Add the newly created SSH key to the SSH agent.
$ ssh-add ~/.ssh/gitea-demo
Enter passphrase for /home/navjot/.ssh/gitea-demo:
Identity added: /home/navjot/.ssh/gitea-demo (HowtoForge Gitea Demo)
You will be prompted for your passphrase.
Step 10 - Clone Repository using SSH
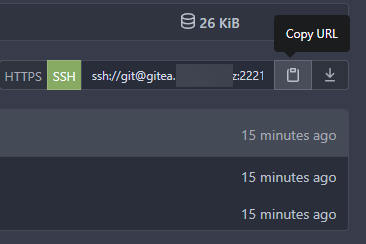
Let us clone the newly created repository using SSH. Visit the repository page again and copy the SSH URL after selecting the SSH option.
It should look like the following.
ssh://[email protected]:2221/navjot/howtoforge.git
Run the following command on your local PC to clone the repository using SSH.
$ git clone ssh://[email protected]:2221/navjot/howtoforge.git
Cloning into 'howtoforge'...
The authenticity of host '[gitea.example.com]:2221 ([209.23.11.75]:2221)' can't be established.
ECDSA key fingerprint is SHA256:sN0N4OkpChwuR00xpGZU1mGJrp7ktwHRC7uxGP7Nh08.
Are you sure you want to continue connecting (yes/no/[fingerprint])? yes
Warning: Permanently added '[gitea.example.com]:2221,[209.23.11.75]:2221' (ECDSA) to the list of known hosts.
remote: Enumerating objects: 4, done.
remote: Counting objects: 100% (4/4), done.
remote: Compressing objects: 100% (3/3), done.
remote: Total 4 (delta 0), reused 0 (delta 0), pack-reused 0
Receiving objects: 100% (4/4), done.
You will be prompted to add the host credentials. Enter yes to proceed with cloning the repository.
You will see the cloned repository on your system.
$ ls
howtoforge
Switch to the directory.
$ cd howtoforge
Check the Git status of the newly cloned repository. For this, you should have Git installed on your local PC.
$ git status
On branch master
Your branch is up to date with 'origin/master'.

nothing to commit, working tree clean
This concludes that SSH is working perfectly.
Step 11 - Testing First Commit
Now that we have set up our first repository, it's time to make some changes and commit them back.
Let us update the README.md file. On your local PC, open the readme file for editing.
$ nano README.md
Edit the file and when finished, save it by pressing Ctrl + X and entering Y when prompted.
Check the Git status again.
$ git status
On branch master
Your branch is up to date with 'origin/master'.

Changes not staged for commit:
  (use "git add <file>..." to update what will be committed)
  (use "git restore <file>..." to discard changes in working directory)
        modified:   README.md

no changes added to commit (use "git add" and/or "git commit -a")
This shows that the Readme file has been edited but not committed. Add the file to prepare it for commit.
$ git add README.md
Commit the file.
$ git commit -m "Update the Readme file for Gitea tutorial."
[master 5e9b039] Update the Readme file for Gitea tutorial.
 1 file changed, 3 insertions(+), 1 deletion(-)
Push the file to your Gitea Server.
$ git push origin master
Enumerating objects: 5, done.
Counting objects: 100% (5/5), done.
Delta compression using up to 4 threads
Compressing objects: 100% (3/3), done.
Writing objects: 100% (3/3), 392 bytes | 392.00 KiB/s, done.
Total 3 (delta 0), reused 0 (delta 0)
remote: . Processing 1 references
remote: Processed 1 references in total
To ssh://gitea.example.com:2221/navjot/howtoforge.git
   a61dfce..5e9b039  master -> master
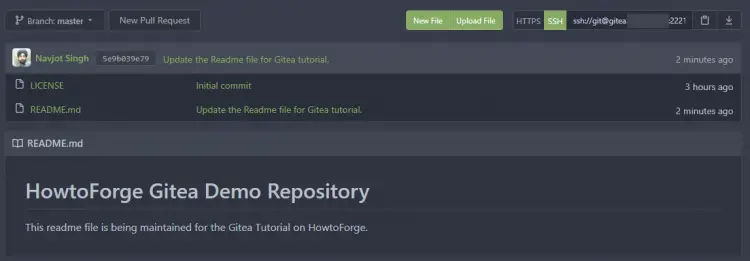
To confirm, go back to the Gitea repository page.
You can notice that the Readme file has been updated, and the latest commit message is also shown. To view the changes, click on the commit message, and you can view the following page with differences.
This concludes our first commit for our repository. You can start working on your Gitea installation for your projects.
Step 12 - Upgrade Gitea
Upgrading Gitea is a simple process.
Shut down and remove the existing containers. Since the data is saved outside the containers on the host, it will be retained.
$ cd ~/gitea-docker
$ docker-compose down --remove-orphans
Open the docker-compose.yml file and change the version of the Gitea container. Next, pull the new Gitea image.
$ docker pull
Start the new containers.
$ docker-compose up -d
Check the status.
$ docker ps
Conclusion
This concludes our tutorial where we installed Gitea Code Hosting Service using Docker on a Rocky Linux server. We also installed the Nginx server to act as a proxy and exposed Gitea via a public URL using SSL. If you have any questions, post them in the comments below.

