How to Install and Use Apache Guacamole Remote Desktop on Rocky Linux 8
On this page
- Prerequisites
- Step 1 - Configure Firewall
- Step 2 - Install Libraries
- Step 3 - Install Apache Tomcat
- Step 4 - Download and Build Guacamole
- Step 5 - Install Guacamole Client
- Step 6 - Install and Configure MySQL
- Step 7 - Configure Apache Guacamole
- Step 8 - Install SSL
- Step 9 - Install and Configure Nginx as Reverse Proxy
- Step 10 - Accessing Guacamole
- Step 11 - How to Use Guacamole
- Conclusion
Apache Guacamole is a free, open-source, clientless, remote desktop gateway. It supports standard protocols like SSH, RDP, and VNC. It does not need any third-party plugins and clients to work. You can access your machine using a web-based gateway. It can be put behind a proxy server which allows you to access your servers from anywhere in the world.
Guacamole is made up of two components:
guacamole-servercontains all the native, server-side components required by Guacamole to connect to remote desktops.guacdis the proxy daemon that runs on the Guacamole server, accepts user connections and then connects them to the remote desktops.guacamole-clientcontains all Java and Javascript components of Guacamole which make up the web application where users can connect to their desktops.
In this tutorial, you will learn how to install and use Apache Guacamole on a Rocky Linux 8 based server. You will also learn how to use it to connect to a remote desktop. We will be installing Guacamole by building from its source code.
Prerequisites
-
A server running Rocky Linux 8 with a minimum of 2GB RAM and 2 CPU Cores.
-
A domain name for the helpdesk pointing to the server. For our tutorial, we will use the
uvdesk.example.comdomain. -
A non-root based user with sudo privileges.
-
Make sure everything is updated.
$ sudo dnf update
-
Install basic utility packages. Some of them may already be installed.
$ sudo dnf install wget curl nano unzip yum-utils -y
Step 1 - Configure Firewall
The first step is to configure the firewall. Rocky Linux uses Firewalld Firewall. Check the firewall's status.
$ sudo firewall-cmd --state
running
The firewall works with different zones, and the public zone is the default one that we will use. List all the services and ports active on the firewall.
$ sudo firewall-cmd --permanent --list-services
It should show the following output.
cockpit dhcpv6-client ssh
Allow HTTP and HTTPS ports.
$ sudo firewall-cmd --permanent --add-service=http
$ sudo firewall-cmd --permanent --add-service=https
Recheck the status of the firewall.
$ sudo firewall-cmd --permanent --list-services
You should see a similar output.
cockpit dhcpv6-client http https ssh
Reload the firewall to enable the changes.
$ sudo firewall-cmd --reload
Step 2 - Install Libraries
Before installing the libraries, we need to install the EPEL repository and enable the PowerTools repository.
$ sudo dnf install epel-release -y
$ sudo dnf config-manager --set-enabled powertools
The first step is to install libraries required to build Guacamole. Install the required libraries.
$ sudo dnf install cairo-devel libjpeg-turbo-devel libjpeg-devel libpng-devel libtool libuuid-devel uuid-devel make cmake
The above dependencies are compulsory ones, which means without them, Guacamole can't be built. You can install some optional dependencies to add support for various protocols and features.
But first, you need to enable the RPMFusion Free Repository because it contains the package ffmpeg-devel.
$ sudo dnf install --nogpgcheck https://mirrors.rpmfusion.org/free/el/rpmfusion-free-release-8.noarch.rpm
Install the optional dependencies.
$ sudo dnf install ffmpeg-devel freerdp-devel pango-devel libssh2-devel libtelnet-devel libvncserver-devel libwebsockets-devel pulseaudio-libs-devel openssl-devel compat-openssl10 libvorbis-devel libwebp-devel libgcrypt-devel
Step 3 - Install Apache Tomcat
For our tutorial, we will install Apache Tomcat 9, which requires Java 8 and later to work.
Install Java
We will install OpenJDK 11, the open-source implementation of the Java platform.
Run the following command to install OpenJDK.
$ sudo dnf install java-11-openjdk-devel
Verify the installation.
$ java -version
openjdk 11.0.14 2022-01-18 LTS
OpenJDK Runtime Environment 18.9 (build 11.0.14+9-LTS)
OpenJDK 64-Bit Server VM 18.9 (build 11.0.14+9-LTS, mixed mode, sharing)
Create Tomcat User
Next, create a user for the Tomcat service. We will set /opt/tomcat as the home directory.
$ sudo useradd -m -U -d /opt/tomcat -s /bin/false tomcat
Download Tomcat
The latest version of Tomcat v10 can be downloaded from its download page. At the time of writing this tutorial, v9.0.59 is the latest available version. Check the latest version before you download Tomcat.
Use wget to download Tomcat.
$ TVERSION=9.0.59
$ wget https://dlcdn.apache.org/tomcat/tomcat-9/v${TVERSION}/bin/apache-tomcat-${TVERSION}.tar.gz
Extract the file to the /opt/tomcat directory.
$ sudo tar -xf apache-tomcat-${TVERSION}.tar.gz --strip-components=1 -C /opt/tomcat/
Change the ownership of the directory to the Tomcat user.
$ sudo chown -R tomcat:tomcat /opt/tomcat
Create a Systemd Unit File and Start Tomcat
Create and open the file /etc/systemd/system/tomcat.service for editing.
$ sudo nano /etc/systemd/system/tomcat.service
Paste the following code.
[Unit]
Description=Apache Tomcat 9 Servlet container
Wants=network.target
After=network.target

[Service]
Type=forking
User=tomcat
Group=tomcat

Environment="JAVA_HOME=/usr/lib/jvm/jre"
Environment="JAVA_OPTS=-Djava.awt.headless=true"
Environment="CATALINA_BASE=/opt/tomcat"
Environment="CATALINA_HOME=/opt/tomcat"
Environment="CATALINA_PID=/opt/tomcat/temp/tomcat.pid"
Environment="CATALINA_OPTS=-Xms512M -Xmx1024M -server -XX:+UseParallelGC"

ExecStart=/opt/tomcat/bin/startup.sh
ExecStop=/opt/tomcat/bin/shutdown.sh
Restart=always

[Install]
WantedBy=multi-user.target
Save the file by pressing Ctrl + X and entering Y when prompted to save.
Reload the service daemon to enable the Tomcat service.
$ sudo systemctl daemon-reload
Enable and Start the Tomcat service.
$ sudo systemctl enable tomcat --now
Check the service status.
$ sudo systemctl status tomcat
? tomcat.service - Apache Tomcat 9 Servlet container
   Loaded: loaded (/etc/systemd/system/tomcat.service; enabled; vendor preset: disabled)
   Active: active (running) since Wed 2022-03-09 09:48:38 UTC; 8s ago
  Process: 25308 ExecStart=/opt/tomcat/bin/startup.sh (code=exited, status=0/SUCCESS)
 Main PID: 25315 (java)
    Tasks: 29 (limit: 11412)
   Memory: 154.9M
   CGroup: /system.slice/tomcat.service
           ??25315 /usr/lib/jvm/jre/bin/java -Djava.util.logging.config.file=/opt/tomcat/conf/logging.properties ..

Mar 09 09:48:38 guacamole systemd[1]: Starting Apache Tomcat 9 Servlet container...
Mar 09 09:48:38 guacamole systemd[1]: Started Apache Tomcat 9 Servlet container.
Step 4 - Download and Build Guacamole
You can obtain the latest stable version of Guacamole from its website. At the time of writing this tutorial, the latest version available was 1.4.0. Download the Guacamole source code.
$ GVERSION=1.4.0
$ wget https://downloads.apache.org/guacamole/${GVERSION}/source/guacamole-server-${GVERSION}.tar.gz
Extract the archive and switch to the newly-created directory.
$ tar -xzf guacamole-server-${GVERSION}.tar.gz
$ cd guacamole-server-${GVERSION}/
Run the configure command to determine which libraries are available and to select components for building.
$ ./configure --with-systemd-dir=/etc/systemd/system/
The directory /etc/systemd/system/ is where the startup script will be installed during the build process to configure Guacamole to start automatically on boot.
You will get the following output on successful completion.
checking for a BSD-compatible install... /usr/bin/install -c
checking whether build environment is sane... yes
...

------------------------------------------------
guacamole-server version 1.4.0
------------------------------------------------

   Library status:

     freerdp2 ............ yes
     pango ............... yes
     libavcodec .......... yes
     libavformat.......... yes
     libavutil ........... yes
     libssh2 ............. yes
     libssl .............. yes
     libswscale .......... yes
     libtelnet ........... yes
     libVNCServer ........ yes
     libvorbis ........... yes
     libpulse ............ yes
     libwebsockets ....... yes
     libwebp ............. yes
     wsock32 ............. no

   Protocol support:

      Kubernetes .... yes
      RDP ........... yes
      SSH ........... yes
      Telnet ........ yes
      VNC ........... yes

   Services / tools:

      guacd ...... yes
      guacenc .... yes
      guaclog .... yes

   FreeRDP plugins: /usr/lib64/freerdp2
   Init scripts: no
   Systemd units: /etc/systemd/system/

Type "make" to compile guacamole-server.
If you don't have some libraries installed, you will see no instead of yes in the output. But if a critical library is missing, the command will fail. To check for more configure options, run the ./configure --help command.
Compile and install the Guacamole server by using the following commands.
$ make && sudo make install
Run the following command to update the system's cache of installed libraries.
$ sudo ldconfig
Reload the service daemon.
$ sudo systemctl daemon-reload
Enable and start the Guacamole service.
$ sudo systemctl enable guacd --now
Verify the status of the service.
$ sudo systemctl status guacd
? guacd.service - Guacamole Server
   Loaded: loaded (/etc/systemd/system/guacd.service; enabled; vendor preset: disabled)
   Active: active (running) since Thu 2022-03-10 09:13:41 UTC; 7s ago
     Docs: man:guacd(8)
 Main PID: 85349 (guacd)
    Tasks: 1 (limit: 11181)
   Memory: 10.8M
   CGroup: /system.slice/guacd.service
           ??85349 /usr/local/sbin/guacd -f

Mar 10 09:13:41 guacamole systemd[1]: Started Guacamole Server.
Mar 10 09:13:41 guacamole guacd[85349]: Guacamole proxy daemon (guacd) version 1.4.0 started
Mar 10 09:13:41 guacamole guacd[85349]: guacd[85349]: INFO:        Guacamole proxy daemon (guacd) version 1.4.0 started
Mar 10 09:13:41 guacamole guacd[85349]: guacd[85349]: INFO:        Listening on host ::1, port 4822
Mar 10 09:13:41 guacamole guacd[85349]: Listening on host ::1, port 4822
Step 5 - Install Guacamole Client
Now that you have installed the server, the next step is to install the client.
Create the configuration directory for Guacamole.
$ sudo mkdir /etc/guacamole
Unlike the Guacamole server, the Guacamole client is available in source code and binary form. For our tutorial, we will download the binary. You can, however, choose to build the client from the source.
Download the Guacamole client binary from the website.
$ sudo wget https://downloads.apache.org/guacamole/${GVERSION}/binary/guacamole-${GVERSION}.war -O /etc/guacamole/guacamole.war
The above command downloads and copies the Guacamole binary file to the /etc/guacamole directory.
For the client to function, it needs to be deployed from Tomcat's directory, which is $CATALINA_HOME/webapps/. In Step 3, we set /opt/tomcat as $CATALINA_HOME.
Run the following command to create a symbolic link from /etc/guacamole/guacamole.war to the Tomcat webapps directory.
$ sudo ln -s /etc/guacamole/guacamole.war /opt/tomcat/webapps/
Change the permission of the app to tomcat user.
$ sudo chown -R tomcat:tomcat /opt/tomcat/webapps
Create the web application configuration file at /etc/guacamole/guacd.conf.
$ sudo nano /etc/guacamole/guacd.conf
Paste the following code in it. Replace your_server_IP with your server's public IP address.
#
# guacd configuration file
#

[daemon]

#pid_file = /var/run/guacd.pid
log_level = info

[server]

bind_host = your_server_IP
bind_port = 4822

#
# The following parameters are valid only if
# guacd was built with SSL support.
#

# [ssl]

# server_certificate = /etc/ssl/certs/guacd.crt
# server_key = /etc/ssl/private/guacd.key
Save the file by pressing Ctrl + X and entering Y when prompted to save.
Restart the Guacamole server and Tomcat to apply the changes.
$ sudo systemctl restart tomcat guacd
Step 6 - Install and Configure MySQL
Apache Guacamole offers various types of authentication methods. For testing purposes, simple password-based authentication is sufficient. But for production environments, we need to implement a stronger and better method of authentication. Here, we will implement database-based authentication using MySQL.
Install MySQL.
$ sudo dnf install mysql-server
Enable and start the MySQL service.
$ sudo systemctl enable mysqld --now
Secure MySQL installation.
$ sudo mysql_secure_installation
For the first step, you will be asked if you want to set up the Validate Password Plugin, which you can use to test the strength of your MySQL password. Choose Y to proceed. You will be asked to choose the password validation level in the next step. Choose 2 which is the strongest level and will require your password to be at least eight characters long and include a mix of uppercase, lowercase, numeric and special characters.
Securing the MySQL server deployment.

Connecting to MySQL using a blank password.

VALIDATE PASSWORD COMPONENT can be used to test passwords
and improve security. It checks the strength of password
and allows the users to set only those passwords which are
secure enough. Would you like to setup VALIDATE PASSWORD component?

Press y|Y for Yes, any other key for No: Y

There are three levels of password validation policy:

LOW    Length >= 8
MEDIUM Length >= 8, numeric, mixed case, and special characters
STRONG Length >= 8, numeric, mixed case, special characters and dictionary                  file

Please enter 0 = LOW, 1 = MEDIUM and 2 = STRONG: 2
You will be asked to choose a root password in the next step. Choose a strong password that fulfills the requirements of the password validation plugin. In the next step, you will be asked whether to continue with the chosen password. Press y to continue.
Please set the password for root here.

New password:

Re-enter new password:

Estimated strength of the password: 100
Do you wish to continue with the password provided?(Press y|Y for Yes, any other key for No) : Y
Press Y and then ENTER key for all the following prompts to remove anonymous users and the test database, disable root logins and load the newly set rules.
...
Remove anonymous users? (Press y|Y for Yes, any other key for No) : Y
Success.
...
Disallow root login remotely? (Press y|Y for Yes, any other key for No) : Y
Success.
...
Remove test database and access to it? (Press y|Y for Yes, any other key for No) : Y
 - Dropping test database...
Success.
 - Removing privileges on test database...
Success.
Reloading the privilege tables will ensure that all changes
made so far will take effect immediately.
...
Reload privilege tables now? (Press y|Y for Yes, any other key for No) : Y
Success.
All done!
Enter the MySQL shell. Enter your root password to continue.
$ mysql -u root -p
Create guacamole_user user. Make sure the password meets the requirements set before.
mysql> CREATE USER 'guacamole_user'@'localhost' IDENTIFIED BY 'Your_password2';
Create guacamole_db database.
mysql> CREATE DATABASE guacamole_db;
Grant the user privileges on the guacamole_db database.
mysql> GRANT SELECT,INSERT,UPDATE,DELETE ON guacamole_db.* TO 'guacamole_user'@'localhost';
Exit the Shell.
mysql> exit
Step 7 - Configure Apache Guacamole
Guacamole's configuration directory is defined by the variable, GUACAMOLE_HOME. All the configuration files, extensions, etc., are in this directory. The /etc/guacamole/guacamole.properties file stores all the configurations and settings for Guacamole and its extensions.
Extensions and libraries require additional directories. Create them.
$ sudo mkdir /etc/guacamole/{extensions,lib}
Set the Guacamole home variable and store it in the /etc/default/tomcat configuration file.
$ echo "GUACAMOLE_HOME=/etc/guacamole" | sudo tee -a /etc/default/tomcat
Configure Apache Guacamole Database Authentication
We have already set up the database for Guacamole in the previous step. We need to download the Guacamole JDBC authenticator plugin and the MySQL Java Connector library to complete the configuration.
Download the Guacamole JDBC Plugin from its website.
$ cd ~
$ wget https://downloads.apache.org/guacamole/${GVERSION}/binary/guacamole-auth-jdbc-${GVERSION}.tar.gz
Extract the plugin to the /etc/guacamole/extensions directory.
$ tar -xf guacamole-auth-jdbc-${GVERSION}.tar.gz
$ sudo mv guacamole-auth-jdbc-${GVERSION}/mysql/guacamole-auth-jdbc-mysql-${GVERSION}.jar /etc/guacamole/extensions/
The next step is to import SQL schema into the MySQL database. Switch to the extracted plugin directory.
$ cd guacamole-auth-jdbc-${GVERSION}/mysql/schema
Import the schema files into MySQL.
$ cat *.sql | mysql -u root -p guacamole_db
Download the MySQL Java Connector. Grab the platform-independent archive file. At the time of writing this tutorial, the latest available version is 8.0.28.
$ cd ~
$ wget https://dev.mysql.com/get/Downloads/Connector-J/mysql-connector-java-8.0.28.tar.gz
Extract the archive and copy its contents to the /etc/guacamole/lib directory.
$ tar -xf mysql-connector-java-8.0.28.tar.gz
$ sudo mv mysql-connector-java-8.0.28/mysql-connector-java-8.0.28.jar /etc/guacamole/lib/
Configure Guacamole Properties file
Create the /etc/guacamole/guacamole.properties file and open it for editing.
$ sudo nano /etc/guacamole/guacamole.properties
Paste the following code in it. Replace your_server_ip with your server's public IP address.
guacd-hostname: your_server_ip
guacd-port:     4822

# MySQL properties
mysql-hostname: localhost
mysql-database: guacamole_db
mysql-username: guacamole_user
mysql-password: Your_password2
Save the file by pressing Ctrl + X and entering Y when prompted to save.
Link the Guacamole configuration directory to the Tomcat servlet directory.
$ sudo ln -s /etc/guacamole /opt/tomcat/.guacamole
Restart Tomcat to enable the database authentication. You don't need to restart guacd because it is completely independent of the web application and does not deal with the guacamole.properties or database authentication in any way.
$ sudo systemctl restart tomcat
Step 8 - Install SSL
To install an SSL certificate using Let's Encrypt, we need to install the Certbot tool. Certbot requires the EPEL repository for the installation, but we can proceed directly with the installation since we already installed it earlier.
Run the following commands to install Certbot.
$ sudo dnf install certbot
Generate the SSL certificate.
$ sudo certbot certonly --standalone --agree-tos --no-eff-email --staple-ocsp --preferred-challenges http -m [email protected] -d guacamole.example.com
The above command will download a certificate to the /etc/letsencrypt/live/guacamole.example.com directory on your server.
Generate a Diffie-Hellman group certificate.
$ sudo openssl dhparam -out /etc/ssl/certs/dhparam.pem 2048
Create a challenge webroot directory for Let's Encrypt auto-renewal.
$ sudo mkdir -p /var/lib/letsencrypt
Create a Cron Job to renew the SSL. It will run every day to check the certificate and renew if needed. For that, first, create the file /etc/cron.daily/certbot-renew and open it for editing.
$ sudo nano /etc/cron.daily/certbot-renew
Paste the following code.
#!/bin/sh
certbot renew --cert-name guacamole.example.com --webroot -w /var/lib/letsencrypt/ --post-hook "systemctl reload nginx"
Save the file by pressing Ctrl + X and entering Y when prompted.
Change the permissions on the task file to make it executable.
$ sudo chmod +x /etc/cron.daily/certbot-renew
Step 9 - Install and Configure Nginx as Reverse Proxy
Configure Tomcat for Reverse Proxy Connection
Before installing Nginx, we need to configure Tomcat to pass through the remote IP address provided by the Nginx reverse proxy.
Open the /opt/tomcat/conf/server.xml file for editing.
$ sudo nano /opt/tomcat/conf/server.xml
Locate the following line in the file.
<Host name="localhost"  appBase="webapps"
            unpackWARs="true" autoDeploy="true">
Change the line by pasting additional code below it, so it looks like the following.
<Host name="localhost"  appBase="webapps"
            unpackWARs="true" autoDeploy="true">

        <Valve className="org.apache.catalina.valves.RemoteIpValve"
               internalProxies="127.0.0.1"
               remoteIpHeader="x-forwarded-for"
               remoteIpProxiesHeader="x-forwarded-by"
               protocolHeader="x-forwarded-proto" />
Save the file by pressing Ctrl + X and entering Y when prompted.
Install Nginx
Rocky Linux 8.5 ships with the latest stable version of Nginx. Install it using the following command.
$ sudo dnf module install nginx:1.20
Verify the installation.
$ nginx -v
nginx version: nginx/1.20.1
Enable the Nginx service.
$ sudo systemctl enable nginx
Create and open the file /etc/nginx/conf.d/guacamole.conf for editing.
$ sudo nano /etc/nginx/conf.d/guacamole.conf
Paste the following code in it.
server {
    listen       443 ssl http2;
    listen       [::]:443 ssl http2;
    server_name  guacamole.example.com;

    access_log  /var/log/nginx/guacamole.access.log;
    error_log   /var/log/nginx/guacamole.error.log;

    # SSL
    ssl_certificate      /etc/letsencrypt/live/guacamole.example.com/fullchain.pem;
    ssl_certificate_key  /etc/letsencrypt/live/guacamole.example.com/privkey.pem;
    ssl_trusted_certificate /etc/letsencrypt/live/guacamole.example.com/chain.pem;
    ssl_session_timeout  5m;
    ssl_session_cache shared:MozSSL:10m;
    ssl_session_tickets off;
    ssl_protocols TLSv1.2 TLSv1.3;
    ssl_prefer_server_ciphers on;
    ssl_ciphers ECDHE-ECDSA-AES128-GCM-SHA256:ECDHE-RSA-AES128-GCM-SHA256:ECDHE-ECDSA-AES256-GCM-SHA384:ECDHE-RSA-AES256-GCM-SHA384:ECDHE-ECDSA-CHACHA20-POLY1305:ECDHE-RSA-CHACHA20-POLY1305:DHE-RSA-AES128-GCM-SHA256:DHE-RSA-AES256-GCM-SHA384;
    ssl_ecdh_curve X25519:prime256v1:secp384r1:secp521r1;
    ssl_stapling on;
    ssl_stapling_verify on;
    ssl_dhparam /etc/ssl/certs/dhparam.pem;
    resolver 8.8.8.8;

    location / {
      proxy_pass http://127.0.0.1:8080/guacamole/;
      proxy_buffering off;
      proxy_http_version 1.1;
      proxy_set_header X-Forwarded-For $proxy_add_x_forwarded_for;
      proxy_set_header Upgrade $http_upgrade;
      proxy_set_header Connection $http_connection;
      client_max_body_size 1g;
      access_log off;
  }
}
# enforce HTTPS
server {
    listen       80;
    listen       [::]:80;
    server_name  guacamole.example.com;
    return 301   https://$host$request_uri;
}
Save the file by pressing Ctrl + X and entering Y when prompted once finished.
Open the file /etc/nginx/nginx.conf for editing.
$ sudo nano /etc/nginx/nginx.conf
Add the following line before the line include /etc/nginx/conf.d/*.conf;.
server_names_hash_bucket_size 64;
Save the file by pressing Ctrl + X and entering Y when prompted.
Verify the Nginx configuration file syntax.
$ sudo nginx -t
nginx: the configuration file /etc/nginx/nginx.conf syntax is ok
nginx: configuration file /etc/nginx/nginx.conf test is successful
Fix the SELinux permission to allow Nginx to make network connections.
$ sudo setsebool -P httpd_can_network_connect 1
Start the Nginx service to enable the new configuration.
$ sudo systemctl start nginx
Restart the Tomcat server to apply the configuration change.
$ sudo systemctl restart tomcat
Step 10 - Accessing Guacamole
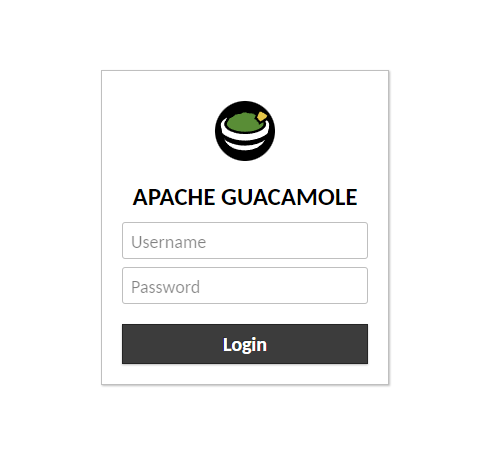
Open the URL https://guacamole.example.com in your browser, and you will be greeted with the following screen.
Enter guacadmin as the username and guacadmin as the password, and click Login to proceed.
Create a new Admin User
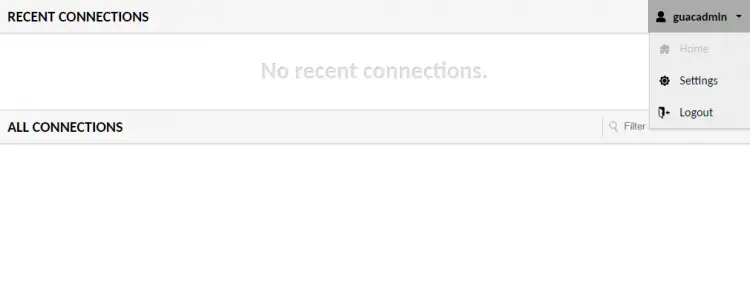
You should create a new user and delete the existing user for security purposes. To do that, click on guacadmin on the top right and click the Settings menu from the drop-down menu.
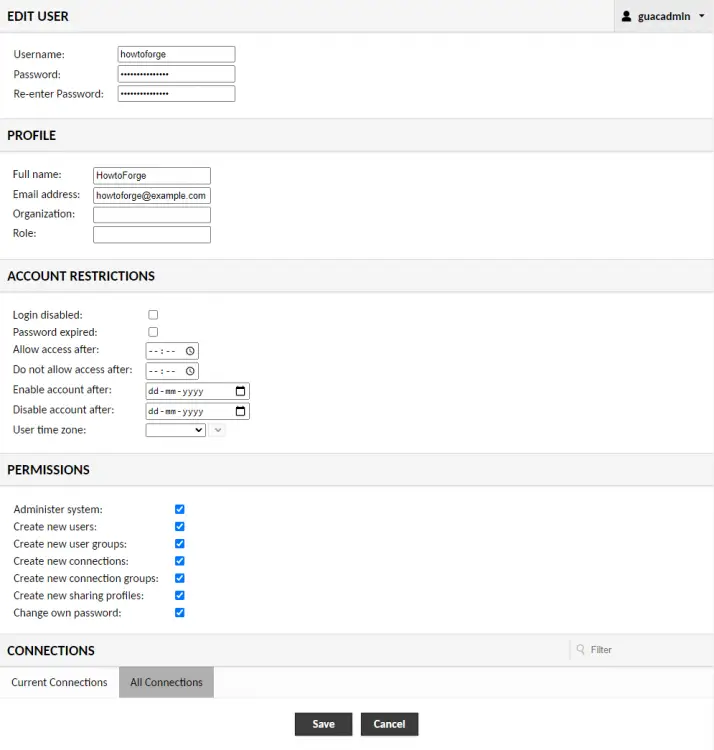
Switch to the Users tab and click on the New User button to get started.
Enter your details and checkmark all the permissions.
Click Save when finished. Log out the guacadmin user and log back in using the newly created user.
Go back to the users' screen. select the guacadmin user to edit and click the Delete button at the bottom to delete the user.
Step 11 - How to Use Guacamole
For our tutorial, we will show you how to connect to a server using SSH protocol.
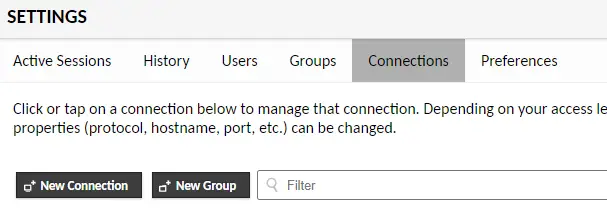
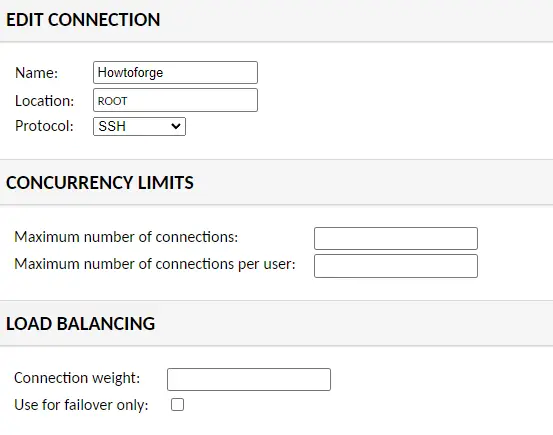
Go to the Settings menu of Guacamole and select Connections. Under the Connections screen, press the New Connection button.
Choose a name for the connection and select SSH as the protocol from the dropdown menu.
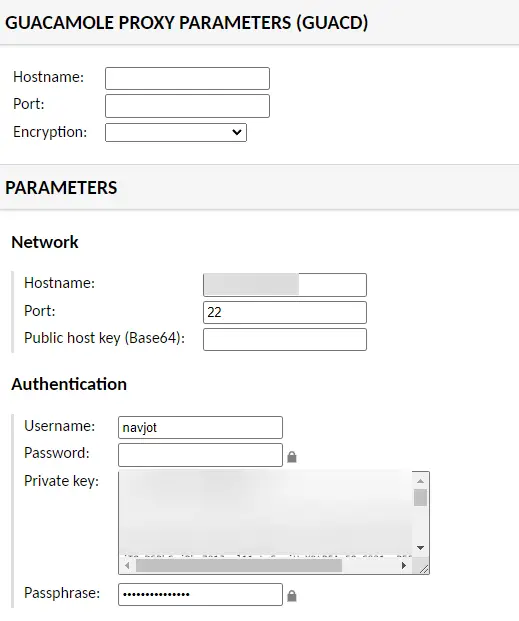
Under the Parameters section, enter your server's IP address as the hostname, 22 as the port (or if you have a custom SSH port, use that) and your username. If you are using password-based authentication, enter the user's password or paste the private key. Enter the passphrase for the private key if you are using it.
If you want to enable any additional settings, do that. Click Save to finish adding the connection.
Go back to the dashboard and click on the connection name under All connections, and you will be taken to the SSH terminal.
Conclusion
This concludes our tutorial on installing and using Apache Guacamole to create an SSH connection on a Rocky Linux 8 based server. If you have any questions, post them in the comments below.

