Using Firewall Builder To Configure Router Access Lists - Page 3
Getting Started: Configuring Cisco Router ACL
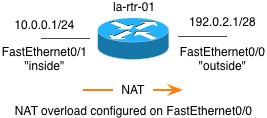
For the following sections we are going to assume that the following rules have been defined for the router configuration shown above.
Step 4: Compile and Install
In Firewall Builder the process of converting the rules from the Firewall Builder GUI syntax to the target device commands is called compiling the configuration.
To compile, click on the Compile icon which looks like a hammer ![]() . If you haven't saved your configuration file yet you will be asked to do so. After you save your file a wizard will be displayed that lets you select which firewall(s) you want to compile. In this example we are going to complie the firewall called la-rtr-1 configured with the rules above.
. If you haven't saved your configuration file yet you will be asked to do so. After you save your file a wizard will be displayed that lets you select which firewall(s) you want to compile. In this example we are going to complie the firewall called la-rtr-1 configured with the rules above.
If there aren't any errors, you should see some messages scroll by in the main window and a message at the top left stating Success.
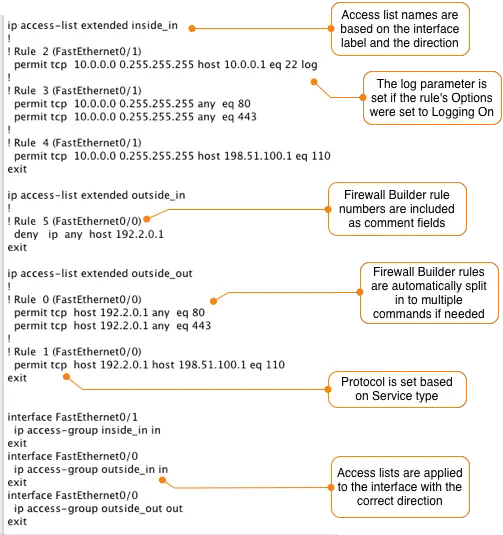
To view the output of the compile, click on the button that says Inspect Generated Files. This will open the file that contains the commands in Cisco command format. Note that any line that starts with "!" is a comment.
The output from the compiler is automatically saved in a file in the same directory as the data file that was used to create it. The generated files are named with the firewall name and a .fw extension. In our example the generated configuration file is called la-rtr-1.fw. You can copy and copy and paste the commands from this file to your router or you can use the built-in Firewall Builder installer.
Installing
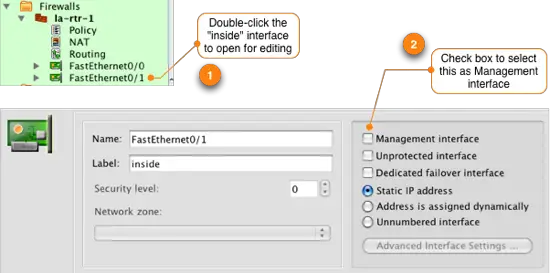
Firewall Builder can install the generated configuration file for you using SSH. To use the installer we need to identify one of the router interfaces as the "Management Interface". This tells Firewall Builder which IP address to connect to on the router.
Do this by double-clicking the firewall object to expand it, and then double-clicking on the interface name that you want to assign as the management interface. In our case this is interface FastEthernet0/1 which is the interface connected to the internal network.
CAUTION! Any time you are changing access lists on your router you face the risk of locking yourself out of the device. Please be careful to always inspect your access lists closely and make sure that you will be able to access the router after the access list is installed.
To install your access lists on the router, click on the install icon ![]() . This will bring up a wizard where you will select the firewall to install. Click Next > to install the selected firewall.
. This will bring up a wizard where you will select the firewall to install. Click Next > to install the selected firewall.
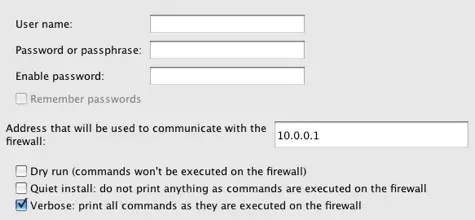
Firewall Builder will compile your rules converting them in to Cisco access list command line format. After the compile completes successfully click Next >. Enter your username, password and enable password.
After the access list configuration is installed you see a message at the bottom of the main window and the status indicator in the upper left corner of the wizard will indicate if the installation was successful.
By default Firewall Builder will connect to your router using SSH and send the commands line-by-line to the router. Depending on the size of your access lists this can be slow.
If your router is running IOS version 12.4 you can select an option to have Firewall Builder scp the generated configuration file to the router instead of applying it line-by-line. This is much faster and is recommended if your router supports it.
This requires ssh version 2 to be enabled on the router and scp server to be enabled. You can find complete instructions for enabling SCP installation in the Firewall Builder Users Guide.


