Using Firewall Builder To Configure Router Access Lists - Page 2
Getting Started: Configuring Cisco Router ACL
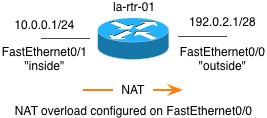
Reminder - In this tutorial we are configuring access lists on a router that has the following interface configuration.
Our goal is to implement the following four rules as access control lists on the router.
- Allow inside traffic (10.0.0.0/24) through the router to any Internet address for the HTTP and HTTPS protocols
- Allow inside traffic (10.0.0.0/24) through the router to a specific IP address (198.51.100.1) for the POP3 protocol.
- Allow inside traffic (10.0.0.0/24) to the router's inside interface (FastEthernet0/1) for the SSH protocol.
- Block all incoming traffic to the router's outside interface (FastEthernet0/0).
Step 3: Configure Access Lists
After we created the firewall object la-rtr-1 it was automatically opened in the object tree and its Policy object was opened in the main window for editing. The Policy object is where access list rules are configured.
To add a new rule to the Policy, click on the green ![]() icon at the top left of the main window. This creates a new rule with default values set to deny all.
icon at the top left of the main window. This creates a new rule with default values set to deny all.
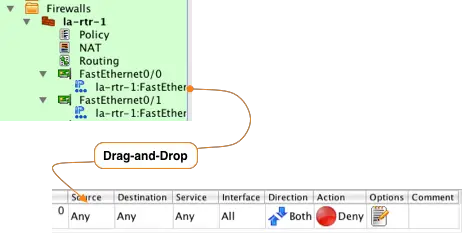
In Firewall Builder everything is based on the concept of objects. To configure rules that will be converted in to access lists you simply find the object you want in the tree and drag-and-drop it to the correct section of the rule.
The first rule in our example is to allow internal network traffic to use the HTTP and HTTPS protocols to access the Internet. In configuration the router is NAT'ing the internal network to the IP address on the FastEthernet interface. Since the order of operations on Cisco routers is that NAT takes place before the outbound access list is checked the Source for the outbound rules must be the post-NAT IP address which is represented by the IP interface object under the outside FastEthernet0/0 interface.
After you drop the interface IP object into the rule the Source section will change from Any to la-rtr-1:FastEthernet0/0:ip.
Since we want this rule to allow traffic to the Internet we will leave the Destination object set to Any. The Any object in Firewall Builder is the same as the "any" parameter in Cisco CLI commands for access lists.
Next we want to define the protocols or services this rule will allow. The example calls for the HTTP and HTTPS services to be allowed out to the Internet.
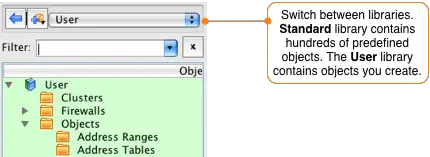
Firewall Builder comes with hundreds of predefined objects including almost all standard protocols. To access these objects switch to the Standard library by selecting it from the drop down at the top of the Object tree window.
After you have switched to the Standard library you can navigate to the HTTP service by opening the Services folder, then opening the TCP folder and scrolling down until you find the http object.
Once you find the http object, drag-and-drop from the tree on the left in to the Service section of the rule in the Rules window.
Repeat this process to add the HTTPS service to the rule. Drag-and-drop the https object from the tree on the left to the Service section of the rule in the Rules window.
NOTE: Notice that you can have more than one service in a single rule. Firewall Builder will automatically expand this rule in to multiple rules in the Cisco command syntax.
IMPORTANT! To access the objects you previously created, including the router, you need to switch back to the User library. Do this by going to the drop down menu at the top of the object tree panel and switch the selected library from Standard to User.
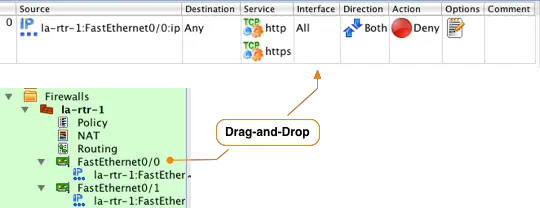
Due to the NAT configuration that is setup on the router traffic from the 10.0.0.0/24 network will be NAT'ed by the router to its outside IP address (192.0.2.1). This means the traffic that we want to match with our rule will be sent out the FastEthernet0/0 interface. Set the interface in the rule by dragging-and-dropping the FastEthernet0/0 interface object from the tree to the Interface section of the rule.
Traffic will be going in the outbound direction on this interface, so we right-click in the Direction section and select Outbound. We want this traffic to be allowed, so we need to change the Action associated with this rule from Deny to Accept. Do this by right-clicking on the Action section of the rule an selecting Accept. Finally, since this is a rule that we expect to match a lot of traffic disable logging by right-clicking in the Options section and selecting Logging Off. You should now see a rule that looks like:
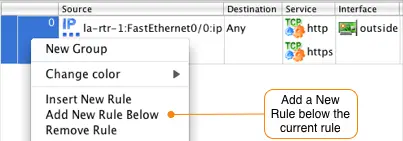
The next rule in our example allows the internal network to access an external POP3 server. Click on the rule you just created and then right-click in the rule number section and select "Add New Rule Below".
To access the objects that we created earlier we need to switch back to the User library. Click on the drop down menu that says Standard and select User from the list. Drag-and-drop the IP address object for the router's outside inteface from the tree on the left to the rule you just created placing it in the Source section.
NOTE: You can also copy-and-paste objects. For example, you can right-click on the la-rtr-01:FastEthernet0/0:ip object in the first rule and select Copy. Navigate to the Source section of the new rule you just created and right-click and select Paste.
This rule requires both the Source and Destination to be set, so go to the Addresses folder and drag-and-drop the POP3 Server object to the Destination section of the rule.
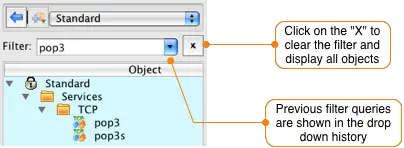
The POP3 protocol object is located in the Standard library, so select it from the dropdown menu at the top of the Object Window. To find the POP3 object you can scroll down through the object tree, or you can simply type pop3 in to the filter field. This will display all objects in the current library that contain pop3.
Drag-and-drop the filtered object from the tree to the Sevice section of the rule you are currently editing. Clear the filter field by clicking the X to the right of the input box and then switch back to the User library by selecting it in the dropdown menu at the top of the object panel.
To set the interface the rule should be applied to drag-and-drop the "outside" interface FastEthernet0/0 to the Interface section of the rule.
To change the Action to Accept right-click in the Action section of the rule and select Accept. To disable logging for this rule, right-click on the Options section and select Logging Off.
You should now have 2 rules that look like this:
Now we need to add our 3rd rule. This rule is designed to allow SSH traffic from the internal network to the router’s inside interface.
Create a new rule below the last rule by selecting the last rule and right-clicking and selecting Add New Rule Below from the menu. This will create a new rule configured with the default values to deny all.
Modify this rule by dragging-and-dropping the Internal Network object from the tree to the Source section of the newly created rule. To restrict the rule to only allow traffic destined to the IP address of the router's FastEthernet1/0 interface, double-click on the firewall object's FastEthernet1/0 interface to expand it. Drag-and- drop the IP address of the interface to the Destination section of the rule.
To set the service to SSH switch to the Standard library by selecting it from the dropdown menu above the object tree and then type in "ssh" in the filter box. Drag-and-drop the ssh object from the tree to the Service section. Clear the filter by clicking on the X next to the filter input text box.
Switch back to the User library by selecting it from the dropdown menu above the object tree. Double click the la-rtr-1 object to expand it and drag-and-drop the FastEthernet1/0 interface to the Interface section of the rule.
Since this rule only applies to inbound traffic on this interface set the direction to Inbound by right-clicking in the Direction section and selecting Inbound. Finally, change the action for the rule by right- clicking on the Action section and selecting Accept. Since this rule defines access to the router via SSH we will leave logging enabled for this rule.
You should now have 3 rules that look like:
Since we added a rule that will create an inbound access list on the inside FastEthernet0/1 interface, we need to add rules that allow the traffic for the first two rules inbound on inside interface. Otherwise this traffic would be blocked coming in to the router and it would never reach the outbound access list on the outside interface. Follow the same steps from above, but set the interface to the inside FastEthernet0/1 interface and set the Direction as Inbound.
Your rules should now look like this:
Finally, we need to add a rule to the router's outside interface that blocks all traffic trying to access the router directly on its outside interface IP address.
To do this we follow the same process from the earlier examples. Since this rule should match all traffic coming from the Internet we leave the Source section as Any. Set the Destination section by dragging-and-dropping the IP address object for outside interface FastEthernet0/0. We want to block all serices, so leave the Service section set to Any. We want this rule to match incoming traffic, so we right-click in the Direction section and select Inbound. The desired Action is to deny the traffic, so we leave that as the default. Finally since this rule will potentially match a lot of traffic we disable logging by right-clicking on the Options section and selecting Logging Off.
We are now done configuring the rules for our access lists and the configuration should look like:
In the next section we will go through the process of converting these rules in to Cisco commands and installing them on the router.

