Using Firewall Builder To Configure Router Access Lists
Author: Mike Horn <mike [at] netcitadel [dot] com>
http://www.fwbuilder.org
Firewall Builder is a firewall configuration and management GUI that supports configuring a wide range of firewalls from a single application. Supported firewalls include Linux iptables, BSD pf, Cisco ASA/PIX, Cisco router access lists and many more. The complete list of supported platforms along with downloadable binary packages and soure code can be found at http://www.fwbuilder.org.
This tutorial is the first in a series of howtos that will walk through the basic steps of using Firewall Builder to configure each of the supported firewall platforms. In this tutorial we will configure Access Control Lists (ACL) on a Cisco router.
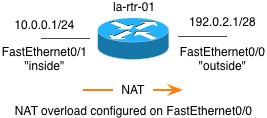
The diagram below shows a simple 2 interface router configuration with the router acting as a gateway to the Internet for a private LAN network.
We will use Firewall Builder to implement the following basic rules as access lists on the router.
- Allow inside traffic (10.0.0.0/24) through the router to any Internet address for the HTTP and HTTPS protocols
- Allow inside traffic (10.0.0.0/24) through the router to a specific IP address (198.51.100.1) for the POP3 protocol.
- Allow inside traffic (10.0.0.0/24) to the router's inside interface (FastEthernet0/1) for the SSH protocol.
- Block all incoming traffic to the rotuer's outside interface FastEthernet0/0.
Note that Cisco router access lists have an implicit deny all at the end of every access list, so anything that we do not setup a rule to explicitly permit will be denied.
The NAT configuration on the router is as follows:
interface FastEthernet0/0
ip nat outside

interface FastEthernet0/1
ip nat inside

access-list 1 permit 10.0.0.0 0.0.0.255

ip nat inside source list 1 interface FastEthernet0/0 overload
Step 1: Create Network Objects
We are going to start by creating the objects that will be used in the rules. Firewall Builder includes hundreds of predefined objects, including most standard protocols, so to implement the rules above we will only need to create the objects that are specific to our network. For our rules this means we need to create objects for the internal 10.0.0.0/24 network and for the POP3 server with an IP address of 198.51.100.1.
Create a New IP Network Object
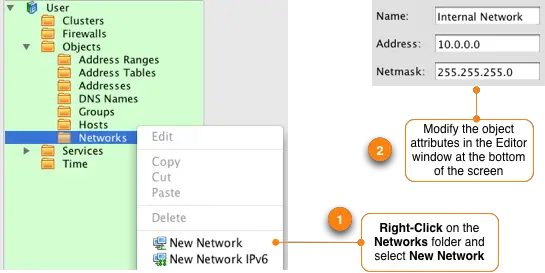
To create the object that will represent our internal 10.0.0.0/24 network in the left hand tree double-click the folder labeled Objects to expand it. Right click on the folder called Networks and select "New Network". This creates a new network object. In the lower portion of your screen, called the Editor Panel, you can modify the properties of this object.
Change the object name to something that matches the function, in this example we are going to call it "Internal Networks" to represent the local LAN IP addresses. The address is set to 10.0.0.0 and the netmask is 255.255.255.0.
NOTE: When editing the attributes of an object there is no Apply or Submit button. Once you edit an attribute as soon as you move away from the field you were editing the change will take effect immediately.
Create a New IP Address Object
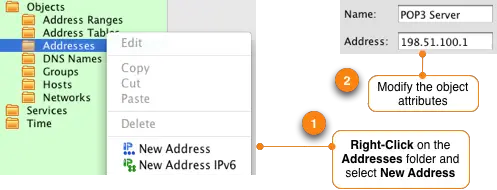
Repeat this process to create an object that will represent the POP3 email server that will be used in rule #2. Go to the object tree and right-click on the Addresses folder and select New Address. In the Editor Panel change the name of the object to "POP3 Server" and set the IP address to 198.51.100.1.
Step 2: Define The Router
Firewall Builder refers to devices that support filtering rules as firewalls. To create a firewall object to represent your router click on the "Create new firewall" icon on the main window of Firewall Builder. This will launch a wizard that walks you through creating your router.
Enter a name for the firewall object, in this example we will use la-rtr-1. Change the drop down menu for software that is running on the firewall to be "Cisco IOS ACL".
Click the Next > button to continue the wizard.
When creating a firewall in Firewall Builder you have a choice of configuring interfaces manually, or you can use SNMP discovery if you have SNMP enabled on your router and you have access to a Read-Only or Read-Write community string. For this example we are going to configure the router interfaces manually.
Click the Next > button to continue to the next step.
The firewall that you create in Firewall Builder needs to match the router that you want to deploy the access lists on. This means that the interface names and IP addresses in the firewall object that you are creating must match exactly to what is configured on the router.
Click the green ![]() icon to add a new interface to the router. Enter the name of the router exactly as it is shown on a router command line when you run "show ip interfaces brief" command. In this example our interfaces are FastEthernet0/0 and FastEthernet0/1.
icon to add a new interface to the router. Enter the name of the router exactly as it is shown on a router command line when you run "show ip interfaces brief" command. In this example our interfaces are FastEthernet0/0 and FastEthernet0/1.
Set the interface name as FastEthernet0/0 and set the label to outside. Click on the Add address button and set the IP address to 192.0.2.1 with a netmask of 255.255.255.240.
Click the green ![]() icon to add another interface to the router. Enter the information in to the wizard to match the second interface as follows:
icon to add another interface to the router. Enter the information in to the wizard to match the second interface as follows:
Click on the Finish button.
After you create the firewall object that represents the router that you will be installing the access lists on it will be displayed in the object tree on the left side. The Policy object, which is where the access list rules are configured, is automatically opened in the main window.
Before moving on we should save our data file that contains the new firewall object that we just created. Do this by going to the File -> Save As menu item. Choose a name and location to save this file to.


