Using Firewall Builder To Configure Cisco ASA & PIX - Page 2
Getting Started: Configuring Cisco ASA & PIX
Reminder - In this tutorial we are configuring a Cisco ASA 5505 firewall that has the following interface configuration.
Access Lists
Our goal is to implement the following access list rules on the firewall.
- Allow inside traffic (10.0.0.0/24) through the firewall to any Internet address for the HTTP and HTTPS protocols
- Allow inside traffic from Email Server (10.0.0.25) through the firewall to a specific IP address (198.51.100.25) for the SMTP protocol. This outside server is acting as an external mail relay.
- Allow inbound SMTP from external IP address (198.51.100.25) to the internal Email Server (10.0.0.25).
- Allow inside traffic (10.0.0.0/24) to the firewall's inside interface (Ethernet0/1) for the SSH protocol.
NAT
And our goal is to implement the following NAT rules on the firewall.
- Source NAT all inside traffic (10.0.0.0/24) through the firewall destined to any Internet address changing the source IP to the IP address of the outside interface (Ethernet0/0).
- Destination NAT traffic from external IP address (198.51.100.25), the external SMTP relay server, coming to the outside interface with TCP destination port of 25 (SMTP) and forward that to an internal Email Server (10.0.0.25).
Step 3: Configure Access Lists
After we created the firewall object asa-1 it was automatically opened in the object tree and its Policy object was opened in the main window for editing. The Policy object is where access list rules are configured.
To add a new rule to the Policy, click on the green ![]() icon at the top left of the main window. This creates a new rule with default values set to deny all.
icon at the top left of the main window. This creates a new rule with default values set to deny all.
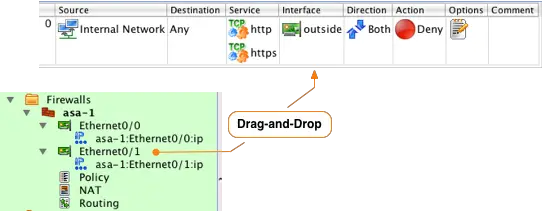
In Firewall Builder everything is based on the concept of objects. To configure rules that will be converted in to access lists you simply find the object you want in the tree and drag-and-drop it to the correct section of the rule.
The first rule in our example is to allow internal network traffic to use the HTTP and HTTPS protocols to access the Internet. Starting in Cisco ASA v8.3 access lists use the real IP address for traffic that is NAT'ed so we will use the "Internal Network" object as the Source for the rule. After you drag-and-drop the object the rule Source will be updated as shown below.
Since we want this rule to allow traffic to the Internet we will leave the Destination object set to Any. The Any object in Firewall Builder is the same as the "any" parameter in Cisco CLI commands for access lists.
Next we want to define the protocols or services this rule will allow. The example calls for the HTTP and HTTPS services to be allowed out to the Internet.
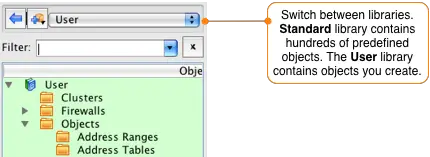
Firewall Builder comes with hundreds of predefined objects including almost all standard protocols. To access these objects switch to the Standard library by selecting it from the drop down at the top of the Object tree window.
After you have switched to the Standard library you can navigate to the HTTP service by opening the Services folder, then opening the TCP folder and scrolling down until you find the http object.
Once you find the http object, drag-and-drop from the tree on the left in to the Service section of the rule in the Rules window.
Repeat this process to add the HTTPS service to the rule. Drag-and-drop the https object from the tree on the left to the Service section of the rule in the Rules window.
NOTE: Notice that you can have more than one service in a single rule. Firewall Builder will automatically expand this rule in to multiple rules in the Cisco command syntax if necessary.
IMPORTANT! To access the objects you previously created, including the router, you need to switch back to the User library. Do this by going to the drop down menu at the top of the object tree panel and switch the selected library from Standard to User.
Set the interface for this rule by dragging-and-dropping the "outside" Ethernet0/0 interface of the firewall from the object tree to the Interface column of the rule.
Traffic will be flowing outbound on this interface, so right-click in the Direction section and select Outbound. We want this traffic to be allowed, so we need to change the Action associated with this rule from Deny to Accept. Do this by right-clicking on the Action section of the rule an selecting Accept. Finally, since this is a rule that we expect to match a lot of traffic disable logging by right-clicking in the Options section and selecting Logging Off. You should now see a rule that looks like:
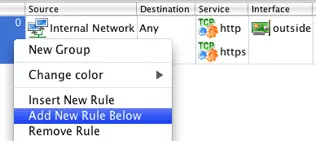
The next rule in our example allows an internal server called "Email Server" to access an external SMTP Server called "SMTP Relay". Click on the rule you just created and then right-click in the rule number section and select "Add New Rule Below".
To access the objects that we created earlier we need to switch back to the User library. Click on the drop down menu that says Standard and select User from the list.
Drag-and-drop the IP address object you created earlier named "Email Server" to the Source column of the new rule. Next, drag-and-drop the IP address object name "SMTP Relay" to the Destination column of the new rule.
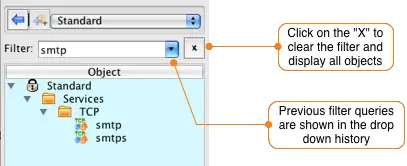
The SMTP protocol object is located in the Standard library, so select it from the dropdown menu at the top of the Object Window. To find the SMTP object you can scroll down through the object tree, or you can simply type smtp in to the filter field. This will display all objects in the current library that contain smtp.
Drag-and-drop the filtered smtp object from the tree to the Sevices column of the rule you are currently editing. Clear the filter field by clicking the X to the right of the input box and then switch back to the User library by selecting it in the dropdown menu at the top of the object panel.
To set the interface the rule should be applied to drag-and-drop the "outside" interface Ethernet0/0 to the Interface column of the rule.
Right-click in the Direction column of the new rule and set the Direction to Outbound.
To change the Action to Accept right-click in the Action section of the rule and select Accept. To disable logging for this rule, right-click on the Options section and select Logging Off.
You should now have 2 rules that look like this:
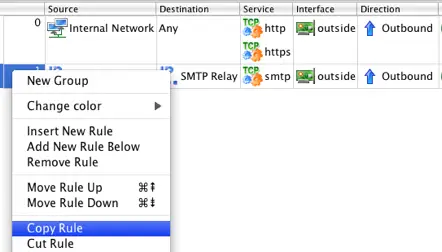
The third rule will be identical to the second rule accept that it allows traffic initiated from the outside SMTP Relay server using the SMTP protocol to reach the inside Email Server. To create this rule right-click on the previous rule and select Copy Rule.
Paste the copied rule by right-clicking on the previous rule and selecting Paste Rule Below. Follow the steps below to modify the copied rule to match incoming traffic from the external SMTP Relay server to the internal Email Server.
- Right-click on the SMTP Relay object in the Destination column of the 3rd rule that you just pasted and select Cut from the context menu.
- Right-click in the Source column of the rule and select Paste.
- Right-click on the Email Server object in the Source column of the rule and select Cut.
- Right-click in the Destination column of the rule and select Paste.
- Right-click on the Direction column and select Inbound.
Your rules should now look like this:
Create a new rule below the last rule by selecting the last rule and right-clicking and selecting Add New Rule Below from the menu. This will create a new rule configured with the default values to deny all.
Modify this rule by dragging-and-dropping the Internal Network object from the tree to the Source section of the newly created rule. To restrict the rule to only allow traffic destined to the IP address of the ASA's Ethernet0/1 interface, double-click on the firewall object's Ethernet0/1 interface to expand it. Drag-and- drop the IP address of the interface to the Destination section of the rule.
To set the service to SSH switch to the Standard library by selecting it from the dropdown menu above the object tree and then type in "ssh" in the filter box. Drag-and-drop the ssh object from the tree to the Service section. Clear the filter by clicking on the X next to the filter input text box.
Switch back to the User library by selecting it from the dropdown menu above the object tree. Double click the asa-1 object to expand it and drag-and-drop the Ethernet0/1 interface to the Interface section of the rule.
Since this rule only applies to inbound traffic on this interface set the direction to Inbound by right-clicking in the Direction section and selecting Inbound. Finally, change the action for the rule by right- clicking on the Action section and selecting Accept. Since this rule defines access to the router via SSH we will leave logging enabled for this rule.
You should now have 4 rules that look like:
In the next section we will go through the process of configuring the NAT rules.


