Using eBox As Windows Primary Domain Controller - Page 4
10. Configuring shares
We have already our domain active with its users, groups and computers. Now we want to add the file sharing service to ease the sharing of data between users.
We have three types of shares available in eBox:
- Users home directory shares
- Groups shares
- General shares
The users home directories shares are automatically created for each user. It will be automatically available to the user as a mapped drive with the letter configured in the General Settings tab. Only the user can connect to its home directory share so it is useful to have access to the same files regardless on which domain the user has logged on.
On the other hand, groups shares are not created automatically, you need to go to the Edit Group window and give a name for the share. All members of the group are granted access to it with the only restriction that they cannot modify or delete files that are owned by other members of the group.
As for the third category of shares, eBox allows us to define multiple file shares each with its own access controls lists (ACL) which will determine what users and groups can read and write the files in that share.
To illustrate this feature we will create a share for the IT technical documentation, all members of the group IT should be able to read the files and the user pdcadmin should have permissions to update them.
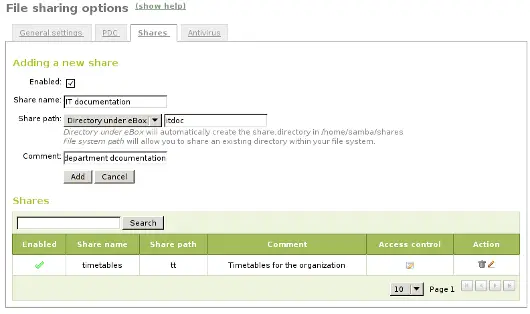
To create a share select the Shares tab that can be found in File sharing in the left menu. We will see the list of shares but since we will have none created the list will be empty. To create the first share click on Add new, this will show you a form to setup the share.
The first parameter in the share is for enabling or disabling the share, we left the share enabled. However if we wanted to disable it temporally this setting would be useful.
Share name is the name to identify this share, in our example we will call the share IT documentation.
The comment field could explain the purpose of this share. Back to our example, we can write Documentation and knowledge base for the IT department there.
Finally we must choose the path of the share in the server, two options are available: Directory under eBox or File path. The second one is intended for already existent directories so in our example we will choose Directory under eBox and give as directory name itdoc.
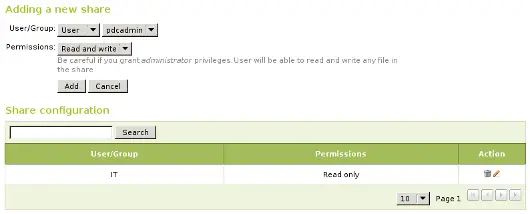
Once we have our share defined we will need to choose a correct set of ACLs for it. To do so we must go to the shares list, look for the line of the share and click on the Access Control field. Here we can add the ACLs for the share, each ACL give permissions to a user or a group. The permissions can be read, read< and write and administrator. The administrator permission allows to write and remove files owned by other users so it must be sparingly granted.
In our example, we will add a read permission to the IT group and a read and write permission to the user pdcadmin. This way the IT members can read the files but only pdcadmin can add or remove them.
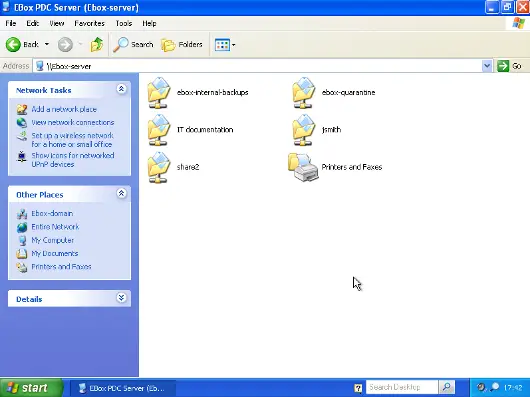
Special shares. are created automatically by eBox and access is only granted to users with administration rights. They are ebox-internal-backups which contains the eBox backup files and ebox-quarantine which contains infected files.
11. File share antivirus
eBox can scan the shares files for viruses. The scan is done when a file is written or accessed so you can be sure that all files in the share have been checked by the antivirus. If an infected file is found it is moved to the ebox-quarantine share which is only accessible by users with administration rights. These users can browse this share and choose whether delete these files or to do another action with them.
To use this feature the antivirus module has to be enabled, so if you disabled it you should enable it again. The antivirus updates its virus database automatically each hour so you don't need to worry about updates.
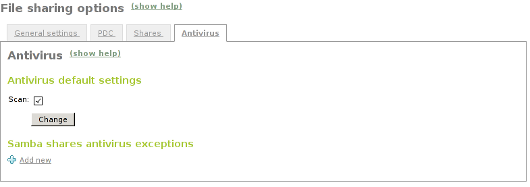
To configure antivirus scan go to the File Sharing page and there under the Antivirus tab. The Scan setting determines if the files should be scanned or not.
We want the antivirus to scan the shares so we enable this for our example. In the Samba shares antivirus exceptions list we can add exceptions to the antivirus scan, the shares listed here will not be scanned regardless of the value of the Scan setting.
12. Accessing shares
We have our shares defined so we could want to access them now. But before we have to make sure that we have saved the last changes in the configuration like we have explained in the Saving changes section.
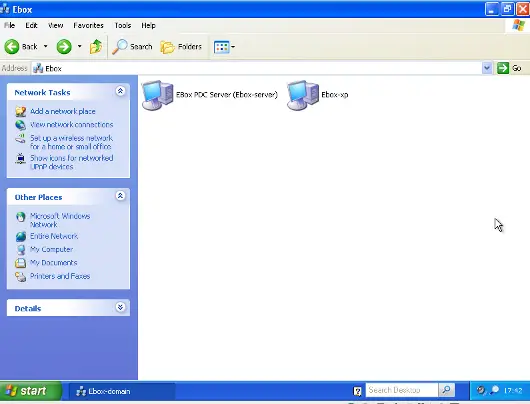
When login into a domain computer with a domain user you will be able to access the shares via the Entire network window, to open this window go to My PC -> Network Place and then click in the link in the Other places left panel.
Then you can click in the eBox server and all the shares known to the user will appear. You can try to access a share clicking on it, if the user has read access a browser page with the share contents will be shown.
Additionally the user home directory will be mapped to a virtual drive with the letter set in the PDC configuration.
Alternative. In a GNU/Linux system you can use the program smbclient to access the shares. You can find a guide to use it here. Another option is using a file browser with SMB capabilities like the default ones in KDE or Gnome.
If you have the antivirus enabled you can test it trying to upload an infected file. For testing purposes we recommend the EICAR test file because is harmless.
13. Logon script
eBox supports the use of Windows logon script. This script will be downloaded and executed every time a user logs into a domain computer.
When writing this script you have take in account that it is executed into the computer where the user logs in, so you should do only things that could be done in every computer of your domain. Furthermore, it will be a Windows computer so you have take care that the file is written with DOS return/linefeed characters. To be sure of this you can write it in a Windows computer or use the Unix tool flip to convert between the two formats.
Once you have written your logon script you have to save it as logon.bat under the /home/samba/netlogon directory in your eBox server.
To continue our example we will show a logon script that maps a share called timetable which contains the organization timetables to the drive Y:. Remember to create this share and grant access to it before trying this logon script!
# contents of logon.bat search server
# map timetable share
echo "Mapping timetable share to drive Y: ..."
net use y: \\ebox-server\timetable
14. The end
That's all folks. We hope the information and examples on this tutorial have helped you to use eBox as a Windows Primary Domain Controller and file server.
I'd like to thank Falko Timme who wrote a file-sharing howto for a previous version of eBox which has been a source of inspiration for this document.


