Using eBox As Windows Primary Domain Controller - Page 3
6. Configuring general PDC settings
To configure the general PDC and file sharing settings, in the left menu select File sharing.
In the General settings tab will enable the PDC with the Enable PDC checkbox. Also you may change the domain name from is default value to a name which makes sense for your domain or organization. We will use ebox as domain name. You may change the netbios name as well. This will be the name used to identify the server when using the netbios protocol. This name should not be the same than the domain, regardless of their case, or we will have troubles connecting. We will use ebox-server as netbios name.
In the Description field you can enter some text to identify the domain.
The Quota limit field is to assign the default disk quota to new users.
The Enable roaming profiles checkbox controls whether the user desktop profile is saved to the PDC server and used in every desktop the user logs in. The downside of this feature is that in some cases the user profile could take a lot of space in the disk. We want to use this feature on this tutorial so we will enable it.
The Drive letter field assigns which letter will be used for the virtual drive containing the user home.
7. Configuring PDC password policy settings
Domain administrators usually enforce some kind of password policy because left to users themselves they will choose weak passwords and rarely will change them.
In the PDC tab we will see three passwords settings to configure:
The first one is Password Length, We want that all users choose a password with 8 character at least, so we raise this value to 8 characters.
The second one is Maximum Password Age, we set it to 180 days to make sure that the users change their password at least two times for year.
Last one is Enforce password history, this setting is to make sure that the users do not reuse old passwords, we set it to Keep history for 5 passwords so the users cannot reuse their last five passwords.
8. Saving changes
Now that we have the basic PDC configuration nailed down, we need to save the changes to commit them to the system. For this we have a button Save changes in the right upper corner, if we have pending changes to commit it will have a red colour otherwise it will be in green. Since we have made changes it will be painted with a bright red, so we can click on it.
After clicking you will see a screen which will show you two options, saving the pending configuration changes or discard them. If you discard them the configuration will revert either to the default state or, if you have already saved any changes, to the last time you saved changes. We want to commit our changes so we will click on the button Save changes.
In some cases after clicking a screen will be pop up asking for authorization to overwrite some configuration files. If you want that eBox to manage those files accept the request, if you deny it eBox would not be able to commit your configuration.
Then you will show a screen which displays the progress in committing the new configuration. When it finish a Changes saved message will be show.
Warning: Changes in user and groups are committed immediately, so you don't need to save them and couldn't discard them.
9. Adding computers to the PDC
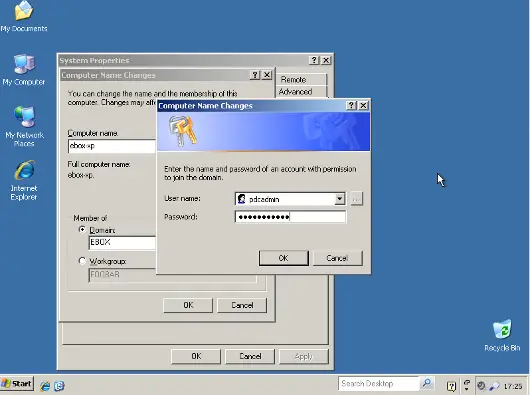
Now we have our PDC server running is time to add some computers to the domain. For this we will need to know the name of our domain and the user name and password of a user with administration rights. In our example the user pdcadmin fits the bills.
The computer to be added must be in the same network and need to have a CIFS- capable Windows (i.e. Windows XP Professional). The eBox network interface that connects to this network must not be marked as external interface. In the following instructions we will assume that you have a Windows XP Professional.
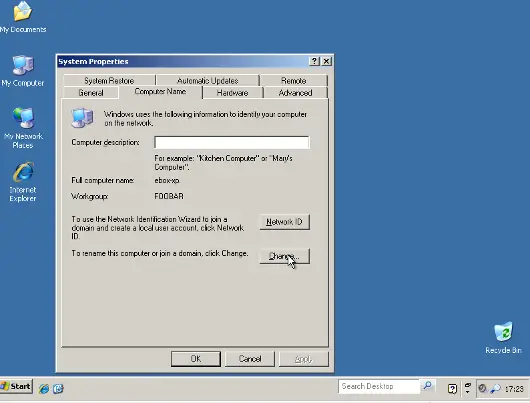
Log into the Windows system and click on My PC -> Properties, then click on the button Change, in the section To rename this computer or join a domain.
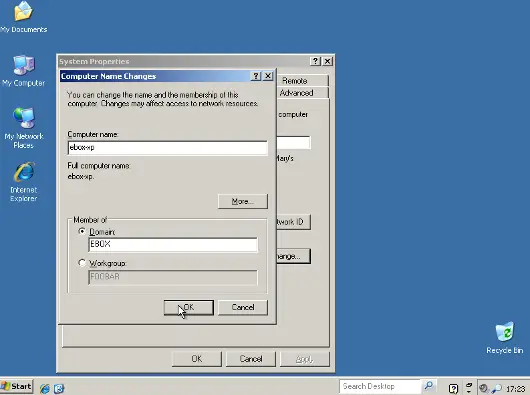
In the next window, set the domain name and then click OK.
A login window will pop up, you have to login as the user with administration privileges.
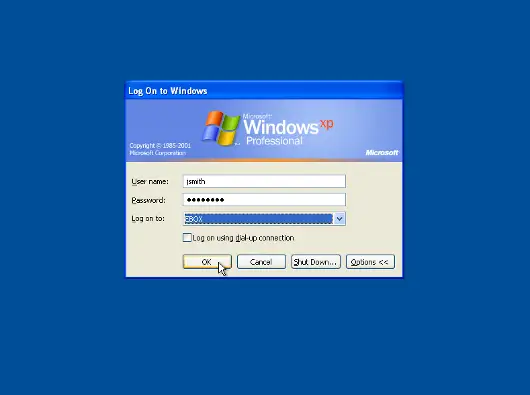
If all the steps were correctly done a welcome message to the domain should appear. After joining the domain you will need to restart the computer. You next login could be done with a domain user.
If you need more assistance to add the computer to your domain you can check the Microsoft documentation about this procedure.


