Using Built-in Policy Installer in Firewall Builder
| Revision 1.0 Author: [email protected] http://www.fwbuilder.org |
Firewall Builder was introduced on this site earlier with articles Getting Started With Firewall Builder and Using Built-In Revision Control In Firewall Builder. There, we looked at the basic functions of fwbuilder and created simple firewall configuration, as well as explored more advanced features of the program such as its built-in revision control system. This article continues the series and demonstrates how Firewall Builder can help you automate the process of deployment and activation of the generated firewall configuration.
After firewall configuration has been generated by one of the policy compilers and saved in a file on disk in the format required by the target firewall, it needs to be transferred to the firewall machine and activated. This function is performed by the component we call "Policy Installer" which is part of the Firewall Builder GUI.
Starting with version 2.0, Firewall Builder comes with built-in installer that uses SSH to communicate with the firewall. Installer works on all OS where Firewall Builder is available: Linux, FreeBSD, Windows and Mac OS X. On Linux, *BSD and Mac OS X it uses standard ssh client that comes with the system; on Windows it uses putty.
Installer needs to be able to copy generated firewall script to the firewall and then run it there. In order to do so, it uses secure shell. The program does not include ssh code, it uses external ssh client. On Linux, BSD and Mac OS X it uses standard ssh client ssh and secure shell file copy program scp that come with the system; on Windows it uses plink.exe and pscp.exe. Full directory path to ssh client program can be configured in the Preferences dialog (accessible via Edit/Preferences menu), however if you are on Linux, *BSD or Mac and use standard ssh client that is available via your PATH environment variable, you do not need to change default value there.
Installer works differently depending on the targert platform. In case of Linux and BSD based firewalls it uses scp to copy generated configuration files to the firewall machine and then uses ssh to log in and run the script. In case of Cisco routers or ASA appliance (PIX), it logs in, switched to enable and then configuration mode and executes configuration commands one by one in a manner similar to expect scripts. It inspects router's replies looking for errors and stops if it detects one. In the end, it issues command write mem to store new configuration in memory and logs out.
Built-in policy installer has been designed to work with dedicated firewall machine, that is, when computer where you run Firewall Builder GUI and actual firewall are different machines. Nevertheless, it can be used when they are the same machine as well. The only difference is that in all commands below you would use the name or address of the machine where you run Firewall Builder instead of the name or address of the dedicated firewall. SSH client will then connect back to the same machine where it runs and everything will work exactly the same as if it was different computer.
How does installer decide what address to use to connect to the firewall
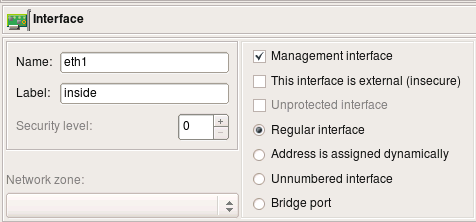
Installer does not use the name of the firewall to connect to, it always connects to its IP address. It starts by scanning interfaces of the firewall object looking for one that is marked as "Management interface" using checkbox in the interface object dialog. Installer will use address of this interface to connect to. The "management interface" checkbox looks like shown on the next screenshot:
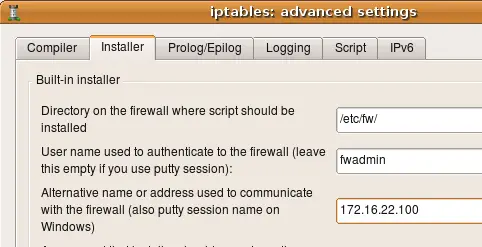
If your firewall has multiple addresses and you want to use the one that is not assigned to its interface in the fwbuilder object, then you can overwrite the address using entry field in the "installer" tab of the "advanced" firewall object settings dialog, like this:
More about other input fields in this dialog below.
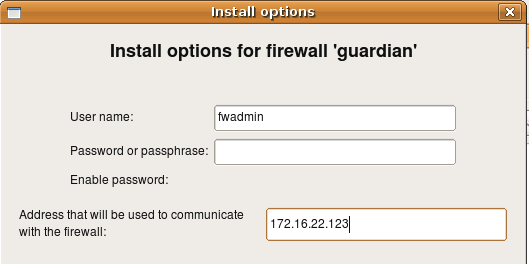
Finally you can overwrite the address on one-time basis just for the install session using entry field in the installer options dialog. This is the same dialog where you enter password:
This works for all supported firewall platforms, i.e. iptables on Linux, pf on OpenBSD and FreeBSD, ipfw on FreeBSD and Mac OS X, ipfilter on FreeBSD, Cisco IOS access lists and Cisco ASA (PIX). Regardless of the platform, installer follows the rules described here to determine what address it should use to connect to the firewall.
Configuring installer on Windows
You can skip this section if you run Firewall Builder GUI on Linux, *BSD or Mac OS X.
Here is the link to slide show that demonstrates the process.
Download and install putty.exe, plink.exe and pscp.exe somewhere on your machine (say, in C:\putty). Download URL is http://www.chiark.greenend.org.uk/~sgtatham/putty/
Installer does not use putty.exe but it will be very useful for troubleshooting and for setting up sessions and ssh keys.
In the Edit/Preferences dialog, in the "SSH" tab, use "Browse" buttons to locate plink.exe. Hit "OK" to save preferences. If you installed it in C:\putty, then you should end up with C:\putty\plink.exe in this entry field. Do the same to configure path to pscp.exe.
You may log in to the firewall using regular user account or as root. See instructions below for an explanation how to configure sudo if you use regular user accounts. This part of the configuration does not depend on the OS you run Firewall Builder.
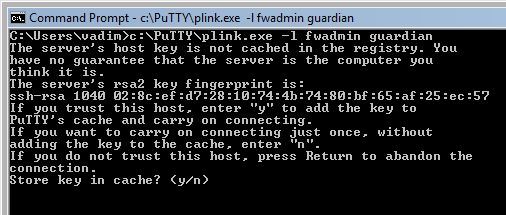
Before you try to use fwbuilder installer with plink.exe and pscp.exe, test it from the command line to make sure you can log in to your firewall. If this is the first time you try to log in to the firewall machine using putty.exe, plink.exe or pscp.exe, then it will discover new host key and ask you if it is correct and if you want to save it in cache. There are lots of resources on the Internet that explain what does this mean and how you should verify key accuracy before you accept it. If the key is already known to the program it will not ask you about it and will just proceed to the part where it asks you to enter password. Enter the password and hit "Return" to see if you can log in and see command line prompt from the firewall.
Here is the command (assuming you use account "fwadmin" to manage firewall "guardian"):
C:\Users\vadim>c:\PuTTY\plink.exe -l fwadmin guardian
NOTE: Built-in installer does not use GUI ssh client putty.exe, it uses command line utilities that come from the same author plink.exe and pscp.exe. You can test with putty.exe but do not enter path to it in the SSH tab of the Preferences dialog in fwbuilder, it won't work.


