Using Built-in Policy Installer in Firewall Builder - Page 3
Running built-in installer to copy generated firewall policy to the firewall machine and activate it there
Now that all preparations are complete, we can move on and actually try to install newly generated firewall policy. Select firewall object in the object tree in Firewall Builder GUI, click right mouse button and use menu item "Install". The program will recompile the policy and open installer dialog.
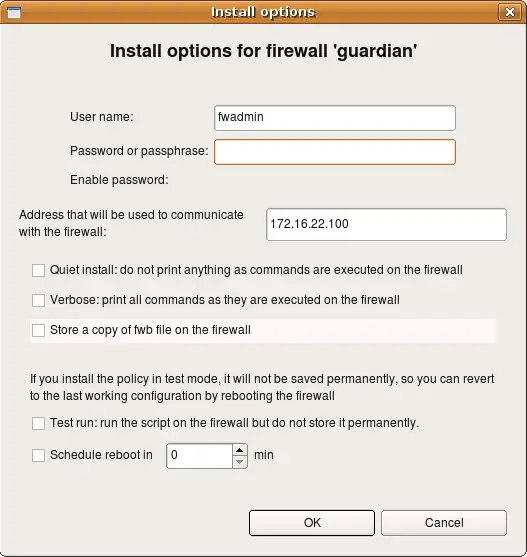
(This how installer options dialog looks like for iptables, pf, ipfilter and ipfw firewalls).
Here the program already entered user name fwadmin in the "User Name" field, but you can change it for one installation session if you wish. Next you need to enter the password for this user. This is the password of user fwadmin on the firewall machine. Address that will be used to comunicate with the firewall is also entered by the program automatically, it is taken from the firewall settings. You can change it for one installation session as well.
Other installer parameters do the following:
- Quiet install: as the name implies, this checkbox suppresses all progress output of the installer
- Verbose: this checkbox has the opposite action, it makes the installer print a lot of debugging information, including ssh client debug output.
- Store a copy of fwb file on the firewall: if this checkbox is on, the installer will copy not only generated firewall configuration files to the directory on the firewall machine which is configured in the "installer" tab of the firewall object dialog, but also original .fwb data file as well. Use of this option is discouraged if you manage many firewalls from the same .fwb file because distributing file that contains security policy of multiple firewalls to all of them is a bad idea.
- Test run: if this checkbox is on, policy installer will copy firewall configuration files to a temporary directory on the firewall and will run them from there. The intent is to test generated configuration without making it permanent. If firewall machine reboots, it will activate previous firewall policy. Installer uses subdirectory "tmp" inside installation directory on the firewall machine which is configured in the "installer" tab of the firewall object dialog. If installation directory configured there is /etc/fw (as in the screenshot earlier in this HOWTO), then installer will put files in the directory /etc/fw/tmp when test install option is in effect. You need to create this directory on the firewall before using this installation mode.
- Schedule reboot in... : If this option is on, installer schedules firewall reboot after given time in minutes. This can be used as a measure of last resort to protect against lost of communication with the firewall which may happen if there is an error in the new firewall policy which makes it block ssh access from the management machine. Installer uses command shutdown -r +10min to schedule reboot in 10 min. If installation has been successfull and everything works right, you need to repeat installation with options "test install" and "Schedule reboot" turned off to cancel reboot and install new policy permanently.
After all parameters are set and the password entered, hit "OK" to start installation.
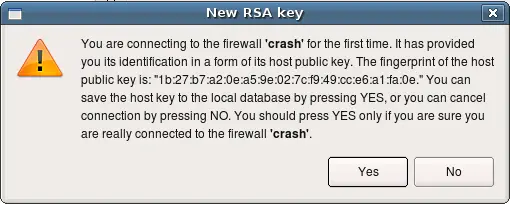
If this is the first time your management machine is logging in to the firewall via ssh, it will find out that ssh host key of the firewall is unknown to it and will present you with a dialog:
Here is says that it does not know host key of the firewall "crash". This is nothing more than a copy of the warning message presented by the ssh client. You should verify the host key manually and if it matches, click "Yes". If you click "No" in the dialog, installation process will be interrupted.
Installer only recognizes ssh client warning message about unknown public host keys. If you rebuld your firewall machine, which means its host key changes, ssh will print different warning message which fwbuilder installer does not recognise. In this case you will see this message in the installer progress window, but installation process will get stuck. You need to use ssh client (ssh on Unix or putty.exe on Windows) to update host key before you can use fwbuilder policy installer with this firewall again.
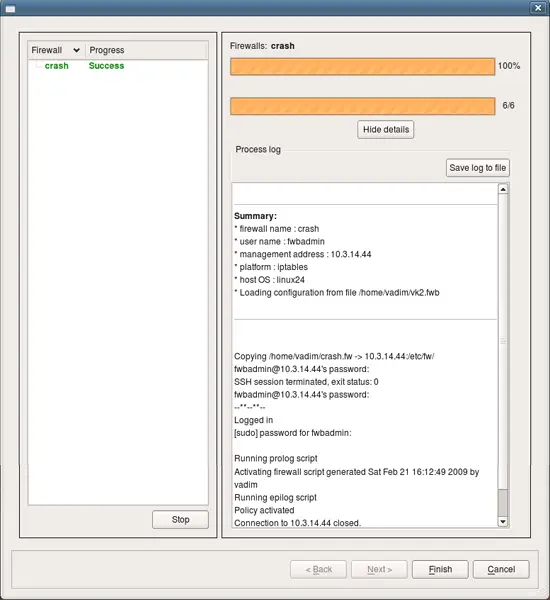
After this, installer copies files to the firewall and runs policy script there. You can monitor its progress in the dialog as shown on the screenshot:
This is an example of successfull installation session. Installer records the status in the left hand side panel of the dialog. If you use installer to update several firewall machines in one session, their names and corresponding status of the installation session for each will be shown in the panel on the left. You can save installer log to a file using "Sabe log to file" button, this can be useful for documentation or troubleshooting.
Running built-in installer to copy generated firewall policy to Cisco router or ASA (PIX)
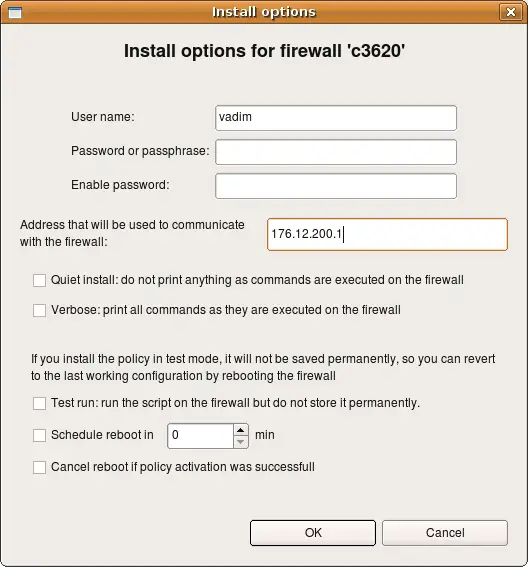
From the user's point of view the installer works the same when you manage Cisco router or ASA firewall, with only few minor differences. First of all, the first screen of the installer, where you enter the password, offers another input field for the enable password as well.
You should be able to use IPv6 address to communicate with the router.
Most of the options and parameters in this dialog are the same as those for Linux firewalls (see above). The following parameters work differently for Cisco devices:
- Test run: if this checkbox is on, policy installer will copy new access lists configuration to the router or ASA appliance but will not issue write mem command in the end.
- Schedule reboot in... : If this option is on, installer issues command reload in NNN after new configuration has been loaded. This schedules reboot in NNN minutes. In combination with "test run" option this can serve as a roll-back mechanism in case of complete loss of contact with the router or firewall because of an error in the policy. Since "test run" does not perform "write mem" in the end, the original access list stays in startup configuration of the router and will be loaded after reboot.
- Cancel reboot if policy activation was successful: If this option is on, installer issues command reload cancel in the end of the policy activation process to cancel previously scheduled reboot.
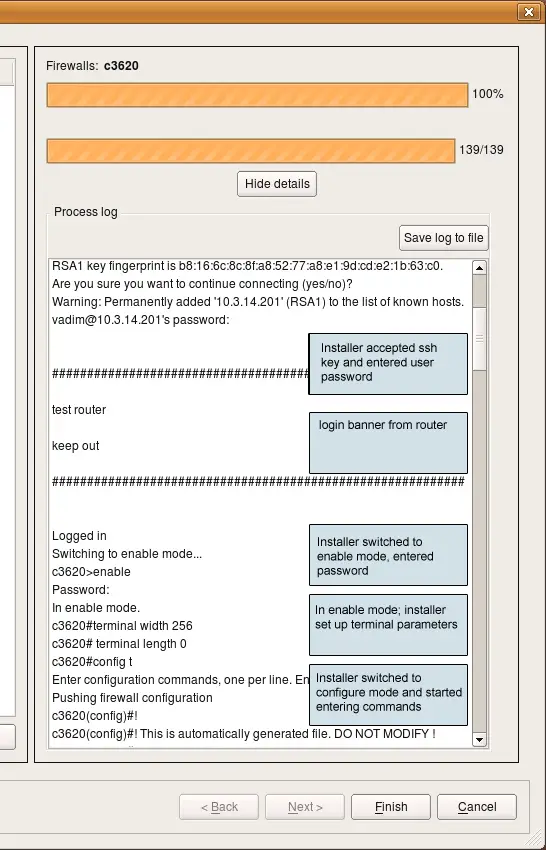
Here is a screenshot of installation session to a Cisco router. Note the output at the very top of the log that shows how installer detected previously unknown RSA host key and accepted it after the user clicked "Yes" in the pop-up dialog (not shown on the screenshot). It then logged into the router; you can see the banner motd output from the router. After this, installer switched to enable mode, set terminal width and turned off terminal pagination using terminal length 0 command and finally switched to the configuration mode. It then started enterig generated configuration line by line.
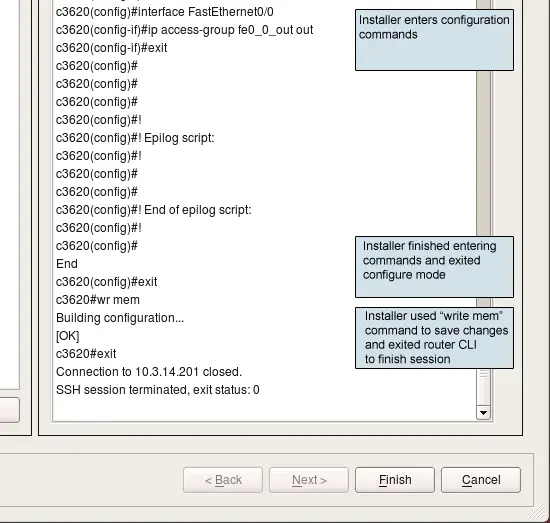
The final part of the installation session looks like this:
This was a successfull installation session, with no errors. Installer finished entering configuration lines and issued exit command to exit configuration mode, then wr mem command to save configuration to memory and finally exit again to log out.

