Server Monitoring with Munin and Monit on Ubuntu 16.04 LTS (Xenial Xerus)
This tutorial exists for these OS versions
- Ubuntu 16.04 (Xenial Xerus)
- Ubuntu 14.04 LTS (Trusty Tahr)
On this page
This tutorial will show you how to monitor an Ubuntu 16.04 server with Munin and Monit. Munin produces nice graphs about nearly every aspect of your server, whereas Monit checks the availability of services like Apache, MySQL, Postfix and takes the appropriate action such as a restart if it finds a service is not behaving as expected. The combination of the two gives you full monitoring: graphics that let you recognize current or upcoming problems, and a watchdog that ensures the availability of the monitored services. This tutorial contains two (optional) chapters about integrating Munin and Monit into ISPConfig 3.1.
1 Preliminary Note
Our system's hostname is server1.example.com, and we have a website www.example.com on it with the document root /var/www/www.example.com/web.
The following steps have to be performed as root user. To become root user on your server, run this command:
sudo -s
Ensure that the system is up to date before you start to install Munin, run:
apt-get update
apt-get upgrade
Apache is used to show the Munin pages, the apache fcgid module is required for the Munin graph zoom feature. I will install apache and the libapache2-mod-fcgid module with apt.
apt-get -y install apache2 libcgi-fast-perl libapache2-mod-fcgid
Enable the fcgid module in apache.
a2enmod fcgid
2 Install and Configure Munin
To install Munin on Ubuntu 16.04, run the commands below:
apt-get -y install munin munin-node munin-plugins-extra
When the server is running MySQL or MariaDB, then enable the a few extra Munin plugins to monitor MySQL:
cd /etc/munin/plugins
ln -s /usr/share/munin/plugins/mysql_ mysql_
ln -s /usr/share/munin/plugins/mysql_bytes mysql_bytes
ln -s /usr/share/munin/plugins/mysql_queries mysql_queries
ln -s /usr/share/munin/plugins/mysql_slowqueries mysql_slowqueries
ln -s /usr/share/munin/plugins/mysql_threads mysql_threads
Next, we must edit the Munin configuration file /etc/munin/munin.conf. Uncomment the dbdir, htmldir, logdir, rundir, and tmpldir lines (the default values are fine). We want Munin to use the name server1.example.com instead of localhost.localdomain in the HTML output, therefore, we replace localhost.localdomain with server1.example.com in the simple host tree section. Without the comments, the changed file looks like this:
nano /etc/munin/munin.conf
# Example configuration file for Munin, generated by 'make build'

# The next three variables specifies where the location of the RRD
# databases, the HTML output, logs and the lock/pid files. They all
# must be writable by the user running munin-cron. They are all
# defaulted to the values you see here.
#
dbdir /var/lib/munin
htmldir /var/cache/munin/www
logdir /var/log/munin
rundir /var/run/munin

# Where to look for the HTML templates
#
tmpldir /etc/munin/templates

# Where to look for the static www files
#
#staticdir /etc/munin/static

# temporary cgi files are here. note that it has to be writable by
# the cgi user (usually nobody or httpd).
#
# cgitmpdir /var/lib/munin/cgi-tmp

# (Exactly one) directory to include all files from.
includedir /etc/munin/munin-conf.d
[...]
# a simple host tree
[server1.example.com]
 address 127.0.0.1
 use_node_name yes
[...]
We should find the Apache configuration file for Munin /etc/munin/apache.conf - it defines an alias called munin to munin's HTML output directory /var/cache/munin/www which means we can access munin from all websites on this server by using the relative path /munin (e.g. http://www.example.com/munin).
Now we will edit the munin.conf file for Apache to allow access from external IP addresses. Create a backup of the original file:
mv /etc/munin/apache24.conf /etc/munin/apache24.conf_bak
Open the new file with an editor:
nano /etc/munin/apache24.conf
And paste the content below:
Alias /munin /var/cache/munin/www
<Directory /var/cache/munin/www>
 # Require local
 Require all granted
 Options FollowSymLinks SymLinksIfOwnerMatch
 Options None
</Directory>

ScriptAlias /munin-cgi/munin-cgi-graph /usr/lib/munin/cgi/munin-cgi-graph
<Location /munin-cgi/munin-cgi-graph>
 # Require local
 Require all granted
 Options FollowSymLinks SymLinksIfOwnerMatch
 <IfModule mod_fcgid.c>
 SetHandler fcgid-script
 </IfModule>
 <IfModule !mod_fcgid.c>
 SetHandler cgi-script
 </IfModule>
</Location>
Restart Apache:
service apache2 restart
Then restart Munin:
service munin-node restart
Now wait a few minutes so that Munin can produce its first output, and then go to http://www.example.com/munin/ in your browser, and you see the first statistics:
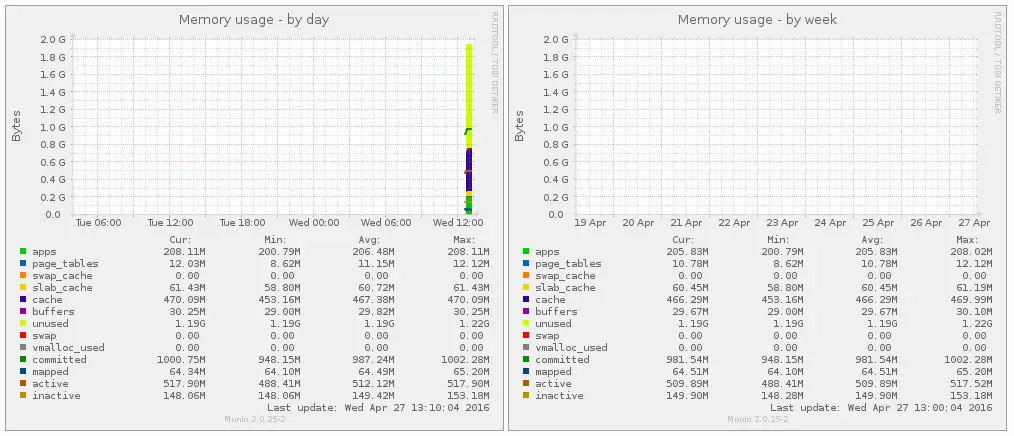
(This is just a small excerpt of the many graphics that munin produces...)
3 Password-Protect the Munin Output Directory (Optional, but highly recommended)
Now it is a good idea to password-protect the munin output directory unless you want everybody to be able to see every little statistic about your server.
To do this, we must create the password file /etc/munin/munin-htpasswd. We want to login with the username admin, so we do this:
htpasswd -c /etc/munin/munin-htpasswd admin
Enter a password for admin. Then open /etc/munin/apache.conf again...
nano /etc/munin/apache24.conf
... comment out "Require all granted and add the lines that I marked in red:
Alias /munin /var/cache/munin/www
<Directory /var/cache/munin/www>
 # Require local
 # Require all granted
 AuthUserFile /etc/munin/munin-htpasswd
 AuthName "Munin"
 AuthType Basic
 Require valid-user
 Options None
</Directory>

ScriptAlias /munin-cgi/munin-cgi-graph /usr/lib/munin/cgi/munin-cgi-graph
<Location /munin-cgi/munin-cgi-graph>
 # Require local
 # Require all granted
 AuthUserFile /etc/munin/munin-htpasswd
 AuthName "Munin"
 AuthType Basic
 Require valid-user
 <IfModule mod_fcgid.c>
 SetHandler fcgid-script
 </IfModule>
 <IfModule !mod_fcgid.c>
 SetHandler cgi-script
 </IfModule>
</Location>
Then restart Apache:
service apache2 restart
4 Enable additional modules in Munin
The Munin command "munin-node-configure --suggest" can be used to get recommendations for additional Munin modules that can be enabled on the server. Run:
munin-node-configure --suggest
The output should be similar to this:
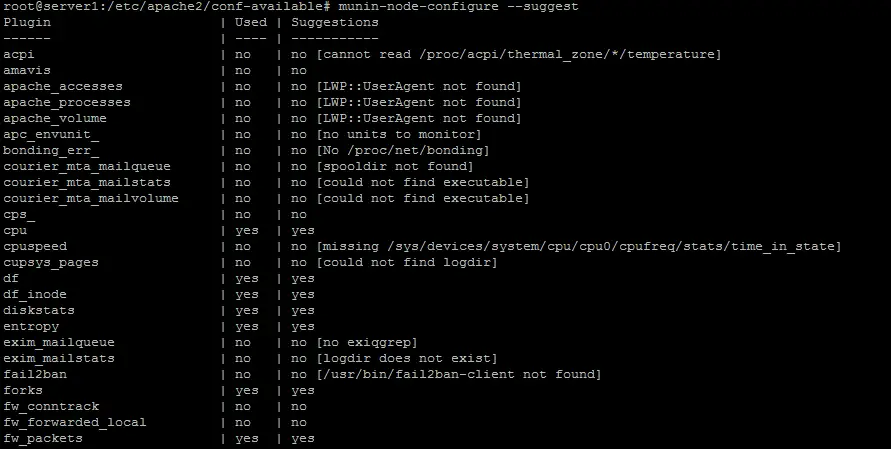
The column "used" shows if a module is enabled, the column "Suggestions" shows if the server runs a service that can be monitored by this module. Create a symlink for the module in /etc/munin/plugins to enable it.
Here I will enable the apache_* modules for example:
cd /etc/munin/plugins
ln -s /usr/share/munin/plugins/apache_accesses
ln -s /usr/share/munin/plugins/apache_processes
ln -s /usr/share/munin/plugins/apache_volume
Restart Munin to load the new configuration.
service munin-node restart
5 Configure Munin in ISPConfig (optional)
The ISPConfig Hosting Control Panel has an option to show Munin data within the ISPConfig Monitor module. The Munin data is loaded in an iframe, as most browsers block content to be loaded from http within a https site, we will have to find a way to access the Munin statistics over SSL. The easiest way is to use the SSL enabled ISPConfig vhost for this by createing a symlink inside the ISPConfig web directory to the Munin www data directory.
ln -s /var/cache/munin/www /usr/local/ispconfig/interface/web/munin
Now we can access Munin in a browser with https://server1.example.com:8080/munin trough the ISPConfig apache vhost.
The next step is to add the configuration in ISPConfig.
Login to ISPConfig as Administrator (admin) user and go to System > Server config, fill in the URL, username and password for Munin as shown below.
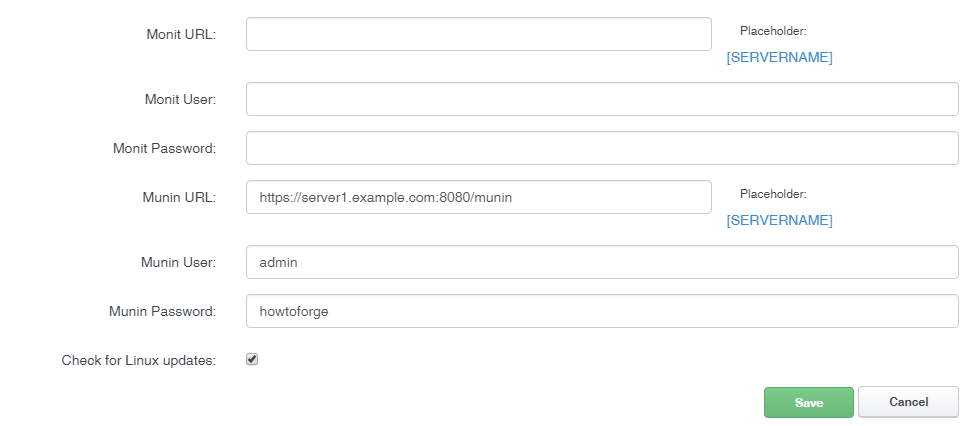
Ensure that you use https:// and port 8080 in the munin URL.

