Samba Server installation on Ubuntu 16.04 LTS
This tutorial exists for these OS versions
- Ubuntu 16.04 (Xenial Xerus)
- Ubuntu 15.10 (Wily Werewolf)
- Ubuntu 14.10 (Utopic Unicorn)
- Ubuntu 14.04 LTS (Trusty Tahr)
- Ubuntu 13.04 (Raring Ringtail)
- Ubuntu 12.10 (Quantal Quetzal)
On this page
This guide explains the installation and configuration of a Samba server on Ubuntu 16.04 (Xenial Xerus) with anonymous and secured Samba shares. Samba is an Open Source/Free Software suite that provides seamless file and print services to SMB/CIFS clients. Samba is freely available, unlike other SMB/CIFS implementations, and allows for interoperability between Linux/Unix servers and Windows-based clients.
1 Preliminary Note
I have a freshly installed Ubuntu 16.04 LTS server, on which I am going to install the samba server. As Samba client system, I will use a Windows Desktop to connect to the samba server and check the setup. The Windows Desktop should be on the same network so that it is able to reach the Ubuntu server. The hostname of my Ubuntu server is server1.example.com and the IP is 192.168.1.100
If you don't have an Ubuntu server already, follow this tutorial to get a minimal server setup as the basis for this tutorial.
Note: The Windows machine must be in the same workgroup. To check the value on the Windows machine run the following command at cmd prompt:
net config workstation
The output will be like this:

Your Windows machine must be in the same Workstation domain as the Ubuntu server, i.e. WORKGROUP in my case.
To make the windows machine reachable in Windows by its hostname, proceed like this. Open a Windows terminal in administrator mode (you can reach the administrator mode by doing a right-click on the Terminal icon in the program menu) and run the following command to open the Windows hosts file:
notepad C:\\Windows\System32\drivers\etc\hosts
There you add the following red line and save the file:
[...]
192.168.1.100 	server1.example.com	server1
The following steps have to be run as root user. Run:
sudo -s
on the shell of your Linux server to become the root user.
2 Anonymous Samba sharing
Samba is available in the Ubuntu repositories. The first step is to install the Samba Server and its dependencies with apt.
apt-get install -y samba samba-common python-glade2 system-config-samba
It will install the Samba version 4.3.9-Ubuntu.
To configure samba, edit the file /etc/samba/smb.conf. I will use nano as editor and make a backup of the original file before I start to change it. The backup file is named /etc/samba/smb.conf.bak
cp -pf /etc/samba/smb.conf /etc/samba/smb.conf.bak
cat /dev/null  > /etc/samba/smb.conf
Open the Samba configuration file with nano:
nano /etc/samba/smb.conf
And add the following lines.
[global]
workgroup = WORKGROUP
server string = Samba Server %v
netbios name = ubuntu
security = user
map to guest = bad user
dns proxy = no

#============================ Share Definitions ==============================

[Anonymous]
path = /samba/anonymous
browsable =yes
writable = yes
guest ok = yes
read only = no
force user = nobody
Then I'll create a directory for the anonymous share.
mkdir -p /samba/anonymous
Set the correct permissions.
chmod -R 0775 /samba/anonymous
chown -R nobody:nogroup /samba/anonymous
And restart Samba to apply the new configuration.
service smbd restart
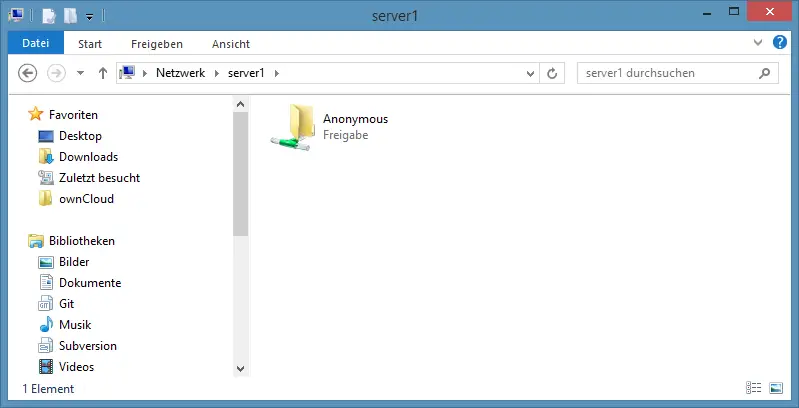
Now you can access the Ubuntu sharing in Windows by entering "\\server1" in the windows search field of the menu or use the network browser of the Windows file explorer to connect to the share.
Try to upload a file by Drag&Drop to the share to see if it is working correctly.
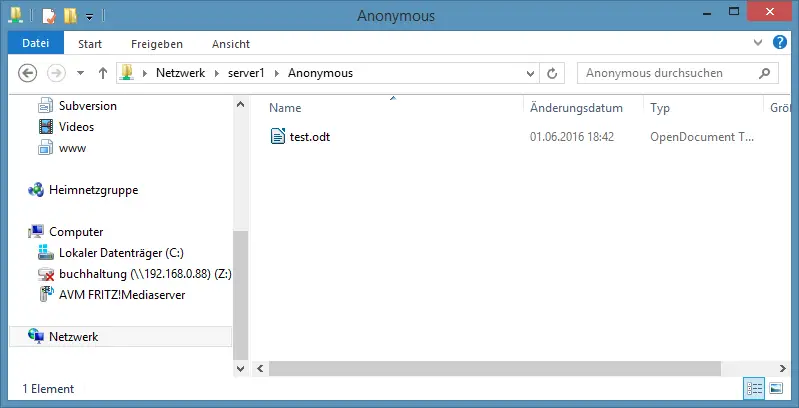
You can cross check the content at server also.
ls -la /samba/anonymous/
root@server1:/samba/anonymous# ls -la /samba/anonymous/
total 16
drwxrwxr-x 2 nobody nogroup 4096 Jun 1 18:46 .
drwxr-xr-x 3 root root 4096 Jun 1 18:39 ..
-rwxr--r-- 1 nobody nogroup 7405 Jun 1 18:42 test.odt
root@server1:/samba/anonymous#
3 Secured Samba server
For the password-protected share, I will create a group smbgrp and user till to access the Samba server. I'll use "howtoforge" as password in this example, please choose a custom and secure password on your server.
addgroup smbgrp
useradd till -G smbgrp
smbpasswd -a till
root@server1:~# smbpasswd -a till
New SMB password:<--howtoforge
Retype new SMB password:<--howtoforge
Added user till.
root@server1:~#
Now create the folder with the name "secured" in the /samba folder and give permissions like this
mkdir -p /samba/secured
cd /samba
chmod -R 0770 secured
chown root:smbgrp secured
Edit the Samba configuration file and add the following (red) lines at the end of the file:
nano /etc/samba/smb.conf
[...]
[secured]
 path = /samba/secured
 valid users = @smbgrp
 guest ok = no
 writable = yes
 browsable = yes
service smbd restart
To cross-check the settings, run this command:
testparm
root@server1:/samba# testparm
Load smb config files from /etc/samba/smb.conf
rlimit_max: increasing rlimit_max (1024) to minimum Windows limit (16384)
Processing section "[Anonymous]"
Processing section "[secured]"
Loaded services file OK.
Server role: ROLE_STANDALONE
Press enter to see a dump of your service definitions <-- Press Enter
# Global parameters
[global]
netbios name = UBUNTU
server string = Samba Server %v
security = USER
map to guest = Bad User
dns proxy = No
idmap config * : backend = tdb
[Anonymous]
path = /samba/anonymous
force user = nobody
read only = No
guest ok = Yes
[secured]
path = /samba/secured
valid users = @smbgrp
read only = No
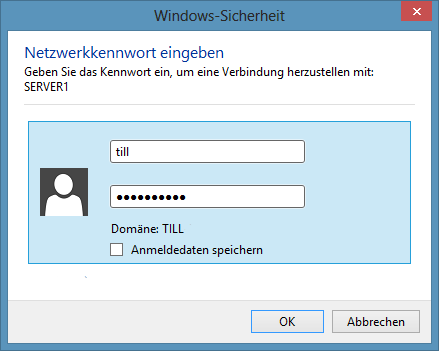
At the Windows machine, open the "\\server1" network device again, it will request a username and password now. Enter the user details that you created above. In my case, the values were user=till and password=howtoforge.

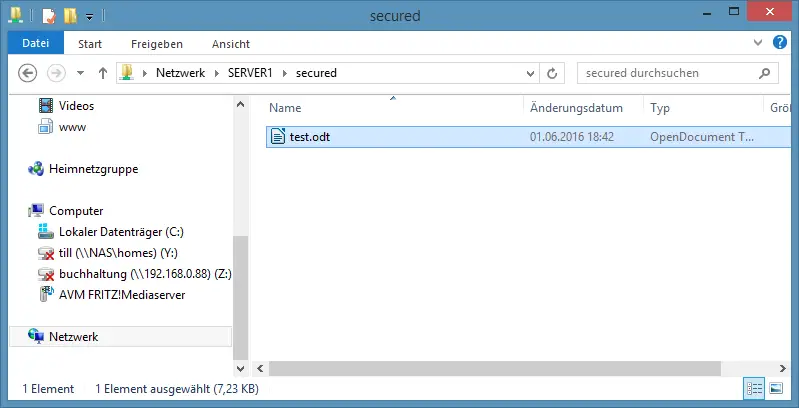
We can check the file on the Ubuntu server like this:
ls -la /samba/secured/
root@server1:/samba# ls -la /samba/secured/
total 16
drwxrwx--- 2 root smbgrp 4096 Jun 1 19:25 .
drwxr-xr-x 4 root root 4096 Jun 1 18:49 ..
-rwxr--r-- 1 till till 7405 Jun 1 18:42 test.odt
root@server1:/samba#
Now we have a successfully configured Samba server with an anonymous and a secured share on Ubuntu 16.04 :)
4 Virtual machine image download of this tutorial
This tutorial is available as ready to use virtual machine image in ovf/ova format that is compatible with VMWare and Virtualbox. The virtual machine image uses the following login details:
SSH / Shell Login
Username: administrator
Password: howtoforge
This user has sudo rights.
The IP of the VM is 192.168.1.100, it can be changed in the file /etc/network/interfaces. Please change all the above passwords to secure the virtual machine.
5 Links
- Ubuntu : http://www.ubuntu.com/
- Samba : http://www.samba.org/samba/

