Installing Nginx with PHP 7 and MySQL 5.7 (LEMP) on Ubuntu 16.04 LTS
This tutorial exists for these OS versions
- Ubuntu 24.04 (Noble Numbat)
- Ubuntu 22.04 (Jammy Jellyfish)
- Ubuntu 20.04 (Focal Fossa)
- Ubuntu 20.04 (Focal Fossa)
- Ubuntu 18.04 (Bionic Beaver)
- Ubuntu 16.04 (Xenial Xerus)
On this page
Nginx (pronounced "engine x") is a free, open-source, high-performance HTTP server. Nginx is known for its stability, rich feature set, simple configuration, and low resource consumption. This tutorial shows how you can install Nginx on an Ubuntu 16.04 server with PHP 7 support (through PHP-FPM) and MySQL 5.7 support (LEMP = Linux + nginx (pronounced "engine x") + MySQL + PHP).
1 Preliminary Note
In this tutorial, I use the hostname server1.example.com with the IP address 192.168.1.100. These settings might differ for you, so you have to replace them where appropriate.
I'm running all the steps in this tutorial with root privileges, so make sure you're logged in as root:
sudo -s
2 Installing MySQL 5.7
In order to install MySQL, we run:
apt-get -y install mysql-server mysql-client
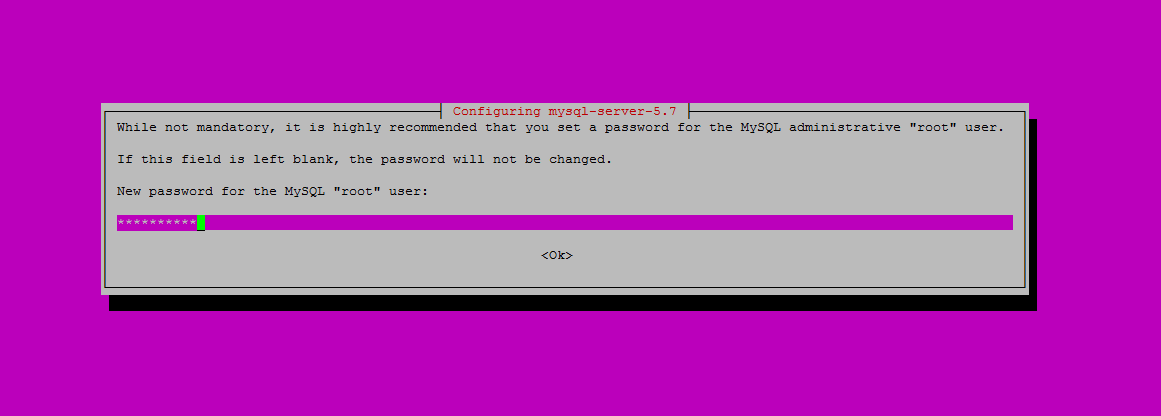
You will be asked to provide a password for the MySQL root user - this password is valid for the user root@localhost as well as [email protected], so we don't have to specify a MySQL root password manually later on:
New password for the MySQL "root" user: <-- yourrootsqlpassword
Repeat password for the MySQL "root" user: <-- yourrootsqlpassword
To secure the database server and remove the anonymous user and test database, run the mysql_secure_installation command.
mysql_secure_installation
You will be asked these questions:
root@server1:~# mysql_secure_installation
Securing the MySQL server deployment.
Enter password for user root: <-- Enter the MySQL root password
VALIDATE PASSWORD PLUGIN can be used to test passwords
and improve security. It checks the strength of password
and allows the users to set only those passwords which are
secure enough. Would you like to setup VALIDATE PASSWORD plugin?
Press y|Y for Yes, any other key for No: <-- Press y if you want this function or press Enter otherwise.
Using existing password for root.
Change the password for root ? ((Press y|Y for Yes, any other key for No) : <-- Press enter
... skipping.
By default, a MySQL installation has an anonymous user,
allowing anyone to log into MySQL without having to have
a user account created for them. This is intended only for
testing, and to make the installation go a bit smoother.
You should remove them before moving into a production
environment.
Remove anonymous users? (Press y|Y for Yes, any other key for No) : <-- y
Success.
Normally, root should only be allowed to connect from
'localhost'. This ensures that someone cannot guess at
the root password from the network.
Disallow root login remotely? (Press y|Y for Yes, any other key for No) : <-- y
Success.
By default, MySQL comes with a database named 'test' that
anyone can access. This is also intended only for testing,
and should be removed before moving into a production
environment.
Remove test database and access to it? (Press y|Y for Yes, any other key for No) : <-- y
- Dropping test database...
Success.
- Removing privileges on test database...
Success.
Reloading the privilege tables will ensure that all changes
made so far will take effect immediately.
Reload privilege tables now? (Press y|Y for Yes, any other key for No) : <-- y
Success.
All done!
MySQL is secured now.
3 Installing Nginx
In case that you have installed Apache2 already, then remove it first with these commands & then install nginx:
service apache2 stop
update-rc.d -f apache2 remove
apt-get remove apache2
Nginx is available as a package for Ubuntu 16.04 which we can install.
apt-get -y install nginx
Start nginx afterwards:
service nginx start
Type in your web server's IP address or hostname into a browser (e.g. http://192.168.1.100), and you should see the following page:

The default nginx document root on Ubuntu 16.04 is /var/www/html.
4 Installing PHP 7
We can make PHP work in nginx through PHP-FPM (PHP-FPM (FastCGI Process Manager) is an alternative PHP FastCGI implementation with some additional features useful for sites of any size, especially busier sites) which we install as follows:
apt-get -y install php7.0-fpm
PHP-FPM is a daemon process (with the init script php7.0-fpm) that runs a FastCGI server on the socket /run/php/php7.0-fpm.sock.
5 Configuring nginx
The nginx configuration is in /etc/nginx/nginx.conf which we open now:
nano /etc/nginx/nginx.conf
The configuration is easy to understand (you can learn more about it here: http://wiki.nginx.org/NginxFullExample and here: http://wiki.nginx.org/NginxFullExample2)
First (this is optional) adjust the keepalive_timeout to a reasonable value:
[...]
    keepalive_timeout   2;
[...]
The virtual hosts are defined in server {} containers. The default vhost is defined in the file /etc/nginx/sites-available/default - let's modify it as follows:
nano /etc/nginx/sites-available/default
[...]
server {
 listen 80 default_server;
 listen [::]:80 default_server;

 # SSL configuration
 #
 # listen 443 ssl default_server;
 # listen [::]:443 ssl default_server;
 #
 # Note: You should disable gzip for SSL traffic.
 # See: https://bugs.debian.org/773332
 #
 # Read up on ssl_ciphers to ensure a secure configuration.
 # See: https://bugs.debian.org/765782
 #
 # Self signed certs generated by the ssl-cert package
 # Don't use them in a production server!
 #
 # include snippets/snakeoil.conf;

 root /var/www/html;

 # Add index.php to the list if you are using PHP
 index index.html index.htm index.nginx-debian.html;

 server_name _;

 location / {
 # First attempt to serve request as file, then
 # as directory, then fall back to displaying a 404.
 try_files $uri $uri/ =404;
 }

 # pass the PHP scripts to FastCGI server listening on 127.0.0.1:9000
 #
 location ~ \.php$ {
 include snippets/fastcgi-php.conf;

 # With php7.0-cgi alone:
 # fastcgi_pass 127.0.0.1:9000;
 # With php7.0-fpm:
 fastcgi_pass unix:/run/php/php7.0-fpm.sock;
 }

 # deny access to .htaccess files, if Apache's document root
 # concurs with nginx's one
 #
 location ~ /\.ht {
  deny all;
 }
}
[...]
server_name _; makes this a default catchall vhost (of course, you can as well specify a hostname here like www.example.com).
root /var/www/html; means that the document root is the directory /var/www/html.
The important part for PHP is the location ~ \.php$ {} stanza. Uncomment it to enable it.
Now save the file and reload nginx:
service nginx reload
Next open /etc/php/7.0/fpm/php.ini...
nano /etc/php/7.0/fpm/php.ini
... and set cgi.fix_pathinfo=0:
[...]
; cgi.fix_pathinfo provides *real* PATH_INFO/PATH_TRANSLATED support for CGI.  PHP's
; previous behaviour was to set PATH_TRANSLATED to SCRIPT_FILENAME, and to not grok
; what PATH_INFO is.  For more information on PATH_INFO, see the cgi specs.  Setting
; this to 1 will cause PHP CGI to fix its paths to conform to the spec.  A setting
; of zero causes PHP to behave as before.  Default is 1.  You should fix your scripts
; to use SCRIPT_FILENAME rather than PATH_TRANSLATED.
; http://php.net/cgi.fix-pathinfo
cgi.fix_pathinfo=0
[...]
Reload PHP-FPM:
service php7.0-fpm reload
Now create the following PHP file in the document root /var/www/html:
nano /var/www/html/info.php
<?php
phpinfo();
?>
Now we call that file in a browser (e.g. http://192.168.1.100/info.php):
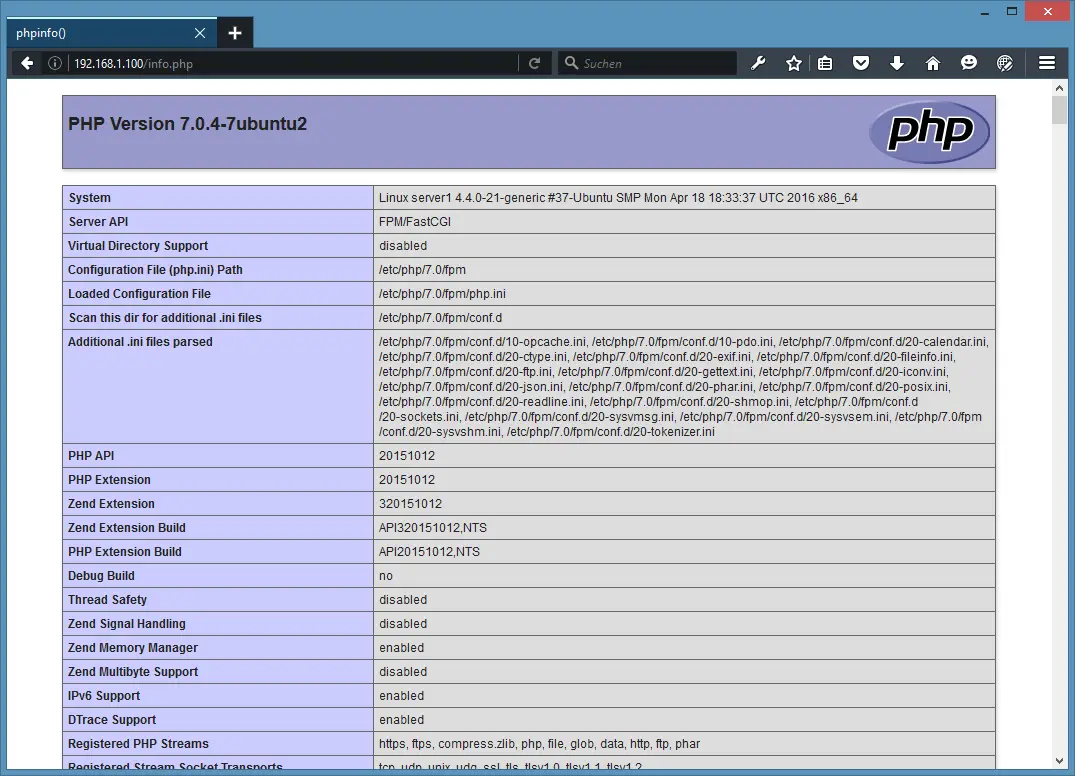
As you see, PHP 7 is working, and it's working through FPM/FastCGI, as shown in the Server API line. If you scroll further down, you will see all modules that are already enabled in PHP. MySQL is not listed there which means we don't have MySQL support in PHP yet.
6 Getting MySQL Support In PHP 7
To get MySQL support in PHP, we can install the php7.0-mysql package. It's a good idea to install some other PHP modules as well as you might need them for your applications. You can search for available PHP modules like this:
apt-cache search php7.0
Pick the ones you need and install them like this:
apt-get -y install php7.0-mysql php7.0-curl php7.0-gd php7.0-intl php-pear php-imagick php7.0-imap php7.0-mcrypt php-memcache php7.0-pspell php7.0-recode php7.0-sqlite3 php7.0-tidy php7.0-xmlrpc php7.0-xsl php7.0-mbstring php-gettext
APCu is an extension for the PHP Opcache module that comes with PHP 7, it adds some compatibility features for software that supports the APC cache (e.g. Wordpress cache plugins).
APCu can be installed as follows:
apt-get -y install php-apcu
Now reload PHP-FPM:
service php7.0-fpm reload
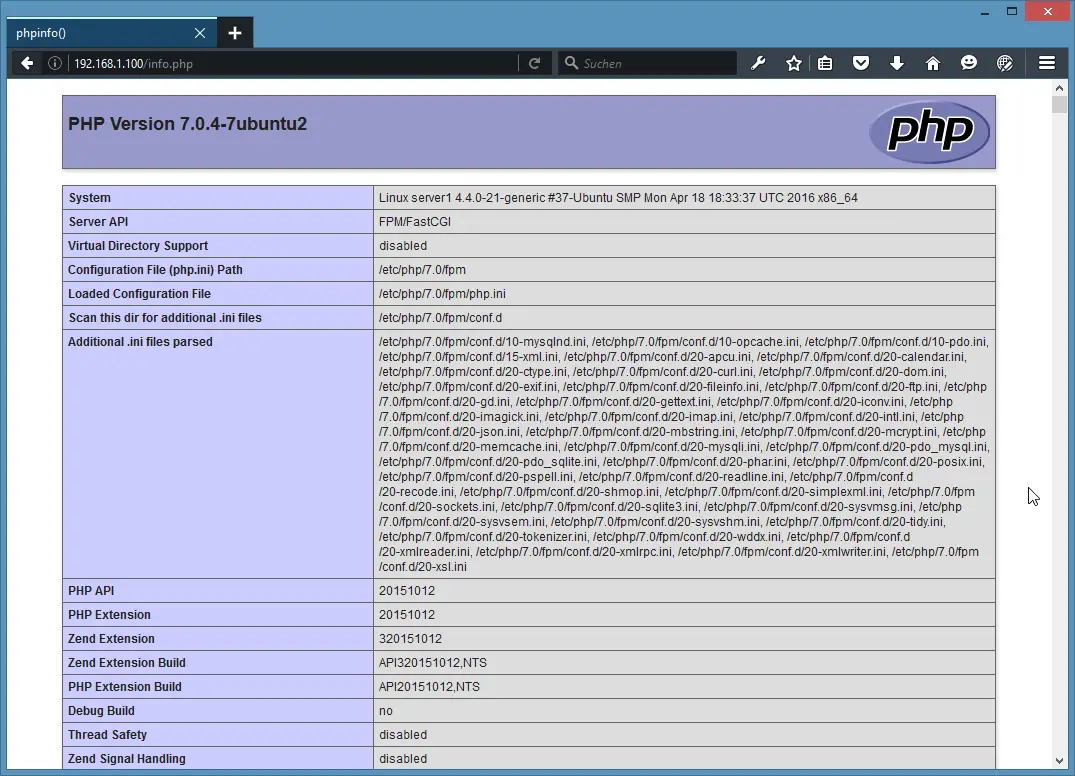
Now reload http://192.168.1.100/info.php in your browser and scroll down to the modules section again. You should now find lots of new modules there, including the MySQL module:
7 Making PHP-FPM use a TCP Connection
By default PHP-FPM is listening on the socket /var/run/php/php7.0-fpm.sock. It is also possible to make PHP-FPM use a TCP connection. To do this, open /etc/php/7.0/fpm/pool.d/www.conf...
nano /etc/php/7.0/fpm/pool.d/www.conf
... and make the listen line look as follows:
[...]
;listen = /var/run/php5-fpm.sock
listen = 127.0.0.1:9000
[...]
This will make PHP-FPM listen on port 9000 on the IP 127.0.0.1 (localhost). Make sure you use a port that is not in use on your system.
Then reload PHP-FPM:
php7.0-fpm reload
Next go through your nginx configuration and all your vhosts and change the line fastcgi_pass unix:/var/run/php/php7.0-fpm.sock; to fastcgi_pass 127.0.0.1:9000;, e.g. like this:
nano /etc/nginx/sites-available/default
[...]
        location ~ \.php$ {
 include snippets/fastcgi-php.conf;

 # With php7.0-cgi alone:
 fastcgi_pass 127.0.0.1:9000;
 # With php7.0-fpm:
 # fastcgi_pass unix:/run/php/php7.0-fpm.sock;
 }
[...]
Finally, reload nginx:
service nginx reload
That's it. The Nginx LEMP server is installed.
8 Links
- nginx: http://nginx.net/
- nginx Wiki: http://wiki.codemongers.com/Main
- PHP: http://www.php.net/
- PHP-FPM: http://php-fpm.org/
- MySQL: http://www.mysql.com/
- Ubuntu: http://www.ubuntu.com/

