Setting a static IP on Ubuntu: a beginner's guide
Many situations occur when a static IP address needs to be set. For example, if you have programs that use the IP address say for remote login, then you might hardcode the IP address. But if the IP address is dynamic it can change, and thus you need an IP that does not change and hence you would need to set a static IP for your system. This tutorial deals with setting a static IP for Ubuntu OS.
1 Manually configuring the interface
This step involves manually configuring the network interface by making changes to the "interfaces" file. Here I use the "gedit" file editor but it is possible to use other editors like "nano", "vi", etc. Type the following command in the terminal:
sudo gedit /etc/network/interfaces
If it asks for password enter that and a file will open that looks like:
# interfaces(5) file used by ifup(8) and ifdown(8)
auto lo
iface lo inet loopback
iface etho inet dynamic
There might be more than one network card and so be sure which network card you want to change. First open another terminal and run the command:
ifconfig
This gives the IP address of your system along with "Bcast" address and "mask". Note the IP, Bcast and the mask of your system. This is done so that you can go back to the original IP when needed. Let's assume the values we have got for "eth0" network interface (that is my ethernet connection) is:
address: 192.168.28.37
Bcast:   192.168.28.255
Mask:    255.255.255.0
So, when the interfaces file is configured for a static IP on "eth0", it must have a general format like below:
# interfaces(5) file used by ifup(8) and ifdown(8)
auto lo eth0
iface lo inet loopback
iface eth0 inet static
        address xxx.xxx.xxx.xxx(enter your ip here)
        netmask xxx.xxx.xxx.xxx
        gateway xxx.xxx.xxx.xxx(enter gateway ip here,usually the address of the router)
Below is a screenshot of my "interfaces" file. Note that Bcast also means Gateway, and mask also means netmask. Here we assume that our new static IP to set is 192.168.3.215.
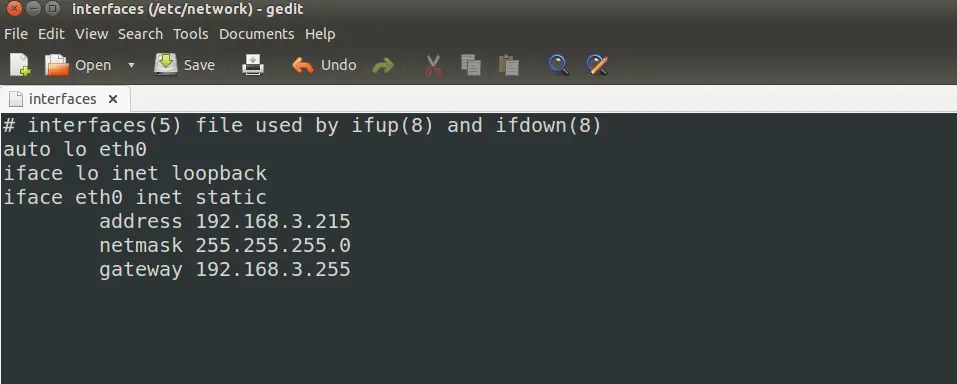
So please make changes according to your "interfaces" file. Save and close it.
2 Configuring DNS information
Please note that this step isn't mandatory. If you do not want to change the DNS information, then skip this step. Here we change the IP of DNS server to what we prefer. There are a lot of DNS server IPs, that can be found and used. First open the file "resolv.conf" using the following command:
sudo gedit /etc/resolv.conf
Initially it will look something like this:
# Dynamic resolv.conf(5) file for glibc resolver(3) generated by resolvconf(8)
# DO NOT EDIT THIS FILE BY HAND -- YOUR CHANGES WILL BE OVERWRITTEN
nameserver 127.0.1.1
search Home
Now we can add many nameservers and change the existing one to suit our needs. Make changes and save the file. The following screenshot shows the resolv.conf file changed to have two nameservers:

3 Making the changes permanent
Once the changes have been made to one or both the files (interfaces and resolv.conf), we will have to apply those changes to reflect them. Previously, we could restart the network to make the changes happen, but due to some reason, newer versions of Ubuntu doesn't apply those changes. So, we will have to reboot the whole system. To do so, use the command:
sudo reboot
After the restart, the output of network details should show the changes. Open a terminal and run the command:
ifconfig
On examining the output , the eth0 interface should have the new IP, Bcast and mask. In this case, the output might look similar to this:
eth0      Link encap:Ethernet  HWaddr xx:xx:xx:xx:xx:xx
          inet addr:192.168.3.215  Bcast:192.168.3.255  Mask:255.255.255.0
          .....
This confirms that the changes have been applied.
4 Configuring other interface like "eth1"
There might be other interfaces, like "eth1" that might require configuration. In this case, some changes are required to interface file as shown. The changes here are:
- adding eth1 in the "auto" line
- ading the configuration for eth0
Make changes as shown in the image below with the required IP, Bcast and mask
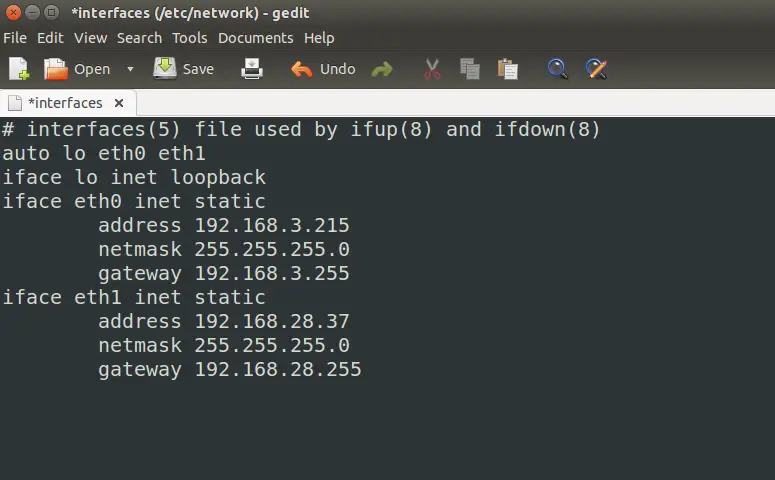
So, this way changes can be made to many different interfaces.
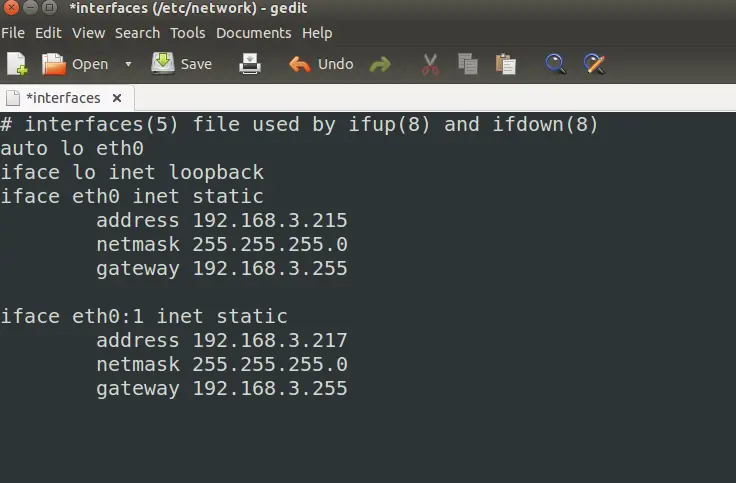
5 Configuring another IP for same interface
Here we have set one IP address for "eth0". But, what if we want to set another IP? Here we have set the IP as 192.168.3.215. Now for the same interface if we want to set another IP say 192.168.3.217, then we can do it by changing the "interfaces" file. Here "eth0:1" indicates that we are assigning a second IP for the "eth0" interface.The changes are represented in the image below.
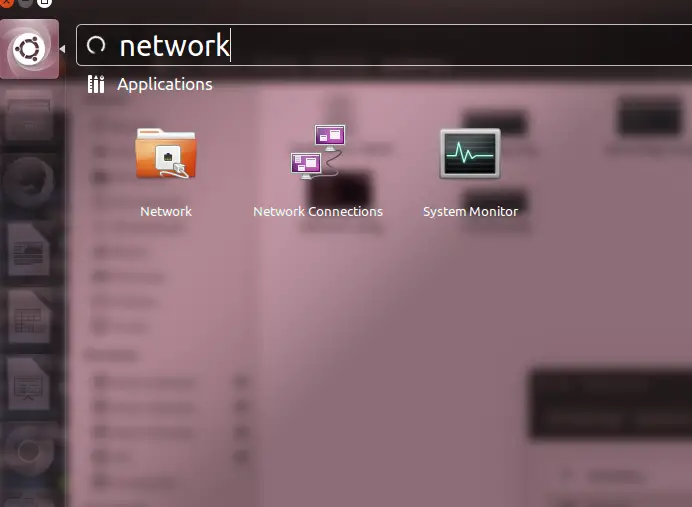
6 Configuring IP address using the Desktop Application
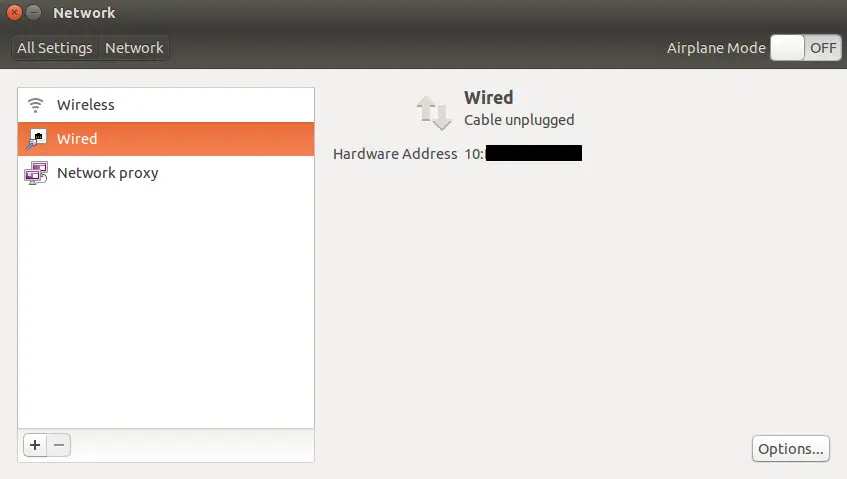
Most of the configuration done above can be carried out in the desktop application called "network". To go ahead with that, start by opening the "network" application from the dash as shown in the image below.
Click on "network" to open it. It will look similar to the one below:
In that window, click on the "options" button at the bottom right corner and in the window that opens, click on the "IPv4 settings" tab. The window is shown below
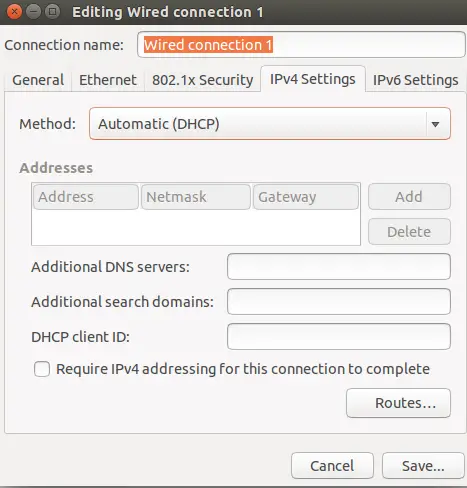
Initially the setting is set to "Automatic(dhcp)", which is dynamic IP. To make it static, select the dropdown menu and click on manual as shown in the image below:
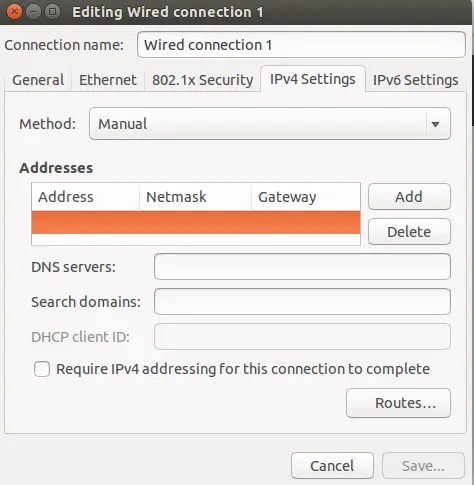
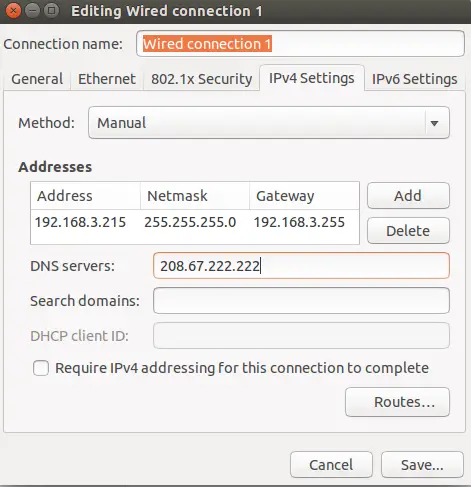
Once manual is selected the text box below it is activated. Click the "Add" button on the right and on the left hand text box, enter the IP, the mask(netmask) and the gateway (Bcast) addresses. Also add the DNS server IP if you wish to change that too. Once done click on save. After this editing, it should look similar to the image below:
Once saved, we will have to restart the system as before in order for the changes to be applied.
Conclusion
Now we can change the IP of an interface to static when we need to. We can have multiple static IP addresses for the same interface and multiple IPs of different interfaces. There can also be a mixture of static and dynamic IPs for different interfaces. It is also possible to change the IP using a desktop application. Please remember to take a screenshot or make a note of the initial IP config, which you might need, when you wish to go back to the initial settings. Also remember that giving IPs same as the ones already existing on the same network can lead to IP conflicts and might lead to network failure too.

