How to use Port Knocking on Ubuntu to hide the SSH port
You all know these old gangster films where a guy uses a knock sequence on a door to get in? Port knocking is exactly that, just for your server. Changing your default ssh port does not guarantee that you won't get hacked. Hackers often use tools to do automated scans for open ports before they attack a server. Port Knocking is a way by which you can defend yourself against port scanners., it refuses access to a protected port until a client accesses a sequence of other ports in the right order upfront.
Installing port knocking on Ubuntu is easy. I will show you in this article how to install and set up port knocking. The steps from this tutorials should work for Debian 8 as well.
Step 1: Make sure that all the required packages are installed
All commands below has t be run as root user. I dont want to prepent sudo to all commands, so I use:
sudo su
to become root user. The very first step is to update the Ubuntu package lists:
apt-get update
Then install the SSH server (if you have not installed it already).
apt-get install openssh-server
Now install the knockd software which is the daemon that controls the port knocking.
apt-get install knockd
Get:1 http://security.debian.org wheezy/updates Release.gpg [1,554 B]
Get:2 http://security.debian.org wheezy/updates Release [102 kB]
Get:3 http://security.debian.org wheezy/updates/main amd64 Packages [336 kB]
Hit http://mirrors.digitalocean.com wheezy Release.gpg
Hit http://mirrors.digitalocean.com wheezy Release
Get:4 http://security.debian.org wheezy/updates/main Translation-en [195 kB]
Hit http://mirrors.digitalocean.com wheezy/main amd64 Packages
Hit http://mirrors.digitalocean.com wheezy/main Translation-en
Fetched 635 kB in 1s (358 kB/s)
Reading package lists... Done
root@howtoforge:~#
root@howtoforge:~# apt-get install openssh-server
Reading package lists... Done
Building dependency tree
Reading state information... Done
The following extra packages will be installed:
 openssh-client
Suggested packages:
 ssh-askpass libpam-ssh keychain monkeysphere rssh molly-guard ufw
The following packages will be upgraded:
 openssh-client openssh-server
2 upgraded, 0 newly installed, 0 to remove and 32 not upgraded.
Need to get 1,364 kB of archives.
After this operation, 0 B of additional disk space will be used.
Do you want to continue [Y/n]?
Press Y then enter to continue.
After installing the package, you have to install the iptables kernel firewall. Run:
apt-get install iptables
Step 2: Adding rules to iptables
First, we flush existing firewall rules and ensure that outgoing connections don't get dropped.
iptables --flush
iptables -t nat --flush
iptables -t mangle --flush
iptables --policy OUTPUT ACCEPT
We want to make ensure to allow all established connections and on-going sessions through the firewall, otherwise, the firewall would block the current SSH session:
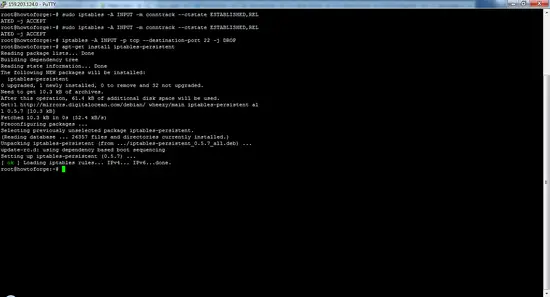
iptables -A INPUT -m conntrack --ctstate ESTABLISHED,RELATED -j ACCEPT
Note: The above rule has no spaces on either side of the comma in STABLISHED,RELATED.
Then use the following rule to block incoming port 22 (SSH):
iptables -A INPUT -p tcp --destination-port 22 -j DROP
Once you have established your iptables rules, you can automate the restore process at reboot with iptables-persistent. We can download this from Ubuntu's default repository:
apt-get install iptables-persistent
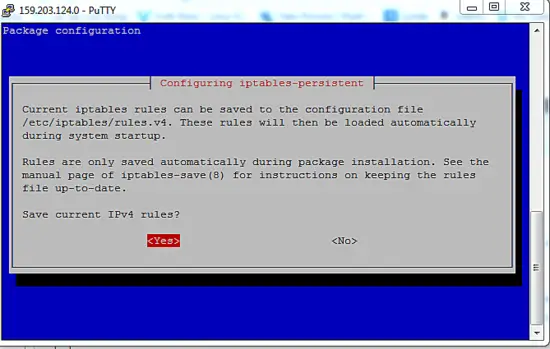
Current iptables rules can be saved to the configuration file ?
 ? /etc/iptables/rules.v4. These rules will then be loaded automatically ?
 ? during system startup. ?
 ? ?
 ? Rules are only saved automatically during package installation. See the ?
 ? manual page of iptables-save(8) for instructions on keeping the rules ?
 ? file up-to-date. ?
 ? ?
 ? Save current IPv4 rules?
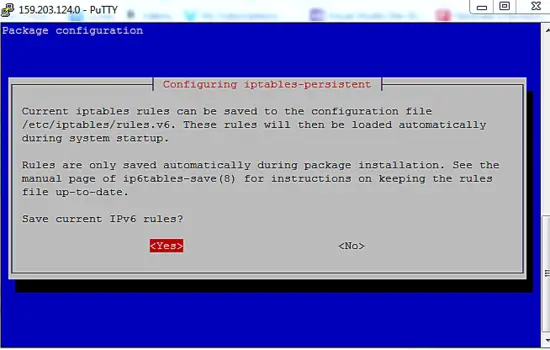
Current iptables rules can be saved to the configuration file ?
 ? /etc/iptables/rules.v6. These rules will then be loaded automatically ?
 ? during system startup. ?
 ? ?
 ? Rules are only saved automatically during package installation. See the ?
 ? manual page of ip6tables-save(8) for instructions on keeping the rules ?
 ? file up-to-date. ?
 ? ?
 ? Save current IPv6 rules?
During the installation, the program will prompt you to save the current iptables rules (ipV4 and ipV6), just select Yes for both.
Save the current rule-set into a file with the iptables-save command. This file can be used by iptables-restore later to restore the same iptables setup:
iptables-save
 # Generated by iptables-save v1.4.14 on Tue Feb 23 04:59:28 2016
*filter
:INPUT ACCEPT [1:40]
:FORWARD ACCEPT [0:0]
:OUTPUT ACCEPT [17:1976]
-A INPUT -m conntrack --ctstate RELATED,ESTABLISHED -j ACCEPT
-A INPUT -m conntrack --ctstate RELATED,ESTABLISHED -j ACCEPT
-A INPUT -p tcp -m tcp --dport 22 -j DROP
COMMIT
# Completed on Tue Feb 23 04:59:28 2016
Now, you will remain connected to your existing connection while blocking other connections on the SSH port.
Next, we have to configure knockd.
To configure the service, we will have to edit the configuration file /etc/knockd.conf. Open the file with nano:
nano /etc/knockd.conf
You will see the sections that will look like this.
[options]
 UseSyslog

[openSSH]
 sequence = 7000,8000,9000
 seq_timeout = 5
 command = /sbin/iptables -A INPUT -s %IP% -p tcp --dport 22 -j ACCEPT
 tcpflags = syn

[closeSSH]
 sequence = 9000,8000,7000
 seq_timeout = 5
 command = /sbin/iptables -D INPUT -s %IP% -p tcp --dport 22 -j ACCEPT
 tcpflags = syn
- In the "options" section, we see a directive name
UseSyslog. logfile is fairly obvious – it logs all knock attempts - Ungerneath, we have two sections: openSSH and closeSSH. The first will allow the knocker to access port 22 (SSH), and the second will close the port when the knocker is complete.
- knockd automatically replaces %IP% with the IP address of the client that sent the knock, so you can open the port only to the authorized client.
sequence = 9000,8000,7000
This means that this set of rules will match if the same IP requests a connection on port 7000, followed directly by port 8000, followed finally by port 9000. It is highly advisable to change the default ports and their order as the default order is well known to attackers as well.
seq_timeout = 5The "seq_timeout" option defines in seconds how long you have time to provide all numbers for the knock. This default value should be fine and won't be an issue if you're automatically generating your knocks.
command = /sbin/iptables -A INPUT -s %IP% -p tcp --dport 22 -j ACCEPT
Specify the command to be executed when a client makes the correct port-knock. All instances of %IP% will be replaced with the knocker's IP address.
tcpflags = syn
Pay attention to packets that have to be used to set this flag, in this case syn packets. When using TCP flags, knockd will IGNORE tcp packets that don't match the flags.
Now enable the knockd. Edit the file /etc/default/knockd with nano:
nano /etc/default/knockd
and change:
START_KNOCKD=0
to
START_KNOCKD=1
after this save and exit. If you have multiple network adapters or experience issues that knockd is not starting automatically during system startup, you can manually specify the network interface to listen on by uncommenting and amending the second line KNOCKD_OPTS.
Then start knockd manually:
service knockd start
This will start the daemon and allows you to change the iptables rule sets by knocking on the sequences of ports.
You have installed the required the packages, if you are disconnected from your server, to reconnect you have to knock the ports that you defined in the right sequence establish an SSH connection.
Step 3: Access the server when knockd is running
If you have followed the above steps, then you will not be able to connect to the SSH server directly anymore without port knocking.
You should receive no response from the server and the SSH client should timeout. This is because our SSH daemon is currently blocked by iptables. Type ctrl-C to end the SSH attempt if it does not time out automatically.
Test knocking with a telnet client
For Linux users: Install the telnet package with apt.
For Windows users: you can install the Telnet client by accessing the “Programs” section, search for "Turn windows features on or off", from there enable the Telnet Client.
Type the following the command in your command prompt (replace the port sequence with your custom sequence):
telnet youripaddress 7000
telnet youripaddress 8000
telnet youripaddress 9000
You have to do all this in 5 seconds because this the time limit imposed for the configuration. Now, attempt to connect to your server via SSH. You will be able to access the connection.
Run the above commands in reverse order to close the SSH server.
telnet youripaddress 9000
telnet youripaddress 8000
telnet youripaddress 7000
The best part of port knocking is that you can configure it alongside the private key authentication. If you configure both, then virtually there is no chance that someone could gain access or connect until and unless they know both the ports and the private key.


