How to Install Joomla with Apache on Debian 9 (Stretch)
This tutorial exists for these OS versions
- Debian 12 (Bookworm)
- Debian 10 (Buster)
- Debian 9 (Stretch)
On this page
Joomla is one of the most popular and widely supported open source content management system (CMS) platform in the world that can be used to build, organize, manage and publish content for websites, blogs, Intranets and mobile applications. It is written in PHP, uses object-oriented programming techniques and stores data in a MySQL or PostgreSQL. Joomla comes with more than 10,000 add-ons to customize its functionality. Joomla is open source means anyone can install Joomla and customize it as per their needs. More than 3 percent of the website running on Joomla around the world.
Here, we will learn how to install and configure Joomla on Debian 9.
Requirements
- A server running Debian 9.
- A static IP address 192.168.0.145 configure on your server
- A non-root user with sudo privileges setup on your server
1 Getting Started
Before starting, it is necessary to update your system with the latest stable version. You can do this by running the following command:
sudo apt-get update -y
sudo apt-get upgrade -y
Once your system is updated, reboot your system and log in with sudo user.
2 Installing Apache
Apache web server is required to install Joomla. you can install Apache with the following command:
sudo apt-get install apache2 libapache2-mod-php7.0 -y
Once Apache is installed, start apache service and enable it to start on boot time with the following command:
sudo systemctl start apache2
sudo systemctl enable apache2
3 Installing PHP7
By default, PHP7 is available in Debian 9 repository, so you can easily install PHP7 with all required libraries with the following command:
sudo apt-get install php7.0 php7.0-cli php7.0-mcrypt php7.0-intl php7.0-mysql php7.0-curl php7.0-gd php7.0-soap php7.0-xml php7.0-zip php7.0-readline php7.0-opcache php7.0-json php7.0-gd -y
Once the installation is completed, you will need to make some changes in php.ini file. You can do this with the following command:
sudo nano /etc/php/7.0/apache2/php.ini
Make the following changes:
memory_limit = 256M
upload_max_filesize = 32M
post_max_size = 32M
date.timezone = Asia/Kolkata
Save and close the file once you are done, then you can proceed to install and configure Database server.
4 Installing and Configuring MariaDB
Here, we will use MariaDB for the database purposes. You can install MariaDB with the following command:
sudo apt-get install mariadb-server -y
After installing MariaDB, start MariaDB service and enable it to start on boot time with the following command:
sudo systemctl start mysql
sudo systemctl enable mysql
By default MariaDB installation is not secured, so you will need to secure it first. You can secure it by running the mysql_secure_installation script as shown below:
sudo mysql_secure_installation
Answer all the questions as shown below:
NOTE: RUNNING ALL PARTS OF THIS SCRIPT IS RECOMMENDED FOR ALL MariaDB
      SERVERS IN PRODUCTION USE!  PLEASE READ EACH STEP CAREFULLY!

In order to log into MariaDB to secure it, we'll need the current
password for the root user.  If you've just installed MariaDB, and
you haven't set the root password yet, the password will be blank,
so you should just press enter here.

Enter current password for root (enter for none):
OK, successfully used password, moving on...

Setting the root password ensures that nobody can log into the MariaDB
root user without the proper authorisation.

You already have a root password set, so you can safely answer 'n'.

Change the root password? [Y/n] n
 ... skipping.

By default, a MariaDB installation has an anonymous user, allowing anyone
to log into MariaDB without having to have a user account created for
them.  This is intended only for testing, and to make the installation
go a bit smoother.  You should remove them before moving into a
production environment.

Remove anonymous users? [Y/n] Y
 ... Success!

Normally, root should only be allowed to connect from 'localhost'.  This
ensures that someone cannot guess at the root password from the network.

Disallow root login remotely? [Y/n] Y
 ... Success!

By default, MariaDB comes with a database named 'test' that anyone can
access.  This is also intended only for testing, and should be removed
before moving into a production environment.

Remove test database and access to it? [Y/n] Y
 - Dropping test database...
 ... Success!
 - Removing privileges on test database...
 ... Success!

Reloading the privilege tables will ensure that all changes made so far
will take effect immediately.

Reload privilege tables now? [Y/n] Y
 ... Success!

Cleaning up...

All done!  If you've completed all of the above steps, your MariaDB
installation should now be secure.

Thanks for using MariaDB!
Once MariaDB is secured, you will need to create a database for Joomla.
First, log in to MariaDB shell with the following command:
mysql -u root -p
Enter your root password when asked, then create a database for Joomla with the following command:
MariaDB [(none)]> CREATE DATABASE joomla_db;
Next, create a user for Joomla and set a password with the following command:
MariaDB [(none)]> CREATE USER joomla@localhost;
MariaDB [(none)]> SET PASSWORD FOR 'joomla'@'localhost' = PASSWORD("password");
Next, you will need to grant privileges to the joomla_db with the following command:
MariaDB [(none)]> GRANT ALL PRIVILEGES ON joomla_db.* TO 'joomla'@'localhost' IDENTIFIED BY 'password' WITH GRANT OPTION;
Next, flush the privileges with the following command:
MariaDB [(none)]> FLUSH PRIVILEGES;
Finally, exit from the MariaDB shell with the following command:
MariaDB [(none)]> exit;
Once you are done, you can proceed to the next step.
5 Installing Joomla
Apache, PHP and MariaDB are installed and configured. Now, it's time to install Joomla. To install Joomla, you will need to download the latest version of the Joomla. You can download it from the Git repository with the following command:
wget https://github.com/joomla/joomla-cms/releases/download/3.7.3-rc1/Joomla_3.7.3-rc1-Release_Candidate-Full_Package.tar.gz
Once Joomla is downloaded, extract the downloaded archieve to the Apache web root directory with the following command:
sudo mkdir /var/www/html/joomla
sudo tar -xvzf Joomla_3.7.3-rc1-Release_Candidate-Full_Package.tar.gz -C /var/www/html/joomla
Next, change the ownership of the joomla directory and give proper permission to it with the following command:
sudo chown -R www-data:www-data /var/www/html/joomla
sudo chmod -R 750 /var/www/html/joomla
Next, you will need to create an Apache virtualhost file for Joomla. You can do this by creating joomla.conf file inside /etc/apache2/sites-available/ directory:
sudo nano /etc/apache2/sites-available/joomla.conf
Add the following lines:
<VirtualHost *:80>
ServerAdmin [email protected]
DirectoryIndex index.php
DocumentRoot /var/www/html/joomla
ServerName 192.168.0.145
ServerAlias www.yourdomain.com
<Directory /var/www/html/joomla>
Options FollowSymLinks
AllowOverride All
Order allow,deny
allow from all
</Directory>
ErrorLog /var/log/apache2/joomla-error_log
CustomLog /var/log/apache2/joomla-access_log common
</VirtualHost>
Save and close the file whe you are finished.
Next, you will need to disable the default virtualhost file and enable Joomla virtualhost file. You can do this with the following command:
sudo a2dissite 000-default
sudo a2ensite joomla
Finally, reload the Apache service to apply these changes with the following command:
sudo systemctl restart apache2
6 Accessing Joomla
Before accessing the Joomla Web Interface, you will need to allow HTTP service through UFW firewall.
By default UFW is disabled on your system, so you need to enable it first. You can enable it with the following command:
sudo ufw enable
Once UFW firewall is enabled, you can allow HTTP service by running the following command:
sudo ufw allow http
You can now check the status of UFW firewall by running the following command:
sudo ufw status
Next, Open your web browser and type the URL http://192.168.0.145 or http://yourdomain.com, you should see the following page:
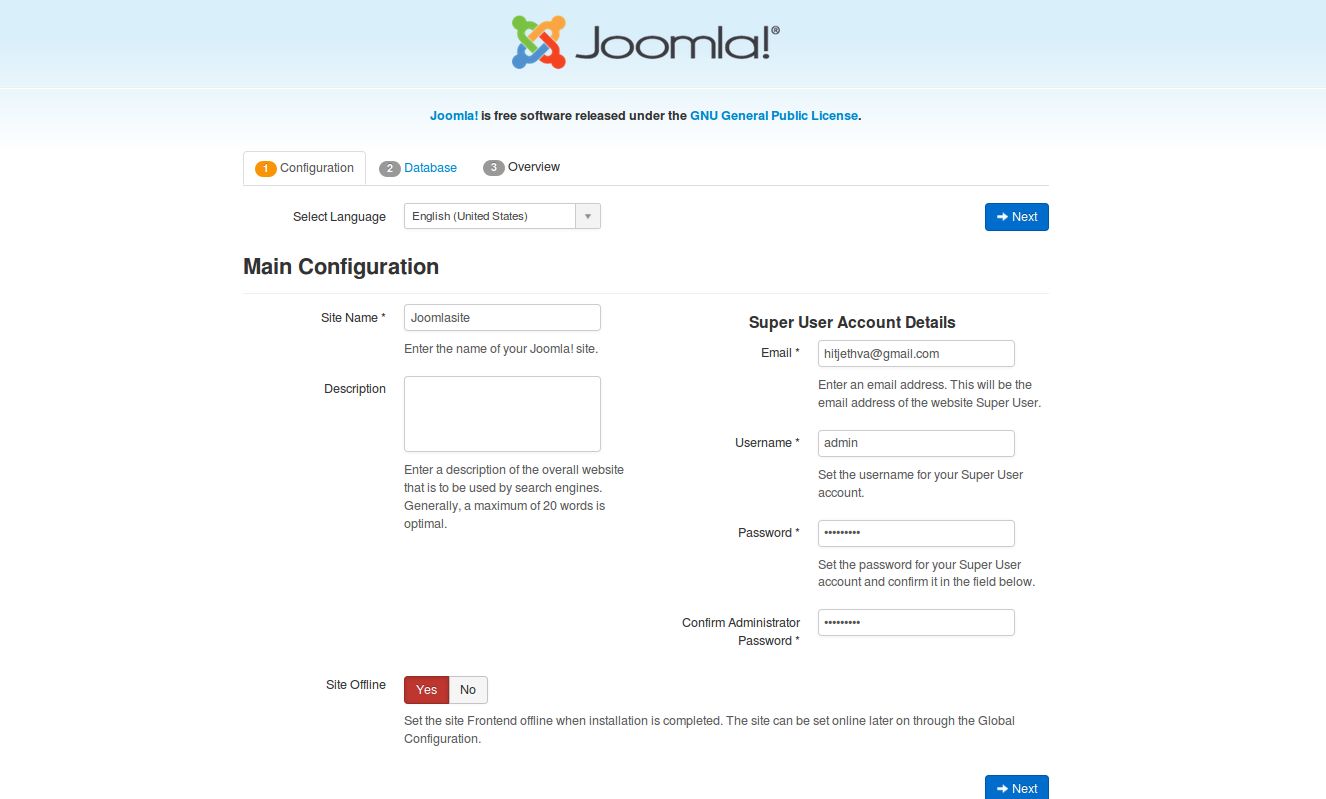
Here, fill up all the details like, Site Name, Admin Email, Admin Username and Password then click on the Next button, you should see the following page:
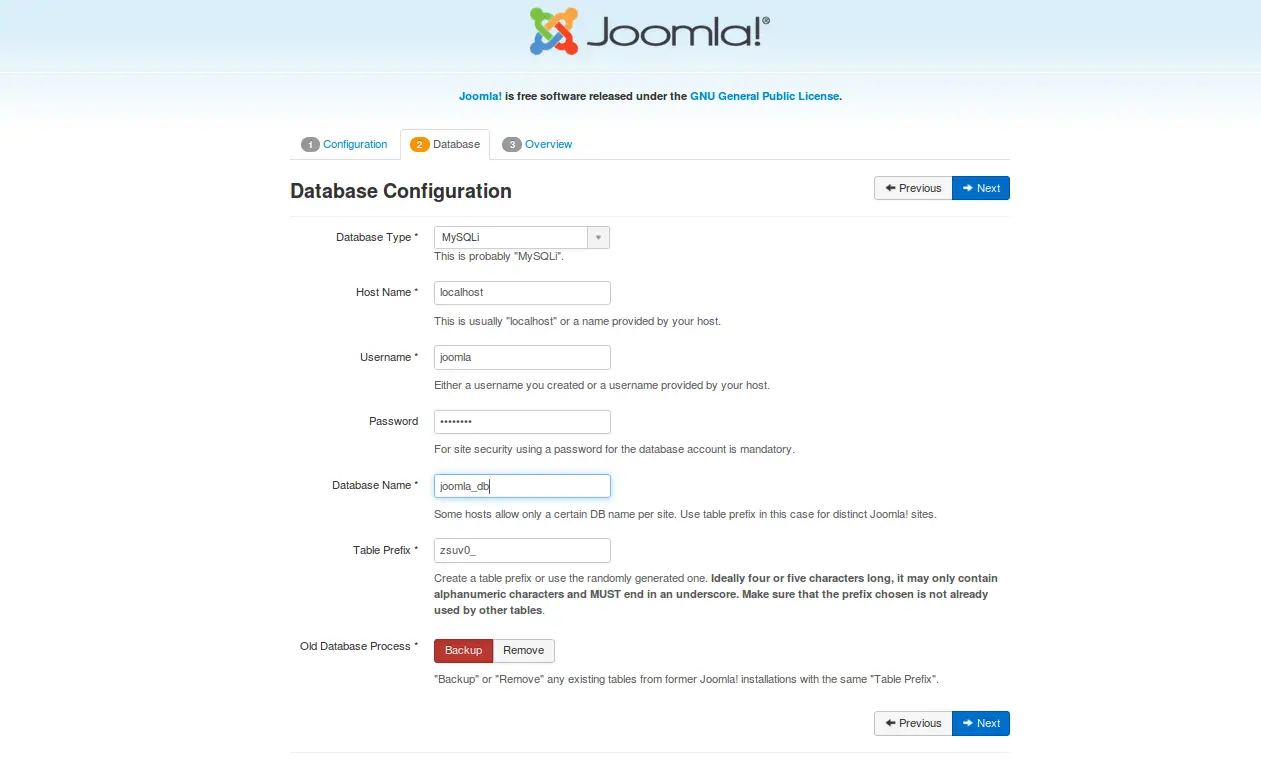
Here, fill up all the database details like, Host Name, Database Username, Password, Database name and Table Prefix, then click on the Next button, you should see the following page:
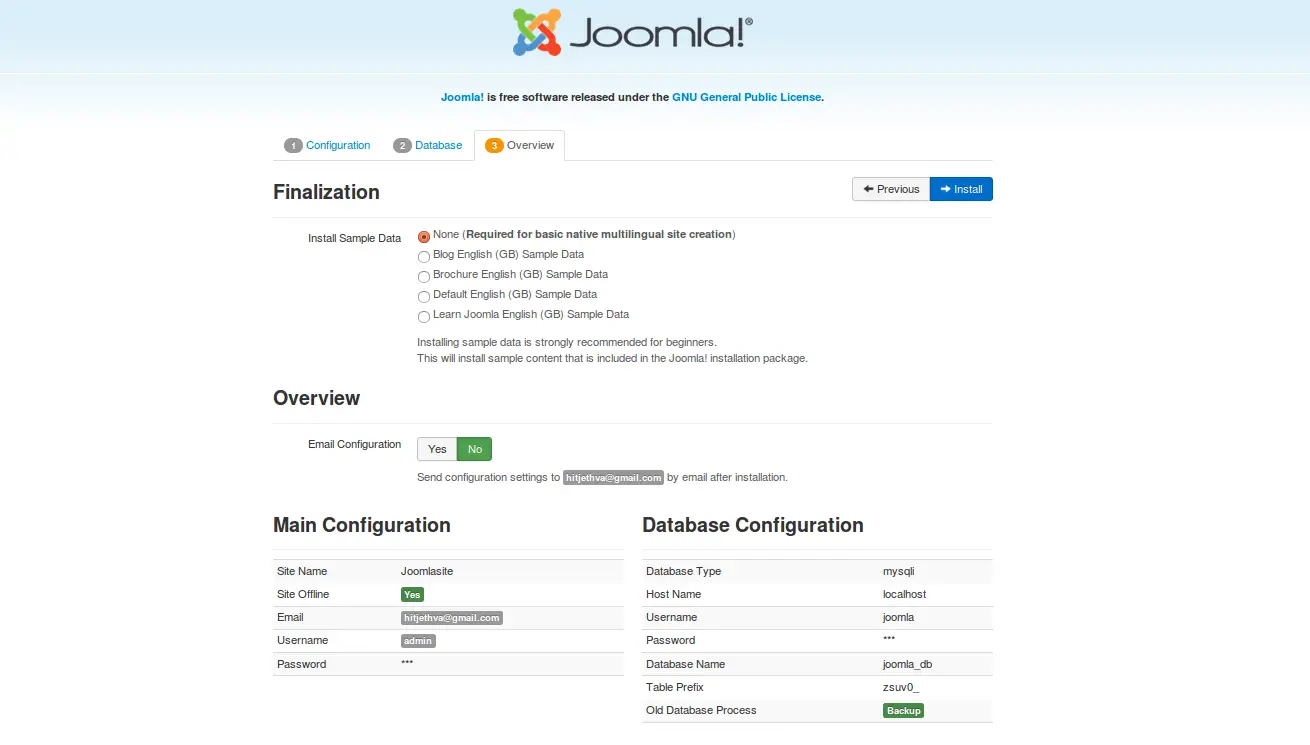
Here, confirm all the settings and click on the Install button, Once Joomla is installed successfully you should see the following page:
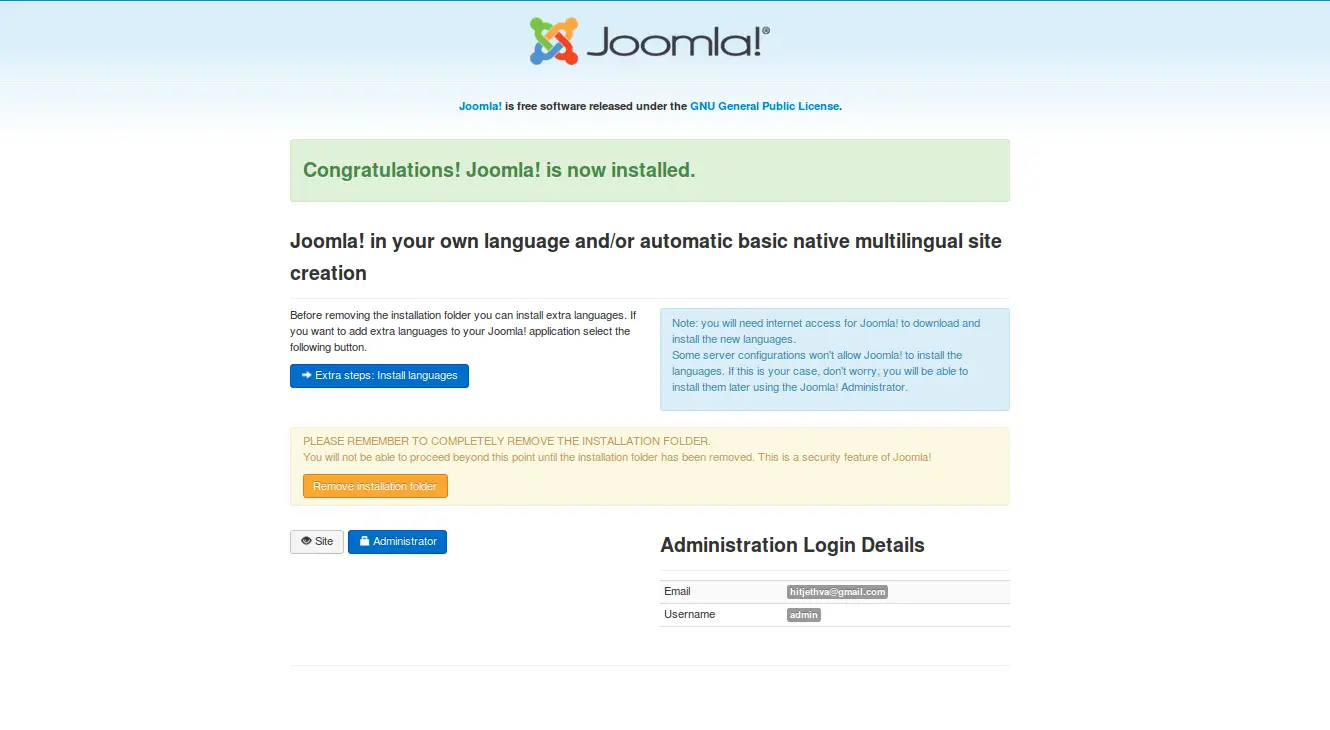
Now, click on the Administrator button, you should see the Joomla login page in following image:

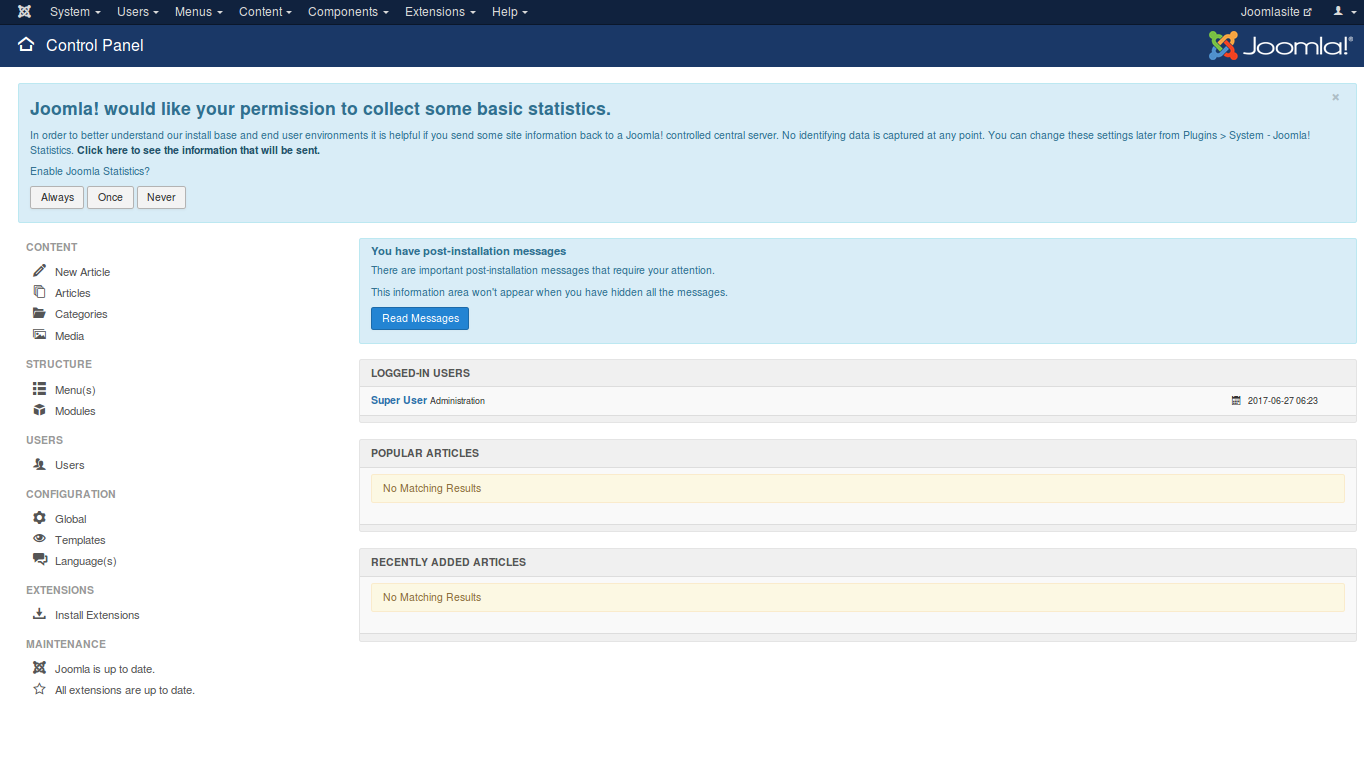
Provide your Admin credentials and click on the Login button, you should see the Joomla Control Panel in the following image:
Congratulations! you have successfully installed Joomla on Debian 9.

