How to install and setup Plex Media Server Ubuntu 16.04
This tutorial exists for these OS versions
- Ubuntu 20.04 (Focal Fossa)
- Ubuntu 18.04 (Bionic Beaver)
- Ubuntu 16.04 (Xenial Xerus)
On this page
Plex is a free feature-rich media library platform that provides a way to store all your movies, shows, and other media in one place. You can access Plex from any device, whether you’re at home or on-the-go. There are many different media tools available in the world like, Kodi, Xmbc, OSMC and Mediatomb, but the Plex Media Server is perhaps one of the most popular solutions for managing media. Plex runs on Windows, macOS, Linux, FreeBSD and many more. Plex is a client-server media player system made up from two main components, 1) The Plex Media Server, which organizes music, photos and videos content from personal media libraries and streams it to their player, 2) The Players that can be the Plex web UI, Plex Apps or Plex home theater. Plex Media Server supports Chromecast, Amazon FireTV, Android, iOS, Xbox, PlayStation, Apple TV, Roku, Android TV and various types of smart TVs. If you are looking for a way to watch your movies from anywhere, then Plex is best choice for you.
In this tutorial, we will learn how to install and configure Plex Media Server on Ubuntu 16.04.
Requirements
- A server running Ubuntu 16.04.
- A not-root user with sudo privileges setup on your server.
- A static IP address 192.168.0.227 setup on your server.
Getting Started
Before starting, make sure your system is fully up to date by running the following command:
sudo apt-get update -y
sudo apt-get upgrade -y
Once your system is updated, restart your system to apply all these changes with the following command:
sudo reboot
After restarting, log in with sudo user and proceed to the next step.
1. Install Plex Media Server
First, you will need to download the latest version of the Plex from their official website. You can download it by running the following command:
wget https://downloads.plex.tv/plex-media-server/1.7.5.4035-313f93718/plexmediaserver_1.7.5.4035-313f93718_amd64.deb
Once Plex is downloaded, run the following command to install Plex:
sudo dpkg -i plexmediaserver_1.7.5.4035-313f93718_amd64.deb
Next, start Plex Media Server and enable it to start on boot time by running the following command:
sudo systemctl start plexmediaserver
sudo systemctl enable plexmediaserver
You can check the status of Plex Media Server at any time by running the following command:
sudo systemctl status plexmediaserver
You should see the following output:
? plexmediaserver.service - Plex Media Server for Linux
   Loaded: loaded (/lib/systemd/system/plexmediaserver.service; enabled; vendor preset: enabled)
   Active: active (running) since Sat 2017-08-05 11:48:52 IST; 17s ago
 Main PID: 3243 (sh)
   CGroup: /system.slice/plexmediaserver.service
           ??3243 /bin/sh -c LD_LIBRARY_PATH=/usr/lib/plexmediaserver "/usr/lib/plexmediaserver/Plex Media Server"
           ??3244 /usr/lib/plexmediaserver/Plex Media Server
           ??3288 Plex Plug-in [com.plexapp.system] /usr/lib/plexmediaserver/Resources/Plug-ins-313f93718/Framework.bundle/Contents/Resources/Versions/

Aug 05 11:49:04 Node1 systemd[1]: Started Plex Media Server for Linux.
Aug 05 11:49:04 Node1 sh[3243]: Error in command line:the argument for option '--serverUuid' should follow immediately after the equal sign
Aug 05 11:49:04 Node1 sh[3243]: Crash Uploader options (all are required):
Aug 05 11:49:04 Node1 sh[3243]:   --directory arg       Directory to scan for crash reports
Aug 05 11:49:04 Node1 sh[3243]:   --serverUuid arg      UUID of the server that crashed
Aug 05 11:49:04 Node1 sh[3243]:   --userId arg          User that owns this product
Aug 05 11:49:04 Node1 sh[3243]:   --platform arg        Platform string
Aug 05 11:49:04 Node1 sh[3243]:   --url arg             URL to upload to
Aug 05 11:49:04 Node1 sh[3243]:   --help                show help message
Aug 05 11:49:04 Node1 sh[3243]:   --version arg         Version of the product
Next, you will need to create a directory to store your Plex media. You can create this by running the following command:
sudo mkdir -p /root/plex/movie
Once you are finished, you can proceed to the next step.
2. Configure Plex
Now, all the components are installed on your system, it's time to configure and access Plex.
Open your web browser and type the URL http://192.168.0.227:32400/web, you should see the following page:
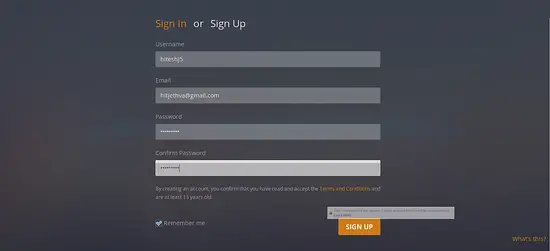
After accepting the user agreement, you will need to create a Plex account, click on "Sign Up" button for a new account. You should see the following page:
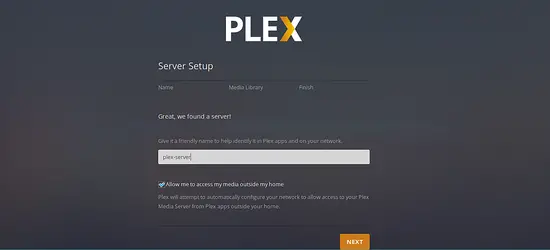
Here, provide all the required details like, Username, Email, Password, and click on the "Sign Up" button. You should see the following screen:
Here, give your server name and click on the Next button, you should see the following screen:
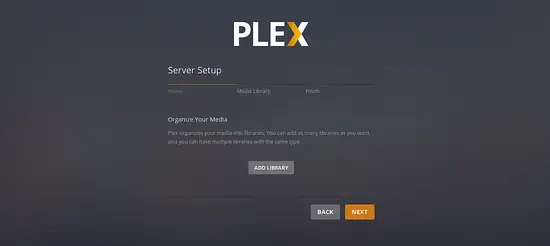
Click on the Next button, you should see the following screen:
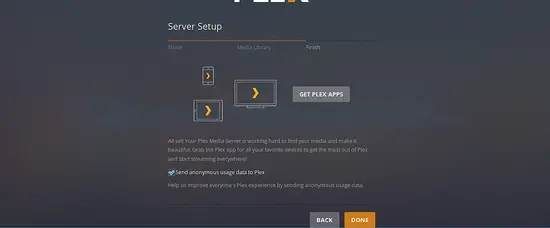
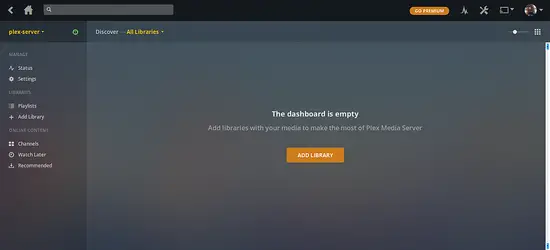
The final step of the initial server setup is to allow remote access to your media server and send anonymous data to Plex. By default both are checked. It is recommended to leave them checked, next click on the "Done" button to finish server setup. You should see the Plex dashboard in the following screen:
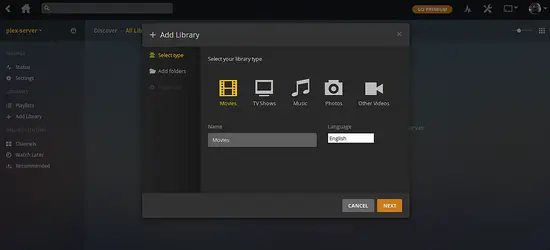
Now, click on "Add Library" button, you should see the following screen:
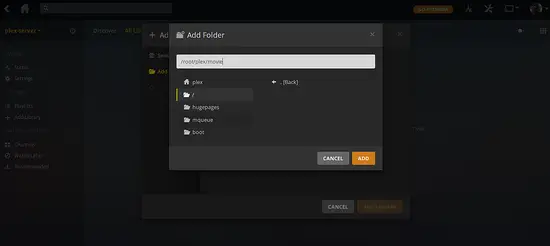
Here, select your library type. Repeat these steps for TV shows, music, and photos. It isn’t necessary to populate all the libraries. Click on the Next button, you should see the following screen:
Navigate to the corresponding media directory that you created previously, then click on Add button.
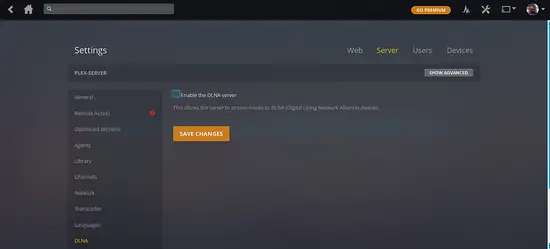
Next, you will need to disable DLNA features. To do so, click the wrench icon in the upper right corner, select Server click on DLNA and uncheck "Enable the DLNA server" then click Save Changes.
Congratulations! your Plex Media Server is ready, you are now ready to connect to it from your Plex client application or Web browser.
Conclusion
I hope you can now easily install and setup Plex media server to your system. You can easily browse all your media libraries right from the Plex control panel. Feel free to comment me if you have any question.


