RESTORE-DC (Data Center) User Manual - Page 2
3 Getting Started as the Client
Overview
The RESTORE system offers incredible control over the backup and restoration of your data. With a large number of tools available to manage your backups all available with just a few mouse clicks, we'll take a look at how to get started in the RESTORE system.
3.1 Logging In
Before you can begin using RESTORE, you will need to log in. This will require some information from your administrator. You will need:
- The address of the RESTORE server
- Your username
- Your password
Open a Web browser on your computer. Into the location bar, type the address of your RESTORE server as provided by your administrator. The Restore browser URL is http://ip_of_server/restore (e.g., http://192.168.10.10/restore).
Upon entering this address, you will see the RESTORE login screen (Figure 3.1). Enter your user name and password (by default, user=admin password=password) in the appropriate fields. How to change your password is discussed in Chapter 7.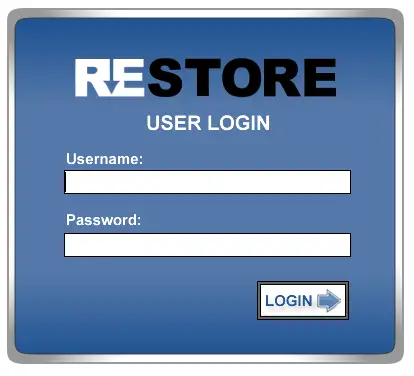
Fig-3.1 Login
If Something Goes Wrong
If you receive a message that your login has failed, there are several possible causes:
- You may have mistyped your username or password
- Your administrator may not yet have created your account
- Note that usernames and passwords are case-sensitive - (Users joe and Joe are different users)
3.2 The Home Page
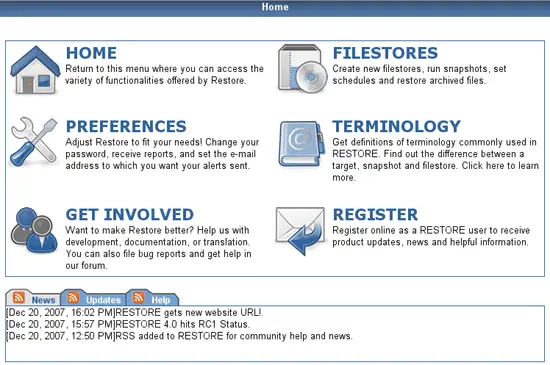
After Logging in, you will see the Restore Home Page (Figure 3.2). From here, you can perform various task such as....
- Home - Return to this menu where you can access the variety of functionalities offered by Restore.
- Preferences - Change your password, receive reports, and set the e-mail address to which you want your alerts sent.
- Get Involved - Help with Development, documentation, or translation. You can also file bug reports and get help in our forum.
- Filestores - Create new filestores, run snapshots, set schedules and restore archived files.
- Register - Register Online as a RESTORE user to receive product updates, news and helpful information
- Terminology - Get definitions of terminology commonly used in RESTORE
Clicking these Icons will take you to the section selected. Alternatively, you may select "Don't show this page again at startup" which will take you to the Filestores page upon next successful login.
3.3 The Toolbar
Along the top of the screen, you will find the Restore toolbar (Figure 3.3). Upon successful login, this will always be at the top of your page for easy access to your destination.
- The Home button will take you back to the main "Home Screen" as discussed in 3.2.
- The Filestores button will direct you to the page where you can manage or create new filestores.
- The Admin Button will take you to a screen where you can manage user accounts and Groups. (This will not be available to un-privileged users)
- The Preferences button will allow you to change your settings for your Restore account. This includes changing your password, setting your email address, and notice options.
- The Get Involved button will take you to the Restore website where you can help with development, documentation, or translation, file bug reports and get help in our forum.
- The Logout button logs you out of the Restore System.
Note: Some of these options will be discussed in greater detail in the following chapters.
4 Setting up Filestores
Overview
Restore is able to back up a variety of types of data over a variety of protocols. In this chapter, we will discuss how to go about setting up Filestores for the varous types of systems and connections Restore supports.
4.1 Different Protocols
Restore supports a wide range of types of data that can be backed up. You can backup data from a MySQL server, Windows Server/workstion, Novell Netware/OES, UNIX/Linux files via ftp or ssh. Below is a list and description of each one. If at anytime you have a question about the protocol, in Step 1 of the Target (Figure 2) Wizard, you may click on the ? button next to each one to get a detailed description.
- MySQL - Backup databases on a MySQL database server. This is the recommended and only *safe* method for backing up a MySQL database.
- Windows File Share - The Windows File Share option uses a protocol called SMB to back up shared directories on Windows, UNIX, Netware, and OES using NSS.
NOTE: To get a greater detailed explanation of how to set permissions on your Windows or Netware machines, go to the following links.
- Windows - Windows Permission Settings (Opens in same Window. Open in a new tab or Windows for easy access back to this page)
- Netware - Netware Permission Settings (Opens in same Window. Open in a new tab or Windows for easy access back to this page) - FTP - The FTP module can be used to backup files available through the File Transfer Protocol. Typically, FTP is used for transferring files like webservers and repositories. NOTE: Use the SFTP option if you can.
- SFTP - The SFTP module is similar to the FTP module and can be used to backup files through Secure File Transfer protocol over SSH.
4.2 Getting Started
The Process for backing up files and directories in Restore is very simple. With Restore's easy to use target Wizard you have the ability to create targets to manage with a few simple steps. To get started, after you log in to the Restore system, click on the "Filestores" button on the top toolbar. You will be taken to a screen (Figure 4.1) where you will be able to add new Filestores.
To add a new Filestore, click on the "Add Target" button on the right of the screen. This will bring up the Target Wizard which we will discuss next.
4.3 Target Wizard
Once you click on the "Add Target" button, the Filestore Wizard will begin. (Figure 4.2). This is a very easy to use 4 step process and we will guide you through each step in this section.
Step 1 - Choosing your protocol. Here you will select which protocol your Filestore will use. Protocol options were discussed in greater detail in section 4.1.
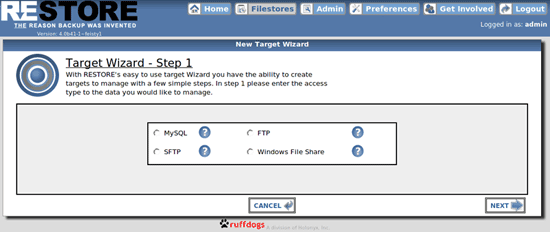
Figure 4.2 - Target Wizard Step 1
Step 2 - (Figure 4.3) Here you will put in your credentials to authenticate to your server / workstation. You will need to provide the hostname, username, password. (The port number will be chosen automatically based on your selection from Step 1). The host name can be either an IP Address or the FQN of the server. The username should be that of a user that has full rights to the shares your are wishing to backup.
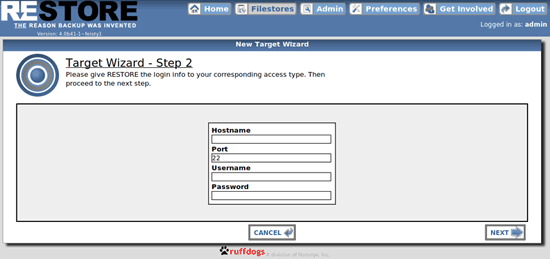
Figure 4.3 - Target Wizard Step 2
Step 3 - Next you will choose the particular files and or directories you want in your backup (Figure 4.4). You will see a hierarchical structure of your remote machine in which you can select your files / directories. You will notice a "+" and "-" symbol next to each file / directory. A "+" symbol indicates that the directory is collapsed. A "- "symbol indicates that the directory has been expanded. If you do not see a "+" or "-" symbol, that indicates that it is a file and there is nothing underneath it. Next you will notice boxes next to each file and or directory. A box with a check mark in it indicates that the file/directory is currently selected for inclusion. An empty box indicates that it is not. You may click on the box in the top level of your hierarchy to de-select everything. In this case, the box next to (ssh://[email protected]) You may then go through and choose what you want included.
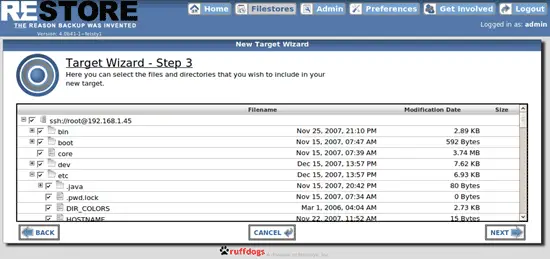
Figure 4.4 - Target Wizard Step 3
NOTE: Do not worry if you don't select everything. If you need to add or subtract any file or directory in your backup, you can do so later on. We will discuss editing your filestores later in Chapter 5.4.
NOTE: Selecting a directory implicitly selects all items beneath that directory. Be sure you know what is beneath the directory you are selecting so you don't end up backing up significatly more than you intend.
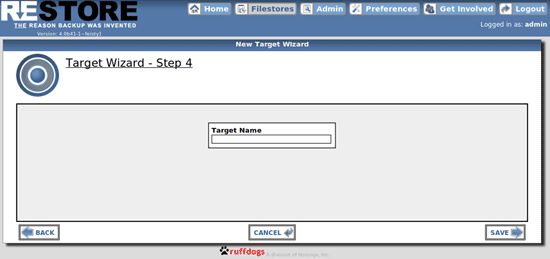
Step 4 - The next and final step is to name your Filestore. On this screen (Figure 4.5), you will be asked to give a name to your new Filestore. The name does not necessarily have to be the same as that of the machine and can be anything you like. The important thing is that the name be something that will remind you of what is being backup up by the Filestore. When you are satisfied with the name you have chosen for your Filestore, click save and this will create your Filestore and take you to the main Filestore page (Figure 4.1 above) where it will be listed.

