The Perfect Server - Fedora 9 - Page 3
4 Fix The Network
When I booted the system, I noticed that I could connect to and from it within my LAN, but the system could not connect to the internet. The output of
ifconfig
revealed that eth0 was up and has the correct IP address, however
route -nee
showed that no gateway had been set although I specified the correct gateay during the setup. I took a look at
chkconfig --list
and found that the network init script was set to off in all runlevels, however there was another init script, NetworkManager, which was set to on. NetworkManager is a tool that figures out the best network connection for the system and sets it up - in my case, it seems to have forgotten the gateway. Anyway, as we only have one network connection, we don't need the NetworkManager. I disabled it and set network to on, restarted the network, and violà, networking is working as expected, also after a reboot:
chkconfig NetworkManager off
chkconfig --levels 35 network on
/etc/init.d/network restart
5 Adjust /etc/hosts
Next we edit /etc/hosts. Make it look like this:
vi /etc/hosts
# Do not remove the following line, or various programs # that require network functionality will fail. 127.0.0.1 localhost.localdomain localhost 192.168.0.100 server1.example.com server1 ::1 localhost6.localdomain6 localhost6 |
It is important that you add a line for server1.example.com and remove server1.example.com and server1 from the 127.0.0.1 line.
6 Configure The Firewall
(You can skip this chapter if you have already disabled the firewall at the end of the basic system installation.)
I want to install ISPConfig at the end of this tutorial which comes with its own firewall. That's why I disable the default Fedora firewall now. Of course, you are free to leave it on and configure it to your needs (but then you shouldn't use any other firewall later on as it will most probably interfere with the Fedora firewall).
Run
system-config-firewall
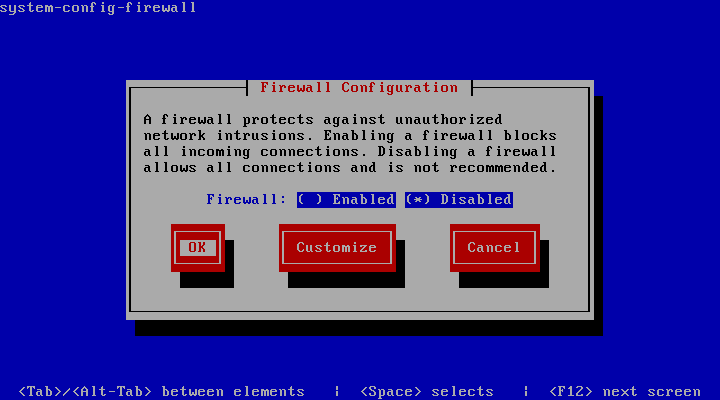
Select Disabled and press OK.
To check that the firewall has really been disabled, you can run
iptables -L
afterwards. The output should look like this:
[root@server1 ~]# iptables -L
Chain INPUT (policy ACCEPT)
target     prot opt source               destination

Chain FORWARD (policy ACCEPT)
target     prot opt source               destination

Chain OUTPUT (policy ACCEPT)
target     prot opt source               destination
[root@server1 ~]#
7 Disable SELinux
SELinux is a security extension of Fedora that should provide extended security. In my opinion you don't need it to configure a secure system, and it usually causes more problems than advantages (think of it after you have done a week of trouble-shooting because some service wasn't working as expected, and then you find out that everything was ok, only SELinux was causing the problem). Therefore I disable it (this is a must if you want to install ISPConfig later on).
Edit /etc/selinux/config and set SELINUX=disabled:
vi /etc/selinux/config
# This file controls the state of SELinux on the system. # SELINUX= can take one of these three values: # enforcing - SELinux security policy is enforced. # permissive - SELinux prints warnings instead of enforcing. # disabled - No SELinux policy is loaded. SELINUX=disabled # SELINUXTYPE= can take one of these two values: # targeted - Targeted processes are protected, # mls - Multi Level Security protection. SELINUXTYPE=targeted |
Afterwards we must reboot the system:
reboot
8 Install Some Software
First we import the GPG keys for software packages:
rpm --import /etc/pki/rpm-gpg/RPM-GPG-KEY*
Then we update our existing packages on the system:
yum update
Now we install some software packages that are needed later on:
yum install fetchmail wget bzip2 unzip zip nmap openssl lynx fileutils ncftp gcc gcc-c++

