How to clone disks with Linux dd command

In this tutorial, we'll refer to a practical example of the Linux dd command that can be used by system administrators to migrate or clone a Windows Operating System or a Linux OS from a larger HDD partitioned in MBR or GPT layout style to a smaller SSD. In this guide, we'll use as an example a Windows system installed on a hard disk with multiple partitions. This method can become quite complicated in case the HDD is partitioned in MBR scheme and contains an extended partition with multiple logical partitions or the partitions are out of order. I suggest you don't use this method if that's the case. In such cases, it's safer to use ddrescure which can clone your entire disk layout (partition table and used blocks inside each partition) without actually transferring the empty space. DDrescure can be obtained by installing gddrescue package from Ubuntu main repositories.

STEP ONE - Shrink Partition

You can resize a Linux or a Windows partition (shrink) to minimal size using a live Linux distribution such as Gparted or run gparted GUI utility from Ubuntu Desktop Live ISO image. Other paid Linux distributions you can use the manipulate disk partition file system sizes (ext2, ext4, NTFS, xfs) are Partition Wizard or Parted Magic . You can also use Microsoft Windows diskmgmt.msc utility in order to shrink an NTFS partition. By shrinking the free space of a partition, the required time that dd will take to copy non-used disk blocks, in case of huge partitions, will be drastically reduced. In case of a large partition with just a small percent of used space, it's advisable to shrink the file system because dd utility will also copy the unused space in the process (dd will also copy all free blocks of 100GB or 1 TB partition which has less than 10% of used space).

STEP TWO - Clone Disks

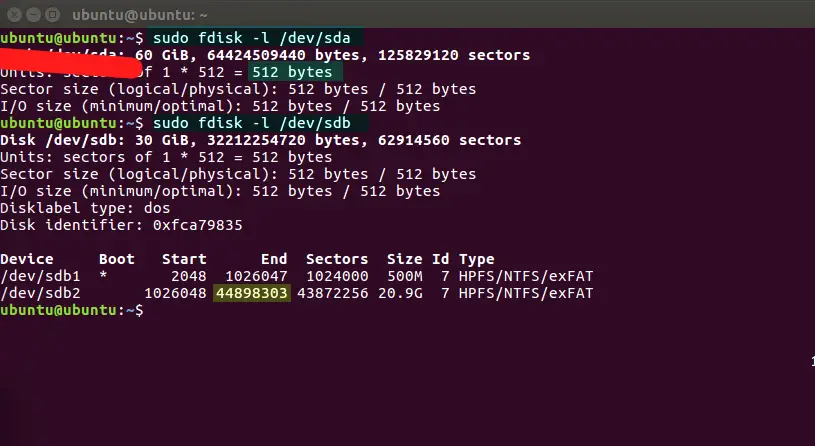
After the partition was resized to minimal, physically plug the second disk or SSD into the machine SATA/SCSI controller and boot-up the machine with a Live Linux distribution. Once the live Linux distribution has been loaded into RAM, open a Linux console and run fdisk -l /dev/sda (assuming that /dev/sda is your windows installation disk or C: drive in a windows environment) and note down the last "End" sector (44898303 as shown in the below example):

Example One - Clone MBR disk (Windows OS installed on the second partition)

In this test setup the disks are inversed, so /dev/sdb represents Windows installation the disk and /dev/sda represents the empty SSD.

Clone MBR disk

Then run the following command with root privileges in order to clone Windows installation disk from HDD (/dev/sdb) to SSD (/dev/sda). pv utility is not installed by default in Ubuntu. You can install it by running:

sudo apt install pv

Then start the cloning process by issuing the below command:

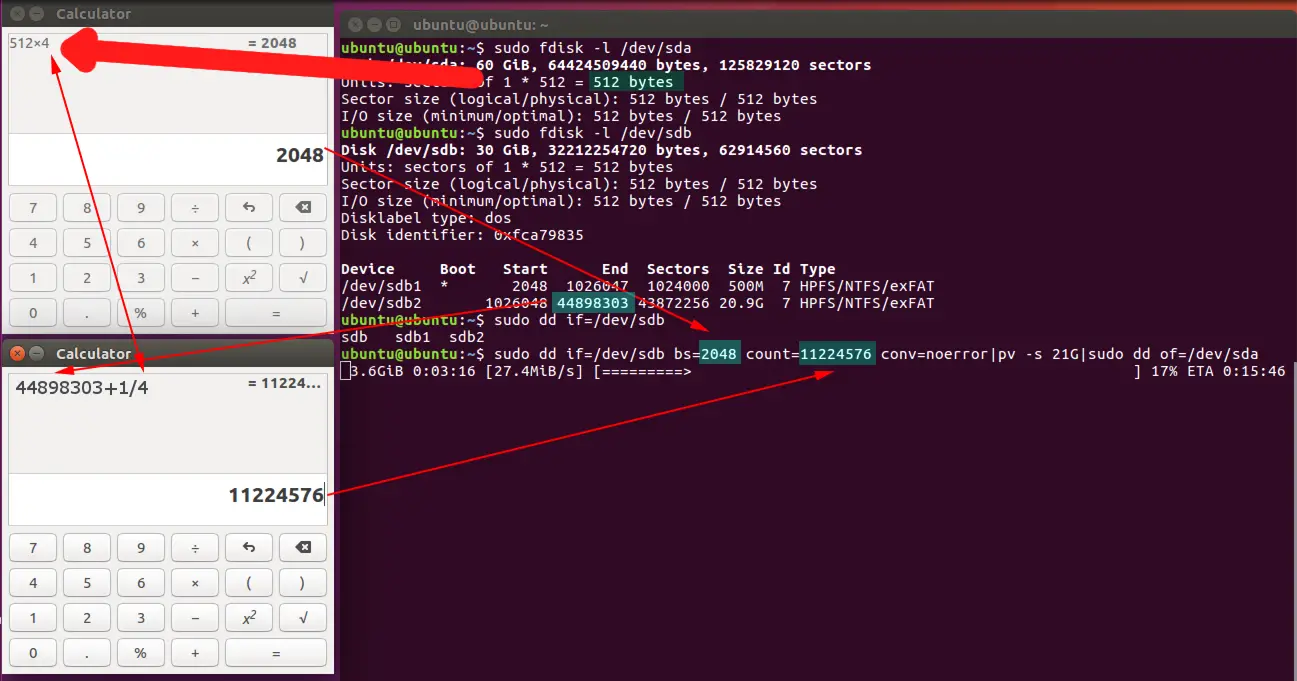
sudo dd if=/dev/sdb bs=512 count=44898303 conv=sync,noerror | pv -s 21G |sudo dd of=/dev/sda

ATTENTION: the target disk must be at least the size of the total space occupied by all partitions up to the Windows partition from the source disk, including the Windows partition.

Explaining the commands used in the above example

dd - dd stands for "Copy and Convert". Some might say it stands for 'Data Destroyer' (in case you mislead the command some serious damage can happen) or Data Duplicate or Data Description. Use whatever description suits your needs!

if - the source disk (in/input file)

bs - Sector size value from fdisk output (Block Size or number of bytes to be read/write one time)

count - Last "End" sector from fdisk output incremented by one integer (+1) - How many 512 size blocks should copy before it stops. Here, it should transfer 44099584 sectors of 512 bytes in size.

conv=sync,noerror - sync I/O and don't stop in case you encounter block errors on the source disk

| - Linux pipe (interprocess communication channel in Linux or FIFO)

pv -s 21GB - monitor the cloning progress - Approximately 21GB should be transferred through the pipe

of - the target disk where the piped data is actually written (out/output file)

In case you want to operate with a larger Block Size than the standard disk block size (512), let's say up to four times the size of standard block size (2048), for speeding up things, you can do some simple math and multiply by four the standard block size of the disk (512x4) and then divide the total number of blocks +1 of the last partition by four.

Another Example

In this example the "End" of sda2: 44898303+1 divided by 4. dd will operate with a block size of 2048 bytes.

sudo dd if=/dev/sda bs=2048 count=44898303 conv=sync,noerror | pv -s 21G |sudo dd of=/dev/sdb

DD command explained

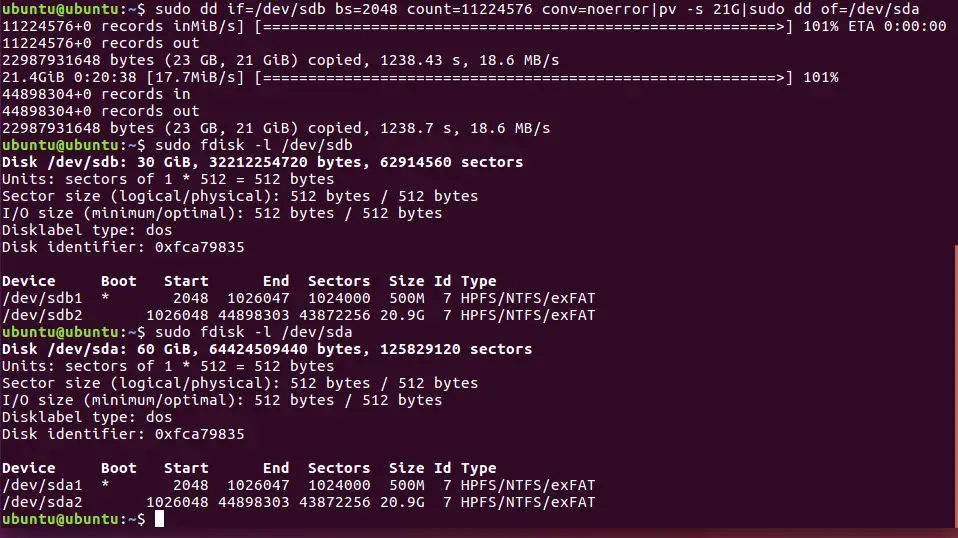
After the process finishes (depending on your disk size and speed it can take ten minutes or even hours) verify target disk using the same sfdisk command and compare the outputs from both disks. The results should be similar.

sfdisk output

Example Two - Clone GPT disk (Windows OS installed on the fourth partition)

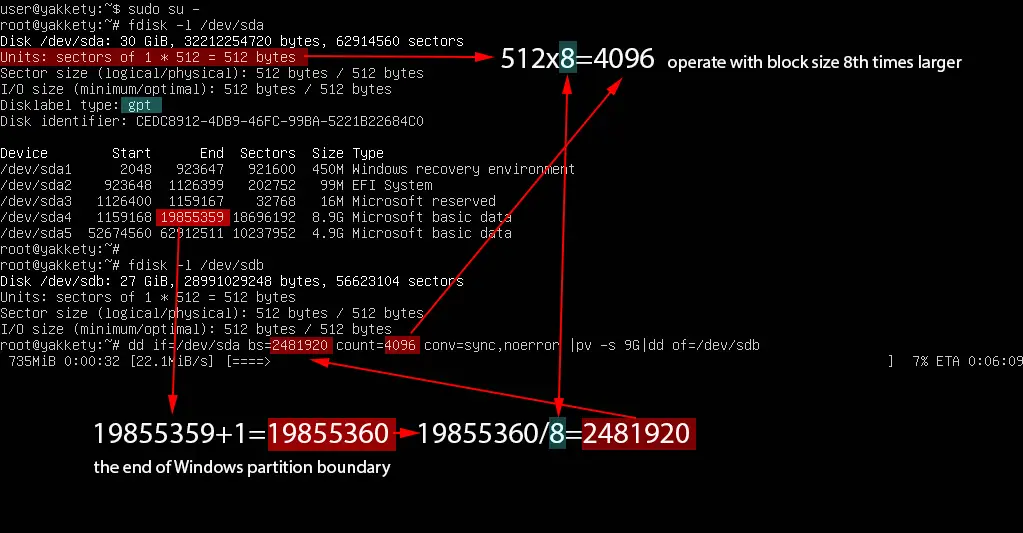
In this excerpt, dd will operate with a block size up to eight times the size of standard block size (4096) in order to transfer more blocks at once. The Windows OS resides in the fourth partition of the hard disk. All preceding Windows partitions must also be cloned. The disk will be fully copied until the last 19855359 sector, which represents the end of Windows partition boundary. Data that follows 19855359+1 sector represents D: partition in Windows, so this partition is of no interest to us since we'll only want to clone the operating system partition.

Multiply by eight the standard block size of the disk (512x8) and then divide the total number of blocks +1 of the last partition by eight as illustrated in the below image. The "End" of sda4 which represents the Windows partition is 19855359+1 divided by 8. dd operates with a block size of 4096 bytes.

sudo dd if=/dev/sda bs=4096 count=2481920 conv=sync,noerror | pv -s 9G |sudo dd of=/dev/sdb

Clone GPT disk (Windows OS installed on the fourth partition)

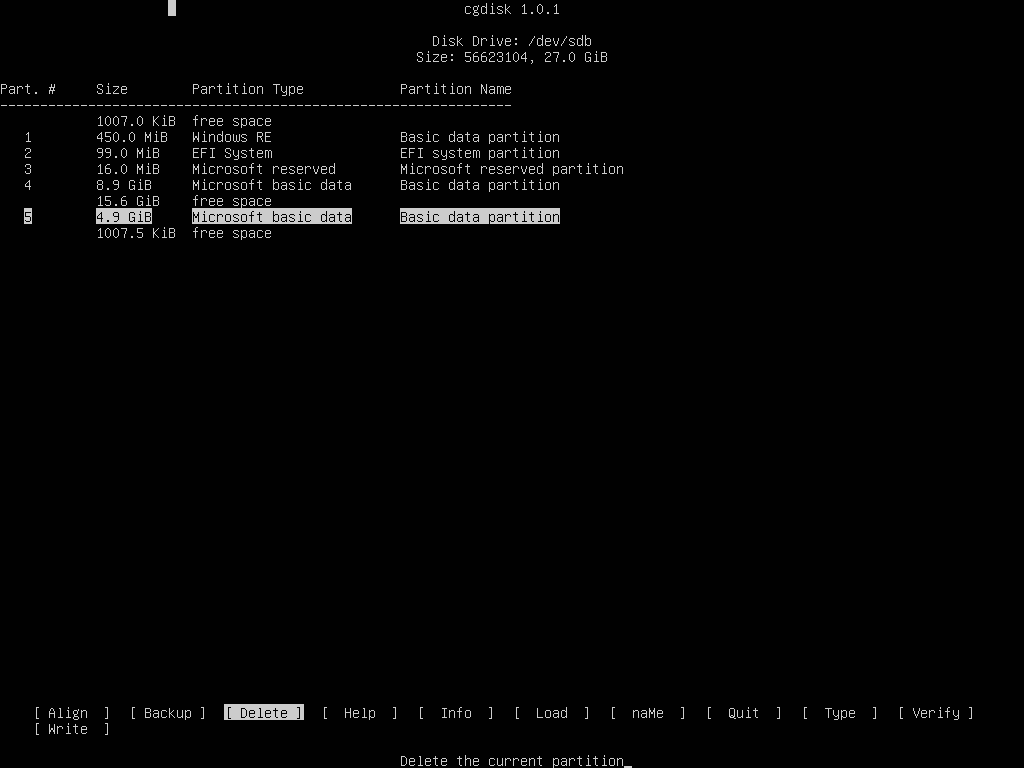
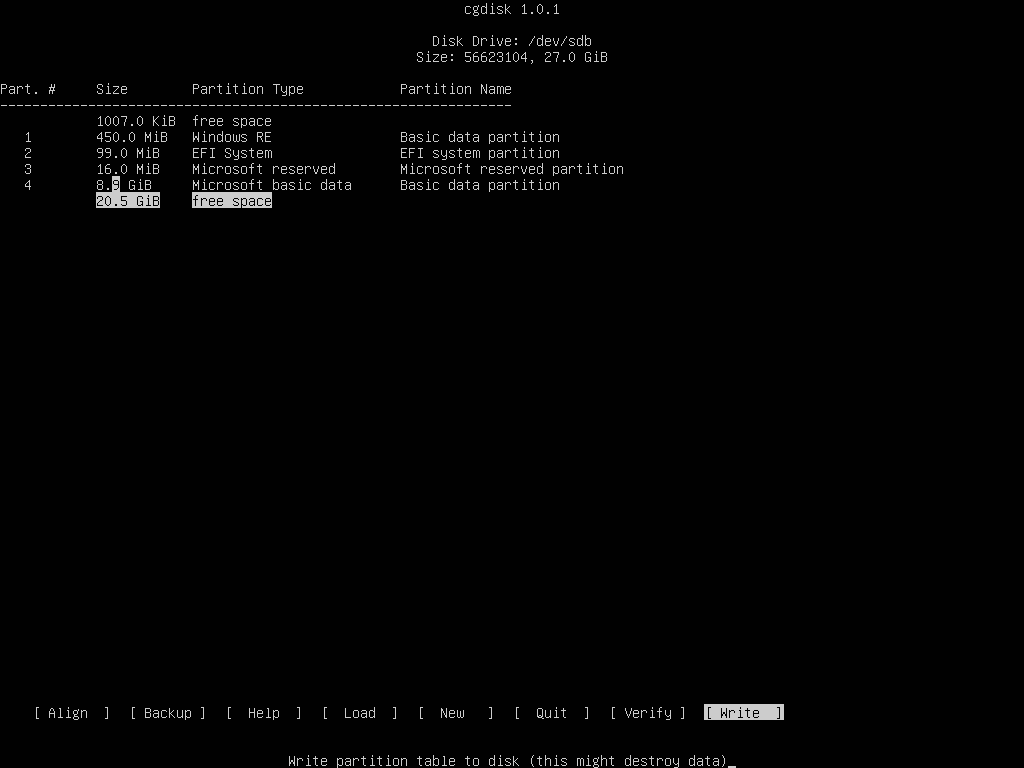
In this example, because we're only copying Windows OS and not the entire disk data that follows the fourth partition we need to delete the last partition. We can delete it by running cgdisk command line utility directly from the console as illustrated on the following screenshots

cgdisk utility

cgdisk - part 2

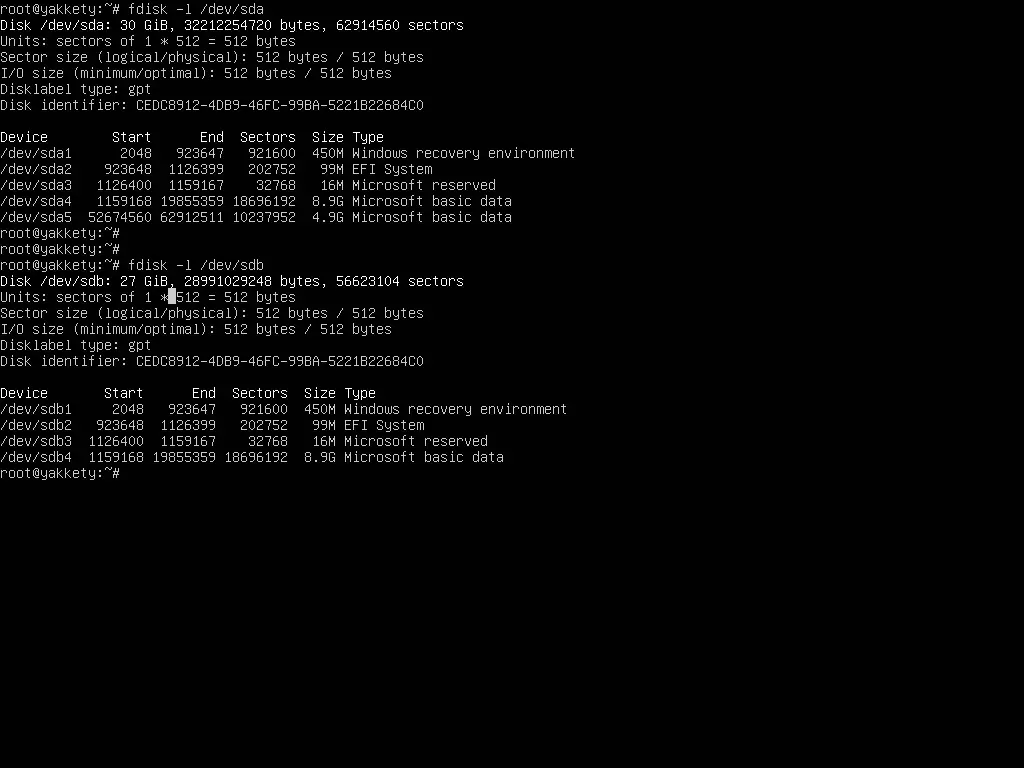
Verify the partition table differences on both disks by issuing fdisk command. The partition table should be similar, except 5th partition from /dev/sda which should be removed from the cloned disk (/dev/sdb ).

fdisk command

STEP THREE - Test the Cloned Disk

Finally, shut down the machine, unplug the old hard disk, and power on the computer with the newly cloned disk only. It should boot up in your operating system in no time. In case the machine refuses to boot, physically verify the SATA connectors on the motherboard and try to reverse them, or go to BIOS/UEFI settings and make sure the appropriate disk is enabled in the booting-up sequence.

Try not to boot up the machine with both disks plugged-in because it might confuse the bootloader, making your machine impossible to start the operating system. After you have the confirmation that your operating system boots up normally, use the same tool as for shrinking the file system to extend the cloned partition by adding the unallocated space.

Using this dd method you can transfer any variant of Windows or Linux OS with all your custom settings, installed programs, and files from a larger HDD to a smaller SSD, without the burden to install the OS from scratch and spend tons of hours to customizing it.

Share this page:

20 Comment(s)

Add comment

Please register in our forum first to comment.

Comments

By: Scott Dowdle at: 2017-08-10 21:13:17

I did this yesterday on a physical disk connected to my Fedora 26 desktop via a USB toaster type box.  The disk was 1TB.  Installed on the disk was a sysprep'ed Windows 10 (1 partition) and Fedora 26 (3 partitions all xfs).  I didn't try to shrink anything.  ddrescue wrote out a 932GB .img file and it took a few hours.

Then I ran the xz command on the .img file with 6 threads... and it took about 3 hours but it compressed the 932GB .img file down to 71GB.  Of course a lot depends on how much software you have installed within the OSes on the disk.

The extra steps you gave probably made it go faster.

By: ahmed shimi at: 2017-08-10 21:21:11

after step one, you can use gnome-disk-utility 3.24.0 UDisks 2.1.8 (built against 2.1.8) Clone Disks and then restored it to any drive or partition you want with the same application . all that will be in GUI interface. thanks 

By: Effrafax at: 2017-08-11 00:38:28

Hi,

Your description of the bs switch is misleading.  It is not block size, but buffer size and is not related to the block size of the media.  Using bs=512 or bs=2k results in a very slow copy.  Using bs=64M or larger dramatically speeds up the copy.

Cheers,

Effrafax.


By: linuxboxgo at: 2017-08-11 18:19:51

I'm pretty sure the variable bs is referencing to block size, not buffer size. From the dd manual: https://www.freebsd.org/cgi/man.cgi?dd(1) 

bs=n Set both input and output block size to n bytes, superseding the ibs and obs operands. If no conversion values other than noerror, notrunc or sync are specified, then each input block is copied to the output as a single block without any aggregation of short blocks.

By: Alex at: 2017-08-11 14:17:19

Does anyone know how to nic boot a Linux ISO? 

By: maxflexy at: 2017-08-13 17:46:43

On recent versions of dd you can monitor the cloning process with status=progress Cheers

By: sedlav at: 2017-08-14 23:34:31

Why Linux dd command? dd is not part of the kernel else of  GNU coreutils.

By: ector at: 2017-11-22 13:08:36

hello, i have many linux arch linux distro and ubntu in efi, and with secure boot deactivated,i usually have two partitions one in / efi fat32 by one giga, and one with 15-20 gb per root, the disk is all in gpt, i have no partzone / home, you could indicate the steps to clone the partition / efi luck 32 and the / root.thank youhector

By: joska the hun at: 2017-11-27 10:55:12

Gparted> copy partition> update grub :)

By: Rajendra Bakre at: 2018-07-25 19:30:58

I am planning to clone internal 320 GB HDD to external 1tb HDD using dd command through Ubuntu installed on yet another external HDD of 80 GB.

I have some doubts.

1. Will partition table and boot loader copied from source HDD to external 1tb HDD?

2. What will happen to remaining around 700gb portion of 1tb HDD?

By: Jonah Wong at: 2019-05-01 00:02:47

Cloned 500GB Western Digital D HDD Windows 7 to 500GB Samsung SSD in Linux Mint 19.1. Followed instructions above, I just hooked up the SATA cable to the new drive, which was recognized easily then cloned the original, then replaced the cable & internal mount position from the old to new once it was completed. Only took about 45 minutes tops to complete the entire process, the disk was only 70% full.

By: Jonah Wrong at: 2019-10-08 18:05:41

dd is a block-by-block copy. A drive that is 0% full and a drive that is 100% full will take the same length of time to copy this way.

By: edcompsci at: 2019-11-19 06:36:04

Could I use this method to dd a turnkey linux or other type of linux that is designed to work off of a usb drive, to a hardd drive or ssd?

By: Mewmew at: 2020-03-12 02:01:07

OMG THANK YOU !!!!

You saved me soooo thank you! I was seeing every sites talking about the complexity of cloning a drive, others tells to use a paid software, others tells to use CloneZilla... I tried CloneZilla but it failed cause I have "MBR and GPT" partitions, so I found you method, tried it and it works perfectly!!!

I managed to clone my 500GB HDD (shrinked to 80GB just for C: and the "system reserved" part) to my new SSD drive of 480 GB without any problem in some 30 minutes folowing your instructions!

Again I thank you so much for these great explanations and examples, you've done a very helpfull job!

By: APR911 at: 2020-07-03 14:28:22

As others have said, dd has the ability to display progress so you could in theory remove the requirement of piping it through pv. pv does however give you a percentage complete and computes an ETA (assuming you provide it the correct value after "-s"). You could do the same manually with the information provided out of dd's progress (speed and amount completed) but why compute something manually when passing it through pv is of very little cost (a couple extra cpu cycles).My big issue with the article that you should look to fix however is when changing the blocksize using bs and using pipes between "dd if" and "dd of".You should set try to set the block size on either side of the pipe to be the same size or larger on the write side. Ideally you want to use the blocksize most efficient for your destination disk. When you do "dd if=/dev/<drive> of=/dev/<drive>" setting bs does this to both the read and the write automatically. When you do "dd if=/dev/<drive> bs=<size> | dd of=/dev/<drive>" you will loose a lot of transfer speed and spend a lot of CPU time converting the input data back into the default 512bytes blocksize before writing it out.In testing, I saw no performance gain when changing bs only on the "input" side of the pipe, getting only 40MB/s with block sizes of 512, 4096 and 65536. Top showed my "output" dd running at 60% CPU, monitoring Disk IO with atop and dstat showed inconsistent throughput from the read side withe drive fluctuating between 50% busy and idle while the write/out side was pegged at 100% busy. I'm copying from a WD Red 5400-5900rpm SATA disk rated for 150MB/s to a Seagate Exos 7200rpm SAS disk rated for 225MB/s so even accepting that sequential writes are more intensive than sequential reads, I would not expect to be IO bound by the write side though that's what the stats were indicating.When I modified the "output" side of the pipe to include "bs=" and used a blocksize greater than or equal to the block size coming from the input side, my throughput jumped to 180MB/s and cpu dropped to 12-13%. Monitoring disk IO showed consistent read and write throughput on both sides and my read disk was consistently at 100% busy while my write side disk fluctuated between 50% and 100%. At 180MB/s I'm IO bound by the read side disk more so than the write side which is more inline with expectation. In fact at 180MB/s I'm running about 120% of the expected sustained throughput of the WD Red Drive while I'm running at about 80% of the expected throughput of the Seagate Exos drive. This would explain why the write drive fluctuates between 50% and 100% as every few seconds, it has to wait for data from the WD Red drive (my Exos drive can write in 4 seconds what it takes the Red drive 5 seconds to read so every 2 seconds, the exos drive can slow down to 50% for 1 second and still write out the same amount of data as the Red drive has offered it).

By: mohamadali modaresi alam at: 2020-12-07 12:10:56

## chech source disks and partition by:

udisksctl status

##then run :

sudo dd bs=400M conv=sync.noerror status=progress if=/dev/hda of=/dev/hdb

By: Peter at: 2021-03-04 20:21:15

dd worked flawlessly to clone a complete boot HD with NTFS partitions to ssd. Minitool ShadowMaker clone feature running MS Windows 7 failed. GNU Linux safed my Windows ass :-)

By: brano at: 2021-11-19 07:12:15

hello, wery nice manuala, I have question about example 2:

command in text is: sudo dd if=/dev/sda bs=4096 count=2481920 conv=sync,noerror | pv -s 9G |sudo dd of=/dev/sdb

but in imagee 4.png are bs and count values swaped: bs=2481920 count=4096...


By: TiTex at: 2022-08-29 15:49:50

How come nobody mentioned partclone ?

I would only use dd if there's no other choice because it's very slow and ineficient

By: Joe H at: 2023-03-13 19:58:30

Actually, dd stands for "device-to-device copy".  It was originally used for writing data on magnetic tape drives with a given block size. Newer kinds of devices have fixed block sizes that are hidden from the user, but for magtape you must specify the block size, and dd did that with the bs= option.  You can tell the extreme age of the command, as it is the only one in the entire Unix bestiary of basic commands left that uses xx=value rather than -xx value.

--jh--