Linux chfn Command Tutorial for Beginners (6 Examples)
On this page
- Linux chfn command
- Q1. How to change user's full name using chfn?
- Q2. How to change home phone number using chfn?
- Q3. How to change user's room number using chfn?
- Q4. How to change user's work phone number using chfn?
- Q5. How to verify changes done through chfn?
- Q6. How to change all information in one go?
- Conclusion
A user in Linux has a lot of information associated with it, including home and office phone numbers, office room number, and more. We usually skip filling this information (as it's all optional) while creating a user. But did you know there exists a command that lets you tweak all this information?
In this tutorial, we will discuss the basics of the chfn command using some easy to understand examples. But before we do that, it's worth mentioning that all examples in this article have been tested on an Ubuntu 18.04LTS machine.
Linux chfn command
The chfn command in Linux basically lets you change a user's full name as well as related information easily. Following is its syntax:
chfn [options] [LOGIN]
And here is what the man page says about it:
 The chfn command changes user fullname, office room number, office
 phone number, and home phone number information for a user's account.
 This information is typically printed by finger(1) and similar
 programs. A normal user may only change the fields for her own account,
 subject to the restrictions in /etc/login.defs. (The default
 configuration is to prevent users from changing their fullname.) The
 superuser may change any field for any account. Additionally, only the
 superuser may use the -o option to change the undefined portions of the
 GECOS field.

 These fields must not contain any colons. Except for the other field,
 they should not contain any comma or equal sign. It is also recommended
 to avoid non-US-ASCII characters, but this is only enforced for the
 phone numbers. The other field is used to store accounting information
 used by other applications.
Following are some Q&A-styled examples to give you an idea on how the chfn command actually works.
Q1. How to change user's full name using chfn?
This can be done using the -f command line option in the following way:
sudo chfn -f HimanshuArora himanshu
Note that 'himanshu' is the Linux user for which the full name is changed to 'HimanshuArora'.
Q2. How to change home phone number using chfn?
To change the home phone number, use the -h command line option.
sudo chfn -h 0172-666666 himanshu
Q3. How to change user's room number using chfn?
This can be done using the -r command line option.
sudo chfn -r 12 himanshu
Q4. How to change user's work phone number using chfn?
To change the work phone number, use the -w command line option.
sudo chfn -w 0173-222222 himanshu
Q5. How to verify changes done through chfn?
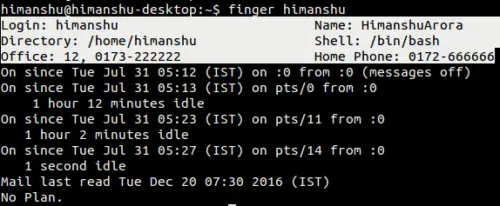
To verify that all changes you've done through chfn have been saved successfully, use the finger command. For example, here's what this command showed on my system after I executed all the previous sections' commands.
So you can see all changes made through chfn have been saved.
Note that in case finger is not installed on your system, install it using the following command:
sudo apt-get install finger
Q6. How to change all information in one go?
If you want to change all user associated information in one go, use the chfn command sans any option (specify user name in case you want to do this for a user other than the currently logged in user).
chfn
Conclusion
Whether you're just a user looking to change your associated information, or a system admin who wants to make changes to information for multiple users, the chfn command is at your service. We've discussed most command line options here. To learn more, head to the tool's man page.


