LAMP On Ubuntu 6.06 For Noobs
I, like many others, made the decision to attempt an install of Ubuntu 6.06 server with the preconfigured LAMP option without having ever attempted using Linux before. My goal was to build a setup that I could host my personal web site from. Embarking on this journey I had no idea how much knowledge I lacked and in turn would learn in my quest to host. I floundered around on forums and clung helplessly to Google for aid in all the places I fell short. I found that a really good resource for building a LAMP configuration for complete Linux noobs was either not available, or stuffed neatly in some Google Bermutan triangle which my browser was afraid to go. Hence, I am writing this as a partial documentation of my trials and tribulations with hopes of aiding all Linux noobs on the steps necessary to create a basic Linux, Apache2, MySQL5 and PHP5 system with FTP. Again, this document is tailored to complete Linux beginners and is in no way a complete guide to attacking such a setup. It will get you up and running but will need security hardening like no other.
If you have a decent amount of RAM I would suggest downloading a copy of Vmware and use that to mess around with installing Linux within it. That would be the best way to tamper with everything here while easily restoring it if you have problems. Vmware server edition is available as a free download (for now) from here.
Installing Ubuntu 6.06 Server
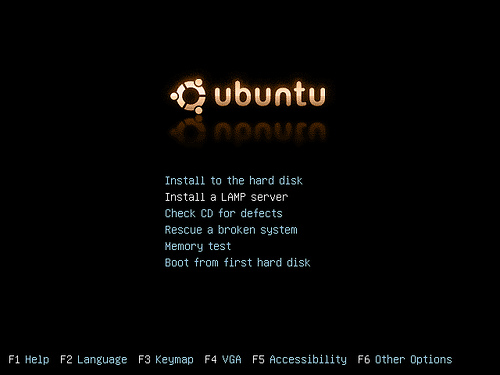
First off, when you download the Ubuntu 6.06 server edition CD from Ubuntu you will obviously have to install it. This document will not go into detail on the installation of the OS itself, as I will assume you already know how to burn an image and boot to the disk. If not, you can write me with questions related to that aspect of the installation. Once you have the disk burned and booted you are presented with the menu options for the installation. Choose the LAMP installation option and follow the prompts to configure the OS.
If you where like me than you had no idea that after installing the LAMP option you would be left with a command prompt and absolutely no idea what to do. It is now that you should make the decision to either learn to use a command prompt to navigate, or install a desktop environment from the prompt in order to navigate in a friendly GUI environment. I will continue with the assumption that you would rather work in a GUI environment, though not resource friendly for your server system, it will make navigation and software installation within Linux much easier for a beginner.
In order to obtain a desktop GUI from the terminal prompt after installing the Ubuntu LAMP server OS you have to type a command. There are I believe a couple different desktop environments to choose from ie. KDE or Gnome but I prefer (for none other than aesthetics) the Gnome option. It is nice and clean and I found a little easier to use. Both use the apt-get for software installation and updates, which is ridiculously easy to use in my opinion.
So, here you are staring at a command prompt. To obtain a desktop GUI you have to type:
sudo apt-get update
sudo apt-get install ubuntu-desktop
(it may ask for the Ubuntu install disk; I can't remember if it uses that or the Universe repositories.) either way, stay connected to the internet just in case.
It should prompt you for the password you entered during the install of Ubuntu since the "sudo" command invokes root privileges. This was something I had a hard time understanding at first since Windows users come from the mentality that users default to administrator access to files. Ubuntu does not; you have to invoke root privileges by using the sudo or su command in order to modify most aspects of the system. This gets most frustrating later on but as you get used to it, it is an extremely preventative measure, which could have saved Windows from so many mono-user based security exploits.
Now that you have entered the commands to begin the installation of the desktop and you see the files loading and installing, you can sit back and relax for a bit. If you're installing on an old system it may take a while for it all to complete.
Once the desktop installation finishes it will prompt you to reboot. Once rebooted you should find yourself with a familiar GUI logon interface requesting your username and password you entered again from the OS installation. Log in and it will bring you to the brown Gnome desktop.
Configuration
At this point you now have Ubuntu 6.06 up with Apache2, MySQl 5, PhP5 and Pearl5 all running on your system you just don't know it. The next step is to configure each to your own needs. Again, this is a drastic difference from Windows type software configuration as most things Windows based include a nice, easy to use setup.exe file that prompts for any configuration needs. This is not the case with Linux for the most part. In order to modify the necessary files within each of these servers you have two options. You can either find the config file for each and manually edit that in a text editor, or you can download a web-based server management utility which simplifies the task for you using a GUI type interface. I found that WebMin made configuring my servers extremely easy as I was not familiar, nor comfortable, manually editing most of the config files.
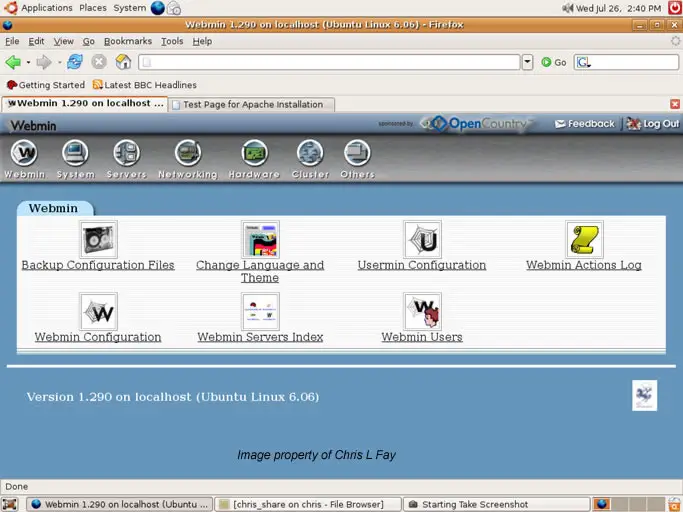
WebMin is a freely available resource and can be downloaded here. I would suggest downloading it directly from the website as the repository may be outdated (It may not even have it). WebMin will require a bit of configuration itself as it defaults to using Apache 1's config files instead of Apache2, which causes some issues when using the interface to adjust Apache2 settings.
After downloading the file you will be left with a file called "webmin-1.290.tar.gz". This is a compressed file that will need to be uncompressed. Just double click it and uncompress it to the desktop.
Now, the next step is to install the WebMin software. Installing software in linux is much different than Windows and to do so you must first have the latest compiling software installed. You can either use Synaptic and search for the package called Build Essential or enter the command in a terminal prompt:
sudo apt-get install build-essential
This will install everything needed for installing the software.
Now that you have the tools to install WebMin, the next step is to open a terminal and navigate to the decompressed folder you created on the desktop. To do this in the terminal you need to type a few commands.
cd Desktop
Type
ls (modified from "dir" as recomended by anonymous)
to make sure the uncompressed folder webmin-1.290 is there.
cd webmin-1.290
You will now be in the folder containing the files for WebMin. The next step is to run the command that will actually install it.
./setup.sh /usr/local/webmin
This will start the installation, which will then prompt you for some configuration settings. Use the default settings except for the username and password of course.
With WebMin installed, you can now configure most of your other servers from WebMin's control panel which is much easier for new linux users than finding and modifying each server's config files. In order to make any modifications to Apache2 within WebMin you will have to change a couple settings within.
First navigate to WebMin's control panel by typing http://chris:10000/ in your internet browser. (replacing "chris" with the default username you installed linux with.) This should bring up the interface for WebMin.
Click on the "servers" option and navigate to the "Apache Webserver" icon.
In the upper left hand corner you will see a tab called "module configuration" which you will need to click on and change a few things therein.
1. change the "File or directory to add virtual servers to" to "/etc/apache2/sites-available/default". This will change to the correct directory if you want to host multiple sites.
2. change the "Directory to create links in for new virtual servers" to "/etc/apache2/sites-enabled/000-default". This will enable the chosen virtual sites.
(should look like this pic)
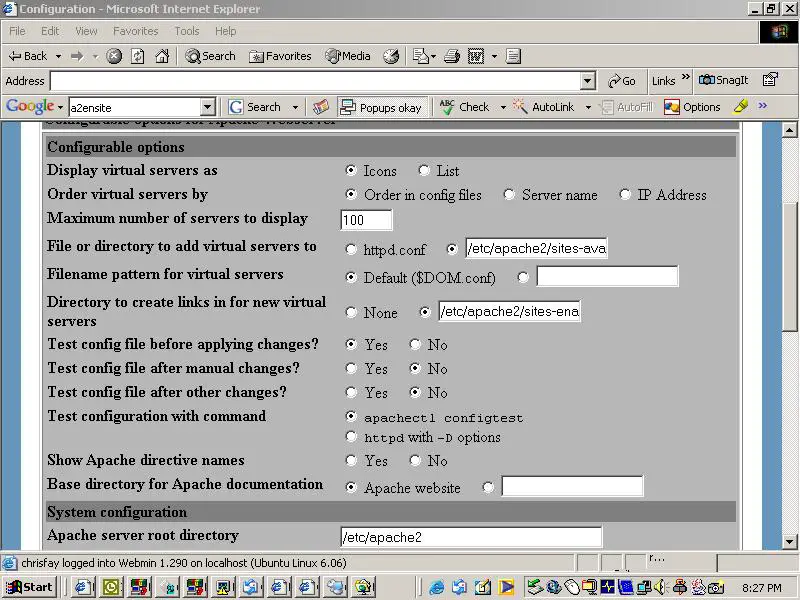
(yeah, I know the pic looks diff....I'm at work :)
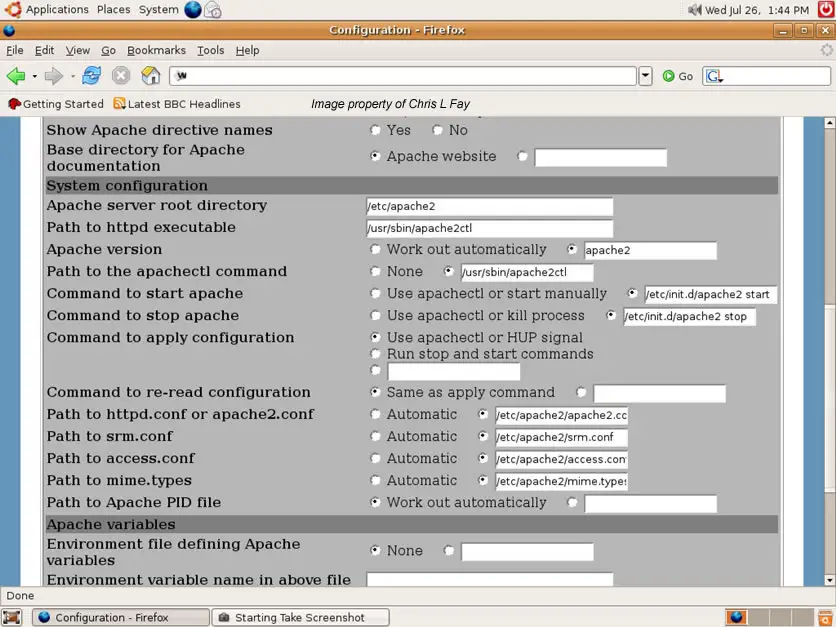
2. scroll down into "system configuration" and change the "server root directory" to "/etc/apache2".
3. change the "path to httpd executable" to "/usr/sbin/apache2ctl".
4. change the "path to apache2ctl" to "/usr/sbin/apache2ctl".
5. change the "command to start apache" to "/etc/init.d/apache2 start"
6. change the "command to stop apache" to "/etc/init.d/apache2 stop"
7. change anything else below that has the word "apache" to "apache2" or it will not access the correct directory or file. I believe this is due to the default settings being designed for apache1 not apache2. (should look like the image below)
After completing these steps you will need to save, and then navigate back to the "apache webserver" icon where you can restart apache2. You will need to do this in order for the changes to take effect. After restarting you will have WebMin configured correctly for use with apache2. If you can't restart apache after the changes, it is because the "restart" button is still using the old configuration from prior to your editing it. You will need to restart the computer as I don't remember the apache restart command for apache1.
In order to reach your web server from the outside world you will have to make sure that port 80 is open. Some ISP's block inbound traffic to this port with the intent to block web servers from running on their network. This can be bypassed by routing through another port (8080 or whatever else) though you will have to update your DNS with the correct port.
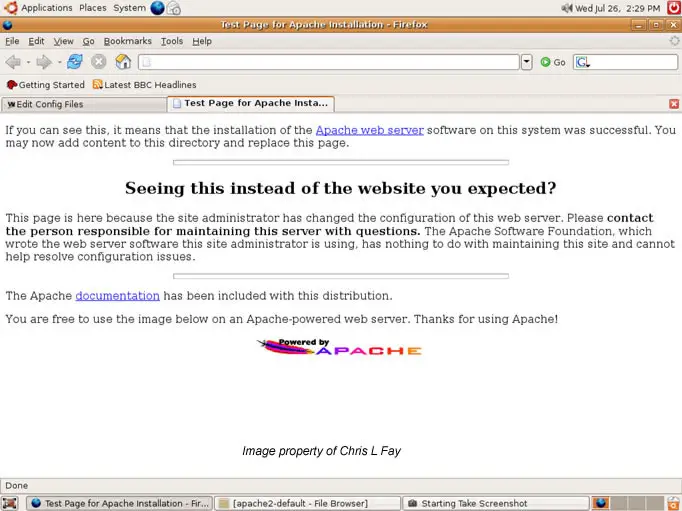
Now is the time to test your settings. You will need to know the WAN IP address of your computer; the one that others would use to access you on the web. This can be found by going to www.myip.dk or another site which will give it to you. Do not use your LAN address (something like 192.168.x.x) as this is your internal address unreachable from outside your internal network. Enter your WAN IP into your web browser and it should bring you to the default Apache2 web page. It should say something about Apache2 having been installed successfully and that you are at the default page.
If you found the default page, then you DO have port 80 available and your server is up and running. From here, all you would have to do is put your site in the directory "/var/www" and lable your home page "index.html" and it would be accessible from your external WAN IP. A little bit later we will discuss how to configure a DNS so others can type in your domain name instead of your IP to reach your site. If for some reason you did not access the default Apache2 page, your ISP may be blocking the port. To circumvent this you will have to port forward using something similar to this:
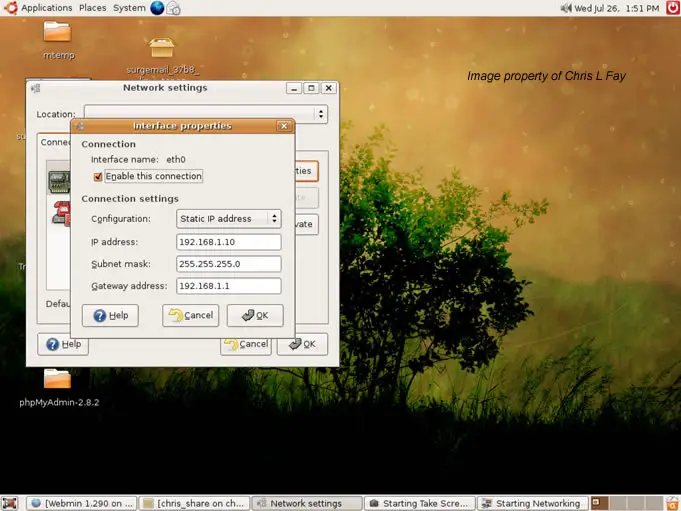
- If you are behind a router you will need to give your pc a static IP. Do this by going into your "network setting" option in the System drop down menu in Ubuntu. Choose "Ethernet connection" and then properties.
- In the IP address option type "192.168.1.3". (you can change the "3" to anything else; if you have DHCP setup make sure you use a number that isn't being used or it will cause conflicts. Generally its ok to use a number below 50)
- In the "subnet mask" it should default to "255.255.255.0". Leave that.
- In the "default gateway" use your routers ip. It should be 192.168.1.1
(should look similar to the pic below ; if you want to use 192.168.1.10 as I have then it would look exactly the same.)
Next, you will need to login to your router and forward HTTP requests to port 8080. I use a Linksys wrt54g router to do this but if you use a different model I'm sure the steps are similar. First you need to type in the ip of the router itself which is generally 192.168.1.1. This should bring up a login box for a username and password. It should be something like :
usrname:
passwrd: admin
Once logged into your router, you will see a simple GUI interface for adusting properties within your router. On the Linksys, you will see a section called "Gaming and Accessories" which is the tab you need to click on. It will bring up the option to portforward I think 10 individual ports. Enter:
Description: "HTTP"
Port from: "8080"
Port to : "8080"
IP: "192.168.1.3" (or whatever statip IP you gave your computer)
Make sure and click the checkbox for "Enable" or it wont activate the portforwarding
(should look like this pic only using 8080 instead of 80)
This will allow you to port forward to the internal IP 192.168.1.3 for port 8080. If you were stuck before and couldn't reach the default Apache2 page, and you have now given your pc a static ip, you will need to change the Apache2 listen port in WebMin from 80 to 8080. To do this:
-open WebMin and click on the "apache webserver" icon.
-click on "network and addresses" and change the port there.
-restart apache using the "restart apache" option in WebMin
To reach your webserver externally you will now have to type your WAN IP and 8080 in your browser. Ex. "66.665.66.1:8080". This is only necessary if your IP is blocking port 80.
At this point you should have the ability to access your webserver. Try replacing the default Apache2 index.html page with your own. You should easily be able to have your own site up after that. From here you have the option to setup FTP to access your web folder from anywhere, a DNS server for configuring your own domain name, mail and ftp routing and many other fun options. I will continue on focusing on FTP, DNS and Mail server configuration.
If you've made it this far, you have probably realized how different it is to navigate in Linux vs Windows. With a little more practice and configuration it may start feeling a bit more comfortable. After getting my web server online I was so eager to be able to add content to it from my other pc or my work computer that my next step was to install a functioning FTP server. The next section will deal with that specifically.
FTP Configuration
The FTP software I have been using is Proftpd. This software may not be any better than others available but it seemed the easiest to configure which is all I really care about as a new linux user. WebMin has the icon for Proftpd already listed but it will not work until you actually install it from Synaptic. To do so:
- Open synaptic in Ubuntu and search for Proftpd.
- Let synaptic download and configure it for you. WebMin will work with it after you have it installed.
- You now have an FTP server on your system. Next you will need to configure a few things.
First, you need to add a new user to your Ubuntu users list. Go to your "system" tab on the desktop again, Go to "administration" then "users and groups". Here you will be able to add a new user and name it whatever you want. Next, add a new group and call it "ftp". Make sure and add the user you made to the group "ftp". You will also need to give your user access to the directory "/var/www" or whatever your site address is so you can access the correct directory.
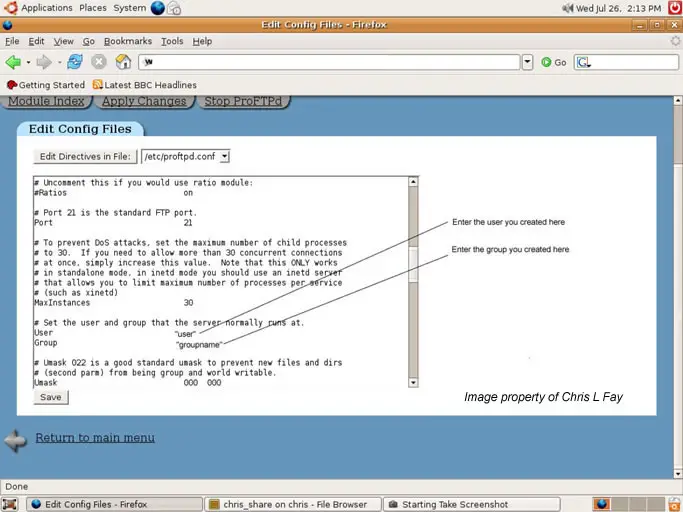
Next you will need to use WebMin to add the user to Proftpd. Click on the Proftpd server icon in WebMin and navigate to the "edit confi files" icon within. There you will have to manually add your user and group into the file. In the config file find where it says:
"set the user and group that the server usually runs at" and add them into the file manually.
(should look like this before you change them)
While you're in the config file you may want to change the "umask" setting to something a little less strict or your files will have a high user permission setting and may be inaccessible by users to your site. You may want to Google how file permissions work in order to gain a better understanding. To test your server you can change your umask setting to a lower setting like "002" or something to test it.
After adding the user and group, you may need to port forward port 21 to your static IP. (this is only if you are behind a router or firewall). Do this in the same fashion as the configuration change earlier for port 8080.
Now you should be able to access your users directory on your Linux PC using FTP. You can try it by opening a new network connection in Windows using "ftp://username@IP". Substitue the username and IP for your ftp username and the external IP of your computer (plus port if you use a port other than 21) and you should be able to access the directory you specified.
MySQL and PHP are both configured for you upon installation of the Ubuntu LAMP Server so configuring them is unnecessary unless you need to. If you do, use the WebMin interface to make those changes as it is probably the easiest. You can also download phpMyAdmin if you want more control over your MySQL databases.
Again, in no way is this a professional outline of how your system should be setup. I intended this document to aid in making the installation and configuration a bit easier for the beginner and have left out probably a few things here and there. If you have anything to add or criticize you can email me.
Written by Chris L. Fay on 7/15/2006

