Installing A Web, Email And MySQL Database Cluster (Mirror) On Debian 5.0 With ISPConfig 3 - Page 2
This tutorial exists for these OS versions
- Debian 8 (Jessie)
- Debian 6 (Squeeze)
- Debian 5 (Lenny)
On this page
3 Installing ISPConfig On The First (Master) Server
In this step we will install ISPConfig on the master server. To get the download URL of the latest ISPConfig 3 stable release, please visit the ISPConfig website: http://www.ispconfig.org/ispconfig-3/download/
Now we have to add two new MySQL root user records in the master database to allow root access from the slave server hostname and IP address. The easiest way to do this is to use the webbased phpmyadmin administration tool that we installed already. Open the URL http://192.168.0.105/phpmyadmin in a webbrowser, log in as MySQL root user and execute these MySQL queries:
CREATE USER 'root'@'192.168.0.106' IDENTIFIED BY 'myrootpassword';
GRANT ALL PRIVILEGES ON * . * TO 'root'@'192.168.0.106' IDENTIFIED BY 'myrootpassword' WITH GRANT OPTION MAX_QUERIES_PER_HOUR 0 MAX_CONNECTIONS_PER_HOUR 0 MAX_UPDATES_PER_HOUR 0 MAX_USER_CONNECTIONS 0 ;
CREATE USER 'root'@'server2.example.tld' IDENTIFIED BY 'myrootpassword';
GRANT ALL PRIVILEGES ON * . * TO 'root'@'server2.example.tld' IDENTIFIED BY 'myrootpassword' WITH GRANT OPTION MAX_QUERIES_PER_HOUR 0 MAX_CONNECTIONS_PER_HOUR 0 MAX_UPDATES_PER_HOUR 0 MAX_USER_CONNECTIONS 0 ;
In the above sql commands, replace 192.168.0.106 with the IP address of the second server, replace server2.example.tld with the hostname of the second server and myrootpassword with the desired root password.
Click on the reload permissions button or restart MySQL. Then close phpmyadmin.
Go back to the shell of server1.example.tld and download the latest ISPConfig 3 stable release:
cd /tmp
wget
http://www.ispconfig.org/downloads/ISPConfig-3-stable.tar.gz
tar xfz ISPConfig-3-stable.tar.gz
cd ispconfig3_install/install/
Start the install script:
php -q install.php
Select language (en,de) [en]: <-- en
Installation mode (standard,expert) [standard]: <-- standard
Full qualified hostname (FQDN) of the server, eg server1.domain.tld [server1.example.tld]: <-- server1.example.tld
MySQL server hostname [localhost]: <-- localhost
MySQL root username [root]: <-- root
MySQL root password []: <-- Enter your mysql root password here
MySQL database to create [dbispconfig]: <-- dbispconfig1 (the local ISPConfig database name of the master and slave must be different, as both servers share the same data directory)
MySQL charset [utf8]: <-- utf8
Country Name (2 letter code) [AU]: <-- DE (Enter the ISO country code where you live here)
State or Province Name (full name) [Some-State]: <-- Niedersachsen (Enter the state where you live here)
Locality Name (eg, city) []: <-- Lueneburg (Enter the city here)
Organization Name (eg, company) [Internet Widgits Pty Ltd]: <- ENTER
Organizational Unit Name (eg, section) []: <- ENTER
Common Name (eg, YOUR name) []: <- ENTER
Email Address []: <- ENTER
ISPConfig Port [8080]: <-- 8080
Clean up the install directories:
rm -rf /tmp/ispconfig3_install/install
rm -f /tmp/ISPConfig-3-stable.tar.gz
4 Installing ISPConfig 3 On The Second Server
In this step we will install ISPConfig on the slave server (server2.example.tld). This time we use the expert mode of the ISPConfig installer to add this node to the master ISPConfig server and database. To get the download URL of the latest ISPConfig 3 stable release, please visit the ISPConfig website: http://www.ispconfig.org/ispconfig-3/download/
Download the latest ISPConfig 3 stable release:
cd /tmp
wget
http://www.ispconfig.org/downloads/ISPConfig-3-stable.tar.gz
tar xfz ISPConfig-3-stable.tar.gz
cd ispconfig3_install/install/
Start the install script:
php -q install.php
Select language (en,de) [en]: <-- en
Installation mode (standard,expert) [standard]: <-- expert
Full qualified hostname (FQDN) of the server, eg server2.domain.tld [server2.example.tld]: <-- server2.example.tld
MySQL server hostname [localhost]: <-- localhost
MySQL root username [root]: <-- root
MySQL root password []: <-- Enter your mysql root password here
MySQL database to create [dbispconfig]: <-- dbispconfig2 (the local ISPConfig database name of the master and slave must be different, as both servers share the same data directory)
MySQL charset [utf8]: <-- utf8
Shall this server join an existing ISPConfig multiserver setup (y,n) [n]: <-- y
MySQL master server hostname []: <-- server1.example.tld
MySQL master server root username [root]: <-- root
MySQL master server root password []: <-- Enter the root password of the master server here
MySQL master server database name [dbispconfig]: <-- dbispconfig1
Configure Mail (y,n) [y]: <-- y
Country Name (2 letter code) [AU]: <-- DE (Enter the ISO country code where you live here)
State or Province Name (full name) [Some-State]: <-- Niedersachsen (Enter the state where you live here)
Locality Name (eg, city) []: <-- Lueneburg (Enter the city here)
Organization Name (eg, company) [Internet Widgits Pty Ltd]: <- ENTER
Organizational Unit Name (eg, section) []: <- ENTER
Common Name (eg, YOUR name) []: <- ENTER
Email Address []: <- ENTER
Configure Jailkit (y,n) [y]: <-- y
Configure FTP Server (y,n) [y]: <-- y
Configure DNS Server (y,n) [y]: <-- y
Configure Apache Server (y,n) [y]: <-- y
Configure Firewall Server (y,n) [y]: <--y
Install ISPConfig Web-Interface (y,n) [y]: <--n
Run:
rm -f /var/www/ispconfig
to remove the ISPConfig interface link in the /var/www directory.
Clean up the install directories:
rm -rf /tmp/ispconfig3_install/install
rm -f /tmp/ISPConfig-3-stable.tar.gz
5 Configure Replication In ISPConfig
Log in to ISPConfig on the master server with a web browser:
http://192.168.0.105:8080
Click on System > Server services > server2.example.tld:
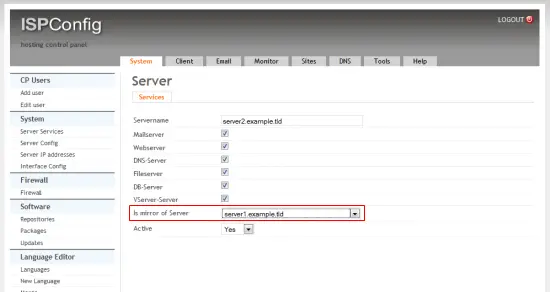
Selecte server1.example.tld in the Is mirror of Server field and click on Save.
6 Additional Notes
When you want to activate a firewall on the master or slave server, ensure that you open port 6996 for GlusterFS on both servers.
7 Links
- ISPConfig Website: http://www.ispconfig.org/
- ISPConfig forum: https://www.howtoforge.com/forums/
- ISPConfig Bugtracker: http://bugtracker.ispconfig.org/
- Glusterfs Website: http://www.gluster.org/

