How to Use the Terraform Command Line Interface (CLI) on Ubuntu
Terraform is a framework for building and configuring infrastructure as code, with a command-line interface and DSL language. Terraform can manage existing and popular service providers as well as custom in-house solutions to build and configure complete distributed data centers.
The Terraform Command Line Interface (CLI) lets you use Terraform without having to write any code or configuration files. It's an ideal way to prototype infrastructure changes with your team before writing code, deploying configurations locally on your machine, or pushing them into production. The CLI builds off of the terraformspec file format that was created for this purpose by third parties such as HashiCorp Nomad CLI Toolkit.
The CLI toolkit implements a JavaScript DSL to define the infrastructure and uses the same configuration format in both Terraform and the CLI. The CLI toolkit also provides commands to generate infrastructure templates, compose infrastructure components into complete solutions, and manage changes. The entire Terraform workflow is driven by stateless functions that are defined in code and executed by Terraform every time you make a change. This allows you to think about your infrastructure as a single design that can be easily modified at runtime without reloading your configuration or modifying your codebase.
A number of IT professionals and companies use the Terraform command-line interface to manage and even create new infrastructure or new cloud infrastructures. The terraform command-line interface can provide a more robust method for automating changes that would take too long to perform by hand. It is a powerful tool for managing infrastructure.
It's easy to see why Terraform is one of the most popular open-source cloud provisioning solutions in the world. It is a tool used by Linux people like you!
Inside, you will find complete explanations and examples of the most-commoned use Terraform CLI commands that have been specially selected to give you hands-on experience with Terraform's most powerful features.
Prerequisite
- In order to follow along with this article, you should have:
- A certain basic knowledge of the features and functions of Terraform.
- A Linux machine. This demo uses Ubuntu 20.04 LTS, but any Linux distribution will work.
- Terraform and docker installed on the machine.
Cloning the Main Code
Now that you have taken care of the prerequisites, you are ready to start cloning the main code to use the Terraform CLI on.
1. Run the apt install command below to install git on your system. Git is an open-source distributed revision control system designed to handle everything from small to very large projects with speed and efficiency. You will use git to clone the terraform command-line interface project template from github.com. Then you will check out the correct version of the terraform command line for this demo.
sudo apt install git -y
2. Run the git clone command below to clone the terraform command line project template your current directory.
git clone https://github.com/howtoforge-com/terraform-cli.git
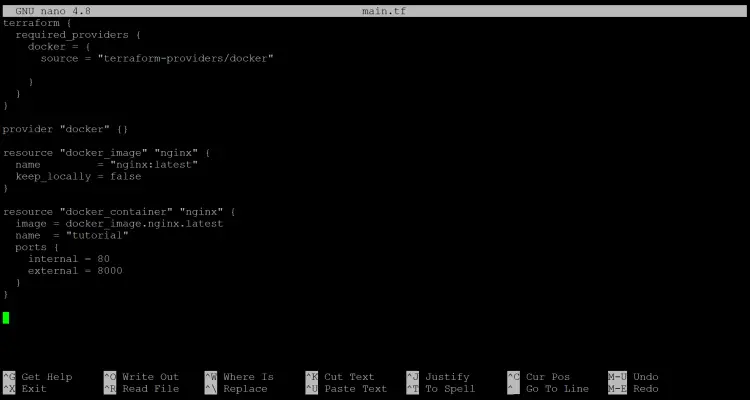
3. Move into the newly cloned terraform-cli directory and open the main.tf file with your favorite text editor (vim, emacs, nano, etc). A main.tf file is your project's entry point to the terraform command-line interface (Cli). When you run the terraform command, it uses the main.tf file as input for instructions on how to build your infrastructure.
cd terraform-cli && sudo nano main.tf
You will get the followign output.
- The terraform { } section of the main.tf file does nothing more than set the docker provider as a required_provider. In order for Terraform to manage your Docker infrastructure, you must have the docker provider configured.
- The resource "docker_image" "nginx" { code block demonstrates using the terraform CLI by creating a new resource called docker_image. The next line uses the docker-image to create a resource called nginx. You can infer that this will be used to manage your Docker container. The next line sets the name of your docker image as nginx:latest. The keep_locally = false prevents the image from being cached locally on your machine and is a good idea to prevent duplicated downloads.
- The resource "docker_container" "nginx" { demonstrates using the terraform CLI by creating a new resource called docker_container. The next line uses the docker_container to create a resource called nginx. This will be used to manage your Docker container's port mapping. The next line sets the name of your docker container as tutorial and finally, demonstrates how to map port 8000 and port 80 on your host machine on your docker container using the ports block.
Using the Terraform Command Line Interface (CLI) to Build Your First Infrastructure
Now that you have cloned the terraform project template, you can build your first infrastructure. You will use the Terraform CLI to build an infrastructure using your project's main.tf file. You will create a docker container and map a port from your host machine to the docker container.
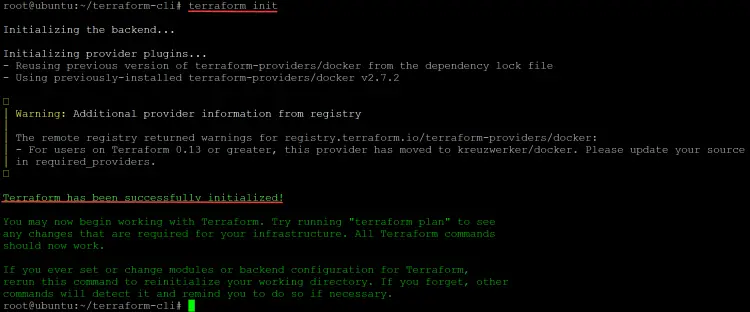
1. First, run the terraform init command to initialize your working directory. The terraform init command initializes your working directory and download any required plugins needed for Terraform to manage your infrastructure. A working directory is the directory in which you will use the terraform command to manage your infrastructure. Once initialized, this directory contains a main.tf file and can contain multiple supporting files.
terraform init
Upon successfully running the terraform init command, you will receive the following output.
2. Next, run terraform fmt command to auto-format your main.tf file for readability and consistency. The terraform fmt command will reformat your main.tf file for readability and consistency. This is a good practice to follow since it will make your files easier to read for you and others.
terraform fmt
If the terraform fmt command modified your main.tf files, it will print out the name of the file it reformatted. In this demo, the output is blank because the main.tf file was already formatted to Terraform's liking, as shown below.
3. Run the terraform validate command to ensure that your infrastructure will be built as intended. The terraform validate command is a safety check to verify that your infrastructure can be built as intended.
terraform validate
If there are no errors, you will receive a similar output to the following, indicating that everything is ready to build your first infrastructure.
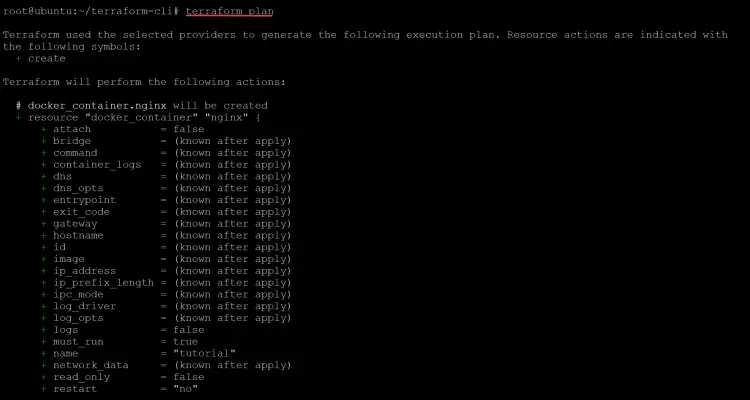
4. Run the terraform plan command to see what Terraform will do to build the infrastructure. The terraform plan command is a preview of what Terraform plans to build and is not the same as terraform apply.
terraform plan
The terraform plan command outputs the following structure, showing that it will create an instance of docker_container resource named nginx and a docker_image resource named tutorial.
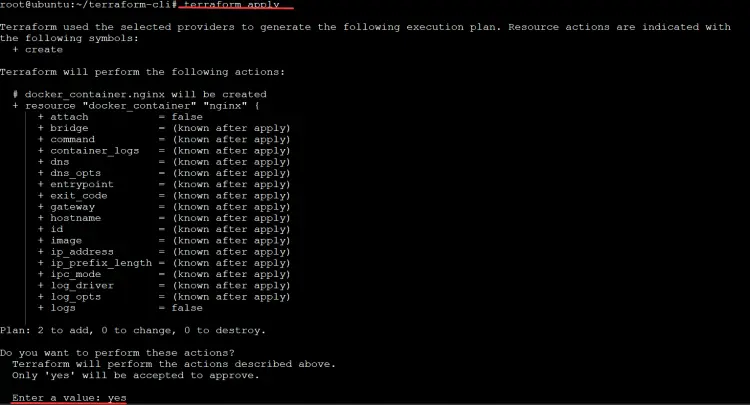
5. Run the terraform apply command to apply the changes that you previewed with terraform plan. The terraform apply command will build your infrastructure. The terraform apply command will create all the resources described in your Terraform main.tf configuration file.
This command will reuse the evaluation of variables, constraints and mappings from the terraform plan command to produce the most efficient possible plan. Any additional options specified on the command line with terraform apply will be used when running the apply command. Enter yes and press Enter when asked to Enter a Value.
terraform apply
Once the terraform apply command succeeds, you will see a message indicating that your infrastructure has been successfully built, as shown below. When this happens, it means that your infrastructure was build as intended and is up to date with your configuration file.
6. Run the ls command to list all the files in your working directory. You will see a new file named terraform.tfstate as shown below. A file with this name is created to track changes to your infrastructure. The terraform plan command stores the changes that will be applied when running terraform apply in an intermediate file named .tfstate. The state file contains the full state of the infrastructure as Terraform sees it. This file is required to apply any configuration and must be transferred when making changes, even if the target is within the same provider.
ls
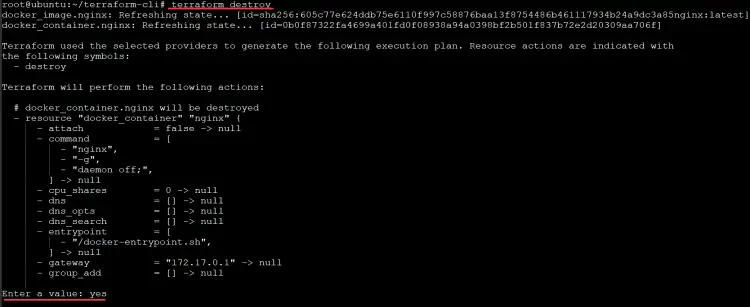
7. The building process is now over. Run the terraform destroy command to destroy the infrastructure that you just built. Enter yes and press Enter when asked to Enter a Value. The terraform destroy command will delete all the resources created by this demo. The terraform destroy command will delete all the resources described in your Terraform main.tf configuration file. Once the resources are destroyed, they can't be recovered.
You should remove unused resources to keep the configuration for an environment in check. It's not about covering up failures - it is about preventing failures by preventing the buildup of disused resources.
terraform destroy
Conclusion
In this tutorial, you learned how to use the most common Terraform concepts demonstrated in an example to build your first infrastructure. You learned how to use the Terraform CLI to build infrastructure using your project's main.tf file. The CLI can be used to plan, apply, and destroy your infrastructure.
You now have the tools to build your own infrastructure. You can manage a wide range of resources with ease, thanks to Terraform's comprehensive and expressive configuration language.
You can leverage your newfound knowledge in infrastructure management, already in use for Docker containers, Kubernetes, and OpenStack, to bring more efficiency and consistency to your infrastructure-as-code practice.


