How to Install Puppet Server and Agent on Debian 11
Puppet is a centralized configuration management and automation tool. DevOps creates configuration management to deploy servers and applications, and all configuration for automation is stored on the central "Puppet Server". After that "Agent" nodes will pull a new configuration from the "Puppet Server" and apply the state as defined.
All connections between "Puppet Server" and "Agent" nodes are encrypted by default using SSL/TLS certificate. Puppet uses Domain Specific Language (DSL) to describe system configuration, and it's similar to Ruby syntax.
In this guide, you will install and configure the Puppet server and agent on the Debian 11 Bullseye. You'll install the Puppet server on the server hostname 'puppet-server' and the Puppet agent on the server with the hostname 'agent'. In the end, you'll be creating the first puppet manifests for installing the basic LEMP stack on the 'agent' node.
Prerequisite
- You will need two different Debian 11 servers.
- The 'puppet-server' with IP address '192.168.5.100' and the fqdn 'puppet-server.localdomainl.lan'.
- The 'agent' node with the IP address '192.168.5.150' and the fqdn 'agent.localdomain.lan'.
- Also, you will need the root user or user with the root/sudo privileges.
Setting Up FQDN
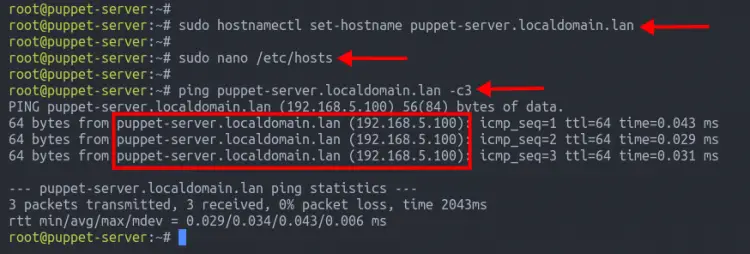
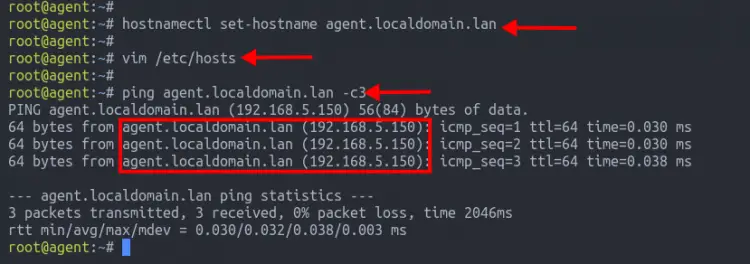
First, you will set up the Fully Qualified Domain Name (FQDN) and the '/etc/hosts' file on both 'puppet-server' and 'agent'. This will ensure both servers can communicate with the local domain name.
To set up FQDN, run the 'hostnamectl' command below.
Run the following command to set up the fqdn 'puppet-server.localdomain.lan' on the 'puppet-server'.
hostnamectl set-hostname puppet-server.localdomain.lan
Run the following command to set up the fqdn 'agent.localdomain.lan' on the 'agent' node.
hostnamectl set-hostname agent.localdomain.lan
Next, edit the '/etc/hosts' file using vim editor as below.
sudo vim /etc/hosts
Copy and paste the following configuration.
192.168.5.100   puppet-server.localdomain.lan
192.168.5.150   agent.localdomain.lan
Save the file and exit.
Finally, run the 'ping' command below to verify the connection between the 'puppet-server' and 'agent'.
ping puppet-server.localdomain.lan -c3
ping agent.localdomain.lan -c3
If your configuration is correct, you will see the following output. The 'puppet-server.localdomain.lan' is resolved to the server '192.168.5.100', and the 'agent.localdomain.lan' is resolved to the agent node '192.168.5.150'.
Adding Puppet Repository
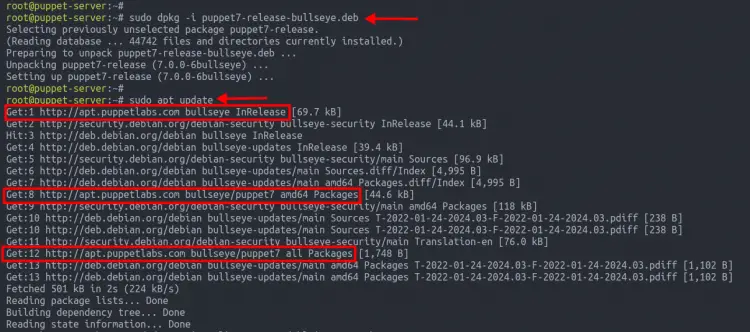
By default, Puppelabs provides repository packages for different Linux distributions, including the latest Debian 11 Bullseye. In this step, you will add and install the Puppet repository to both 'puppet-server' and 'agent'. At the time of this writing, the latest version of Puppet is v7.x.
Download the repository package using the 'wget' command below.
wget https://apt.puppet.com/puppet7-release-bullseye.deb
Next, install the deb file 'puppet7-release-bullseye.deb' using the 'dpkg' command below.
sudo dpkg -i puppet7-release-bullseye.deb
After installation is completed, run the 'apt' command below to update and refresh the Debian package index.
sudo apt update
Now you're ready to install Puppet packages.
Installing Puppet Server
In this step, you will be installing the Puppet server package on the 'puppet-server'. At the time of this writing, the latest version of Puppet is v7.
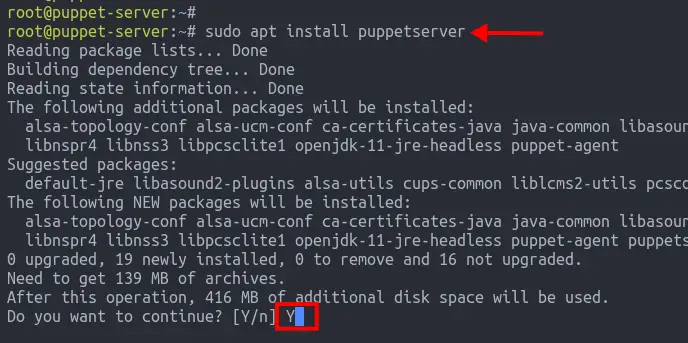
To install Puppet Server, run the apt command below. This command also automatically installed other packages such as Java OpenJDK.
sudo apt install puppetserver
Type 'Y' to confirm the installation.
After installation is completed, you will need to load the bash environment for the Puppet Server.
By default, Puppet stores its binary file on the '/opt/puppetlabs/bin' directory. Run the following command to apply the new '$PATH' environment variable for Puppet Server.
source /etc/profile.d/puppet-agent.sh
echo $PATH
Optionally, you can also apply the '$PATH' environment variable by running the following command.
echo "export PATH=$PATH:/opt/puppetlabs/bin/" | tee -a ~/.bashrc
source ~/.bashrc
Now verify the '$PATH' environment variable using the command below. Make sure the directory '/opt/puppetlabs/bin' is on the list of the '$PATH' environment variable.
echo $PATH
After that, you can run the 'puppetserver' command normally. Below you can check the Puppet version.
puppetserver -v
You should get the output similar to the screenshot below.
Next, edit the Puppet server configuration '/etc/default/puppetserver' using the vim editor.
sudo vim /etc/default/puppetserver
Change the max memory allocation for the Puppet Server. It depends on your system memory. In this guide, we've 2GB of memory and will allocate for the Puppet server 1GB. And we will use the below configuration.
JAVA_ARGS="-Xms1g -Xmx1g"
Save the configuration file and exit.
Next, reload the systemd manager to apply the new Puppet service file.
sudo systemctl daemon-reload
Then start and enable the 'puppetserver' service using the below command.
sudo systemctl start enable --now puppetserver
The service 'puppetserver' should be up and running. Run the below command to verify the 'puppetserver'.
sudo systemctl status puppetserver
You should see the output similar to the screenshot below.
Additionally, if you are using a UFW firewall on your system, be sure to open the port '8140' that will be used by the Puppet Server.
Run the below command to ally any incoming connections from the local subnet '192.168.5.0/24' to the Puppet Server on the port '8140'.
sudo ufw allow from 192.168.5.0/24 to any proto tcp port 8140
sudo ufw status
Below are the current UFW firewall rules you should see.
Configuring Puppet Server
In this step, you'll be editing the Puppet Server configuration. And this can be done by editing the Puppet configuration directly or by generating the configuration using the 'puppet' command-line.
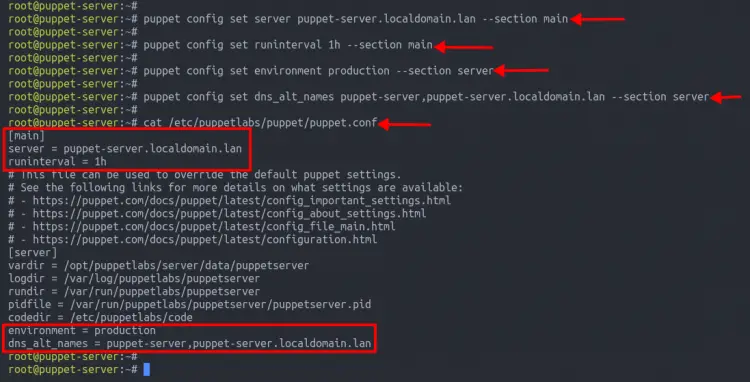
Run the 'puppet' commands below to set up the Puppet Server. This will be setting up the default Puppet Server domain name and the run interval in the 'main' section, and the environment and dns_alt_names in the section 'server'.
puppet config set server puppet-server.localdomain.lan --section main
puppet config set runinterval 1h --section main

puppet config set environment production --section server
puppet config set dns_alt_names puppet-server,puppet-server.localdomain.lan --section server
Now check the Puppet Server configuration '/etc/puppetlabs/puppet/puppet.conf' using the 'cat' command below.
cat /etc/puppetlabs/puppet/puppet.conf
You should see the Puppet Server configuration as below.
Lastly, restart the service 'puppetserver' to apply a new configuration by running the 'systemctl' command below.
sudo systemctl restart puppetserver
At this point, you've completed the Puppet Server installation and configuration.
Installing and Configuring Puppet Agent
In this step, you'll be installing and configuring the Puppet Agent on the client machine 'agent'.
Before installing Puppet Agent, ensure you've completed the FQDN configuration and added the Puppet repository.
Now let's install and configure the Puppet Agent.
Install the package 'puppet-agent' using the apt command below.
sudo apt install puppet-agent
After installation is completed, run the below command to start and enable the Puppet service.
sudo /opt/puppetlabs/bin/puppet resource service puppet ensure=running enable=true
You should see the output similar to the screenshot below.
Next, you will be setting up the '$PATH' environment variable to add the Puppet binary path '/opt/puppetlabs/bin/'. Doing this, allows you to run the 'puppet' command directly without the full path of the binary file.
source /etc/profile.d/puppet-agent.sh
echo $PATH
Another way to do that is by adding a new '$PATH' environment variable to the '~/.bashrc' configuration using the following command.
echo "export PATH=$PATH:/opt/puppetlabs/bin/" | tee -a ~/.bashrc
source ~/.bashrc
Now verify the '$PATH' environment variable configuration using the following command.
echo $PATH
You should see the Puppet binary path '/opt/puppetlabs/bin' is added to the '$PATH' environment variable.
Registering Puppet Agent to the Puppet Server
After installing the Puppet Agent, you will now be setting up Puppet Agent to register it to the main Puppet Server.
First, ensure the Puppet Server fqdn is reachable from the 'agent' machine. Test it using the 'ping' command below.
ping puppet-server.localdomain.lan -c3
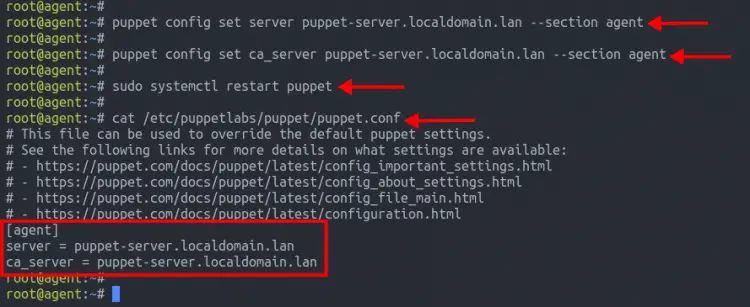
Next, run the below commands to configure the Puppet Agent. This will define the Puppet Server domain name and ca_server on the 'agent' section.
puppet config set server puppet-server.localdomain.lan --section agent
puppet config set ca_server puppet-server.localdomain.lan --section agent
Verify the generated Puppet configuration in the file '/etc/puppetlabs/puppet/puppet.conf'.
cat /etc/puppetlabs/puppet/puppet.conf
You should see the output similar to the screenshot below.
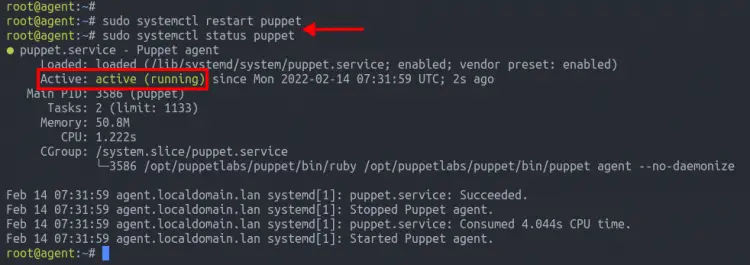
Now, run the below command to restart the Puppet service and apply new changes. Then verify the Puppet service and make sure it's active and running.
sudo systemctl restart puppet
sudo systemctl status puppet
Below is the output of the Puppet service status.
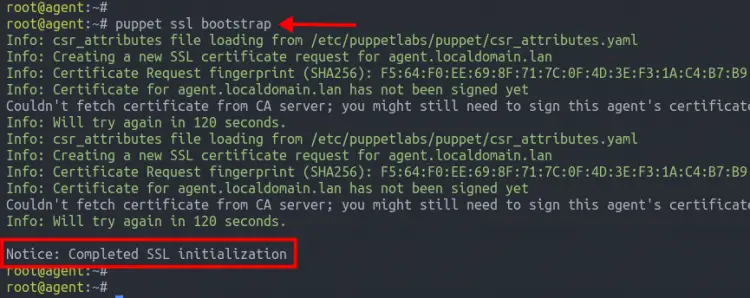
Next, run the below command to register the Puppet agent to the Puppet server. This command will generate new TLS certificates and create new certificate signing requests to the Puppet server.
puppet ssl bootstrap
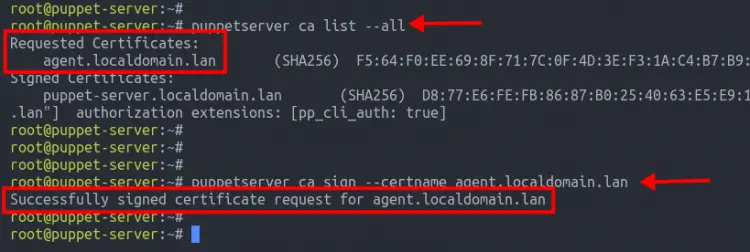
Now move to the Puppet Server terminal and run the below command to check certificate signing requests, then verify the certificate signing for the Puppet Agent 'agent.localdomain.lan'.
puppetserver ca list --all
puppetserver ca sign --certname agent.localdomain.lan
You should see the message such as 'Successfully signed certificate request ....'.
Next, run the below command to verify the list of certificates on the Puppet Server.
puppetserver ca list-all
You should see two different certificates, the certificate for the Puppet Server and Puppet Agent.
Now move again to the Puppet Agent terminal and you should see the messages such as 'Notice: Completed SSL initialization', which means the certificate signing requests are completed successfully.
At this point, you're ready to create a new first Puppet manifest.
Creating First Puppet Manifest
In this step, you'll create a new first puppet manifests for installing the LEMP Stack (Nginx, MariaDB, and PHP-FPM). All manifests for the production environment must be stored at the Puppet Server directory '/etc/puppetlabs/code/environments/production/'.
Change your current working directory to '/etc/puppetlabs/code/environments/production/'.
cd /etc/puppetlabs/code/environments/production/
Next, create a new manifest layout directory for the LEMP Stack under the 'modules' directory.
mkdir -p modules/lemp/{manifests,files}
Move to the 'modules/lemp' directory and create a new Puppet manifest file 'manifests/init.pp' using vim/nano editor.
cd modules/lemp/
nano manifests/init.pp
Copy and paste the following puppet syntax language for installing LEMP Stack, ensure each LEMP Stack service is up and running, and create a new custom index.html file.
class lemp {

    Package { ensure => 'installed' }
    $lemppackages = [ 'nginx', 'mariadb-server', 'php-fpm' ]
    package { $lemppackages: }

    Service { ensure => 'running', enable => 'true'}
    $lempsvc = [ 'nginx', 'mariadb', 'php7.4-fpm' ]
    service { $lempsvc: }

    file { '/var/www/html/index.html':
     ensure  => file,
     content => "<h1><center>Welcome to Nginx - Managed by Puppet</center></h1>",
     mode    => '0644',
   }

}
Save the file and exit.
Next, run the below command to validate the Puppet manifest file 'init.pp'.
puppet parser validate init.pp
If you didn't see any output message, the configuration is correct.
Now create another configuration 'manifests/site.pp' using vim/nano editor.
cd /etc/puppetlabs/code/environments/production/
vim manifests/sites.pp
Define the target host to 'agent.localdomain.lan' and apply the new Puppet manifest 'lemp'.
node 'agent.localdomain.lan' {
    include lemp
}
Save the file and exit.
Verify again the Puppet manifest configuration using the following command.
puppet parser validate site.pp
Verifying and Applying Puppet Manifests
You've now created a new first Puppet manifest for deploying LEMP Stack. At this point, the Puppet Agent node will automatically sync all manifests to the Puppet Server and apply a new manifest configuration.
But also, you can apply the Puppet manifest manually from the Puppet Agent machine.
Move back to the terminal server 'agent' and run the below command to apply Puppet manifests manually.
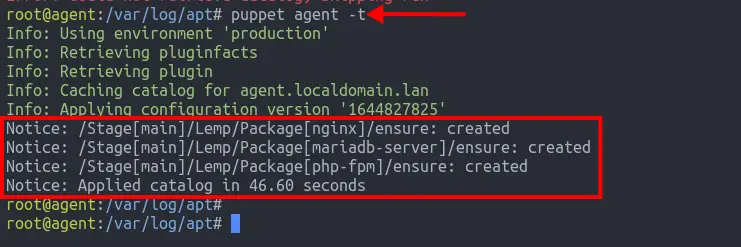
puppet agent -t
This will run the Puppet manifest on the Puppet Agent machine and install LEMP Stack through the Puppet manifests 'lemp'.
Below is the output you will get.
Now run the below command to verify each service Nginx, MariaDB, and PHP-FPM.
sudo systemctl status nginx
sudo systemctl status mariadb
sudo systemctl status php7.4-fpm
You should see each service is active and running.
Now open up your web browser and type the IP address of your Agent node on the address bar. And you should see the custom index.html file below.
You've now successfully applied LEMP Stack deployment to the Agent machine using the Puppet manifests.
Conclusion
Congratulation! You've now successfully installed Puppet Server and Agent on the Debian 11 Bullseye. Also, you learned how to create the first Puppet manifests for installing LEMP Stack.
OIn the next step, you may be interesting to set up another node and create a more complex Puppet manifest for your deployments.

