How to Install OpenSearch on Ubuntu 24.04
This tutorial exists for these OS versions
- Ubuntu 24.04 (Noble Numbat)
- Ubuntu 22.04 (Jammy Jellyfish)
On this page
OpenSearch is a community-driven project by Amazon and a fork of Elasticsearch and Kibana. It's a fully open-source search engine and analytics suite with rich features and innovative functionality. The OpenSearch project's main components are OpenSearch (a fork of Elasticsearch) and the OpenSearch Dashboards (a fork of Kibana). Both components provide features such as enterprise security, alerting, machine learning, SQL, index state management, and more.
This guide will show you how to install OpenSearch and OpenSearch Dashboard on the Ubuntu 24.04 server. You'll also secure OpenSearch with TLS certificates and enable authentication with username and password.
Prerequisites
Before you start, make sure you have the following:
- An Ubuntu 24.04 server with at least 8GB of RAM
- A non-root user with an administrator server
Adding OpenSearch repository
To begin, you need to add the OpenSearch and OpenSearch Dashboard repositories to your system. In this example, we'll be using the latest stable version of OpenSearch.
First, run the command below to install basic packages to your Ubuntu system.
sudo apt install lsb-release ca-certificates curl gnupg2 -y
Download the GPG key for the OpenSearch repository with the following command.
curl -o- https://artifacts.opensearch.org/publickeys/opensearch.pgp | sudo gpg --dearmor --batch --yes -o /usr/share/keyrings/opensearch-keyring
Add repositories for the OpenSearch and OpenSearch Dashboard to your system with the command below. In this example, you'll be using OpenSearch 2.x stable version.
echo "deb [signed-by=/usr/share/keyrings/opensearch-keyring] https://artifacts.opensearch.org/releases/bundle/opensearch/2.x/apt stable main" | sudo tee /etc/apt/sources.list.d/opensearch-2.x.list

echo "deb [signed-by=/usr/share/keyrings/opensearch-keyring] https://artifacts.opensearch.org/releases/bundle/opensearch-dashboards/2.x/apt stable main" | sudo tee /etc/apt/sources.list.d/opensearch-dashboards-2.x.list
Lastly, run the 'apt' command below to update your package index and retrieve new OpenSearch package information.
sudo apt update
Installing OpenSearch and OpenSearch Dashboard
After the OpenSearch repository is added, you'll be installing OpenSearch and OpenSearch Dashboard through the APT package manager. Then, you'll start both services via the 'systemctl' utility.
Before installing OpenSearch, run the command below to generate a random password for the OpenSearch installation. Make sure to copy the output and include uppercase, number, and symbol.
sudo openssl rand -hex 16
Now run the command below to install the 'opensearch' and 'opensearch-dashboard' packages. Make sure to change the 'OPENSEARCH_INITIAL_ADMIN_PASSWORD' and type 'Y' to confirm with the installation.
sudo env OPENSEARCH_INITIAL_ADMIN_PASSWORD=B07e_af7e9f8fe12e@85ab797ddc1f174Dapt-get install opensearch opensearch-dashboard
After the installation is finished, run the 'systemctl' command below to reload the systemd manager and apply the new service files.
sudo systemctl daemon-reload
You can now start, enable, and verify OpenSearch with the command below.
sudo systemctl enable --now opensearch
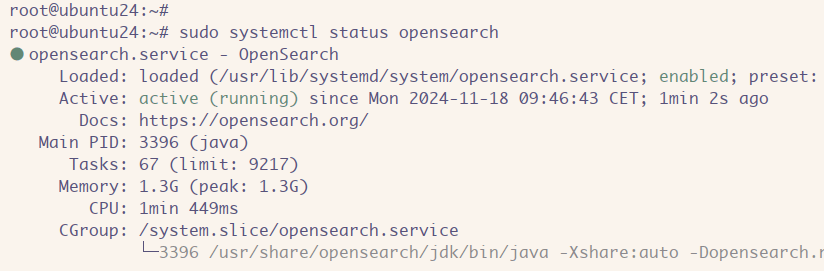
sudo systemctl status opensearch
You can see below OpenSearch is running.
Lastly, you can now start, enable, and verify the OpenSearch Dashboard service using the following command.
sudo systemctl enable --now opensearch-dashboards
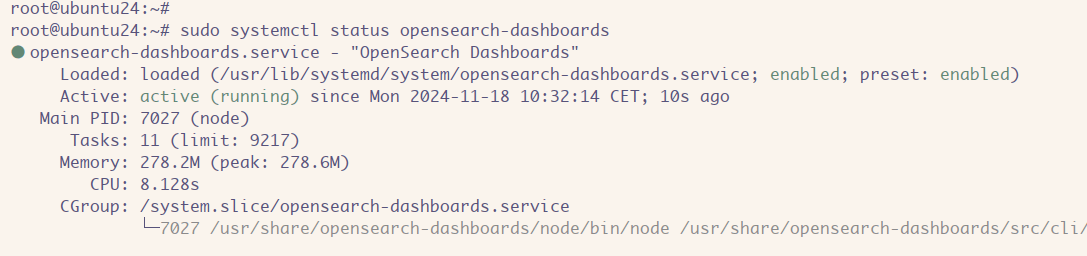
sudo systemctl status opensearch-dashboards
In the following output, you can see the 'opensearch-dashboards' service is running.
Configuring OpenSearch
With OpenSearch installed, you will be configuring the installation through the '/etc/opensearch/opensearch.yml' file. You'll also increase the default max JVM (Java Virtual Memory) size for OpenSearch as needed.
Open the default OpenSearch configuration '/etc/opensearch/opensearch.yml' with the 'nano' editor.
sudo nano /etc/opensearch/opensearch.yml
Change the following OpenSearch configurations:
- * Change the 'network.host' option with your local IP address
- * Add the 'discovery.type' as 'single-node' to run OpenSearch on a single mode
- * Set the 'plugins.security.disabled' to 'false'
# Bind OpenSearch to the correct network interface. Use 0.0.0.0
# to include all available interfaces or specify an IP address
# assigned to a specific interface.
network.host: 192.168.10.60

# Unless you have already configured a cluster, you should set
# discovery.type to single-node, or the bootstrap checks will
# fail when you try to start the service.
discovery.type: single-node

# If you previously disabled the security plugin in opensearch.yml,
# be sure to re-enable it. Otherwise you can skip this setting.
plugins.security.disabled: false
Save the file and exit the editor when finished.
Next, open the JVM (Java Virtual Machine) configuration '/etc/opensearch/jvm.options' with the 'nano' editor.
sudo nano /etc/opensearch/jvm.options
Increase the default max memory for OpenSearch as needed. The default value is '1GB'.
-Xms2g
-Xmx2g
Save and exit the file.
Lastly, run the following 'systemctl' command to restart 'opensearch' and apply your changes. With this, OpenSearch will be running on a local IP address in a single mode.
sudo systemctl restart opensearch
Securing OpenSearch with TLS/SSL certificates
Now that you've configured OpenSearch, you'll need to set up the OpenSearch security through SSL/TLS certificates. In this section, you'll disable demo certificates, and then generate root certificates, admin certificates, and host/server certificates.
Before generating SSL certificates, delete demo certificates from OpenSearch using the command below.
rm -f /opt/opensearch/{esnode-key.pem,esnode.pem,kirk-key.pem,kirk.pem,root-ca.pem}
Edit the OpenSearch configuration '/etc/opensearch/opensearch.yml' with the 'nano' editor.
sudo nano /etc/opensearch/opensearch.yml
Comment 'demo' security configuration for OpenSearch like the following.
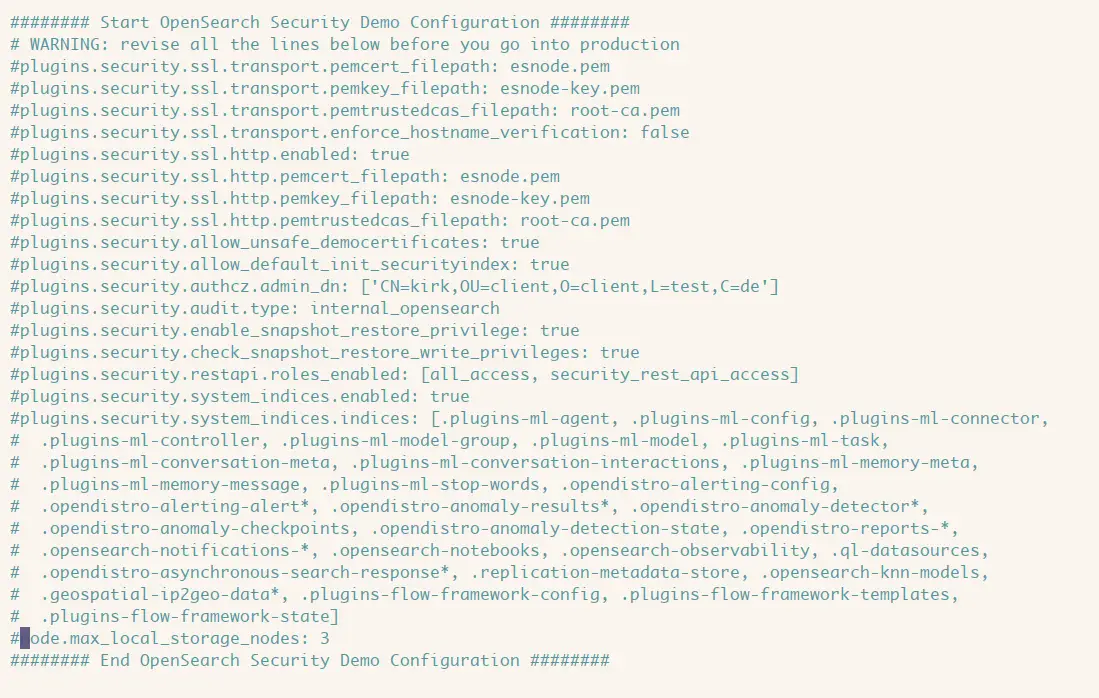
Save the file and exit the editor.
Now create a new directory '/etc/opensearch/certs' and move into it. This directory will be used to store new certificates for OpenSearch.
mkdir -p /etc/opensearch/certs; cd /etc/opensearch/certs
Generating root certificates
First, run the command below to generate root certificates that will be used to sign your other certificates such as server and client certificates.
openssl genrsa -out root-ca-key.pem 2048
Now run the following command to generate a root certificate from your private key. Make sure to change the '-subj' option with your server details.
openssl req -new -x509 -sha256 -key root-ca-key.pem -subj "/C=CA/ST=ONTARIO/L=TORONTO/O=ORG/OU=UNIT/CN=ROOT" -out root-ca.pem -days 730
Generating admin certificates
Create a new private key for your admin certificate with the following.
openssl genrsa -out admin-key-temp.pem 2048
Convert your admin key to the PKCS8 format using the command below.
openssl pkcs8 -inform PEM -outform PEM -in admin-key-temp.pem -topk8 -nocrypt -v1 PBE-SHA1-3DES -out admin-key.pem
Next, create a new signing request certificate (CSR) for the admin certificate with the command below.
openssl req -new -key admin-key.pem -subj "/C=CA/ST=ONTARIO/L=TORONTO/O=ORG/OU=UNIT/CN=A" -out admin.csr
Now run the following command to sign your new admin request certificate (CSR) with the root certificate.
openssl x509 -req -in admin.csr -CA root-ca.pem -CAkey root-ca-key.pem -CAcreateserial -sha256 -out admin.pem -days 730

Generating host or server certificates
Generate the private key for your OpenSearch hosts/servers and convert the certificate to PKCS8 format.
openssl genrsa -out ubuntu24-key-temp.pem 2048
openssl pkcs8 -inform PEM -outform PEM -in ubuntu24-key-temp.pem -topk8 -nocrypt -v1 PBE-SHA1-3DES -out ubuntu24-key.PEM
Now run the following command to generate a certificate request (CSR) for your host. The CN or Common Name should match the fqdn of your host server and not the hostname. In this example, the fqdn for the server is 'ubuntu24.howtoforge.local'.
openssl req -new -key ubuntu24-key.pem -subj "/C=CA/ST=ONTARIO/L=TORONTO/O=ORG/OU=UNIT/CN=ubuntu24.howtoforge.local" -out ubuntu24.csr
Next, run the command below to create a new extension file that contains the DNS of your host/server.
echo 'subjectAltName=DNS:ubuntu24.howtoforge.local' > ubuntu24.ext
Lastly, run the following command to sign the host/server certificate with the root certificate and include the extension file you created earlier.
openssl x509 -req -in ubuntu24.csr -CA root-ca.pem -CAkey root-ca-key.pem -CAcreateserial -sha256 -out ubuntu24.pem -days 730 -extfile ubuntu24.ext

Setting up certificates
Delete temporary certificates, CSR (certificate requests) for the admin and host, and the extension file with the following.
rm *temp.pem *csr *ext
ls
Now convert the 'root-ca.pem' certificate to the 'root-ca.crt' file with the command below.
openssl x509 -outform der -in root-ca.pem -out root-ca.crt
After that, copy the 'root-ca.crt' certificate to the '/usr/local/share/ca-certificates' directory and load your root certificate to the server.
sudo cp root-ca.crt /usr/local/share/ca-certificates
sudo update-ca-certificates

Lastly, run the following command to set up proper permission and ownership of certificate files and directories.
sudo chown -R opensearch:opensearch /etc/opensearch/certs
sudo chmod 0700 /etc/opensearch/certs
sudo chmod 0600 /etc/opensearch/certs/*.pem
sudo chmod 0600 /etc/opensearch/certs/*.crt
Adding certificates to OpenSearch
After generating TLS certificates for OpenSearch, you need to add a new configuration to the 'opensearch.yml' file. In this case, you'll add a new configuration to the 'opensearch.yml' through the bash script.
Before adding certificates to your OpenSearch server, run the command below to back up the 'opensearch.yml' file and set up your server fqdn.
sudo cp /etc/opensearch/opensearch.yml /etc/opensearch/opensearch.yml.orig
sudo hostnamectl set-hostname ubuntu24.howtoforge.local
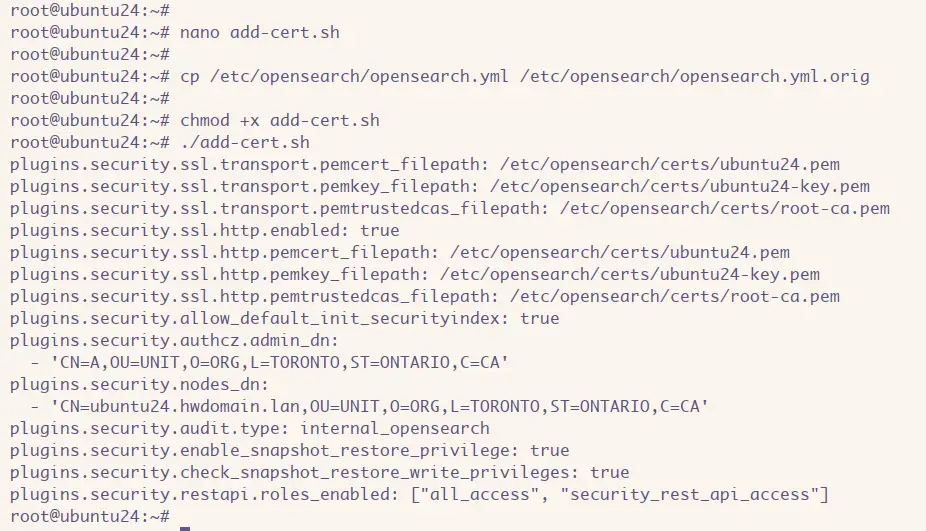
Now create a new file 'add-cert.sh' file with the 'nano' editor.
nano add-cert.sh
Insert the following configurations into the file. With this, you'll add new configurations to the OpenSearch config file 'opensearch.yml'
#! /bin/bash

# Before running this script, make sure to replace the CN in the
# node's distinguished name with a real DNS A record.

echo "plugins.security.ssl.transport.pemcert_filepath: /etc/opensearch/certs/ubuntu24.pem" | sudo tee -a /etc/opensearch/opensearch.yml
echo "plugins.security.ssl.transport.pemkey_filepath: /etc/opensearch/certs/ubuntu24-key.pem" | sudo tee -a /etc/opensearch/opensearch.yml
echo "plugins.security.ssl.transport.pemtrustedcas_filepath: /etc/opensearch/certs/root-ca.pem" | sudo tee -a /etc/opensearch/opensearch.yml
echo "plugins.security.ssl.http.enabled: true" | sudo tee -a /etc/opensearch/opensearch.yml
echo "plugins.security.ssl.http.pemcert_filepath: /etc/opensearch/certs/ubuntu24.pem" | sudo tee -a /etc/opensearch/opensearch.yml
echo "plugins.security.ssl.http.pemkey_filepath: /etc/opensearch/certs/ubuntu24-key.pem" | sudo tee -a /etc/opensearch/opensearch.yml
echo "plugins.security.ssl.http.pemtrustedcas_filepath: /etc/opensearch/certs/root-ca.pem" | sudo tee -a /etc/opensearch/opensearch.yml
echo "plugins.security.allow_default_init_securityindex: true" | sudo tee -a /etc/opensearch/opensearch.yml
echo "plugins.security.authcz.admin_dn:" | sudo tee -a /etc/opensearch/opensearch.yml
echo " - 'CN=A,OU=UNIT,O=ORG,L=TORONTO,ST=ONTARIO,C=CA'" | sudo tee -a /etc/opensearch/opensearch.yml
echo "plugins.security.nodes_dn:" | sudo tee -a /etc/opensearch/opensearch.yml
echo " - 'CN=ubuntu24.hwdomain.lan,OU=UNIT,O=ORG,L=TORONTO,ST=ONTARIO,C=CA'" | sudo tee -a /etc/opensearch/opensearch.yml
echo "plugins.security.audit.type: internal_opensearch" | sudo tee -a /etc/opensearch/opensearch.yml
echo "plugins.security.enable_snapshot_restore_privilege: true" | sudo tee -a /etc/opensearch/opensearch.yml
echo "plugins.security.check_snapshot_restore_write_privileges: true" | sudo tee -a /etc/opensearch/opensearch.yml
echo "plugins.security.restapi.roles_enabled: [\"all_access\", \"security_rest_api_access\"]" | sudo tee -a /etc/opensearch/opensearch.yml
Save the file and exit the editor when finished.
Now make the 'add-cert.sh' file executable and execute it with the following command. New configurations will be added to the 'opensearch.yml' file.
chmod +x add-cert.sh
./add-cert.sh
Securing OpenSearch with password authentication
At this point, you've configured OpenSearch with SSL/TLS certificates, and in the next step, you'll set up password authentication for OpenSearch. You'll be setting two users that will be used to log in to the OpenSearch and integrate into the OpenSearch Dashboard.
Go to the '/usr/share/opensearch/plugins/opensearch-security/tools' directory and execute the 'hash.sh' script to generate a new password for OpenSearch. Execute the 'hash.sh' twice to generate two passwords for OpenSearch and OpenSearch Dashboard. Also, make sure to copy the generated password on your note.
cd /usr/share/opensearch/plugins/opensearch-security/tools
OPENSEARCH_JAVA_HOME=/usr/share/opensearch/jdk ./hash.sh
Now open the file '/etc/opensearch/opensearch-security/internal_users.yml' with the following 'nano' editor.
sudo nano /etc/opensearch/opensearch-security/internal_users.yml
Change the hash password for user 'admin' and 'kibanaserver' with your password earlier. The 'admin' user will be used to log in to the OpenSearch Dashboard, the 'kibanaserver' user will be used to connect between OpenSearch and OpenSearch Dashboard.
admin:
hash: "$2y$12$zPtsgbrpfmInPRuDEKvDKetuzhUzsQWyCpE9foT1uun5RTMW51p9K"
reserved: true
backend_roles:
- "admin"
description: "Admin user"

kibanaserver:
hash: "$2y$12$zPtsgbrpfmInPRuDEKvDKetuzhUzsQWyCpE9foT1uun5RTMW51p9K"
reserved: true
description: "Demo OpenSearch Dashboards user"
Save the file and exit the editor when finished.
Now run the command below to restart the 'opensearch' service and apply your changes.
sudo systemctl restart opensearch
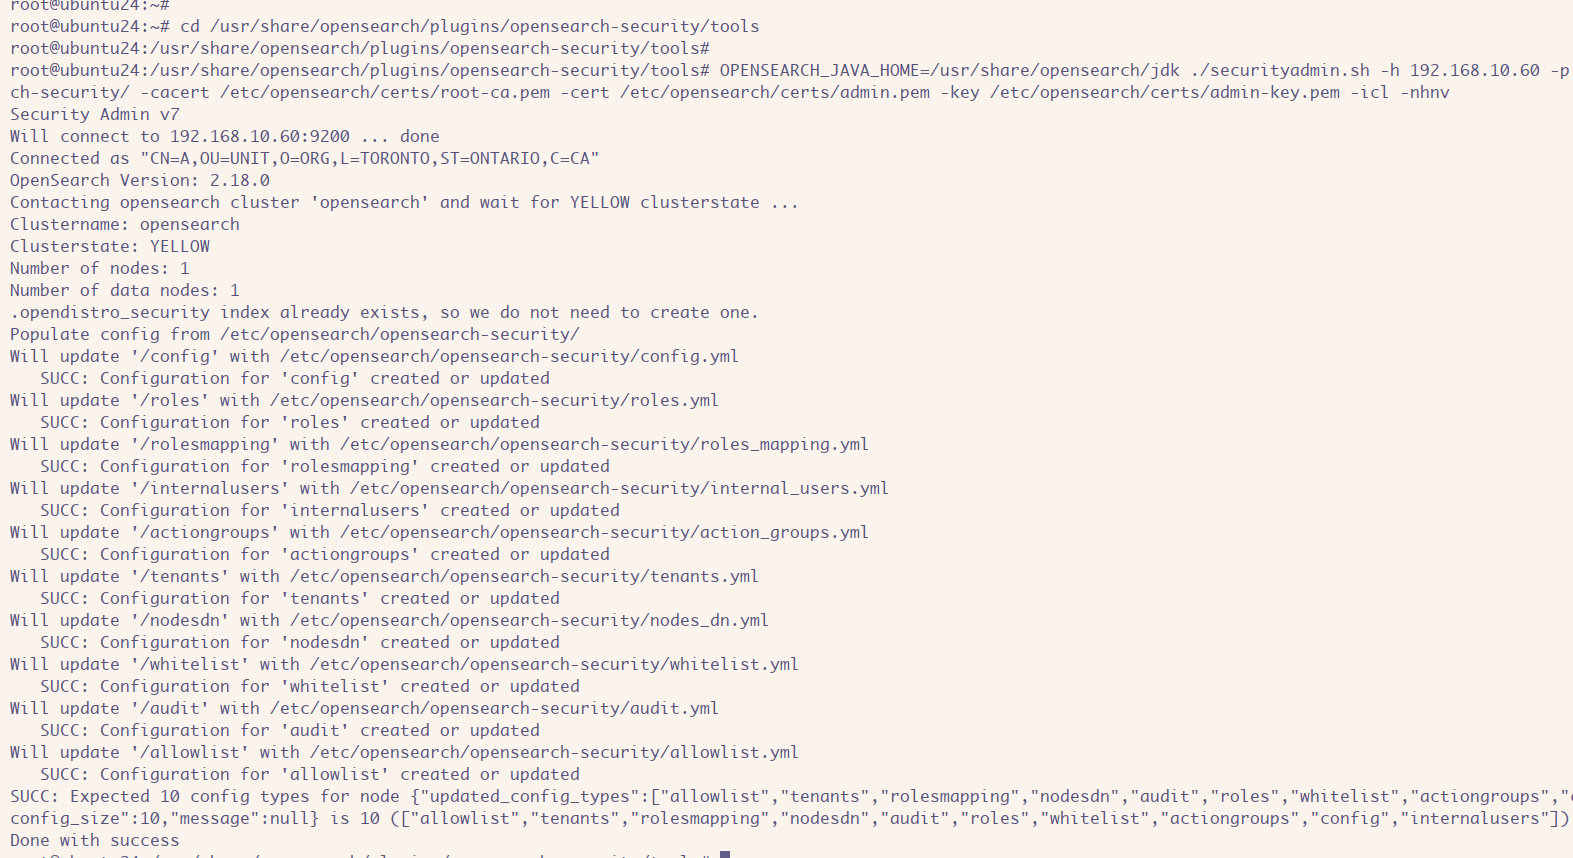
Once OpenSearch restarted, run the command below to apply your SSL certificates to the OpenSearch.
cd /usr/share/opensearch/plugins/opensearch-security/tools
OPENSEARCH_JAVA_HOME=/usr/share/opensearch/jdk ./securityadmin.sh -h 192.168.10.60 -p 9200 -cd /etc/opensearch/opensearch-security/ -cacert /etc/opensearch/certs/root-ca.pem -cert /etc/opensearch/certs/admin.pem -key /etc/opensearch/certs/admin-key.pem -icl -nhnv
If it goes well, you'll see an output like this:
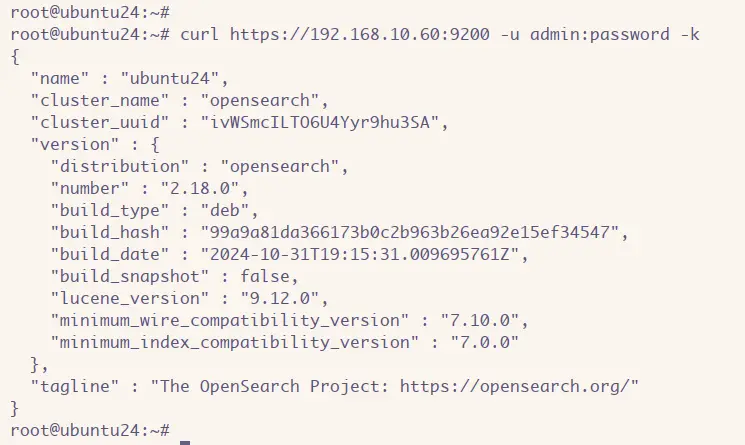
Lastly, run the 'curl' command below to verify the authentication to the OpenSearch server.
curl https://192.168.10.60:9200 -u admin:password -k
curl https://node-rock1:9200 -u kibanaserver:kibanapass -k
When successful, you'll be able to access OpenSearch with your username and password through HTTPS protocol.
Configuring OpenSearch Dashboard
After password authentication is configured, you'll be setting up the OpenSearch Dashboard by editing the file 'opensearch-dashboard,yml'.
Open the configuration for OpenSearch Dashboard '/etc/opensearch-dashboards/opensearch-dashboard.yml' with the'nano' editor.
sudo nano /etc/opensearch-dashboards/opensearch-dashboard.yml
Input your local IP address to the 'server.host' option like the following:
server.host: "192.168.10.60"
Make sure to change the OpenSearch host, username, and password with your information.
opensearch.hosts: ["https://192.168.10.60:9200"]
opensearch.ssl.verificationMode: none
opensearch.username: kibanaserver
opensearch.password: kibanapass
Save the file and exit the editor.
Now run the 'systemctl' command below to restart the OpenSearch Dashboard and apply your changes. With this, the OpenSearch Dashboard should be connected to OpenSearch.
sudo systemctl restart opensearch-dashboards
Next, open your web browser and visit http://192.168.10.60:5601. If your installation is successful, you'll see the OpenSearch Dashboard login page.
Enter your admin user and password, then click 'Log in'.

Once logged in, select the 'Add data' to add new data or click the 'Explore on my own' option.

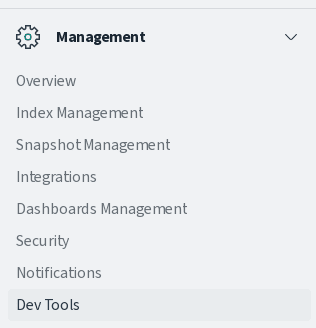
To ensure the connection between OpenSearch and OpenSearch Dashboard, you need to check the OpenSearch status from the dashboard.
On the 'Management' section, click 'Dev Tools'.
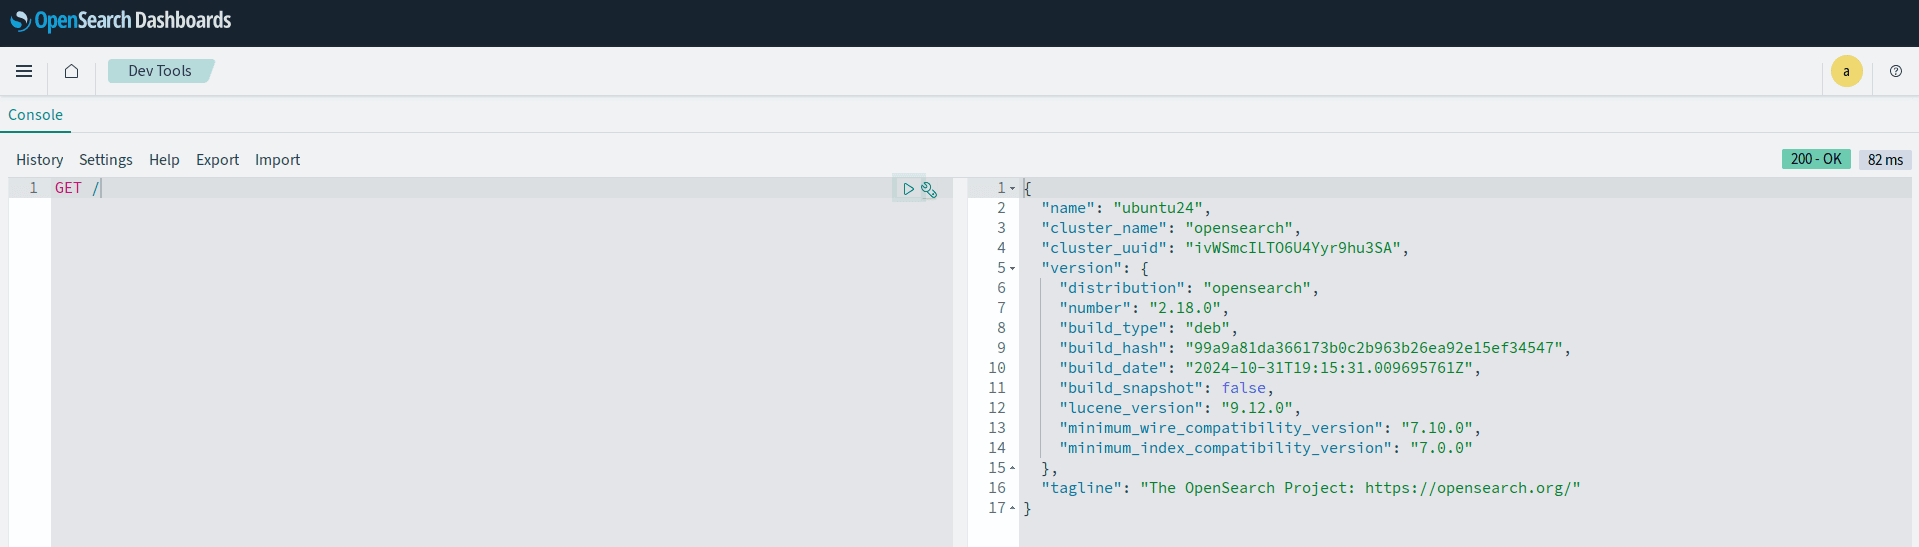
Within the console section, input 'GET /' and click the play button. If your connection to the OpenSearch and OpenSearch Dashboard is successful, you'll see the following page.
Conclusion
Congratulations! You've installed OpenSearch and OpenSearch Dashboard on the Ubuntu 24.04 server. OpenSearch runs in single mode, and the installation is secured with HTTPS. Lastly, you've also configured authentication for OpenSearch and integrated OpenSearch with the OpenSearch Dashboard.

