How to Install Mattermost Team Messaging System on Ubuntu 22.04
This tutorial exists for these OS versions
- Ubuntu 24.04 (Noble Numbat)
- Ubuntu 22.04 (Jammy Jellyfish)
- Ubuntu 20.04 (Focal Fossa)
On this page
- Prerequisites
- Step 1 - Configure Firewall
- Step 2 - Install PostgreSQL
- Step 3 - Configure PostgreSQL
- Step 4 - Download Mattermost
- Step 5 - Create a System user for Mattermost and configure permissions
- Step 6 - Create a Systemd unit file
- Step 7 - Install Nginx
- Step 8 - Install SSL
- Step 9 - Configure Nginx
- Step 10 - Access Mattermost Server
- Step 11 - Configure Mattermost Server
- Conclusion
Mattermost is an open-source messaging platform used for chatting, file-sharing, project management, and workflow orchestration. It is written in Go language. It is offered as both, a cloud-hosted solution, and a self-hosted server. It is an alternative to Slack and other professional platforms. The ability to host it on your server allows you to have control over your communications and sensitive data.
In this tutorial, you will learn how to install Mattermost Team Messaging System on a Ubuntu 22.04 server.
Prerequisites
-
A server running Ubuntu 22.04 with a minimum of 2 GB of RAM for up to 1000 users.
-
A non-root user with sudo privileges.
-
The Uncomplicated Firewall(UFW) is enabled and running.
-
A Fully Qualified domain name pointed to the server. For our tutorial, we will be using the domain
mattermost.example.com. -
Everything is updated.
$ sudo apt update && sudo apt upgrade
Step 1 - Configure Firewall
The first step before installing any packages is to configure the firewall to allow HTTP and HTTPS connections.
Check the status of the firewall.
$ sudo ufw status
You should see something like the following.
Status: active

To                         Action      From
--                         ------      ----
OpenSSH                    ALLOW       Anywhere
OpenSSH (v6)               ALLOW       Anywhere (v6)
The port 8065 is required by Mattermost. This port needs to be opened only temporarily to confirm the installation. We will remove it later on.
$ sudo ufw allow 8065
Allow HTTP and HTTPs ports.
$ sudo ufw allow http
$ sudo ufw allow https
Check the status again to confirm.
$ sudo ufw status
Status: active

To                         Action      From
--                         ------      ----
OpenSSH                    ALLOW       Anywhere
80/tcp                     ALLOW       Anywhere
443                        ALLOW       Anywhere
8065                       ALLOW       Anywhere
OpenSSH (v6)               ALLOW       Anywhere (v6)
80/tcp (v6)                ALLOW       Anywhere (v6)
443 (v6)                   ALLOW       Anywhere (v6)
8065 (v6)                  ALLOW       Anywhere (v6)
Step 2 - Install PostgreSQL
Mattermost can work with both MySQL and PostgreSQL servers but PostgreSQL is the recommended choice.
Ubuntu 22.04 ships with the latest stable(v14) version of PostgreSQL. You can install it with a single command.
$ sudo apt install postgresql postgresql-contrib
Check the version of MySQL.
$ psql --version
psql (PostgreSQL) 14.4 (Ubuntu 14.4-0ubuntu0.22.04.1)
Step 3 - Configure PostgreSQL
PostgreSQL creates a Linux user account postgres during installation. The PostgreSQL shell can be accessed using this account.
Log in to the PostgreSQL shell.
$ sudo -u postgres psql
Create the Mattermost database.
postgres=# CREATE DATABASE mattermostdb;
Create the Mattermost database user. Replace mmuser-password with a stronger password of your choice.
postgres=# CREATE USER mmuser WITH PASSWORD 'mmuser-password';
Grant all privileges on the database to the user.
postgres=# GRANT ALL PRIVILEGES ON DATABASE mattermost to mmuser;
Exit the PostgreSQL shell by entering \q in the shell.
postgres=# \q
Open the file /etc/postgresql/{version}/main/pg_hba.conf for editing.
$ sudo nano /etc/postgresql/{version}/main/pg_hba.conf
Find the following lines.
# "local" is for Unix domain socket connections only
local   all             all                                     peer
# IPv4 local connections:
host    all             all             127.0.0.1/32            scram-sha-256
# IPv6 local connections:
host    all             all             ::1/128                 scram-sha-256
Change the values peer and scram-sha-256 to trust in the above lines.
# "local" is for Unix domain socket connections only
local   all             all                                     trust
# IPv4 local connections:
host    all             all             127.0.0.1/32            trust
# IPv6 local connections:
host    all             all             ::1/128                 trust
Save the file by pressing Ctrl + X and entering Y when prompted.
Restart the PostgreSQL service to enable the change.
$ sudo systemctl restart postgresql
Verify that you can connect to the Mattermost SQL user.
$ psql --dbname=mattermost --username=mmuser --password
You will be prompted for the password. Enter it and you will be logged in to the PostgreSQL shell. Enter \q to exit the shell.
Password:
psql (14.4 (Ubuntu 14.4-0ubuntu0.22.04.1))
Type "help" for help.

mattermost-> \q
Step 4 - Download Mattermost
Download the latest version of the Mattermost server. At the time of writing this tutorial, the latest available version is 7.0.1.
$ wget https://releases.mattermost.com/7.0.1/mattermost-7.0.1-linux-amd64.tar.gz
Extract the archive.
$ tar -xvzf mattermost*.gz
Move the extracted files to the /opt directory.
$ sudo mv mattermost /opt
Create the data storage directory for the Mattermost server.
$ sudo mkdir /opt/mattermost/data
Step 5 - Create a System user for Mattermost and configure permissions
Open the configuration file /opt/mattermost/config/config.json for editing.
$ sudo nano /opt/mattermost/config/config.json
Set the variable SiteURL to the domain name, you want to use for your installation.
"SiteURL": "https://mattermost.example.com",
Find the variable DriverName under the SqlSettings and change its value to mysql.
"DriverName": "mysql",
Set the variable DataSource to the following value. Replace mmuser with the SQL username, YourPassword23! with the SQL password, and mattermostdb with the database name, you configured in step 4.
"DataSource": "mmuser:YourPassword23!@tcp(localhost:3306)/mattermostdb?charset=utf8mb4,utf8&writeTimeout=30s",
There are a lot of other settings you can configure at this point but it would be easier to do them post-installation. For now, only these two settings are essential.
Save the file by pressing Ctrl + X and entering Y when prompted.
Create a system user and group for the Mattermost server.
$ sudo useradd --system --user-group mattermost
Change ownership of the Mattermost directory to the newly created user and group.
$ sudo chown -R mattermost:mattermost /opt/mattermost
Give write permissions to the mattermost group on the directory.
$ sudo chmod -R g+w /opt/mattermost
Switch to the Mattermost directory.
$ cd /opt/mattermost
Start the Mattermost server as the mattermost user.
$ sudo -u mattermost ./bin/mattermost
The server will start and it will generate a bunch of log information. Wait for the line Server is listening on [::]:8065 to appear. Visit the URL http://<serverIPaddress>:8065 in your browser and you will see the following login page.
Press Ctrl + C to stop the server. We will come back to this later to configure the installation.
Step 6 - Create a Systemd unit file
The next step is to create a system file for Mattermost.
Create and open the unit file for editing.
$ sudo nano /lib/systemd/system/mattermost.service
Paste the following code in it.
[Unit]
Description=Mattermost
After=network.target
After=postgresql.service
BindsTo=postgresql.service

[Service]
Type=notify
ExecStart=/opt/mattermost/bin/mattermost
TimeoutStartSec=3600
KillMode=mixed
Restart=always
RestartSec=10
WorkingDirectory=/opt/mattermost
User=mattermost
Group=mattermost
LimitNOFILE=49152

[Install]
WantedBy=multi-user.target
Save the file by pressing Ctrl + X and entering Y when prompted.
Reload the systemd daemon to load the service file.
$ sudo systemctl daemon-reload
Start the Mattermost service.
$ sudo systemctl start mattermost
Check the status of the service.
? mattermost.service - Mattermost
     Loaded: loaded (/lib/systemd/system/mattermost.service; disabled; vendor preset: enabled)
     Active: active (running) since Mon 2022-07-11 01:24:46 UTC; 20s ago
   Main PID: 23628 (mattermost)
      Tasks: 48 (limit: 2241)
     Memory: 448.2M
        CPU: 14.929s
     CGroup: /system.slice/mattermost.service
             ??23628 /opt/mattermost/bin/mattermost
             ??23651 plugins/com.mattermost.plugin-channel-export/server/dist/plugin-linux-amd64
             ??23656 plugins/com.mattermost.nps/server/dist/plugin-linux-amd64
             ??23662 plugins/com.mattermost.calls/server/dist/plugin-linux-amd64
             ??23668 plugins/com.mattermost.apps/server/dist/plugin-linux-amd64
             ??23674 plugins/playbooks/server/dist/plugin-linux-amd64
             ??23683 plugins/focalboard/server/dist/plugin-linux-amd64
 ....
Enable the service.
$ sudo systemctl enable mattermost
Step 7 - Install Nginx
Ubuntu 22.04 ships with an older version of Nginx. To install the latest version, you need to download the official Nginx repository.
Import Nginx's signing key.
$ curl https://nginx.org/keys/nginx_signing.key | gpg --dearmor \
| sudo tee /usr/share/keyrings/nginx-archive-keyring.gpg >/dev/null
Add the repository for Nginx's stable version.
$ echo "deb [signed-by=/usr/share/keyrings/nginx-archive-keyring.gpg arch=amd64] \
http://nginx.org/packages/ubuntu `lsb_release -cs` nginx" \
| sudo tee /etc/apt/sources.list.d/nginx.list
Update the system repositories.
$ sudo apt update
Install Nginx.
$ sudo apt install nginx
Verify the installation.
$ nginx -v
nginx version: nginx/1.22.0
Step 8 - Install SSL
We need to install Certbot to generate the SSL certificate. You can either install Certbot using Ubuntu's repository or grab the latest version using the Snapd tool. We will be using the Snapd version.
Ubuntu 22.04 comes with Snapd installed by default. Run the following commands to ensure that your version of Snapd is up to date.
$ sudo snap install core
Install Certbot.
$ sudo snap install --classic certbot
Use the following command to ensure that the Certbot command can be run by creating a symbolic link to the /usr/bin directory.
$ sudo ln -s /snap/bin/certbot /usr/bin/certbot
Run the following command to generate an SSL Certificate.
$ sudo certbot certonly --standalone --agree-tos --no-eff-email --staple-ocsp --preferred-challenges http -m [email protected] -d mattermost.example.com
The above command will download a certificate to the /etc/letsencrypt/live/mattermost.example.com directory on your server.
Generate a Diffie-Hellman group certificate.
$ sudo openssl dhparam -dsaparam -out /etc/ssl/certs/dhparam.pem 4096
Open the file /etc/letsencrypt/renewal/mattermost.example.com.conf for editing.
$ sudo nano /etc/letsencrypt/renewal/mattermost.example.com.conf
Paste the following code at the bottom.
pre_hook = systemctl stop nginx
post_hook = systemctl start nginx
Save the file by pressing Ctrl + X and entering Y when prompted.
We have generated the SSL certificate using the standalone option of Certbot. It runs its web server to create the certificate which means Nginx should be shut off during the renewal. The pre_hook and post_hook commands run before and after the renewal to automatically shut and restart the Nginx server thereby requiring no manual intervention.
To check whether the SSL renewal is working fine, do a dry run of the process.
$ sudo certbot renew --dry-run
If you see no errors, you are all set. Your certificate will renew automatically.
Step 9 - Configure Nginx
Open the file /etc/nginx/nginx.conf for editing.
$ sudo nano /etc/nginx/nginx.conf
Add the following line before the line include /etc/nginx/conf.d/*.conf;.
server_names_hash_bucket_size 64;
Save the file by pressing Ctrl + X and entering Y when prompted.
Create and open the file /etc/nginx/conf.d/monica.conf for editing.
$ sudo nano /etc/nginx/conf.d/mattermost.conf
Paste the following code in it. Replace mattermost.example.com with your domain name. Make sure the value of the client_max_body_size is set to 10MB which is what the default upload size of files in Monica is. It is the same value we configured with PHP earlier.
upstream backend {
   server 127.0.0.1:8065;
   keepalive 32;
}

proxy_cache_path /var/cache/nginx levels=1:2 keys_zone=mattermost_cache:10m max_size=3g inactive=120m use_temp_path=off;

server {
  listen 80 default_server;
  server_name   mattermost.example.com;
  return 301 https://$server_name$request_uri;
}

server {
   listen 443 ssl http2;
   server_name    mattermost.example.com;

   http2_push_preload on; # Enable HTTP/2 Server Push

   ssl_certificate /etc/letsencrypt/live/mattermost.example.com/fullchain.pem;
   ssl_certificate_key /etc/letsencrypt/live/mattermost.example.com/privkey.pem;
   ssl_trusted_certificate /etc/letsencrypt/live/mattermost.example.com/chain.pem;
   ssl_session_timeout 1d;

   # Enable TLS versions (TLSv1.3 is required upcoming HTTP/3 QUIC).
   ssl_protocols TLSv1.2 TLSv1.3;

   # Enable TLSv1.3's 0-RTT. Use $ssl_early_data when reverse proxying to
   # prevent replay attacks.
   #
   # @see: https://nginx.org/en/docs/http/ngx_http_ssl_module.html#ssl_early_data
   ssl_early_data on;

   ssl_ciphers 'ECDHE-ECDSA-AES256-GCM-SHA384:ECDHE-RSA-AES256-GCM-SHA384:ECDHE-ECDSA-CHACHA20-POLY1305:ECDHE-RSA-CHACHA20-POLY1305:ECDHE-ECDSA-AES256-SHA384:ECDHE-RSA-AES256-SHA384';
   ssl_prefer_server_ciphers on;
   ssl_session_cache shared:SSL:50m;
   # HSTS (ngx_http_headers_module is required) (15768000 seconds = six months)
   add_header Strict-Transport-Security max-age=15768000;
   # OCSP Stapling ---
   # fetch OCSP records from URL in ssl_certificate and cache them
   ssl_stapling on;
   ssl_stapling_verify on;
   ssl_dhparam /etc/ssl/certs/dhparam.pem;

   add_header X-Early-Data $tls1_3_early_data;

   location ~ /api/v[0-9]+/(users/)?websocket$ {
       proxy_set_header Upgrade $http_upgrade;
       proxy_set_header Connection "upgrade";
       client_max_body_size 50M;
       proxy_set_header Host $http_host;
       proxy_set_header X-Real-IP $remote_addr;
       proxy_set_header X-Forwarded-For $proxy_add_x_forwarded_for;
       proxy_set_header X-Forwarded-Proto $scheme;
       proxy_set_header X-Frame-Options SAMEORIGIN;
       proxy_buffers 256 16k;
       proxy_buffer_size 16k;
       client_body_timeout 60;
       send_timeout 300;
       lingering_timeout 5;
       proxy_connect_timeout 90;
       proxy_send_timeout 300;
       proxy_read_timeout 90s;
       proxy_http_version 1.1;
       proxy_pass http://backend;
   }

   location / {
       client_max_body_size 50M;
       proxy_set_header Connection "";
       proxy_set_header Host $http_host;
       proxy_set_header X-Real-IP $remote_addr;
       proxy_set_header X-Forwarded-For $proxy_add_x_forwarded_for;
       proxy_set_header X-Forwarded-Proto $scheme;
       proxy_set_header X-Frame-Options SAMEORIGIN;
       proxy_buffers 256 16k;
       proxy_buffer_size 16k;
       proxy_read_timeout 600s;
       proxy_cache mattermost_cache;
       proxy_cache_revalidate on;
       proxy_cache_min_uses 2;
       proxy_cache_use_stale timeout;
       proxy_cache_lock on;
       proxy_http_version 1.1;
       proxy_pass http://backend;
   }
}

# This block is useful for debugging TLS v1.3. Please feel free to remove this
# and use the `$ssl_early_data` variable exposed by NGINX directly should you
# wish to do so.
map $ssl_early_data $tls1_3_early_data {
  "~." $ssl_early_data;
  default "";
}
Save the file by pressing Ctrl + X and entering Y when prompted.
Give Nginx permissions to the cache directory.
$ sudo chown -R nginx:nginx /var/cache/nginx
Verify your Nginx configuration.
$ sudo nginx -t
Restart the Nginx server.
$ sudo systemctl restart nginx
Step 10 - Access Mattermost Server
Open the URL https://mattermost.example.com in your browser and you will be greeted with the signup page as shown in step 5. Enter your account details and it will be set as the System administrator.
Before proceeding any further, we need to close port 8065 since we have configured Mattermost to be accessible via a public URL. Therefore, the open port poses a security risk.
$ sudo ufw delete allow 8065
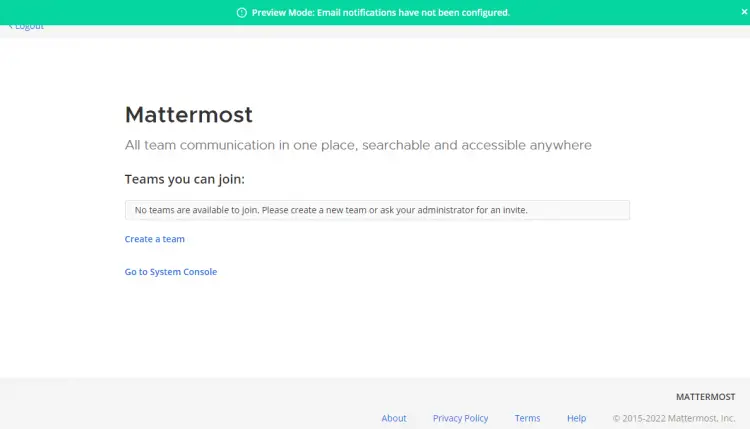
Next, you will be taken to the Team creation page.
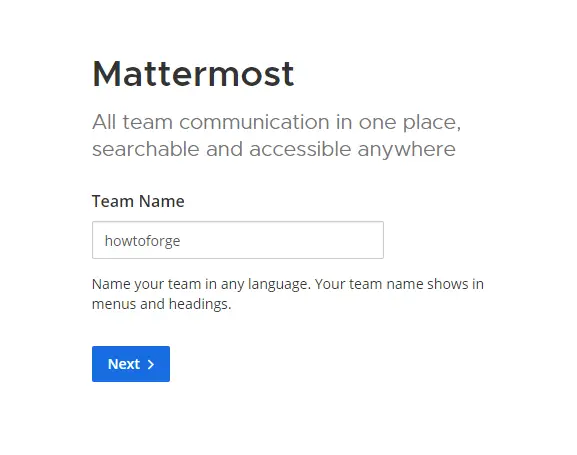
Click the Create a team button to create your first team.
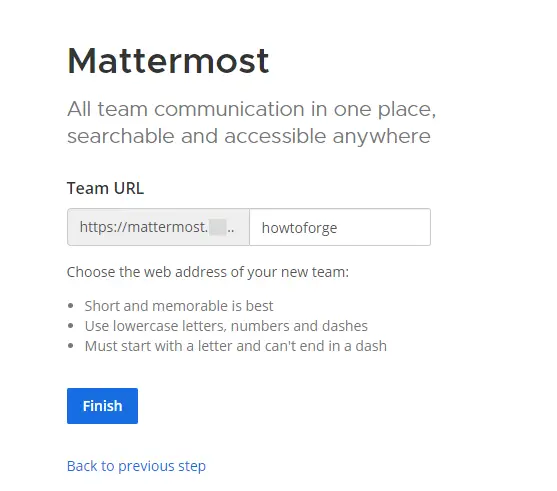
Next, you will be asked to set a public URL for the team.
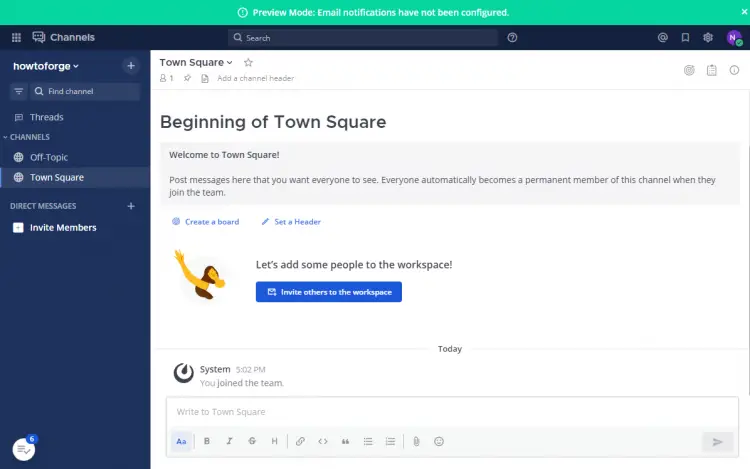
Click the Finish button to open the Mattermost Dashboard.
Step 11 - Configure Mattermost Server
You can configure Mattermost using the config.json file or using the System console from the dashboard. We will be doing it via the dashboard since it is much easier that way. Click the Product Button on the top left corner and then select the System console option.
You will be taken to the System console dashboard from where you can configure everything about the server.
Configure Email Notifications
One of the most important features of a messaging system is email notifications.
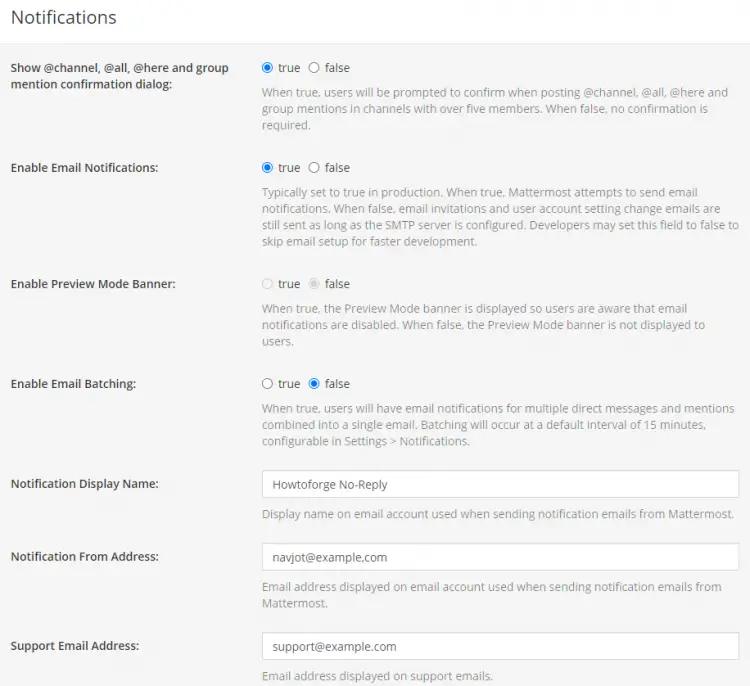
The first step is to enable notifications. Visit System Console >> Site Configuration >> Noficiations menu and set the following options.
- Set Enable Email Notifications to true
- Set Notification Display Name to No-Reply
- Set Notification From Address to something like [email protected].
- Set Support Email Address to something like [email protected]
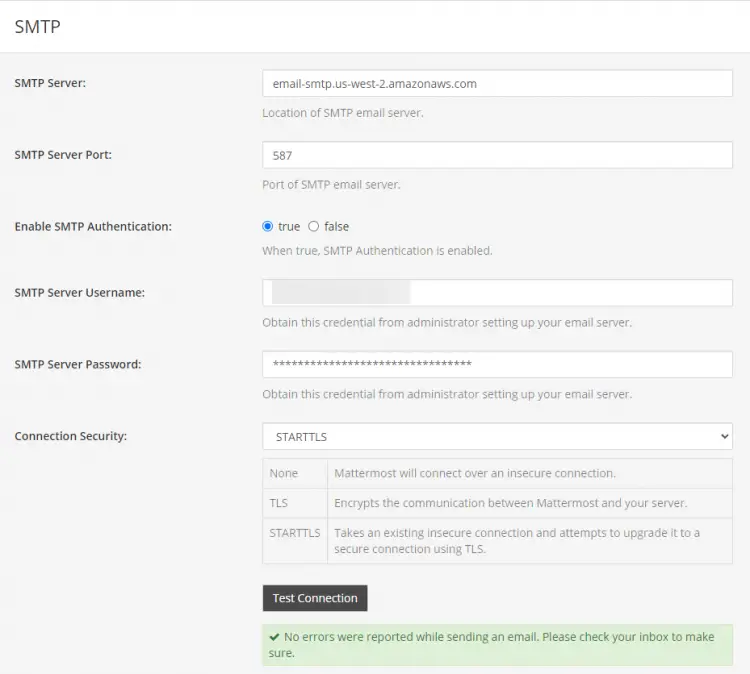
The next step is to enable SMTP. Visit System Console >> Environment >> SMTP menu and set the following options. For our tutorial, we are using the Amazon SES mailer.
- Set SMTP Server to {SMTP-server}
- Set SMTP Server Port to 465
- Set Enable SMTP Authentication to true
- Set SMTP Server Username to {SES-username}
- Set SMTP Server Password to {SES-Key}
- Set Connection Security to TLS or STARTTLS, depending on what the SMTP server accepts
Click the Test Connection button to confirm the SMTP settings.
There are a lot more settings to configure. Once you have finished, you need to restart the server from the terminal for the changes to apply.
$ sudo systemctl restart mattermost
Conclusion
This concludes our tutorial on installing and configuring the Mattermost Team Messaging system on a Ubuntu 22.04 server. If you have any questions, post them in the comments below.


