How to Install LibreNMS on Debian 11
LibreNMS is an open-source network monitoring system based on PHP and with autodiscovery support. It is a community fork of the Observium monitoring software released under GPLv3 License. Using LibreNMS allows you to monitor operating systems like Linux, Windows, and BSD, also it supports a wide range of network hardware from multiple vendors such as Aruba, Cisco, Dell, D-Link, HP, Mikrotik, etc.
As a fully-featured monitoring system, LibreNMS provides a wealth of features with multiple integrations and multiple protocols data collection.
Below are some notable features of LibreNMS:
- Auto-discovery your entire network with multiple protocols such as CDP, BGP, SNMP, OSPF, and ARP.
- Multiple alerting methods using email, slacks, IRC, Rocket.chat, Telegram, etc.
- Extensive API for managing, graphing, and retrieving data from your monitoring system.
- Supports billing system for generating bandwidth bills based on network usage or transfer.
- Supports multiple authentication methods such as MySQL, Radius, LDAP, HTTP, and Active Directory.
- Supports Two Factor Authentication
- Multiple integrations with third-party applications such as Graylog, NfSen, Nagios Plugins, Oxidized, RANCID.
- Wide-range supports of Hardware vendors, check your vendors here.
- User-friendly and customizable dashboard.
- Keep your LibreNMS software with auto-update supports.
- Native application for Android and iOS which provides core functionality.
In this guide, you will learn how to install and configure the LibreNMS monitoring tool on the Debian 11 Bullseye.
Prerequisites
To complete this guide, ensure you've got the following requirements:
- Operating System: Debian 11 Bullseye
- Root privileges
Now let's start the installation.
Installing Packages Dependencies
In this first step, you will be installing basic and essential packages for the LireNMS. You will be installing the LEMP Stack, Python packages, snmpd, and additional system utilities such as curl, fping, git, and imagemagick.
1. Refresh and update Debian repositories using the following command.
sudo apt update
2. Now execute the following command to install packages dependencies.
sudo apt install acl curl composer fping git graphviz imagemagick mariadb-client mariadb-server mtr-tiny nginx-full nmap php7.4-cli php7.4-curl php7.4-fpm php7.4-gd php7.4-gmp php7.4-json php7.4-mbstring php7.4-mysql php7.4-snmp php7.4-xml php7.4-zip python3-dotenv python3-pymysql python3-redis python3-setuptools python3-pip python3-systemd rrdtool snmp snmpd whois
Type 'y' to confirm the installation and press 'Enter' to continue.
3. After packages dependencies installation completes, execute the following commands to start and enable services like Nginx, MariaDB, PHP-FPM, and snmpd.
sudo systemctl enable --now nginx
sudo systemctl enable --now mariadb
sudo systemctl enable --now php7.4-fpm
sudo systemctl enable --now snmpd.service
Now you've completed the installation of packages dependencies for LibreNMS.
Setup New User librenms
In this step, you will be creating a new system user 'librenms'. Your LibreNMS monitoring tool will be running under the 'librenms' user.
1. Execute the following command to create a new 'librenms' user.
useradd librenms -d /opt/librenms -M -r -s "$(which bash)"
Options you must know:
- -d /opt/librenms: Setup default home directory for user 'librenms' to '/opt/librenms'.
- -M: Do not create a home directory for user 'librenms'.
- -r: Make this user 'librenms' as a system user.
- -s "$(which bash)": Setup default shell for user 'librenms'. The shell will be the output of the command 'which bash'.
2. Next, create a new password for the user 'librenms' using the following command.
passwd librenms
Type a new strong password and repeat.
Continue to the next stage to configure your system for the LibreNMS installation.
Setup Timezone System and PHP
Time is an essential part of monitoring. In this step, you will be setting up the default timezone for your PHP and the system timezone, make sure both (PHP and system) timezones are synchronized and using the same timezone.
1. Edit the configuration 'php.ini' for PHP-FPM and CLI using the following command.
sudo nano /etc/php/7.4/fpm/php.ini
sudo nano /etc/php/7.4/cli/php.ini
Uncomment the option 'date.timezone' and put your timezone after it. For this example, we're using the timezone 'Europe/Paris'.
date.timezone = Europe/Paris
Save both configurations and exit.
2. Now restart PHP-FPM to apply a new configuration using the following command.
sudo systemctl restart php7.4-fpm
3. After that, execute the timedatectl command below to set up the default system timezone to 'Europe/Paris'.
sudo timedatectl set-timezone Europe/Paris
You've completed the timezone configuration for your PHP and system.
Setup MariaDB and Create Database
In this step, you will be adding configuration for MariaDB as the LibreNMS requirements, then create a new MariaDB database and user for the LibreNMS installation.
1. Edit the MariaDB server configuration '/etc/mysql/mariadb.conf.d/50-server.cnf' using nano editor.
sudo nano /etc/mysql/mariadb.conf.d/50-server.cnf
Add the following configuration under the section '[mysqld]'.
[mysqld]
.....
....
innodb_file_per_table=1
lower_case_table_names=0
Save the configuration and exit.
2. To apply the new MariaDB configuration, restart the service using the systemctl command below.
sudo systemctl restart mariadb
Now you've added additional configuration to the MariaDB server.
3. Next, log in to the MariaDB/MySQL shell using the command 'mysql' as the user 'root' as below.
mysql -u root -p
Type your password or press 'Enter' to log in.
4. Now execute the following MariaDB queries to create a new database and user 'librenms'. And make sure to change the password 'LibreNMSPassword' with your strong password.
CREATE DATABASE librenms CHARACTER SET utf8mb4 COLLATE utf8mb4_unicode_ci;
CREATE USER 'librenms'@'localhost' IDENTIFIED BY 'LibreNMSPassword';
GRANT ALL PRIVILEGES ON librenms.* TO 'librenms'@'localhost';
FLUSH PRIVILEGES;
Type 'exit' and press 'Enter' to log out from the MariaDB shell.
Now you've created the database and user for LibreNMS installation.
Create a New PHP-FPM Pool
FastCGI Process Manager (FPM) or PHP-FPM allows you to custom pool for your PHP applications. By default, the PHP-FPM running the 'www' pool with the configuration '/etc/php/7.4/fpm/pool.d/www.conf'.
In his step, you will be creating a new custom PHP-FPM pool for LibreNMS. You will be creating a new PHP-FPM pool 'librenms' with the configuration '/etc/php/7.4/fpm/pool.d/librenms.conf', and will be running under the user 'librenms'.
1. First, copy the default pool configuration 'www.conf' to 'librenms.conf' using the following command.
cp /etc/php/7.4/fpm/pool.d/www.conf /etc/php/7.4/fpm/pool.d/librenms.conf
2. Edit the custom 'librenms.conf' pool configuration using nano editor.
sudo nano /etc/php/7.4/fpm/pool.d/librenms.conf
At the top of the line, change the default user from '[www]' to '[librenms]'.
[librenms]
Change the default user and group to 'librenms'.
user = librenms
group = librenms
Change default PHP-FPM sock file to '/run/php-fpm-librenms.sock'.
listen = /run/php-fpm-librenms.sock
Save the configuration and exit.
3. Next, restart the PHP-FPM service to apply a new configuration.
sudo systemctl restart php7.4-fpm
Now the PHP-FPM will spawn new pool 'librenms' with the sock file '/run/php/php-fpm-librenms.sock'.
4. Verify the 'librenms' sock file using the following command.
ss -anl | grep librenms
You will see a similar output as below.
u_str LISTEN 0 511 /run/php/php-fpm-librenms.sock 69199 * 0 users:(("php-fpm7.4",pid=26105,fd=10),("php-fpm7.4",pid=26104,fd=10),("php-fpm7.4",pid=26103,fd=7))
Now you're ready to download and install the LibreNMS monitoring tool.
Download LibreNMS
In this step, you will be downloading the LibreNMS source code and setup the permission and access control for it.
1. Change your working directory to '/opt' and download LibreNMS source code using the git command as below.
cd /opt/
git clone https://github.com/librenms/librenms.git
Your LibreNMS installation is the '/opt/librenms' directory.
2. Change the ownership and permission of the LibreNMS installation using the following command.
chown -R librenms:librenms /opt/librenms
chmod 771 /opt/librenms
3. Next, set up Access Control Lists (ACLs) for the LibreNMS installation directory. Allows the group to read write execute on each directory below using the following setfacl command.
setfacl -d -m g::rwx /opt/librenms/rrd /opt/librenms/logs /opt/librenms/bootstrap/cache/ /opt/librenms/storage/
setfacl -R -m g::rwx /opt/librenms/rrd /opt/librenms/logs /opt/librenms/bootstrap/cache/ /opt/librenms/storage/
Continue to the next step for installing PHP dependencies for LibreNMS.
Installing LibreNMS PHP Dependencies
To install LibreNMS PHP dependencies, you must log in as a user 'librenms' and use the composer_wrapper, which is included in the LibreNMS source code.
1. log in as user 'librenms' using the following command.
su - librenms
2. Execute the PHP script 'composer_wrapper.php' to install PHP packages dependencies for LibreNMS.
./scripts/composer_wrapper.php install --no-dev
3. After all download processes are completed, type 'exit' and press 'Enter' to log out from the user 'librenms'.
Now you've completed the installation of PHP Dependencies for LibreNMS.
Configuring Nginx for LibreNMS
In this step, you will be creating a new Nginx server block for the LibreNMS monitoring tool. This example will be using the domain name 'librenms.example.io'.
1. Create a new Nginx server blocks configuration 'librenms' using nano editor.
sudo nano /etc/nginx/sites-available/librenms
Copy and paste the following configuration. And make sure to change the domain name with your domain.
server {
 listen      80;
 server_name librenms.example.io;
 root        /opt/librenms/html;
 index       index.php;

 charset utf-8;
 gzip on;
 gzip_types text/css application/javascript text/javascript application/x-javascript image/svg+xml text/plain text/xsd text/xsl text/xml image/x-icon;
 location / {
  try_files $uri $uri/ /index.php?$query_string;
 }
 location ~ [^/]\.php(/|$) {
  fastcgi_pass unix:/run/php-fpm-librenms.sock;
  fastcgi_split_path_info ^(.+\.php)(/.+)$;
  include fastcgi.conf;
 }
 location ~ /\.(?!well-known).* {
  deny all;
 }
}
For secure HTTPS LibreNMS installation, use the following configuration. And make sure to change the domain name and path of SSL certificates.
server {
    listen      80;
    server_name librenms.example.io;
    rewrite     ^   https://$server_name$request_uri? permanent;
}

server {

 server_name librenms.example.io;
 root        /opt/librenms/html;
 index       index.php;

   listen 443 ssl http2;
    server_name example.io;
    ssl_certificate           /etc/letsencrypt/live/librenms.example.io/fullchain.pem;
    ssl_certificate_key       /etc/letsencrypt/live/librenms.example.io/privkey.pem;

    ssl_session_cache  builtin:1000  shared:SSL:10m;
    ssl_protocols TLSv1.2;
    ssl_ciphers HIGH:!aNULL:!eNULL:!EXPORT:!CAMELLIA:!DES:!MD5:!PSK:!RC4;
    ssl_prefer_server_ciphers on;

 charset utf-8;
 gzip on;
 gzip_types text/css application/javascript text/javascript application/x-javascript image/svg+xml text/plain text/xsd text/xsl text/xml image/x-icon;
 location / {
  try_files $uri $uri/ /index.php?$query_string;
 }
 location ~ [^/]\.php(/|$) {
  fastcgi_pass unix:/run/php/php-fpm-librenms.sock;
  fastcgi_split_path_info ^(.+\.php)(/.+)$;
  include fastcgi.conf;
 }
 location ~ /\.(?!well-known).* {
  deny all;
 }
}
Now save the configuration and exit.
2. Next, activate the new virtual host 'librenms' and verify the nginx configuration using the following command.
sudo ln -s /etc/nginx/sites-available/librenms /etc/nginx/sites-enabled/
sudo nginx -t
If your configuration is correct, you will see the output message such as 'test is successful'.
3. Lastly, restart the nginx service to apply a new configuration.
sudo systemctl restart nginx
Now you've completed the Nginx server block configuration for LibreNMS. You're ready to start the LibreNMS installation.
Start LibreNMS Installation
To start LibreNMS installation, open your web browser and type LibreNMS domain name on the address bar.
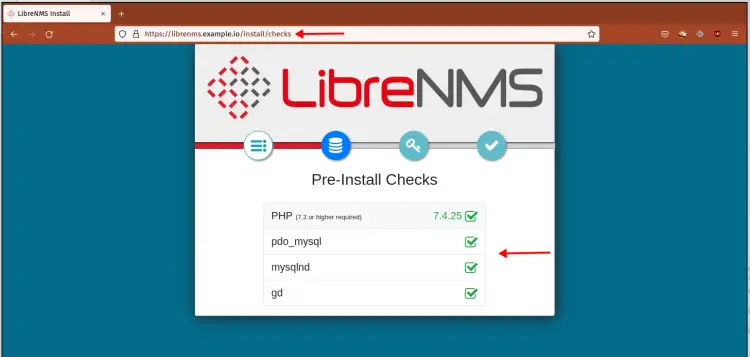
1. You will see the LibreNMS 'Pre-Install Checks'. Make sure all check status mark as green, then click the icon database to continue.
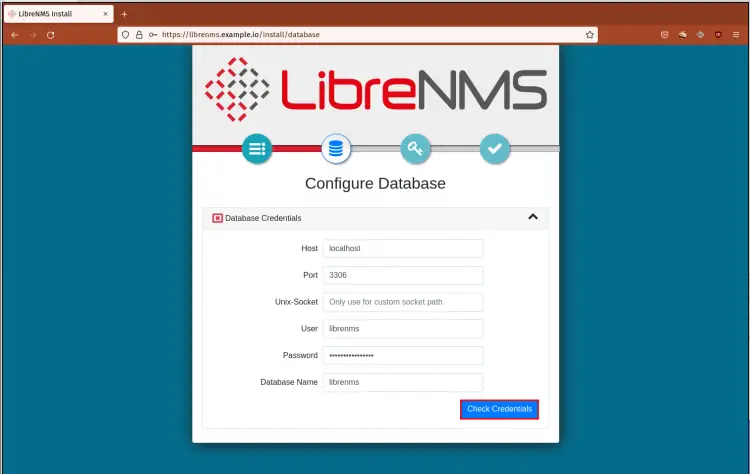
2. Type your database, user, and password. Then click the button 'Check Credentials'.
This will perform checking for your MariaDB database and user. If successful, you will see the green mark on the 'Database Credentials'.
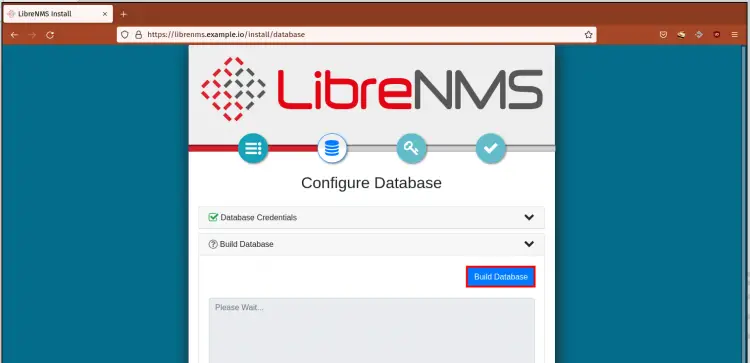
3. Now click the button 'Build Database' to import database schema for your LibreNMS.
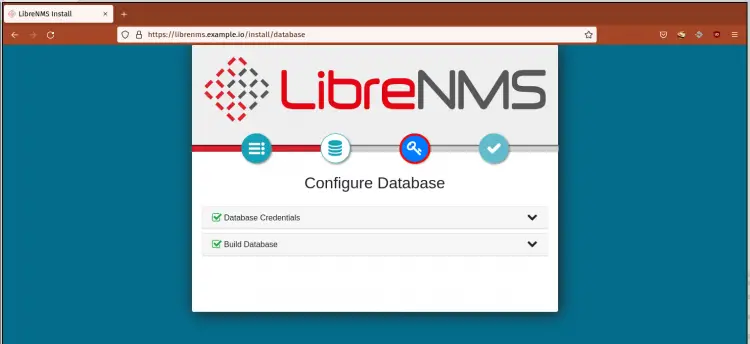
After database configuration completes, make sure both sections 'Database Credentials' and 'Build Database' mark as green.
4. Now click on the 'Key' icon to continue.
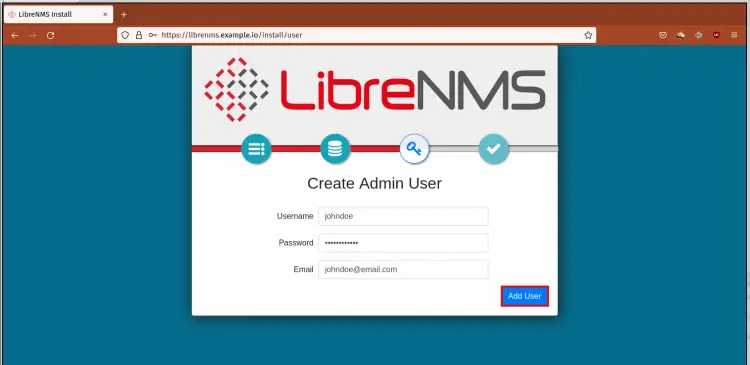
Type new user, password, and email address to create the LibreNMS admin user.
Click the button 'Add User'.
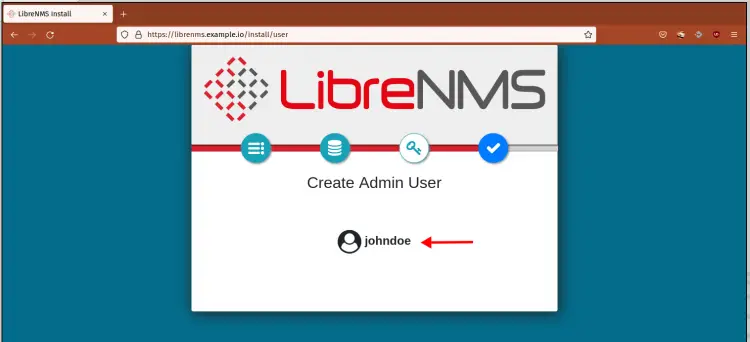
If your admin user is created, you will see your user admin on the page as below.
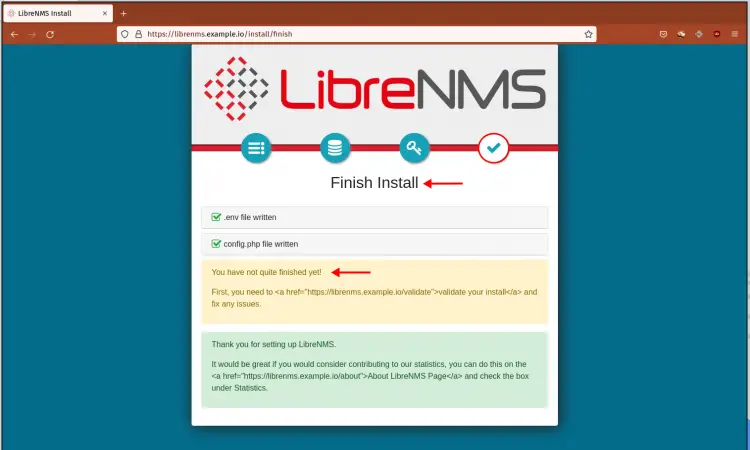
5. Click the mark icon to complete the installation. Below is the output you will get.
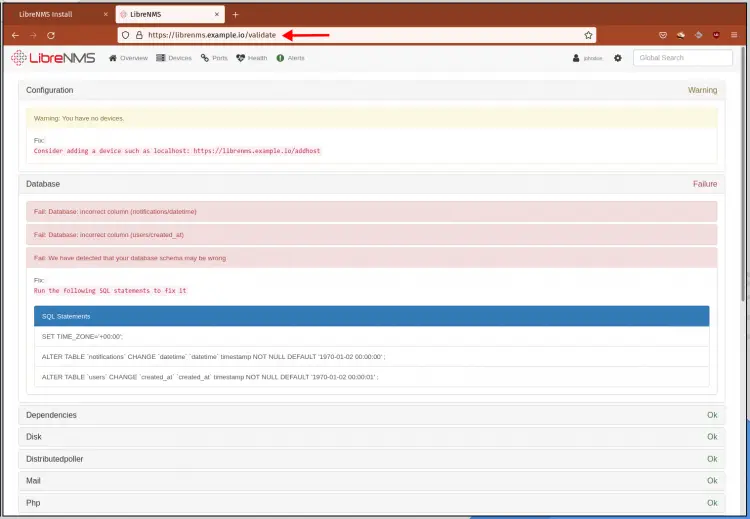
To finish the LibreNMS installation, open the LibreNMS validating page as below.
https://librenms.example.io/validate
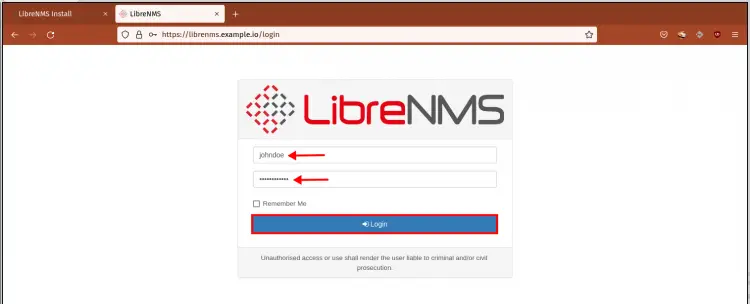
6. And you will be redirected to the LibreNMS login page.
Type your admin user and password, then click the 'Login' button
7. On the LibreNMS validate pages, you will see some errors as below.
You may have different errors, but the LibreNMS validate page provides solutions for your error.
8. Below are some errors in our installation and how to fix them.
- Fix database timezone
Log in to the MariaDB shell using your root user.
mysql -u root -p
Change the current database to 'librenms'.
use librenms;
Now execute the following queries to fix database timezone error.
SET TIME_ZONE='+00:00';
ALTER TABLE `notifications` CHANGE `datetime` `datetime` timestamp NOT NULL DEFAULT '1970-01-02 00:00:00' ;
ALTER TABLE `users` CHANGE `created_at` `created_at` timestamp NOT NULL DEFAULT '1970-01-02 00:00:01' ;
- Fix System Errors
Add the binary command LibreNMS 'lnms' to the '/usr/bin' directory using the following command.
sudo ln -s /opt/librenms/lnms /usr/bin/lnms
Enable bash completion for the command 'lnms'.
sudo cp /opt/librenms/misc/lnms-completion.bash /etc/bash_completion.d/
Lastly, copy the logrotate configuration for LibreNMS to the directory '/etc/logrotate.d/'.
sudo cp /opt/librenms/misc/librenms.logrotate /etc/logrotate.d/librenms
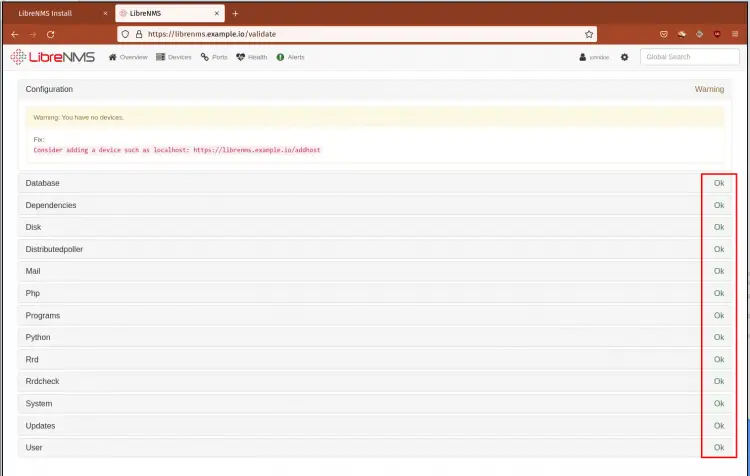
9. After fixing LibreNMS errors, back to the LibreNMS validate pages and reload the page.
Now make sure all status is 'OK'.
10. Click the 'Overview' menu to show the dashboard.
Now you've completes the LibreNMS installation on the Debian 11 Bullseye.
Conclusion
Congratulation! You've successfully installed the LibreNMS monitoring tool with Nginx, PHP-FPM, and MariaDB database on the latest Debian 11 Bullseye. Additionally, you've learned how to create the custom PHP-FPM pool and fix some errors of LibreNMS installation.
For the next step, you will learn how to add hosts to monitor to the LibreNMS monitoring tool.


