How to Install Icinga 2 Monitoring Software on Debian 12
This tutorial exists for these OS versions
- Debian 12 (Bookworm)
- Debian 11 (Bullseye)
- Debian 10 (Buster)
- Debian 9 (Stretch)
On this page
- Prerequisites
- Step 1 - Configure Firewall on the Master server
- Step 2 - Install MariaDB Server
- Step 3 - Configure MariaDB
- Step 4 - Install Icinga2 and Monitoring plugins on the Master Server
- Step 5 - Install IDO MySQL driver on the Master Server
- Step 6 - Configure Icinga2 API
- Step 7 - Install Nginx
- Step 8 - Install SSL
- Step 9 - Configure Nginx and PHP
- Step 10 - Prepare Web Setup
- Step 11 - Set up IcingaWeb
- Step 12 - Initialize Master Server
- Step 13 - Initialize Icinga2 Agent on Client Server
- Step 14 - Create Zones Configuration on the Master Server
- Step 15 - Verify on the Icinga Dashboard
- Conclusion
Icinga 2 is an open-source monitoring system that checks the availability of network resources, notifies users of outages, and generates performance data for reporting. You can monitor network services (SMTP, POP3, HTTP, NNTP, ping), host resources (CPU usage, Disk usage), and network components (switches, routers, temperature, and humidity sensors) using Icinga2. It can be integrated with Nagios plugins.
In the following tutorial, you will learn how to install Icinga2 on a Debian 12 server and connect it to a client node. Instead of the default Apache server, we will use Nginx to run Icinga2 Web.
Prerequisites
-
Two machines running Debian 12. One of them will act as a Master server and another one will act as the client for monitoring.
-
A non-root user with sudo privileges on both servers.
-
A fully qualified domain name (FQDN) for the master server,
icinga.example.comand the client node,client.example.com. -
Make sure everything is updated.
$ sudo apt update && sudo apt upgrade
-
Few packages that your system needs.
$ sudo apt install wget curl nano software-properties-common dirmngr apt-transport-https gnupg2 ca-certificates lsb-release debian-archive-keyring ufw unzip -y
Some of these packages may already be installed on your system.
Step 1 - Configure Firewall on the Master server
The first step is to configure the firewall. Debian comes with ufw (Uncomplicated Firewall) by default.
Check if the firewall is running.
$ sudo ufw status
You should get the following output.
Status: inactive
Allow SSH port so the firewall doesn't break the current connection on enabling it.
$ sudo ufw allow OpenSSH
Allow port 5665 which is required by the Icinga2 client to connect to the server.
$ sudo ufw allow 5665
Allow HTTP and HTTPS ports as well.
$ sudo ufw allow http
$ sudo ufw allow https
Enable the Firewall
$ sudo ufw enable
Command may disrupt existing ssh connections. Proceed with operation (y|n)? y
Firewall is active and enabled on system startup
Check the status of the firewall again.
$ sudo ufw status
You should see a similar output.
Status: active

To                         Action      From
--                         ------      ----
OpenSSH                    ALLOW       Anywhere
80/tcp                     ALLOW       Anywhere
443                        ALLOW       Anywhere
5665                       ALLOW       Anywhere
OpenSSH (v6)               ALLOW       Anywhere (v6)
80/tcp (v6)                ALLOW       Anywhere (v6)
443 (v6)                   ALLOW       Anywhere (v6)
5665 (v6)                  ALLOW       Anywhere (v6)
Step 2 - Install MariaDB Server
Debian 12 ships with the latest version of MariaDB. You can install it with a single command.
$ sudo apt install mariadb-server
Check the version of MySQL.
$ mysql --version
mysql  Ver 15.1 Distrib 10.11.4-MariaDB, for debian-linux-gnu (x86_64) using  EditLine wrapper
Run the MariaDB secure install script.
$ sudo mariadb-secure-installation
You will be asked for the root password. Press Enter because we haven't set any password for it.
NOTE: RUNNING ALL PARTS OF THIS SCRIPT IS RECOMMENDED FOR ALL MariaDB
      SERVERS IN PRODUCTION USE!  PLEASE READ EACH STEP CAREFULLY!

In order to log into MariaDB to secure it, we'll need the current
password for the root user. If you've just installed MariaDB, and
haven't set the root password yet, you should just press enter here.

Enter current password for root (enter for none):
Next, you will be asked if you want to switch to the Unix socket authentication method. The unix_socket plugin allows you to use your operating system credentials to connect to the MariaDB server. Since you already have a protected root account, enter n to proceed.
OK, successfully used password, moving on...

Setting the root password or using the unix_socket ensures that nobody
can log into the MariaDB root user without the proper authorisation.

You already have your root account protected, so you can safely answer 'n'.

Switch to unix_socket authentication [Y/n] n
Next, you will be asked if you want to change your root password. On Debian 12, the root password is tied closely to automated system maintenance, so it should be left alone. Type n to proceed further.
 ... skipping.

You already have your root account protected, so you can safely answer 'n'.

Change the root password? [Y/n] n
Next, you will be asked certain questions to improve MariaDB security. Type Y to remove anonymous users, disallow remote root logins, remove the test database, and reload the privilege tables.
 ... skipping.

By default, a MariaDB installation has an anonymous user, allowing anyone
to log into MariaDB without having to have a user account created for
them.  This is intended only for testing, and to make the installation
go a bit smoother.  You should remove them before moving into a
production environment.

Remove anonymous users? [Y/n] y
 ... Success!

Normally, root should only be allowed to connect from 'localhost'.  This
ensures that someone cannot guess at the root password from the network.

Disallow root login remotely? [Y/n] y
 ... Success!

By default, MariaDB comes with a database named 'test' that anyone can
access.  This is also intended only for testing, and should be removed
before moving into a production environment.

Remove test database and access to it? [Y/n] y
 - Dropping test database...
 ... Success!
 - Removing privileges on test database...
 ... Success!

Reloading the privilege tables will ensure that all changes made so far
will take effect immediately.

Reload privilege tables now? [Y/n] y
 ... Success!

Cleaning up...

All done!  If you've completed all of the above steps, your MariaDB
installation should now be secure.

Thanks for using MariaDB!
You can enter the MariaDB shell by typing sudo mysql or sudo mariadb on the command line.
Step 3 - Configure MariaDB
Log in to the MariaDB shell. Enter your root password when prompted.
$ sudo mysql
Create the Icinga database.
MariaDB [(none)]> CREATE DATABASE icinga2;
Create the SQL user account for Icinga2. Don't change the database and the username because they are already set by default. If you want to change them, you will need to perform some extra steps while installing the MySQL driver in Step 5. Enter the password and you will get an error and then be asked to reconfigure where you can specify your custom database name and users.
MariaDB [(none)]> CREATE USER 'icinga2'@'localhost' IDENTIFIED BY 'Your_password2';
Grant all privileges on the database to the user.
MariaDB [(none)]> GRANT ALL PRIVILEGES ON icinga2.* TO 'icinga2'@'localhost';
Since we are not modifying the root user, you should create another SQL user for performing administrative tasks that employ password authentication. Choose a strong password for this one.
MariaDB> GRANT ALL ON *.* TO 'navjot'@'localhost' IDENTIFIED BY 'Yourpassword32!' WITH GRANT OPTION;
Flush user privileges.
MariaDB [(none)]> FLUSH PRIVILEGES;
Exit the shell.
MariaDB [(none)]> exit
Step 4 - Install Icinga2 and Monitoring plugins on the Master Server
We will use the Icinga2 official repository for installation. Download and import the Icinga2 GPG key.
$ wget -O - https://packages.icinga.com/icinga.key | sudo gpg --dearmor -o /usr/share/keyrings/icinga-archive-keyring.gpg
Run the following commands to create and add the Icinga2 repository information to the APT sources list.
$ echo "deb [signed-by=/usr/share/keyrings/icinga-archive-keyring.gpg] https://packages.icinga.com/debian icinga-`lsb_release -cs` main" | sudo tee /etc/apt/sources.list.d/$(lsb_release -cs)-icinga.list
$ echo "deb-src [signed-by=/usr/share/keyrings/icinga-archive-keyring.gpg] http://packages.icinga.com/debian icinga-`lsb_release -cs` main" | sudo tee -a /etc/apt/sources.list.d/$(lsb_release -cs)-icinga.list
Update the system repositories list.
$ sudo apt update
Install Icinga2, Icingacli, and the monitoring plugins.
$ sudo apt install icinga2 monitoring-plugins -y
Step 5 - Install IDO MySQL driver on the Master Server
For Icinga2 to work, it needs a database. For that, we need to install the IDO MySQL driver and set up the database connection. Run the following command to install the MySQL driver.
$ sudo apt install -y icinga2-ido-mysql
Next, you will be asked to enable the ido-mysql feature. Select Yes to continue.
Next, You will be prompted to set up the driver and create a database using the dbconfig-common utility. Select Yes to continue.
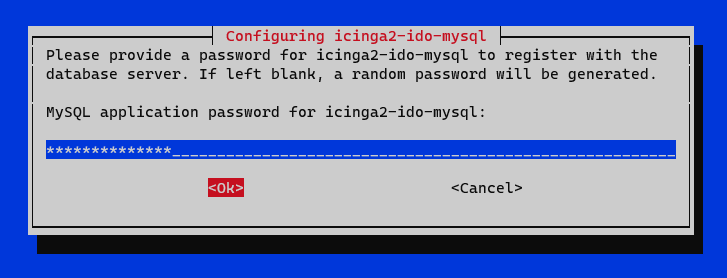
Next, you will be asked for the MySQL password for the icinga2 database. Enter the password configured in step 3 to continue.
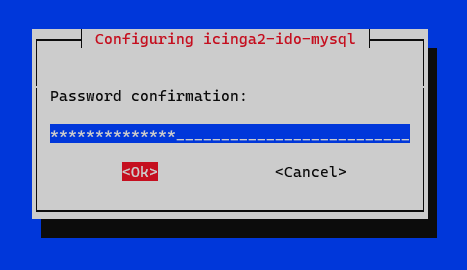
You will be asked to confirm the password again.
You can check the database details in the /etc/icinga2/features-available/ido-mysql.conf file.
$ sudo cat /etc/icinga2/features-available/ido-mysql.conf
/**
 * The db_ido_mysql library implements IDO functionality
 * for MySQL.
 */

library "db_ido_mysql"

object IdoMysqlConnection "ido-mysql" {
  user = "icinga2",
  password = "Your_password2",
  host = "localhost",
  database = "icinga2"
}
Enable the ido-mysql feature.
$ sudo icinga2 feature enable ido-mysql
Enabling feature ido-mysql. Make sure to restart Icinga 2 for these changes to take effect.
Restart the Icinga2 service.
$ sudo systemctl restart icinga2
Verify the service status.
$ sudo systemctl status icinga2
? icinga2.service - Icinga host/service/network monitoring system
     Loaded: loaded (/lib/systemd/system/icinga2.service; enabled; preset: enabled)
    Drop-In: /etc/systemd/system/icinga2.service.d
             ??limits.conf
     Active: active (running) since Mon 2024-01-08 07:35:29 UTC; 4s ago
    Process: 15404 ExecStartPre=/usr/lib/icinga2/prepare-dirs /etc/default/icinga2 (code=exited, status=0/SUCCESS)
   Main PID: 15411 (icinga2)
     Status: "Startup finished."
      Tasks: 14
     Memory: 13.6M
        CPU: 858ms
     CGroup: /system.slice/icinga2.service
             ??15411 /usr/lib/x86_64-linux-gnu/icinga2/sbin/icinga2 --no-stack-rlimit daemon --close-stdio -e /var/log/icinga2/error.log
             ??15433 /usr/lib/x86_64-linux-gnu/icinga2/sbin/icinga2 --no-stack-rlimit daemon --close-stdio -e /var/log/icinga2/error.log
             ??15438 /usr/lib/x86_64-linux-gnu/icinga2/sbin/icinga2 --no-stack-rlimit daemon --close-stdio -e /var/log/icinga2/error.log
Step 6 - Configure Icinga2 API
To manage and configure the Icinga2 monitoring through HTTP, you need to configure the Icinga2 API. Run the following command to enable the Icinga2 API, generate TLS certificates for Icinga2, and update Icinga2 configurations.
$ sudo icinga2 api setup
You will get a similar output.
information/cli: Generating new CA.
information/base: Writing private key to '/var/lib/icinga2/ca//ca.key'.
information/base: Writing X509 certificate to '/var/lib/icinga2/ca//ca.crt'.
information/cli: Generating new CSR in '/var/lib/icinga2/certs//icinga.example.com.csr'.
information/base: Writing private key to '/var/lib/icinga2/certs//icinga.example.com.key'.
information/base: Writing certificate signing request to '/var/lib/icinga2/certs//icinga.example.com.csr'.
information/cli: Signing CSR with CA and writing certificate to '/var/lib/icinga2/certs//icinga.example.com.crt'.
information/pki: Writing certificate to file '/var/lib/icinga2/certs//icinga.example.com.crt'.
information/cli: Copying CA certificate to '/var/lib/icinga2/certs//ca.crt'.
information/cli: Adding new ApiUser 'root' in '/etc/icinga2/conf.d/api-users.conf'.
information/cli: Reading '/etc/icinga2/icinga2.conf'.
information/cli: Enabling the 'api' feature.
Enabling feature api. Make sure to restart Icinga 2 for these changes to take effect.
information/cli: Updating 'NodeName' constant in '/etc/icinga2/constants.conf'.
information/cli: Created backup file '/etc/icinga2/constants.conf.orig'.
information/cli: Updating 'ZoneName' constant in '/etc/icinga2/constants.conf'.
information/cli: Backup file '/etc/icinga2/constants.conf.orig' already exists. Skipping backup.
Done.

Now restart your Icinga 2 daemon to finish the installation!
The above command creates a /etc/icinga2/conf.d/api-users.conf file with the default user root having all the permissions over the Icinga2 API. We need a new user with minimal permissions required by Icinga Web.
Open the api-users.conf file for editing.
$ sudo nano /etc/icinga2/conf.d/api-users.conf
Add the following code at the end of the file. Choose a strong password for the API.
/** api for icingaweb2 */
object ApiUser "icingaweb2" {
  password = "PassWordApiIcingaWeb2"
  permissions = [ "status/query", "actions/*", "objects/modify/*", "objects/query/*" ]
}
Make a note of the credentials which will be needed later on to access the website. The Icinga2 API server listens on port 5665 by default. Restart the service for the changes to take effect.
$ sudo systemctl restart icinga2
The next step is to install the Icinga Web interface. It comes pre-configured for Apache but we will be using the Nginx server. Therefore, first, we need to install Nginx and the SSL certificates.
Step 7 - Install Nginx
Debian 12 ships with an older version of Nginx. To install the latest version, you need to download the official Nginx repository.
Import Nginx's signing key.
$ curl https://nginx.org/keys/nginx_signing.key | gpg --dearmor \
| sudo tee /usr/share/keyrings/nginx-archive-keyring.gpg >/dev/null
Add the repository for Nginx's mainline version.
$ echo "deb [signed-by=/usr/share/keyrings/nginx-archive-keyring.gpg arch=amd64] \
http://nginx.org/packages/mainline/debian `lsb_release -cs` nginx" \
| sudo tee /etc/apt/sources.list.d/nginx.list
Update the system repositories.
$ sudo apt update
Install Nginx.
$ sudo apt install nginx
Verify the installation. On Debian systems, the following command will only work with sudo.
$ sudo nginx -v
nginx version: nginx/1.25.3
Start the Nginx server.
$ sudo systemctl start nginx
Check the service status.
$ sudo systemctl status nginx
? nginx.service - nginx - high performance web server
     Loaded: loaded (/lib/systemd/system/nginx.service; enabled; preset: enabled)
     Active: active (running) since Mon 2024-01-08 07:43:24 UTC; 4s ago
       Docs: https://nginx.org/en/docs/
    Process: 16330 ExecStart=/usr/sbin/nginx -c /etc/nginx/nginx.conf (code=exited, status=0/SUCCESS)
   Main PID: 16331 (nginx)
      Tasks: 3 (limit: 2299)
     Memory: 2.9M
        CPU: 16ms
     CGroup: /system.slice/nginx.service
             ??16331 "nginx: master process /usr/sbin/nginx -c /etc/nginx/nginx.conf"
             ??16332 "nginx: worker process"
             ??16333 "nginx: worker process"

Jan 08 07:43:24 icinga systemd[1]: Starting nginx.service - nginx - high performance web server...
Jan 08 07:43:24 icinga systemd[1]: Started nginx.service - nginx - high performance web server.
Step 8 - Install SSL
We need to install Certbot to generate the SSL certificate. You can install Certbot using Debian's repository or grab the latest version using the Snapd tool. We will be using the Snapd version.
Debian 12 comes doesn't come with Snapd installed. Install Snapd package.
$ sudo apt install snapd
Run the following commands to ensure that your version of Snapd is up to date.
$ sudo snap install core && sudo snap refresh core
Install Certbot.
$ sudo snap install --classic certbot
Use the following command to ensure that the Certbot command can be run by creating a symbolic link to the /usr/bin directory.
$ sudo ln -s /snap/bin/certbot /usr/bin/certbot
Verify if Certbot is functioning correctly.
$ certbot --version
certbot 2.8.0
Run the following command to generate an SSL Certificate.
$ sudo certbot certonly --nginx --agree-tos --no-eff-email --staple-ocsp --preferred-challenges http -m [email protected] -d icinga.example.com
The above command will download a certificate to the /etc/letsencrypt/live/icinga.example.com directory on your server.
Generate a Diffie-Hellman group certificate.
$ sudo openssl dhparam -dsaparam -out /etc/ssl/certs/dhparam.pem 4096
Check the Certbot renewal scheduler service.
$ sudo systemctl list-timers
You will find snap.certbot.renew.service as one of the services scheduled to run.
NEXT                        LEFT          LAST                        PASSED  UNIT                         ACTIVATES
-----------------------------------------------------------------------------------------------------------------------------------------
Mon 2024-01-08 09:47:46 UTC 1h 56min left Sun 2024-01-07 09:47:46 UTC 22h ago systemd-tmpfiles-clean.timer systemd-tmpfiles-clean.service
Mon 2024-01-08 13:35:00 UTC 5h 43min left -                           -       snap.certbot.renew.timer     snap.certbot.renew.service
Tue 2024-01-09 00:00:00 UTC 16h left      Mon 2024-01-08 00:00:01 UTC 7h ago  dpkg-db-backup.timer         dpkg-db-backup.service
Do a dry run of the process to check whether the SSL renewal is working fine.
$ sudo certbot renew --dry-run
If you see no errors, you are all set. Your certificate will renew automatically.
Step 9 - Configure Nginx and PHP
Since Icinga is configured for Apache, the PHP-FPM package is not installed by default. You will also need the PHP Imagick module if you want to export the graphs to PDF. Run the following command to install PHP-FPM and the PHP Imagick library.
$ sudo apt install php-fpm php-imagick
Configure PHP-FPM
Open the file /etc/php/8.2/fpm/pool.d/www.conf.
$ sudo nano /etc/php/8.2/fpm/pool.d/www.conf
We need to set the Unix user/group of PHP processes to nginx. Find the user=www-data and group=www-data lines in the file and change them to nginx.
...
; Unix user/group of processes
; Note: The user is mandatory. If the group is not set, the default user's group
;       will be used.
user = nginx
group = nginx
...
Find the listen.owner = www-data and listen.group = www-data lines in the file and change them to nginx.
; Set permissions for unix socket, if one is used. In Linux, read/write
; permissions must be set in order to allow connections from a web server. Many
; BSD-derived systems allow connections regardless of permissions. The owner
; and group can be specified either by name or by their numeric IDs.
; Default Values: user and group are set as the running user
;                 mode is set to 0660
listen.owner = nginx
listen.group = nginx
Save the file by pressing Ctrl + X and entering Y when prompted.
Restart the PHP-FPM service.
$ sudo systemctl restart php8.2-fpm
Configure Nginx
Create and open the file /etc/nginx/conf.d/icinga.conf for editing.
$ sudo nano /etc/nginx/conf.d/icinga.conf
Paste the following code in it.
server {
    listen       443 ssl http2;
    listen       [::]:443 ssl http2;
    server_name  icinga.example.com;

    access_log  /var/log/nginx/icinga.access.log;
    error_log   /var/log/nginx/icinga.error.log;

    # SSL
    ssl_certificate      /etc/letsencrypt/live/icinga.example.com/fullchain.pem;
    ssl_certificate_key  /etc/letsencrypt/live/icinga.example.com/privkey.pem;
    ssl_trusted_certificate /etc/letsencrypt/live/icinga.example.com/chain.pem;
    ssl_session_timeout  5m;
    ssl_session_cache shared:MozSSL:10m;
    ssl_session_tickets off;
    ssl_protocols TLSv1.2 TLSv1.3;
    ssl_prefer_server_ciphers on;
    ssl_ciphers ECDHE-ECDSA-AES128-GCM-SHA256:ECDHE-RSA-AES128-GCM-SHA256:ECDHE-ECDSA-AES256-GCM-SHA384:ECDHE-RSA-AES256-GCM-SHA384:ECDHE-ECDSA-CHACHA20-POLY1305:ECDHE-RSA-CHACHA20-POLY1305:DHE-RSA-AES128-GCM-SHA256:DHE-RSA-AES256-GCM-SHA384;
    ssl_ecdh_curve X25519:prime256v1:secp384r1:secp521r1;
    ssl_stapling on;
    ssl_stapling_verify on;
    ssl_dhparam /etc/ssl/certs/dhparam.pem;
    resolver 8.8.8.8;

    location ~ ^/index\.php(.*)$ {
        # fastcgi_pass 127.0.0.1:9000;
        fastcgi_pass unix:/run/php/php8.2-fpm.sock; # Depends On The PHP Version
        fastcgi_index index.php;
        # try_files $uri =404;
        # fastcgi_split_path_info ^(.+\.php)(/.+)$;
        include fastcgi_params;
        fastcgi_param SCRIPT_FILENAME /usr/share/icingaweb2/public/index.php;
        fastcgi_param ICINGAWEB_CONFIGDIR /etc/icingaweb2;
        fastcgi_param REMOTE_USER $remote_user;
    }

    location ~ ^/(.*)? {
        alias /usr/share/icingaweb2/public;
        index index.php;
        rewrite ^/$ /dashboard;
        try_files $1 $uri $uri/ /index.php$is_args$args;
    }

    location ~ \.php$ {
        return 404;
    }
}

# enforce HTTPS
server {
    listen       80;
    listen       [::]:80;
    server_name  icinga.example.com;
    return 301   https://$host$request_uri;
}
Notice the root directory to be used in the Nginx configuration is /usr/share/icingaweb2/public.
Save the file by pressing Ctrl + X and entering Y when prompted once finished.
Open the file /etc/nginx/nginx.conf for editing.
$ sudo nano /etc/nginx/nginx.conf
Add the following line before the line include /etc/nginx/conf.d/*.conf;.
server_names_hash_bucket_size 64;
Save the file by pressing Ctrl + X and entering Y when prompted.
Verify the Nginx configuration file syntax.
$ sudo nginx -t
nginx: the configuration file /etc/nginx/nginx.conf syntax is ok
nginx: configuration file /etc/nginx/nginx.conf test is successful
Restart the Nginx service.
$ sudo systemctl restart nginx
Step 10 - Prepare Web Setup
Before accessing Icinga Web, we need to install it along with the command line tool.
$ sudo apt install icingaweb2 icingacli
Add the Nginx user to the icingaweb2 group.
$ sudo usermod -aG icingaweb2 nginx
Set the permissions of the Icingaweb directory to the icingaweb2 group.
$ sudo icingacli setup config directory --group icingaweb2
Successfully created configuration directory /etc/icingaweb2
When using Icinga Web, you are required to authenticate using a token. Generate the token using the following command.
$ sudo icingacli setup token create
The newly generated setup token is: 56951f01f9f77a68
Note down the token because you will need it later. You can always retrieve it later using the following command.
$ sudo icingacli setup token show
The current setup token is: 56951f01f9f77a68
The next step is to create a database and a database user. Log in to the MariaDB shell.
$ sudo mysql
Create the Icinga Web database.
MariaDB [(none)]> CREATE DATABASE icingaweb2;
Create the SQL user account for Icinga Web.
MariaDB [(none)]> CREATE USER 'icingaweb2'@'localhost' IDENTIFIED BY 'Your_password3';
Grant all privileges on the database to the user.
MariaDB [(none)]> GRANT ALL PRIVILEGES ON icingaweb2.* TO 'icingaweb2'@'localhost';
Flush user privileges.
MariaDB [(none)]> FLUSH PRIVILEGES;
Exit the shell.
MariaDB [(none)]> exit
Restart Nginx and PHP-FPM to apply the permission changes.
$ sudo systemctl restart nginx php8.2-fpm
Step 11 - Set up IcingaWeb
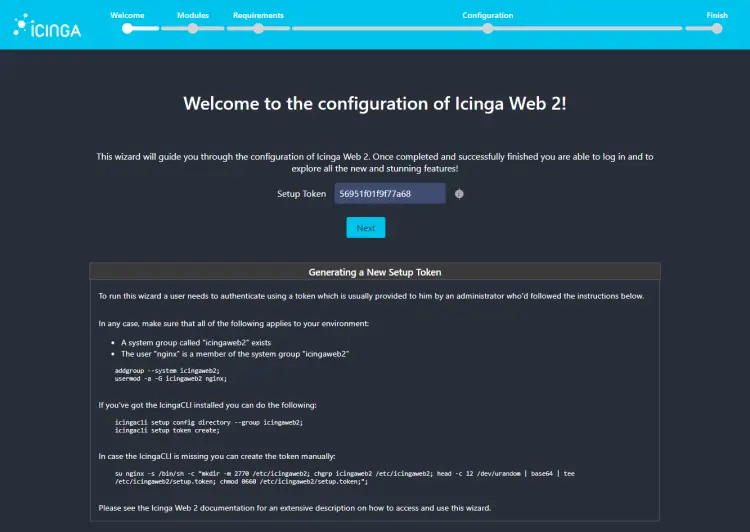
Open the URL https://icinga.example.com/setup in your browser and you will get the following screen.
Enter the token generated in the previous step and press the Next button to proceed.
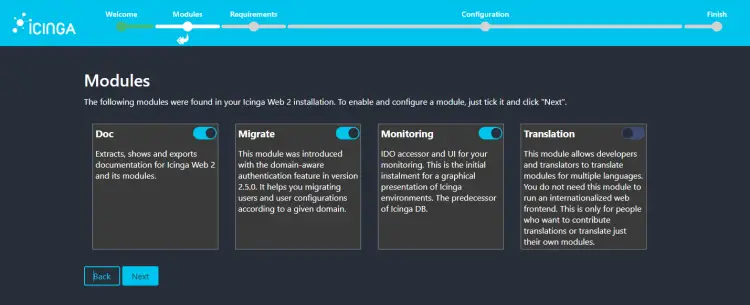
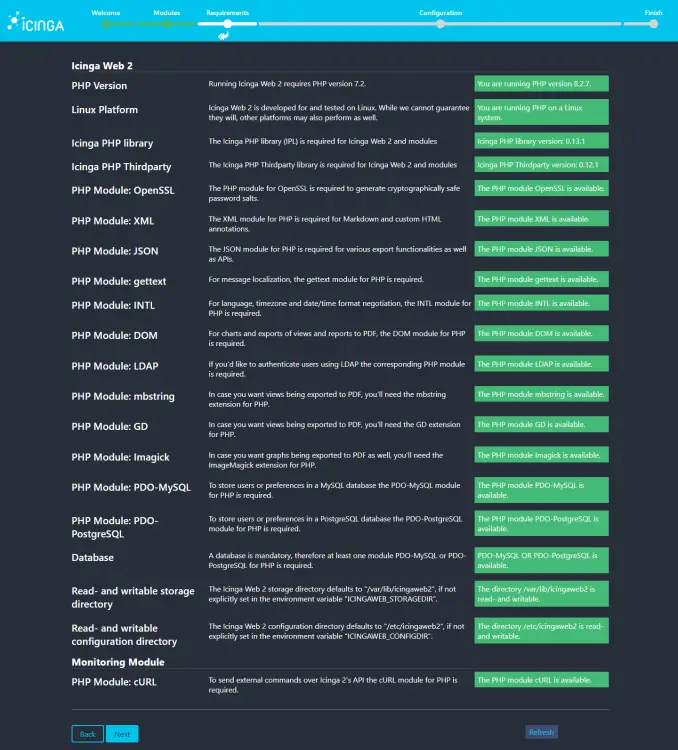
On the next screen, choose the modules you want to install and click Next to proceed. The Monitoring module is selected for you by default. On the next page, you will be shown the requirements and whether they have been fulfilled. Make sure all the requirements are marked green.
Click Next to proceed to the next page to select the authentication type.
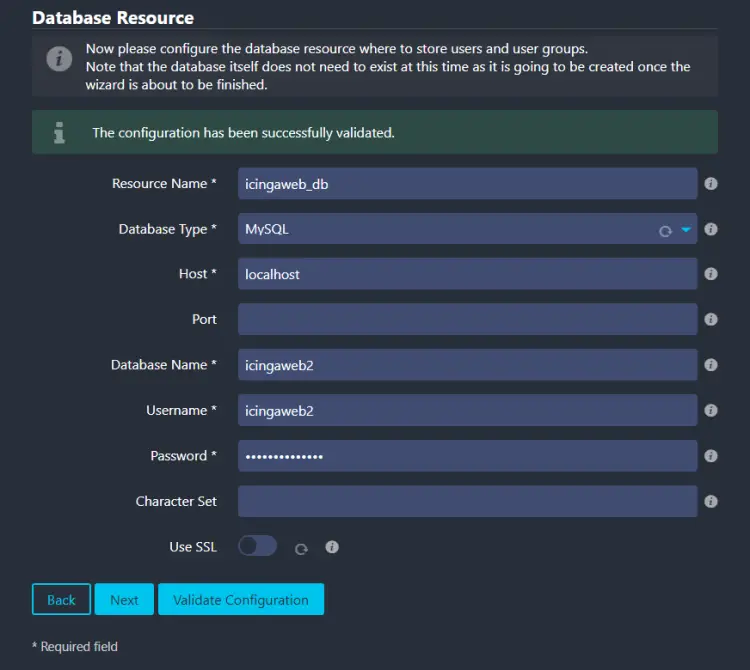
The authentication type is set to Database by default. Click Next to proceed. You will be asked to fill in the database credentials on the next page.
Fill in the database credentials created in step 10. Click the Validate Configuration button to verify the credentials. Once verified, click Next to proceed. Next, you will be asked to name the authentication backend.
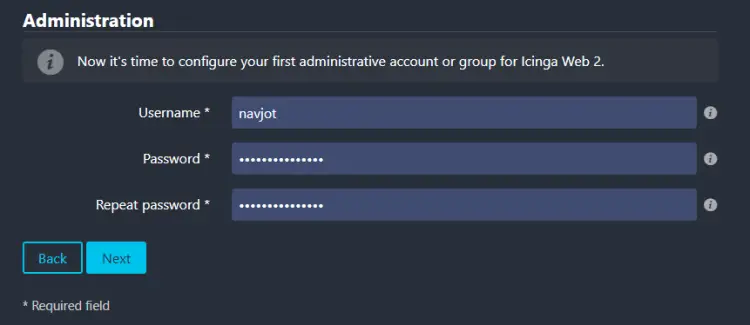
Leave the default value and click Next to proceed. On the next page, you will be asked to create an administrator account.
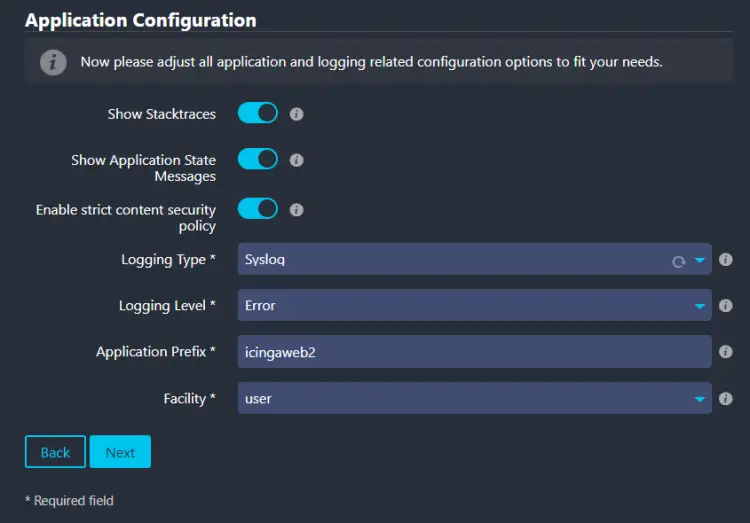
Enter the credentials for your new administrator account and click Next to proceed. Next, you will be shown the Application Configuration page.
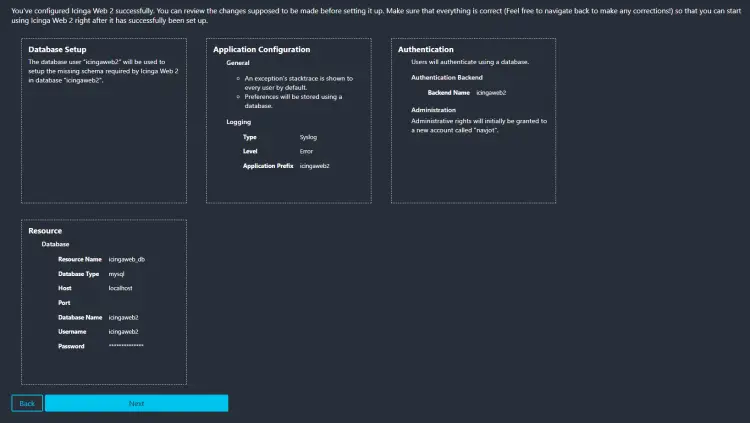
The Enable strict content security policy is unchecked. Check it and leave all the other default values untouched. Click Next to proceed. You will be asked to review the configuration on the last page.
You can go back to change any of the settings. If you are satisfied, click Next to proceed.
Click Next to proceed with the configuration of the monitoring module. Next, you will be asked for Icinga database credentials.
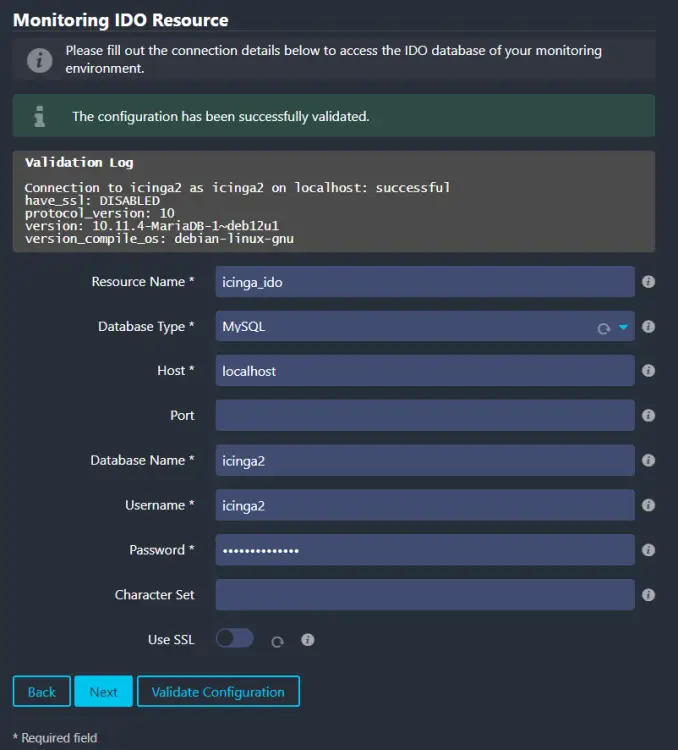
Fill in the database credentials in step 3 and click Validate Configuration to verify the connection. Once verified, click Next to proceed. Next, you will be asked to fill in the API details.
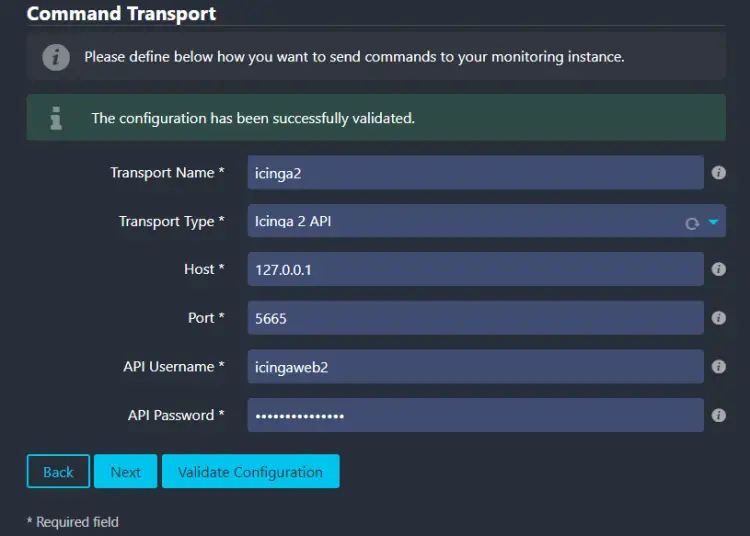
Fill in the API credentials created in step 6, 127.0.0.1 as the Host, and click Validate Configuration to verify the connection. Click Next to proceed. Next, you will be asked to choose protected custom variables for monitoring security.
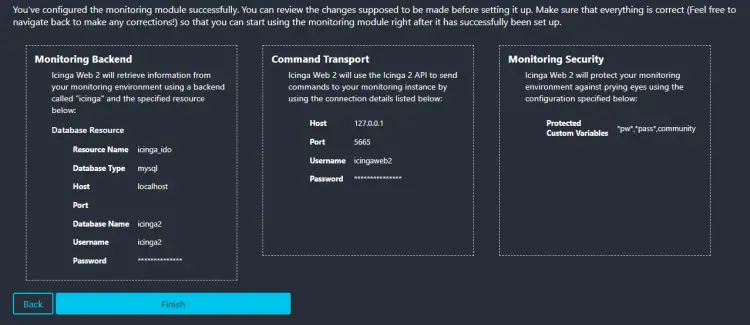
Leave the default values and click Next to proceed. Next, you will be asked to review the Monitoring configuration. You can go back and change it if you want.
If you are satisfied, click Finish to complete the installation.
Once finished successfully, click the Login to Icinga Web 2 button to open the login page (https://icinga.example.com).
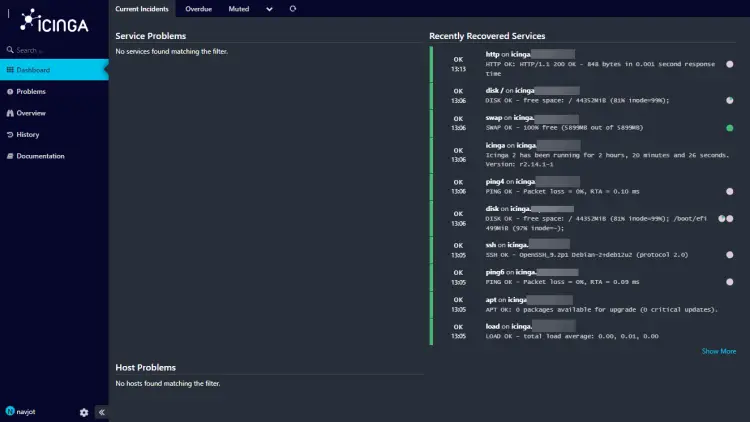
Enter your administrator account details and click the Login button to open the Icinga Web dashboard.
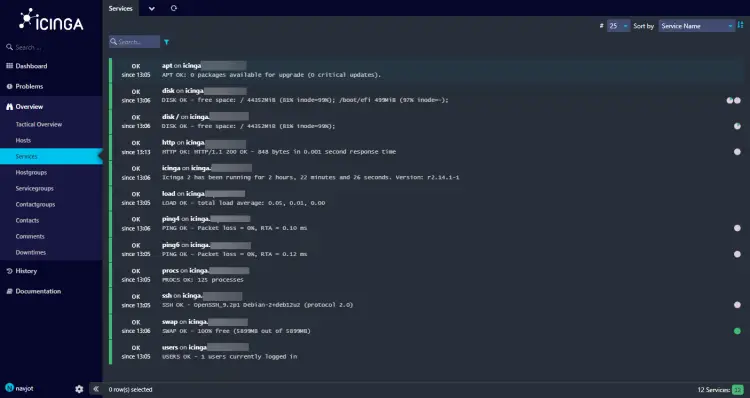
Visit the Overview >> Services page to check the status of the master server similar to the following.
Step 12 - Initialize Master Server
The next step is to initialize the master server as the master node. The master node acts as the main controller for the monitoring stack. Run the following command to start the initialization process.
$ sudo icinga2 node wizard
You will be prompted if it is an agent setup. Enter n to set up the master node.
Welcome to the Icinga 2 Setup Wizard!

We will guide you through all required configuration details.

Please specify if this is an agent/satellite setup ('n' installs a master setup) [Y/n]: n
Next, you will be asked for the common name or the domain name. Press Enter to select the default value that is displayed if it's the correct one. Otherwise, enter the domain and press Enter.
Please specify the common name (CN) [icinga.example.com]:
Reconfiguring Icinga...
Checking for existing certificates for common name 'icinga.example.com'...
Certificate '/var/lib/icinga2/certs//icinga.example.com.crt' for CN 'icinga.example.com' already existing. Skipping certificate generation.
Generating master configuration for Icinga 2.
'api' feature already enabled.
Next, enter the master zone name and press Enter to proceed. In our case, it is the same as the server domain name.
Master zone name [master]: icinga.example.com
Next, you will be asked if you want to add any additional global zones. Press n to skip adding and press Enter to proceed.
Default global zones: global-templates director-global
Do you want to specify additional global zones? [y/N]: n
In the next step, leave the API bind host and port as default and press Enter to proceed.
Please specify the API bind host/port (optional):
Bind Host []:
Bind Port []:
Next, press Y to disable the configuration inside the /etc/icinga2/conf.d/ directory since we will use the Icinga2 Zones configuration later.
Do you want to disable the inclusion of the conf.d directory [Y/n]: Y
Disabling the inclusion of the conf.d directory...
Checking if the api-users.conf file exists...

Done.

Now restart your Icinga 2 daemon to finish the installation!
Restart the service to apply the changes.
$ sudo systemctl restart icinga2
And last but not least, run the following command to create a ticket for the client server. Use the client's domain name as the argument.
$ sudo icinga2 pki ticket --cn 'client.example.com'
c81f2a3b86534f34160ed8b776906e5452d8d09c
Note down the ticket for use later.
Step 13 - Initialize Icinga2 Agent on Client Server
Log in to the client server and install Icinga2 and the monitoring plugins. Run the following commands to do that.
$ wget -O - https://packages.icinga.com/icinga.key | sudo gpg --dearmor -o /usr/share/keyrings/icinga-archive-keyring.gpg
$ echo "deb [signed-by=/usr/share/keyrings/icinga-archive-keyring.gpg] https://packages.icinga.com/debian icinga-`lsb_release -cs` main" | sudo tee /etc/apt/sources.list.d/$(lsb_release -cs)-icinga.list
$ echo "deb-src [signed-by=/usr/share/keyrings/icinga-archive-keyring.gpg] http://packages.icinga.com/debian icinga-`lsb_release -cs` main" | sudo tee -a /etc/apt/sources.list.d/$(lsb_release -cs)-icinga.list
$ sudo apt update
$ sudo apt install icinga2 monitoring-plugins -y
Verify if the Icinga service is enabled and running.
$ sudo systemctl status icinga2
? icinga2.service - Icinga host/service/network monitoring system
     Loaded: loaded (/lib/systemd/system/icinga2.service; enabled; preset: enabled)
    Drop-In: /etc/systemd/system/icinga2.service.d
             ??limits.conf
     Active: active (running) since Mon 2024-01-08 12:52:53 UTC; 35s ago
   Main PID: 19530 (icinga2)
     Status: "Startup finished."
      Tasks: 12
     Memory: 13.4M
        CPU: 216ms
     CGroup: /system.slice/icinga2.service
             ??19530 /usr/lib/x86_64-linux-gnu/icinga2/sbin/icinga2 --no-stack-rlimit daemon --close-stdio -e /var/log/icinga2/error.log
             ??19573 /usr/lib/x86_64-linux-gnu/icinga2/sbin/icinga2 --no-stack-rlimit daemon --close-stdio -e /var/log/icinga2/error.log
             ??19578 /usr/lib/x86_64-linux-gnu/icinga2/sbin/icinga2 --no-stack-rlimit daemon --close-stdio -e /var/log/icinga2/error.log
Start the Icinga Node Wizard to initialize the agent on the client server.
$ sudo icinga2 node wizard
You will be prompted if it is an agent setup. Enter Y to set up the agent.
Welcome to the Icinga 2 Setup Wizard!

We will guide you through all required configuration details.

Please specify if this is an agent/satellite setup ('n' installs a master setup) [Y/n]: Y
Next, you will be asked to specify the common name. Leave the default value and press Enter to proceed.
Starting the Agent/Satellite setup routine...

Please specify the common name (CN) [client.example.com]:
Next, specify the parent endpoint as icinga.example.com and enter Y to establish a connection to the parent node from the client.
Please specify the parent endpoint(s) (master or satellite) where this node should connect to:
Master/Satellite Common Name (CN from your master/satellite node): icinga.example.com

Do you want to establish a connection to the parent node from this node? [Y/n]: Y
Next, enter the IP address of the master server and leave the port value unchanged as default.
Please specify the master/satellite connection information:
Master/Satellite endpoint host (IP address or FQDN): 199.247.31.184
Master/Satellite endpoint port [5665]:
Enter N to reject adding more master endpoints.
Add more master/satellite endpoints? [y/N]: N
Next, you will be shown the certificate information for the master server. Press Y to confirm the information and proceed.
Parent certificate information:

 Version:             3
 Subject:             CN = icinga.example.com
 Issuer:              CN = Icinga CA
 Valid From:          Jan  8 07:36:55 2024 GMT
 Valid Until:         Feb  8 07:36:55 2025 GMT
 Serial:              3a:e5:5e:e6:d5:5e:cc:1d:89:be:18:0b:10:cb:7d:54:8f:82:b1:5e

 Signature Algorithm: sha256WithRSAEncryption
 Subject Alt Names:   icinga.example.com
 Fingerprint:         DB 62 0D 2D AF 73 02 F2 86 92 5E A8 50 CD 0F 4F F2 D6 9E 86 AE F6 F9 E4 D7 F2 F2 60 78 1B 92 E5

Is this information correct? [y/N]: Y
Next, enter the request ticket generated in the previous step.
Please specify the request ticket generated on your Icinga 2 master (optional).
 (Hint: # icinga2 pki ticket --cn 'client.example.com'): c81f2a3b86534f34160ed8b776906e5452d8d09c
Leave the API bind host and port as default and press Enter to continue.
Please specify the API bind host/port (optional):
Bind Host []:
Bind Port []:
Next, enter Y twice to accept configuration and commands from the master node.
Accept config from parent node? [y/N]: Y
Accept commands from parent node? [y/N]: Y
Press Enter to accept the default local zone name which is the client domain name. Enter the master domain name as the parent zone name to proceed.
Reconfiguring Icinga...
Disabling feature notification. Make sure to restart Icinga 2 for these changes to take effect.
Enabling feature api. Make sure to restart Icinga 2 for these changes to take effect.

Local zone name [client.example.com]:
Parent zone name [master]: icinga.example.com
Press N to skip adding additional global zones.
Default global zones: global-templates director-global
Do you want to specify additional global zones? [y/N]: N
Press Y to skip disable the configurations from the /etc/icinga2/conf.d/ directory.
Do you want to disable the inclusion of the conf.d directory [Y/n]: Y
Disabling the inclusion of the conf.d directory...

Done.

Now restart your Icinga 2 daemon to finish the installation!
Restart the Icinga service to apply the configuration changes.
$ sudo systemctl restart icinga2
Step 14 - Create Zones Configuration on the Master Server
Log back into the server and create a new directory as the default zone.
$ sudo mkdir -p /etc/icinga2/zones.d/icinga.example.com/
Next, create a configuration file in the newly created directory and open it for editing.
$ sudo nano /etc/icinga2/zones.d/icinga.example.com/client.example.com.conf
Paste the following code in it. The IP address in the code should match the public IP address of the client.
// Endpoints
object Endpoint "client.example.com" {
}
// Zones
object Zone "client.example.com" {
    endpoints = [ "client.example.com" ]
    parent = "icinga.example.com"
}
// Host Objects
object Host "client.example.com" {
    check_command = "hostalive"
    address = "95.179.138.148"
    vars.client_endpoint = name
}
Save the file by pressing Ctrl + X and entering Y when prompted once finished.
Create and open the services file for editing.
$ sudo nano /etc/icinga2/zones.d/icinga.example.com/services.conf
Paste the following code in it.
// Ping
 apply Service "Ping" {
 check_command = "ping4"
 assign where host.address // check executed on master
 }
 // System Load
 apply Service "System Load" {
 check_command = "load"
 command_endpoint = host.vars.client_endpoint // Check executed on client01
 assign where host.vars.client_endpoint
 }
 // SSH Service
 apply Service "SSH Service" {
 check_command = "ssh"
 command_endpoint = host.vars.client_endpoint
 assign where host.vars.client_endpoint
 }
 // Icinga 2 Service
 apply Service "Icinga2 Service" {
 check_command = "icinga"
 command_endpoint = host.vars.client_endpoint
 assign where host.vars.client_endpoint
 }
Run the following command to verify the configuration.
$ sudo icinga2 daemon -C
You will get a similar output.
[2024-01-08 13:01:26 +0000] information/cli: Icinga application loader (version: r2.14.1-1)
[2024-01-08 13:01:26 +0000] information/cli: Loading configuration file(s).
[2024-01-08 13:01:26 +0000] information/ConfigItem: Committing config item(s).
[2024-01-08 13:01:26 +0000] information/ApiListener: My API identity: icinga.example.com
[2024-01-08 13:01:26 +0000] information/ConfigItem: Instantiated 1 IcingaApplication.
[2024-01-08 13:01:26 +0000] information/ConfigItem: Instantiated 1 Host.
[2024-01-08 13:01:26 +0000] information/ConfigItem: Instantiated 1 FileLogger.
[2024-01-08 13:01:26 +0000] information/ConfigItem: Instantiated 1 IdoMysqlConnection.
[2024-01-08 13:01:26 +0000] information/ConfigItem: Instantiated 4 Zones.
[2024-01-08 13:01:26 +0000] information/ConfigItem: Instantiated 1 CheckerComponent.
[2024-01-08 13:01:26 +0000] information/ConfigItem: Instantiated 2 Endpoints.
[2024-01-08 13:01:26 +0000] information/ConfigItem: Instantiated 2 ApiUsers.
[2024-01-08 13:01:26 +0000] information/ConfigItem: Instantiated 1 ApiListener.
[2024-01-08 13:01:26 +0000] information/ConfigItem: Instantiated 1 NotificationComponent.
[2024-01-08 13:01:26 +0000] information/ConfigItem: Instantiated 246 CheckCommands.
[2024-01-08 13:01:26 +0000] information/ConfigItem: Instantiated 4 Services.
[2024-01-08 13:01:26 +0000] information/ScriptGlobal: Dumping variables to file '/var/cache/icinga2/icinga2.vars'
[2024-01-08 13:01:27 +0000] information/cli: Finished validating the configuration file(s).
Restart the Icinga service to apply the configuration changes.
$ sudo systemctl restart icinga2
Step 15 - Verify on the Icinga Dashboard
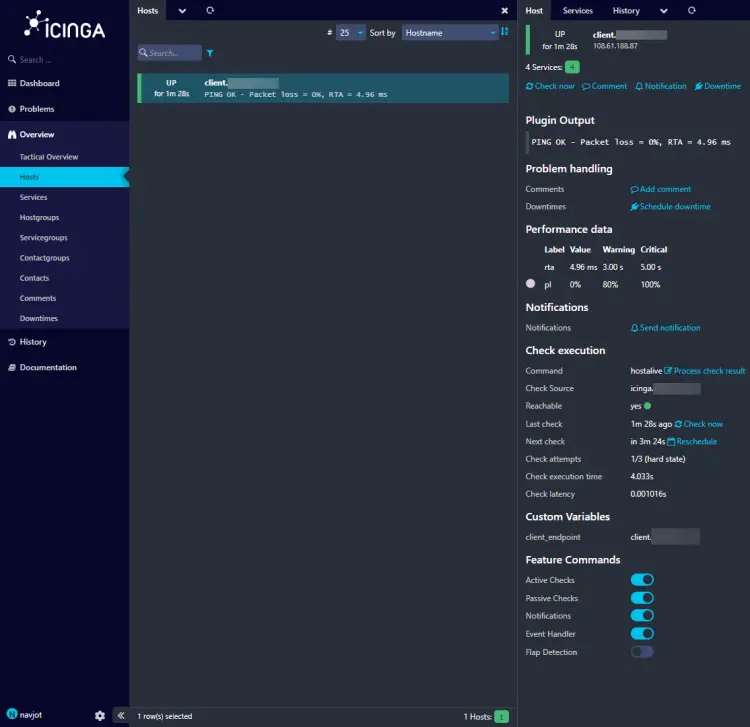
Open the Icinga2 Web Dashboard to verify the client machine information. Select Overview >> Hosts from the left menu, and you will see the following screen.
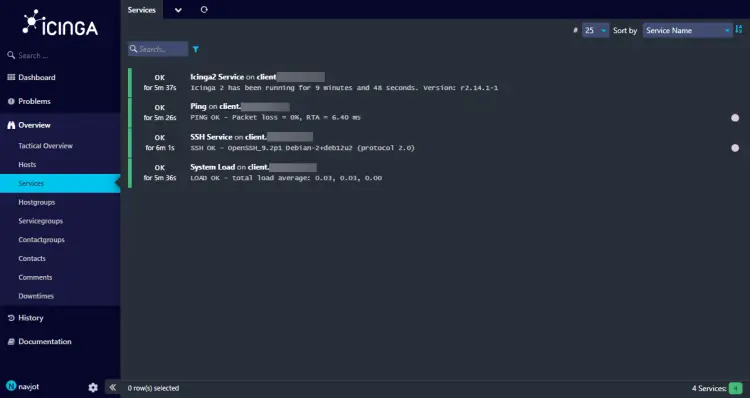
It might take some time for the client status to show as UP. Click the Client to see more details about it. Select Overview >> Services and you will see the following statuses about the client.
This confirms that the client is sending stats correctly to the Icinga master server.
Conclusion
This concludes our tutorial on installing Icinga Monitoring Software on a Debian 12 server and configuring it to monitor a client machine running the same Operating system. If you have any questions, post them in the comments below.


