How to Install, Configure and Use latest PostgreSQL Version on Ubuntu
On this page
- PostgreSQL Installation:
- Using PostgreSQL roles and Authentication Methods
- Connect to PostgreSQL
- Creating roles and database in PostgreSQL
- Creating a PostgreSQL Database
- Login to postgres prompt using the new role
- Creating tables in PostgreSQL
- Adding data into the table
- Delete Column from table
- Alter PostgreSQL table
- Updating Data in a table
Postgres is an open-source relational database. It has many advanced features like enterprise-class performance, triggers, Atomicity, Consistency, Isolation, Durability, and many other features that will make Postgres a good choice for many complex applications.
PostgreSQL Installation:
In this tutorial, we download the latest version of Postgres from official PostgreSQL website https://www.postgresql.org/download/linux/ubuntu/
PostgreSQL is also available in Ubuntu's repository by default. By using PostgreSQL apt repository from its official site we can install a specific version of our choice.
To use the apt repository, follow these steps:
Choose your Ubuntu version
My Ubuntu version is Bionic (18.04)
Create the file PostgreSQL repository.
nano /etc/apt/sources.list.d/pgdg.list and add a line for the repository in pgdg.list
deb http://apt.postgresql.org/pub/repos/apt/ bionic-pgdg main
If you use a different Ubuntu version that 18.04 (Bionic), then replace the word 'bionic' with the name of the used Ubuntu version. Import the repository signing key, and update the package lists
wget --quiet -O - https://www.postgresql.org/media/keys/ACCC4CF8.asc | sudo apt-key add -
sudo apt-get update
Now install Latest PostgreSQL Server in our Ubuntu system using the following commands.
sudo apt-get install postgresql postgresql-contrib
After the Installation PostgreSQL server will start automatically.
Check the status of PostgreSQL service
systemctl status postgresql
Now verify PostgreSQL connection and PostgreSQL server version.
sudo -u postgres psql -c "SELECT version();"
This will connect to PostgreSQL using psql and give server version
 version
-----------------------------------------------------------------------------------------------------------------------------------
 PostgreSQL 11.4 (Ubuntu 11.4-1.pgdg18.04+1) on x86_64-pc-linux-gnu, compiled by gcc (Ubuntu 7.4.0-1ubuntu1~18.04.1) 7.4.0, 64-bit
Using PostgreSQL roles and Authentication Methods
PostgreSQL uses the concept of the role of database access permission. A role can be applied to a database user or a group of database users.
PostgreSQL supports multiple authentication methods.
The following are the most commonly used authentication methods of PostgreSQL.
1.Trust
Trust authentication Methods can be defined in pg_hba.conf, using this method, the role can connect with a database without a password.
2.Password
A role can connect with the database by proving the password.
3.Ident
Ident Authentication Methods works on TCP/IP connections only.
4. Peer
Peer Authentication Methods used for local connection only.
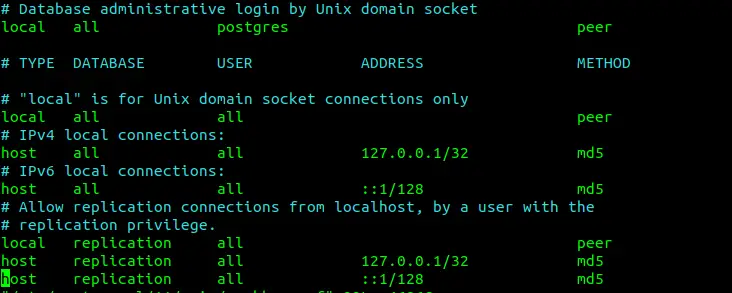
pg_hba.conf file define client authentication methods. we can change authentication methods by editing the following files.
nano /etc/postgresql/11/main/pg_hba.conf
In this file, PostgreSQL uses the peer authentication method by default. we can change authentication methods by changes peer to other methods.
At the time of the PostgreSQL installation, postgres user will be created by default, postgres is the superuser of PostgreSQL database, similarly root user in MYSQL database server. this 'postgres' user also creates in ubuntu.
Connect to PostgreSQL
The following command to connect with PostgreSQL.
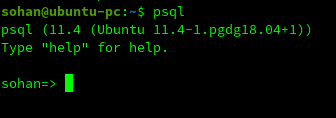
sudo -i -u postgres
Now we can connect to a Postgres prompt like MySQL by typing following command.
psql
We will get the following prompt and we are ready to run PostgreSQL queries on it.
Please note that we can directly connect to the database server by simply typing following command.
sudo -u postgres psql
Creating roles and database in PostgreSQL
We already have the postgres role in the database, now we create a new role using the following commands.
root@ubuntu-pc:/home# sudo -u postgres createuser --interactive

Enter name of role to add: sohan
Shall the new role be a superuser? (y/n) y
We can list existing user roles using the following command.
postgres=# \du
or run the following command from the postgres prompt.
SELECT rolname FROM pg_roles;

We can drop any existing user role using DROP ROLE command.
postgres=# DROP ROLE sohan;
DROP ROLE
Creating a PostgreSQL Database
Here we can log in as the postgres account and run the following command.
postgres@ubuntu-pc:~$ createdb dummu
or we can simply run following commands with normal ubuntu users.
sudo -u postgres createdb dummu
Login to postgres prompt using the new role
run directly from your system terminal to create a new user.
sudo adduser sohan
After creating a new user in the system, simply run
sudo -u sohan psql
or type the following command
sudo -i -u sohan
psql
We can connect to a different database by simply providing database name like
psql -d dummu
After connecting to the above database we can get that database information by a simple command
dummu=> \conninfo
output
You are connected to database "dummu" as user "sohan" via socket in "/var/run/postgresql" at port "5432"UPDATE dummu SET password = 'postgres' where username = 'sohan';
Creating tables in PostgreSQL
After creating roles, database and creating a connection with the database server, now we will create a table.
CREATE TABLE dummu(user_id serial PRIMARY KEY,username VARCHAR (50) UNIQUE NOT NULL, password VARCHAR (50) NOT NULL, email VARCHAR (355) UNIQUE NOT NULL, created_on TIMESTAMP NOT NULL, last_login TIMESTAMP);
Above command will create new table dummy just like MySQL, we can check this new table by typing
\d
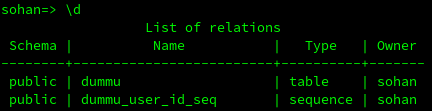
Here, we will see dummu_user_id_seq table also, which will keep track of the next number in the sequence.
If we just want to display table name without the sequence, run following command.
\dt
This will only display dummu table
sohan=> \dt
Output

          List of relations
 Schema |    Na    | Type  | Owner
--------+------------+-------+-------
 public | dummu      | table | soha
Adding data into the table
Now we will add data into dummu table by typing,
Insert into dummu(user_id,username,password,email,created_on,last_login) values (1,'sohan','123456','[email protected]','2019-06-24 11:11:11','2019-06-24 11:11:11');
Now we will fetch data from dummu table,
SELECT * FROM dummu;

Delete Column from table
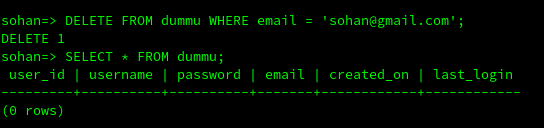
Now let's delete data from this table
DELETE FROM dummu WHERE email = '[email protected]';
Alter PostgreSQL table
Similar way we can modify the table by using alter query as
ALTER TABLE dummu DROP email;
This will remove email field from dummu table.
verify it by
SELECT * FROM dummu;
output:-

user_id | username | password |     created_on      |     last_login
---------+----------+----------+---------------------+---------------------
       1 | sohan    | 123456   | 2019-06-24 11:11:11 | 2019-06-24 11:11:11
Updating Data in a table
Now we will see how to update data into a table
run following command to update password into dummu table
UPDATE dummu SET password = 'postgres' where username = 'sohan';
verify changes by simply typing
SELECT * FROM dummu;
output

user_id | username | password |     created_on      |     last_login
---------+----------+----------+---------------------+---------------------
       1 | sohan    | postgres | 2019-06-24 11:11:11 | 2019-06-24 11:11:11
In short, In this tutorial we learn how to install PostgreSQL, creating role and database and basic database command.

