How to Install Apache Guacamole on Debian 11
Apache Guacamole is a free and open-source remote desktop gateway that allows you to connect to your computer/server remotely using different protocols such as SSH, RDP, and VNC. Apache Guacamole is maintained by Apache Software Foundation, and licensed with Apache License 2.0.
Apache Guacamole is a clientless remote desktop gateway. You can access Apache Guacamole using only a web browser from anywhere at any time. Using Apache Guacamole is recommended if you have multiple remote operating systems with different protocols, such as Windows with RDP, Linux system with VNC and SSH.
In this tutorial, you'll install and configure the Apache Guacamole to a Debian 11 Bullseye. This includes installing some packages dependencies and the Apache Tomcat 9, then building the Guacamole-server and installing the Java application, Guacamole web application. In the end, you'll set up Nginx as a reverse proxy for the Guacamole web application that allows you to access your servers from anywhere, as long as you have a web browser.
Prerequisites
To complete this tutorial, you'll need the following requirements:
- A server with at least 2GB RAM running Debian 11 Bullseye.
- A use or non-root user with root privileges.
- Basic knowledge with nano editor. Or you can use your preferred editor such as vim.
Installing Build Dependencies
At first, you'll install some build dependencies for building the Apache Guacamole server. This includes some basic packages such as 'libvncserver-dev' that enable supports for the VNC protocol, 'libssh2-1' for the SSH protocol, 'freerdp2-dev' for the RDP protocol, and 'libwebsockets-dev' for the Kubernetes support.
For consideration, you'll not install the 'libtelnet-dev' for the Telnet supports. This is because telnet is considered an old protocol and not secure.
1. Now, update your package list by running the apt command below.
sudo apt update
2. After that, install dependencies for building the Apache Guacamole server by running the following command.
sudo apt install -y freerdp2-dev libavcodec-dev libavformat-dev libavutil-dev libswscale-dev libcairo2-dev libjpeg62-turbo-dev libjpeg-dev libpng-dev libtool-bin libpango1.0-dev libpango1.0-0 libssh2-1 libwebsockets16 libwebsocketpp-dev libossp-uuid-dev libssl-dev libwebp-dev libvorbis-dev libpulse-dev libwebsockets-dev libvncserver-dev libssh2-1-dev openssl
This command may take some time to finish, depending on your server internet's connection.
Installing Apache Tomcat 9
After installing build dependencies, you'll install the Apache Tomcat 9. This package is required for the Guacamole web application, which is a web application written in Java.
1. Run the following command to install the Apache Tomcat 9 to your system.
sudo apt install -y tomcat9 tomcat9-admin tomcat9-common tomcat9-user
2. After the Apache Tomcat 9 is installed, start and enable the Apache Tomcat service by running the command below. On the Debian-based systems, Apache Tomcat 9 comes with the service called 'tomcat9'.
sudo systemctl enable --now tomcat9
3. Now, if everything looks okay, verify the status of the 'tomcat9' service by running the command below.
sudo systemctl status tomcat9
You'll receive the following output. Make sure the 'tomcat9' service is 'active (running)'.
Compiling Guacamole-server
In this section, you'll download and compile the Guacamole-server. This is the main component of Apache Guacamole, which contains libraries for connecting to remote servers and desktops. The Guacamole-server contains the C library 'libguacd' and all libraries for supported protocols, as well the heart of Guacamole, guacd.
The guacd handles all client connections that are tunneled from the guacamole web application, then connects to remote servers and desktops on their behalf. By building and compiling Guacamole-server, you'll have a new service 'guacd' on your system.
1. Start by navigating the working directory to '/usr/src'. All source code for building and compiling stuff goes to this directory.
cd /usr/src
2. Now, you'll download the Guacamole-server source code by running the wget command below. Be sure to check the Guacamole Download page and copy the latest version of Guacamole-server. At the time of this writing, the latest version is 1.3.0.
wget https://dlcdn.apache.org/guacamole/1.3.0/source/guacamole-server-1.3.0.tar.gz
3. Then, extract the source code and you'll get a new directory 'guacamole-server-VERSION-NUMBER'. Navigate into that directory.
tar -xzvf guacamole-server-1.3.0.tar.gz
cd guacamole-server-*/
4. Now, verify all system requirements for building the Guacamole-server and set up your environment by running the following command. The option '--with-systemd-dir=/etc/systemd/system/' is used to set up systemd service file, which will be available at the directory '/etc/systemd/system/'.
./configure --with-systemd-dir=/etc/systemd/system/
You'll receive output similar to this:
------------------------------------------------
guacamole-server version 1.3.0
------------------------------------------------

   Library status:

     freerdp2 ............ yes
     pango ............... yes
     libavcodec .......... yes
     libavformat.......... yes
     libavutil ........... yes
     libssh2 ............. yes
     libssl .............. yes
     libswscale .......... yes
     libtelnet ........... no
     libVNCServer ........ yes
     libvorbis ........... yes
     libpulse ............ yes
     libwebsockets ....... yes
     libwebp ............. yes
     wsock32 ............. no

   Protocol support:

      Kubernetes .... yes
      RDP ........... yes
      SSH ........... yes
      Telnet ........ no
      VNC ........... yes

   Services / tools:

      guacd ...... yes
      guacenc .... yes
      guaclog .... yes

   FreeRDP plugins: /usr/lib/x86_64-linux-gnu/freerdp2
   Init scripts: no
   Systemd units: /etc/systemd/system/

Type "make" to compile guacamole-server.
Take a look at the 'Libraries status' and 'Protocol support' sections. You can adjust protocol supports by installing additional dependencies and libraries.
5. Next, compile and install the Guacamole-server by running the command below.
make
make install
The compilation and installation process may take some time to complete.
6. Now, after everything is completed, run the following command to apply all new system libraries.
sudo ldconfig
In this section, you have installed the Guacamole-server package. Next, you'll create some necessary configurations for the Guacamole-server.
Setting Up Guacamole-Server
To make Guacamole-server work, you'll create configuration directory '/etc/guacamole/', then create new file 'guacamole.properties' as the default Guacamole-server configuration, file 'logback.xml' for Guacamole logging system, and file 'user-mapping.xml' for defining Guacamole users authentication and connections to remote servers and desktops.
1. To start, run the following command to create a new directory '/etc/guacamole/' within additional directories 'extensions' and 'lib' inside. Then add the environment variable 'GUACAMOLE_HOME=/etc/guacamole' to the file '/etc/default/tomcat9'. This will tell the Tomcat 9 servlet container to look up the 'GUACAMOLE_HOME' directory to the '/etc/guacamole/'.
mkdir -p /etc/guacamole/{extensions,lib}
echo 'GUACAMOLE_HOME=/etc/guacamole' >> /etc/default/tomcat9
2. Now, create the main configuration 'guacamole.properties' using nano or your preferred editor.
sudo nano /etc/guacamole/guacamole.properties
Enter the following configuration:
# Hostname and port of guacamole proxy
guacd-hostname: localhost
guacd-port:     4822

# user mapping and user connections
user-mapping:    /etc/guacamole/user-mapping.xml
- The option 'guacd-hostname' defines the hostname or IP address which the guacd service will be running at. This tutorial uses the localhost to run the guacd service.
- The option 'guacd-port' defines the default port for guacd service. This tutorial uses the port '4822' for guacd service.
- The option 'user-mapping' defines the file configuration for users' authentication and a list of available connections. This tutorial uses the file '/etc/guacamole/user-mapping.xml' to define users and connections for the Guacamole-server. You may be interested to use another authentication method, check the Guacamole Documentation.
Save and close the file.
3. Next, create a new configuration 'loogback.xml' for logging and debugging. By default, the Guacamole will log to the console only. Using this configuration allows Guacamole to log via the Logback logging framework.
sudo nano /etc/guacamole/logback.xml
Add the following configuration lines.
<configuration>

    <!-- Appender for debugging -->
    <appender name="GUAC-DEBUG" class="ch.qos.logback.core.ConsoleAppender">
        <encoder>
            <pattern>%d{HH:mm:ss.SSS} [%thread] %-5level %logger{36} - %msg%n</pattern>
        </encoder>
    </appender>

    <!-- Log at DEBUG level -->
    <root level="debug">
        <appender-ref ref="GUAC-DEBUG"/>
    </root>

</configuration>
Save and close the configuration file.
4. Now, you'll generate a new md5 password hash and create a new file for Guacamole user authentication and connections.
Run the following command to generate the md5 password hash. And make sure to change the password with your strong password.
echo -n StrongPasswordUserJohnDoe | openssl md5
You'll receive an output of the mod5 hashed password. Copy it to your note.
(stdin)= aca22211ffcfb8aa8ad7627195ad4fce
5. After that, create a new file 'user-mapping.xml' using nano editor.
sudo nano /etc/guacamole/user-mapping.xml
Input these following configurations. And make sure to change the 'username' and 'password'. Also, take a look at the '<connection>...</connection>' section and add your connection details to servers or desktops.
<user-mapping>

    <!-- Another user, but using md5 to hash the password
         (example below uses the md5 hash of "PASSWORD") -->
    <authorize
            username="johndoe"
            password="aca22211ffcfb8aa8ad7627195ad4fce"
            encoding="md5">

        <!-- First authorized connection -->
        <connection name="SSH localhost">
            <protocol>ssh</protocol>
            <param name="hostname">localhost</param>
            <param name="port">22</param>
            <param name="username">johndoe</param>
            <param name="password">SSHPASSWORD</param>
        </connection>

        <!-- Second authorized connection -->
        <connection name="localhost">
            <protocol>vnc</protocol>
            <param name="hostname">localhost</param>
            <param name="port">5901</param>
            <param name="password">VNCPASS</param>
        </connection>

        <!-- Third authorized connection -->
        <connection name="otherhost">
            <protocol>vnc</protocol>
            <param name="hostname">otherhost</param>
            <param name="port">5900</param>
            <param name="password">VNCPASS</param>
        </connection>

    </authorize>

</user-mapping>
Save and close the file.
Now you've completed the configuration of Guacamole-server. Next, you'll install and configure the Guacamole web application, which is the web application you'll see on your browser.
Installing Guacamole Client Web Application
In this section, you'll install the Guacamole web application to your system. This can be done by downloading the compiled binary file of the Guacamole web application and deploying it to the Tomcat 'webaps' directory.
1. Navigate your working directory to '/usr/src' and download the compiled Guacamole web application '.war' using the wget command. Ensure to visit the Guacamole download page and copy the link for the latest version Guacamole web application.
cd /usr/src
wget https://dlcdn.apache.org/guacamole/1.3.0/binary/guacamole-1.3.0.war
2. Now, deploy the Java binary application 'guacamole-VERSION.war' to the Tomcat directory '/var/lib/tomcat9/webapps/' by running the following command. This makes the Guacamole web application accessible through the Apache Tomcat servlet container.
sudo cp guacamole-1.3.0.war /var/lib/tomcat9/webapps/guacamole.war
3. After that, restart the Tomcat 9 service to apply a new web application.
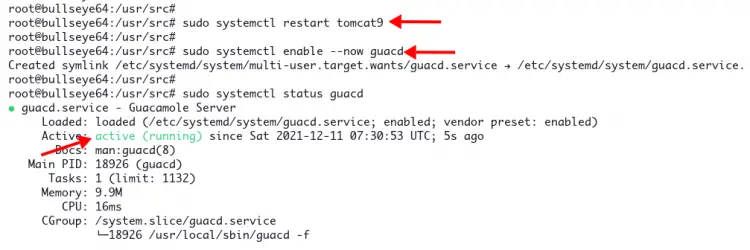
sudo systemctl restart tomcat9
4. Next, start and enable the 'guacd' service by running the command below.
sudo systemctl enable --now guacd
Then verify it using the following command.
sudo systemctl status guacd
You'll receive the output like the screenshot below.
At this point, you've completed the installation of the Guacamole-server application (backend) and the Guacamole web application (front-end). Next, you'll set up Nginx as a reverse proxy for the Guacamole web application.
Setup Nginx Reverse proxy for Guacamole
In this section, you'll install the Nginx web server and configure it as a reverse proxy for the Guacamole web application. This allows you to set up the domain name for your Guacamole web application and secure it with SSL certificates.
1. To get started, run the following 'apt' command to install Nginx packages.
sudo apt install nginx -y
2. After all Nginx packages are installed, create a new virtual host file 'guacamole' on the directory '/etc/nginx/sites-available'. All configurations related to the Guacamole reverse proxy will be stored in this file.
sudo nano /etc/nginx/sites-available/guacamole
Input this following configuration. And make sure to change the domain name and path of SSL certificates. This example uses the domain 'example.io' with the SSL private key 'privkey.pem' and the public key 'fullchain.pem', and bot certificates available at the directory '/etc/letsencrypt/live/exmaple.io/'.
server {
    listen      80;
    server_name example.io;
    rewrite     ^   https://$server_name$request_uri? permanent;
}

server {
    listen      443 ssl http2;
    server_name example.io;

    root /var/www/html;
    index index.html;

    location / {
       try_files $uri $uri/ =404;
    }

    ssl_certificate /etc/letsencrypt/live/example.io/fullchain.pem;
    ssl_certificate_key /etc/letsencrypt/live/example.io/privkey.pem;

    access_log /var/log/nginx/guacamole-access.log;
    error_log /var/log/nginx/guacamole-error.log;

    location /guacamole/ {
        proxy_pass http://127.0.0.1:8080/guacamole/;
        proxy_buffering off;
        proxy_http_version 1.1;
        proxy_set_header X-Forwarded-For $proxy_add_x_forwarded_for;
        proxy_set_header Upgrade $http_upgrade;
        proxy_set_header Connection $http_connection;
        access_log off;
    }
}
Save and close the file.
3. Now, activate the virtual host file 'guacamole' by creating a new symbolic link to the directory '/etc/nginx/sites-enabled/'. Then verify all Nginx configurations to check if there are any syntax errors.
sudo ln -s /etc/nginx/sites-available/guacamole /etc/nginx/sites-enabled/
sudo nginx -t
You'll receive an output 'Syntax OK', which means the configuration has no error.
4. Next, restart the Nginx service to apply a new configuration, then verify its status by running the following command.
sudo systemctl restart nginx
sudo systemtl status nginx
You'll receive the output similar to the screenshot below. The Nginx service is 'active (running)'.
5. Additionally, if you want to deploy Guacamole web-application in different sub-URL, change the option 'location /guacamole/ { ... }' to new path 'location /new-path/ { ... }' and add the option 'proxy_cookie_path' to your new path as below.
location /new-path/ {
    proxy_pass http://127.0.0.1:8080/guacamole/;
    proxy_buffering off;
    proxy_http_version 1.1;
    proxy_set_header X-Forwarded-For $proxy_add_x_forwarded_for;
    proxy_set_header Upgrade $http_upgrade;
    proxy_set_header Connection $http_connection;
    proxy_cookie_path /guacamole/ /new-path/;
    access_log off;
}
In this section, you've completed the Nginx installation and configuration as a reverse proxy for the Guacamole web application. At this point, your Apache Guacamole installation is completed, and it's accessible from your domain name.
Verify Apache Guacamole Installation
In this section, you'll verify the Apache Guacamole installation.
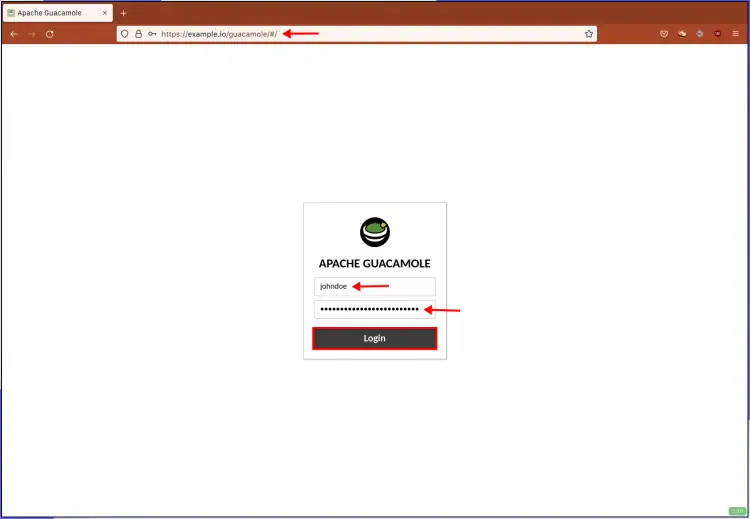
First off, open up your web browser and type the domain name for your Guacamole installation with the default path '/guacamole'.
Now, you'll see the Guacamole login page below. Input your username and password that you've configured in file 'user-mapping.xml', then click the Login button.
After logging in, you'll see a list of defined connections for your users.
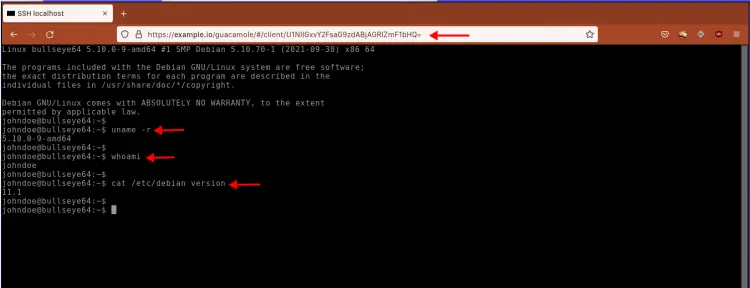
Click on the connection name to connect to the target server. This example will connect to the local server with SSH protocol.
Now, you will see a new ssh terminal session on your server.
Conclusion
Congratulation! In this tutorial, you've learned how to install Apache Guacamole on the Debian 11 Bullseye. Also, you've learned how to set up user authentication and connections using the configuration file 'user-mapping.xml' and set up Nginx as a reverse proxy for the Guacamole web application, which enables you to run Guacamaloe using the domain name and secure it using SSL certificates.


