How to Install and Configure OpenLiteSpeed Server on Fedora 31 along with MariaDB
On this page
OpenLiteSpeed is a lightweight and open-source version of the LiteSpeed Server developed by LiteSpeed Technologies. It supports Apache Rewrite rules, HTTP/2 and HTTP/3 along with TLS v1.3 and QUIC protocols. It comes with a WebGUI based Administration panel which makes it different from other servers and easier to manage.
In this tutorial, we will learn how to install OpenLiteSpeed Server on Fedora 31 along with PHP 7.4 and MariaDB server.
Prerequisites
-
Fedora 31 based web server.
-
A non-root user account with sudo privileges.
-
Update your system.
$ sudo dnf update -
libnsl package. This package contains the public client interface for NIS services. To install it, issue the following command.
$ sudo dnf install libnsl -y
Step 1 - Configure Firewall
Before we begin with the tutorial, we need to configure the Fedora Firewall which is usually enabled by default. Let's check the status of the firewall first.
$ sudo systemctl status firewalld
If it is not working, then start the firewall.
$ sudo systemctl start firewalld
Next, we need to enable SSH, HTTP, HTTPS and ports 7080, 8088 for the firewall.
$ sudo firewall-cmd --permanent --add-service=ssh
$ sudo firewall-cmd --permanent --add-service=http
$ sudo firewall-cmd --permanent --add-service=https
$ sudo firewall-cmd --permanent --add-port=7080/tcp
$ sudo firewall-cmd --permanent --add-port=8088/tcp
When you are finished, you can see the list of exemptions that will be implemented.
$ sudo firewall-cmd --permanent --list-all
When you are satisfied with the changes, reload the Firewall to make the changes live.
$ sudo firewall-cmd --reload
Enable the firewall so that it will be reloaded on every bootup.
$ sudo systemctl enable firewalld
Step 2 - Install OpenLiteSpeed
Run the following command to download the OpenLiteSpeed binary package from the website. As of writing this tutorial, the latest version available was 1.6.4. Check the latest version from the downloads page and change the URL as required.
$ wget https://openlitespeed.org/packages/openlitespeed-1.6.4.tgz
Extract the archive.
$ tar -zxvf openlitespeed-1.6.4.tgz
Switch to the openlitespeed directory and run the installation script.
$ cd openlitespeed
$ sudo ./install.sh
Start the webserver.
$ sudo /usr/local/lsws/bin/lswsctrl start
Check the status of the server.
$ sudo /usr/local/lsws/bin/lswsctrl status
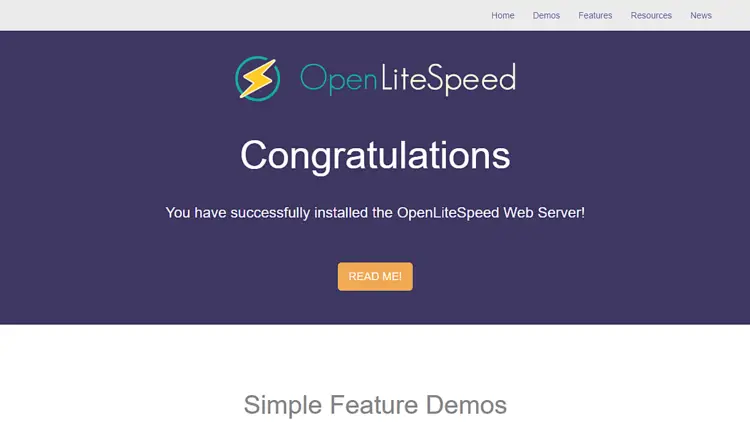
Open http://<YOURSERVERIP>:8088 to access your web server. You should see the following page.
Step 3 - Install PHP
OpenLiteSpeed server ships with PHP 5.6 which is pre-enabled. But we want to use PHP 7.4 so we will install our copy.
Install the REMI repository which is the official Fedora repository for installing PHP packages.
$ sudo dnf -y install https://rpms.remirepo.net/fedora/remi-release-31.rpm
Enable the remi and remi-php74 repositories and disable the remi-modular repository. This enables the repository required to install PHP 7.4 packages.
$ sudo dnf config-manager --set-enabled remi
$ sudo dnf config-manager --set-enabled remi-php74
$ sudo dnf config-manager --set-disabled remi-modular
Install PHP 7.4 along with some additional packages.
$ sudo dnf install php php-mysqlnd php-gd php-mcrypt php-bcmath php-litespeed
Verify your PHP installation.
$ php -v
PHP 7.4.0 (cli) (built: Nov 26 2019 20:13:36) ( NTS )
Copyright (c) The PHP Group
Zend Engine v3.4.0, Copyright (c) Zend Technologies
   with Zend OPcache v7.4.0, Copyright (c), by Zend Technologies
You can check for the enabled PHP modules.
$ php --modules
We will configure PHP to work with OpenLiteSpeed later.
Step 4 - Install MariaDB
Install MariaDB server.
$ sudo dnf install mariadb-server
Start and enable the MariaDB service.
$ sudo systemctl start mariadb
$ sudo systemctl enable mariadb
Secure your MariaDB installation. This script will set your root password, remove anonymous users, disallow remote root login and drop test tables. Choose a strong password and answer the questions as described below.
$ sudo mysql_secure_installation
[sudo] password for username:

NOTE: RUNNING ALL PARTS OF THIS SCRIPT IS RECOMMENDED FOR ALL MariaDB
SERVERS IN PRODUCTION USE!  PLEASE READ EACH STEP CAREFULLY!

In order to log into MariaDB to secure it, we'll need the current
password for the root user.  If you've just installed MariaDB, and
you haven't set the root password yet, the password will be blank,
so you should just press enter here.

Enter current password for root (enter for none):
OK, successfully used password, moving on...

Setting the root password ensures that nobody can log into the MariaDB
root user without the proper authorisation.

Set root password? [Y/n] y
New password:
Re-enter new password:
Password updated successfully!
Reloading privilege tables..
 ... Success!

By default, a MariaDB installation has an anonymous user, allowing anyone
to log into MariaDB without having to have a user account created for
them.  This is intended only for testing, and to make the installation
go a bit smoother.  You should remove them before moving into a
production environment.

Remove anonymous users? [Y/n] y
 ... Success!

Normally, root should only be allowed to connect from 'localhost'.  This
ensures that someone cannot guess at the root password from the network.

Disallow root login remotely? [Y/n] y
 ... Success!

By default, MariaDB comes with a database named 'test' that anyone can
access.  This is also intended only for testing, and should be removed
before moving into a production environment.

Remove test database and access to it? [Y/n] y
 - Dropping test database...
 ... Success!
 - Removing privileges on test database...
 ... Success!

Reloading the privilege tables will ensure that all changes made so far
will take effect immediately.

Reload privilege tables now? [Y/n] y
 ... Success!

Cleaning up...

All done!  If you've completed all of the above steps, your MariaDB
installation should now be secure.

Thanks for using MariaDB!
Once this is done, you can log in to the MySQL shell using the following command.
$ sudo mysql -u root -p
Create a test database and user with access permission. Replace testdb and testuser with appropriate names for your setup. Replace password with a strong password.
CREATE DATABASE testdb;
CREATE USER 'testuser' IDENTIFIED BY 'password';
GRANT ALL PRIVILEGES ON testdb.* TO 'testuser';
FLUSH PRIVILEGES;
Exit the MySQL shell.
exit
Step 5 - Configure OpenLiteSpeed
Configure Admin Panel
Set the Administrator panel credentials.
$ sudo /usr/local/lsws/admin/misc/admpass.sh
You can set both the username and password using this command. You can also use this command in case you forget your login details.
To access the administration panel, open http://<YOURSERVERIP>:7080.
Switch HTTP port back to 80
Let us change the default HTTP port to 80. Log in to your administration panel at http://<YOURSERVERIP>:7080 with the credentials you just created.
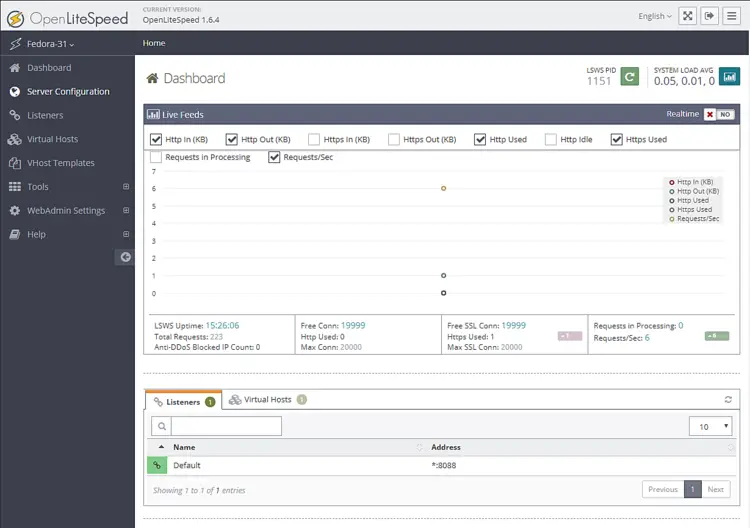
You will be greeted by the following screen.
Visit Listeners section from the left. You will see the default listeners with port 8080.
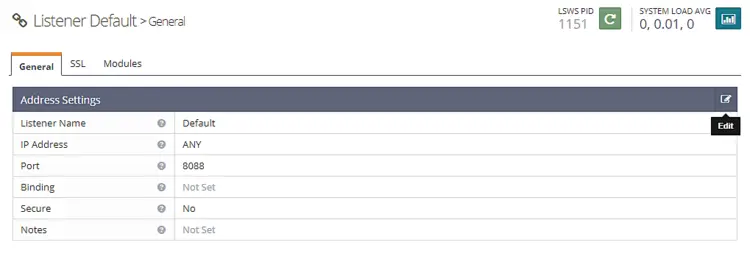
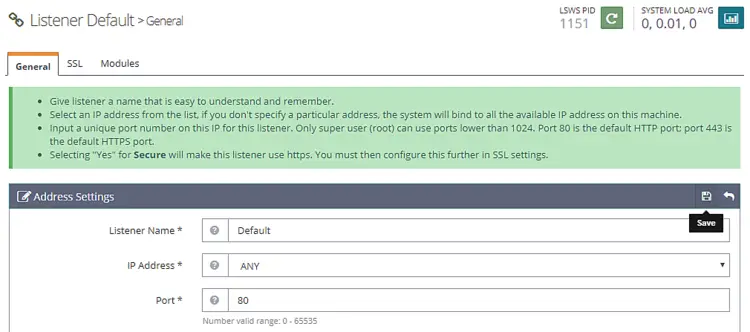
Click the View button to see the details configuration. On the next page under Listener Default > General Page, click on the Edit icon and change the port from 8088 to 80.
Click Save and then restart the server by clicking on the Graceful restart button.
Step 6 - Configure PHP
In this step, we need to associate our copy of PHP 7.4 with the server.
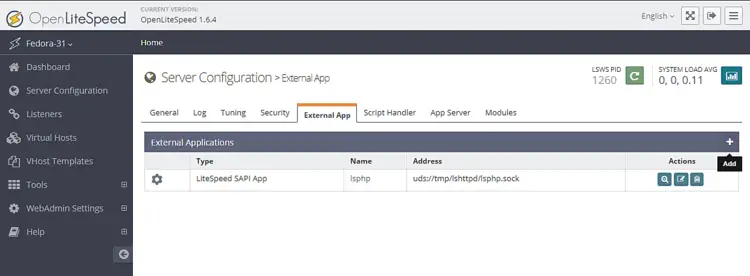
Click on the Server Configuration section on the left and then on the tab External App. You will see an existing LiteSpeed App for PHP 5.6. We will create our own LiteSpeed App for PHP 7.4. You can easily switch between them later on if you want.
Click on the Add button to create a new app. For the type, select LiteSpeed SAPI App and click on Next.
Next, add the configuration below. Leave all the other fields blank.
Name: lsphp74
Address: uds://tmp/lshttpd/lsphp.sock
Max Connections: 35
Environment: PHP_LSAPI_MAX_REQUESTS=500
             PHP_LSAPI_CHILDREN=35
			LSAPI_AVOID_FORK=200M
Initial Request Timeout (secs): 60
Retry Timeout : 0
Persistent Connection: Yes
Response Buffering: no
Start By Server: Yes(Through CGI Daemon)
Command: /usr/bin/lsphp
Back Log: 100
Instances: 1
Priority: 0
Memory Soft Limit (bytes): 2047M
Memory Hard Limit (bytes): 2047M
Process Soft Limit: 1400
Process Hard Limit: 1500
Click Save when finished.
Now that we have created our own PHP 7.4 based app, we need to tell the server to start using it.
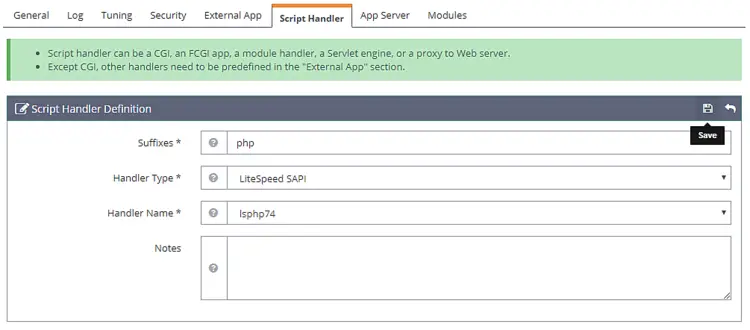
Go to the Script Handler tab and edit the lsphp handler. Switch the Handle name to lsphp74 from the drop-down menu.
Click Save and then restart the server by clicking on the Graceful restart button.
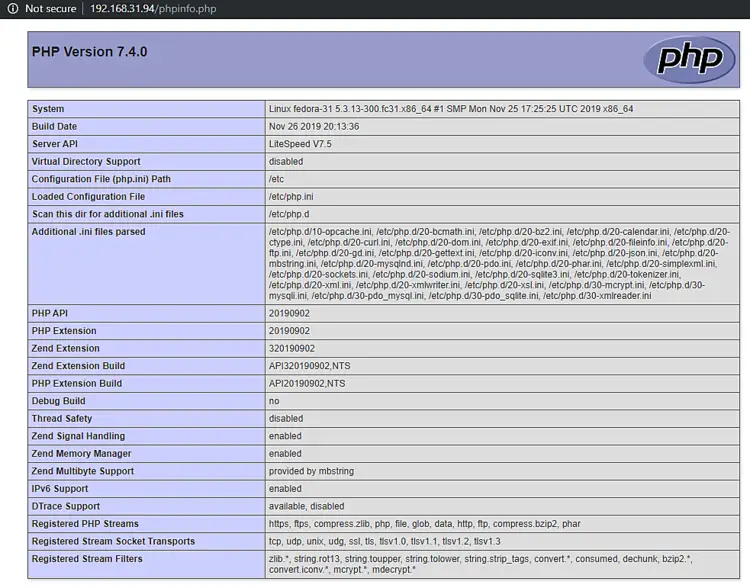
To test whether your PHP has been switched correctly, visit http://<YOURSERVERIP>/phpinfo.php in your browser.
Step 7 - Setup Virtual Host
First, we need to create directories for our virtual host.
$ sudo mkdir /usr/local/lsws/example.com/{html,logs} -p
The html directory will hold the public files and the logs directory will contain server logs.
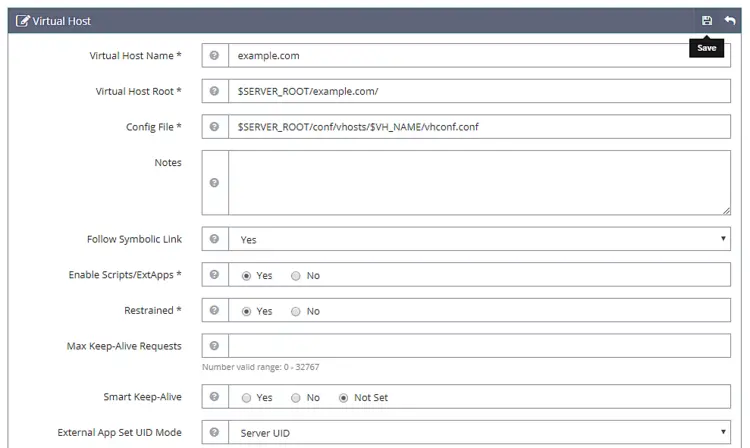
Next, open the Admin console and access the Virtual Hosts section from the left and click the Add button.
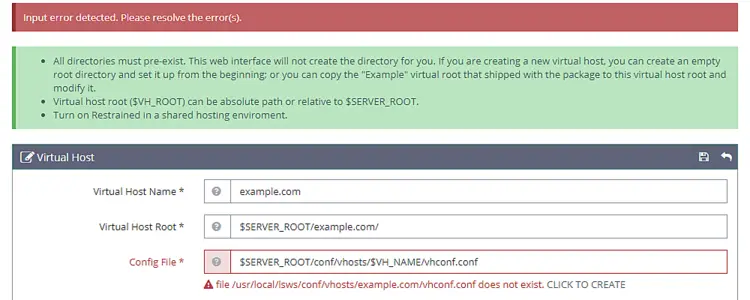
Fill in the values as specified
Virtual Host Name: example.com
Virtual Host Root: $SERVER_ROOT/example.com/
Config File: $SERVER_ROOT/conf/vhosts/$VH_NAME/vhconf.conf
Follow Symbolic Link: Yes
Enable Scripts/ExtApps: Yes
Restrained: Yes
External App Set UID Mode: Server UID
Click on the Save button when finished. You will get the following error because the configuration file doesn't exist as of now. Click on the link to create the configuration file.
Click the Save button again to finish creating the Virtual Host.
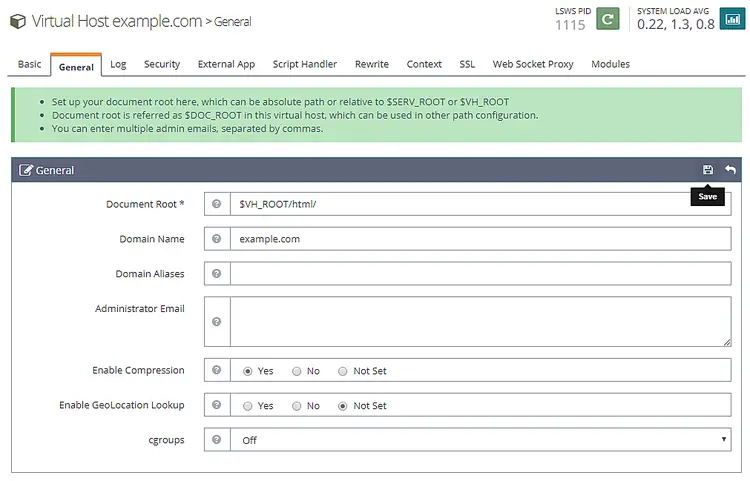
Once the virtual host is created, go to Virtual Hosts -> Choose Virtual Host(example.com) -> General and modify the configuration as given.
Document Root: $VH_ROOT/html/
Domain Name: example.com
Enable Compression: Yes
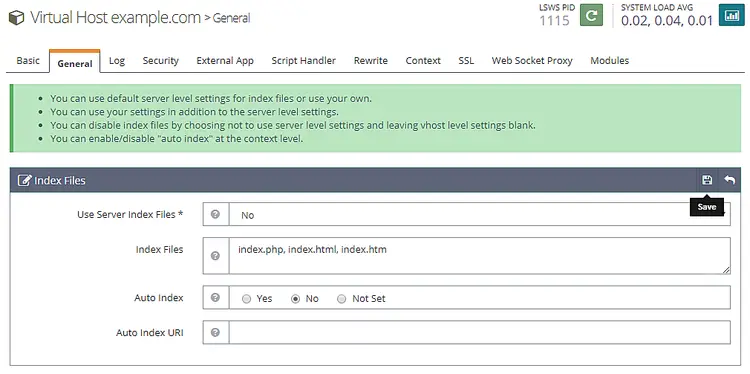
Click the Save button when finished. Next, we need to setup index files. Click the edit button against Index files below the General Section. Set the following options.
Use Server Index Files: No
Index files: index.php, index.html, index.htm
Auto Index: No
Click Save when done. Next, we need to choose Log files. Go to the Log section and click Edit against Virtual Host Log and fill the following values.
Use Server’s Log: Yes
File Name: $VH_ROOT/logs/error.log
Log Level: ERROR
Rolling Size (bytes): 10M
You can choose the Log Level as DEBUG if you are on a production/development machine.
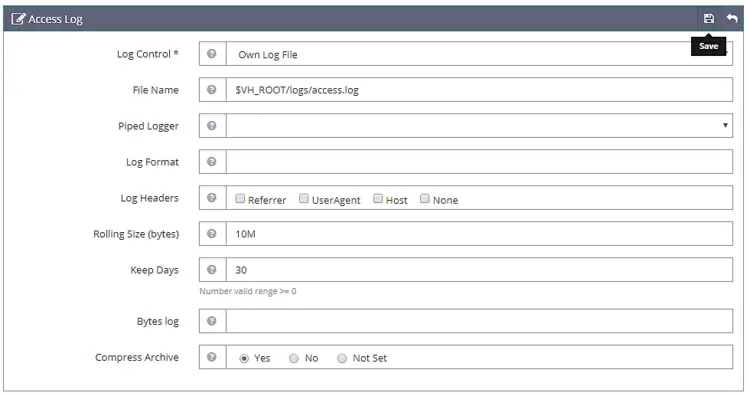
Click Save and then open the Access Log section. Fill in the following values.
Log Control: Own Log File
File Name: $VH_ROOT/logs/access.log
Piped Logger: Not Set
Log Format: Not Set
Log Headers: Not Set
Rolling Size (bytes): 10M
Keep Days: 30
Bytes log: Not Set
Compress Archive: Yes
Click Save when done. Next, we need to configure Access Control under the Security section. Set the following values.
Allowed List: *
Denied List: Not set
Click Save when done. Next, we need to set the script handler. Set the following values.
Suffixes: php
Handler Type: LiteSpeed SAPI
Handler Name: [Server Level]: lsphp74
Next, we need to set Rewrite Control under the Rewrite section. Set the following values.
Enable Rewrite: Yes
Auto Load from .htaccess: Yes
Log Level: Not Set
And at last, we need to set the Listeners. Go to the Listeners section and click on the View button against Default Listener. Then, click on the Add button against Virtual Host Mappings to add a new mapping and set the following values.
Virtual Host: example.com
Domains: example.com
Click Save when done. Now, click on the Graceful restart button to apply all the changes above and restart the server.
Step 8 - Setup SSL
To use Let's Encrypt, we need to install the Certbot tool.
$ sudo dnf install certbot
Obtain the SSL certificate.
$ sudo certbot certonly --webroot -w /usr/local/lsws/example.com/html/ -d example.com
Follow the Interactive prompt.
Saving debug log to /var/log/letsencrypt/letsencrypt.log
Plugins selected: Authenticator webroot, Installer None
Enter email address (used for urgent renewal and security notices) (Enter 'c' to
cancel): [email protected]
Starting new HTTPS connection (1): acme-v01.api.letsencrypt.org

-------------------------------------------------------------------------------
Please read the Terms of Service at
https://letsencrypt.org/documents/LE-SA-v1.2-November-15-2017.pdf. You must agree
in order to register with the ACME server at
https://acme-v02.api.letsencrypt.org/directory
-------------------------------------------------------------------------------
(A)gree/(C)ancel: A

-------------------------------------------------------------------------------
Would you be willing to share your email address with the Electronic Frontier
Foundation, a founding partner of the Let's Encrypt project and the non-profit
organization that develops Certbot? We'd like to send you email about our work
encrypting the web, EFF news, campaigns, and ways to support digital freedom.
-------------------------------------------------------------------------------
(Y)es/(N)o: N
Obtaining a new certificate
Performing the following challenges:
http-01 challenge for example.com
Using the webroot path /usr/local/lsws/example.com/html for all unmatched domains.
Waiting for verification...
Cleaning up challenges

IMPORTANT NOTES:
 - Congratulations! Your certificate and chain have been saved at:
   /etc/letsencrypt/live/example/fullchain.pem. Your key file has
   been saved at:
   /etc/letsencrypt/live/linode.nspeaks.com/privkey.pem Your cert will
   expire on 2020-03-07. To obtain a new or tweaked version of this
   certificate in the future, simply run certbot again. To
   non-interactively renew *all* of your certificates, run "certbot
   renew"
 - Your account credentials have been saved in your Certbot
   configuration directory at /etc/letsencrypt. You should make a
   secure backup of this folder now. This configuration directory will
   also contain certificates and private keys obtained by Certbot so
   making regular backups of this folder is ideal.
 - If you like Certbot, please consider supporting our work by:

   Donating to ISRG / Let's Encrypt:   https://letsencrypt.org/donate
   Donating to EFF:                    https://eff.org/donate-le
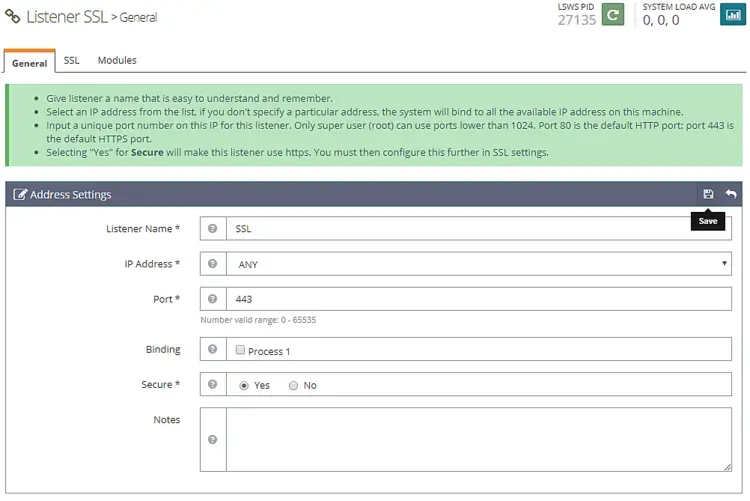
Now open the Admin console and go to Listeners >> Add New Listener and add the following values.
Listener Name: SSL
IP Address: ANY
Port: 443
Secure: Yes
Click Save when done. Next, go to Virtual Host Mappings section under the SSL Listener, click on the Add button and fill the following values.
Virtual Host: example.com
Domains: example.com
Click Save when done.
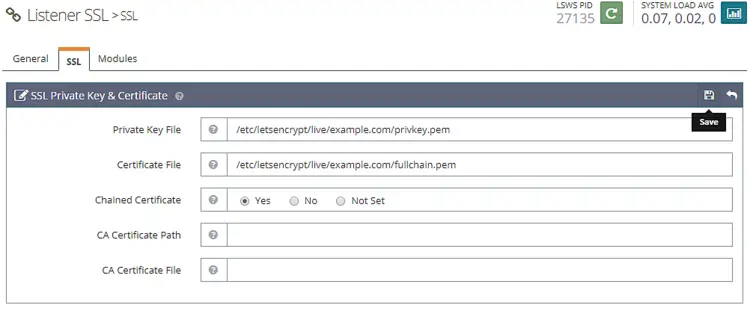
Next go to Listeners >> SSL Listener >> SSL Tab >>SSL Private Key & Certificate (Edit button) and fill the following values
Private Key File: /etc/letsencrypt/live/example.com/privkey.pem
Certificate File: /etc/letsencrypt/live/example.com/fullchain.pem
Chained Certificate: Yes
Click Save when finished. Restart the server by clicking on the Graceful restart button.
Step 9 - Test Site
Create a Test file in your html directory.
$ sudo nano /usr/local/lsws/example.com/html/index.php
Paste the following code in the Nano editor.
<html>
<head>
    <h2>OpenLiteSpeed Server Install Test</h2>
</head>
    <body>
    <?php echo '<p>Hello,</p>';

    // Define PHP variables for the MySQL connection.
    $servername = "localhost";
    $username = "testuser";
    $password = "password";

    // Create a MySQL connection.
    $conn = mysqli_connect($servername, $username, $password);

    // Report if the connection fails or is successful.
    if (!$conn) {
        exit('<p>Your connection has failed.<p>' .  mysqli_connect_error());
    }
    echo '<p>You have connected successfully.</p>';
    ?>
</body>
</html>
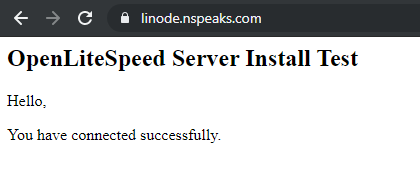
Visit your site at https://example.com in a browser and you should see the following page.
That's all for this tutorial. If you have any questions, shoot them in the comments below.

