How to Install Calibre Ebook Server on Ubuntu 20.04
This tutorial exists for these OS versions
- Ubuntu 22.04 (Jammy Jellyfish)
- Ubuntu 20.04 (Focal Fossa)
On this page
- Prerequisites
- Configure Firewall
- Download and Install the calibre Server
- Create a Library and Add your first Book
- Run the calibre Server
- Create a service for calibre server
- Add User authentication to calibre server
- Automatically Add Books to your library
- Install Nginx
- Install SSL
- Configure Nginx to serve Calibre over proxy using SSL
- Conclusion
Calibre is a free and open-source e-book manager. It ships as a cross-platform desktop application along with a server component and can be used to manage your e-book library.
Setting up calibre as a server allows you to access your books from anywhere in the world and allows you to share them with friends and family. You can also transfer them to your mobile devices for reading later. Calibre server also allows you to read e-books directly on the web.
In this tutorial, you will learn about how to install and use a calibre ebook server on an Ubuntu 20.04 based server.
Prerequisites
-
An Ubuntu 20.04 based server with a user with sudo privileges.
-
Keep the server updated.
$ sudo apt update && sudo apt upgrade
Configure Firewall
Ubuntu 20.04 comes with Uncomplicated Firewall(UFW) by default. In case it is not, install it first.
$ sudo apt install ufw
Enable SSH port.
$ sudo ufw allow "OpenSSH"
Enable the firewall.
$ sudo ufw enable
Enable the ports 8080 which is used by the calibre server.
$ sudo ufw allow 8080
Check the firewall status.
$ sudo ufw status
Status: active

To                         Action      From
--                         ------      ----
OpenSSH                    ALLOW       Anywhere
8080                       ALLOW       Anywhere
OpenSSH (v6)               ALLOW       Anywhere (v6)
8080 (v6)                  ALLOW       Anywhere (v6)
Download and Install the calibre Server
Ubuntu 20.04 does ship with calibre but it is better to install it directly from their site instead to get the latest version.
First, you need to install some dependencies.
$ sudo apt install libfontconfig libgl1-mesa-glx
Download the calibre server installer.
$ wget https://download.calibre-ebook.com/linux-installer.sh
Set the installer script as executable.
$ chmod +x ./linux-installer.sh
Run the installer.
$ sudo ./linux-installer.sh
You will get some warnings because the installer expects a Desktop system and not a headless server. It is safe to ignore them.
Create a Library and Add your first Book
For our tutorial, we will download a book from Project Gutenberg as an example. Project Gutenberg is a massive repository of free, public domain books.
Run the following command to download your first book. In the spirit of the recent Halloween festival, let us download a horror story, "The turn of the screw" by Henry James.
$ wget http://www.gutenberg.org/ebooks/209.kindle.noimages -O turnofthescrew.mobi
Create a directory for your calibre library.
$ mkdir calibre-library
Add the book you just downloaded to your calibre library using the calibredb command.
$ calibredb add *.mobi --with-library calibre-library/
Added book ids: 1
It is time now to start calibre.
Run the calibre Server
Run the following command to start the calibre content server.
$ calibre-server calibre-library
calibre-server is the command used to start the server and calibre-library is the name of the directory we just created and will be used by the server to load the interface.
You should see a similar output.
calibre server listening on 0.0.0.0:8080
OPDS feeds advertised via BonJour at: your_server_ip port: 8080
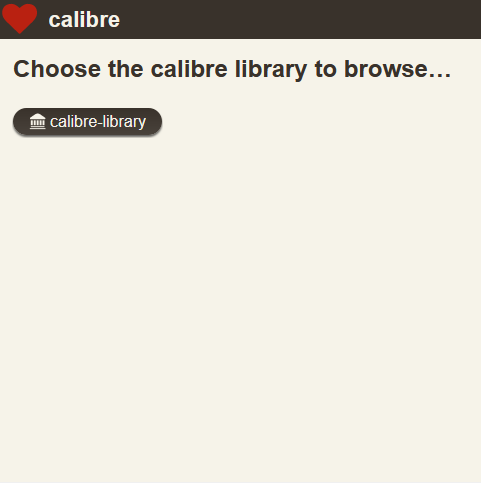
Launch the URL http://<yourserverip>:8080 in your browser and you will see the default calibre screen.
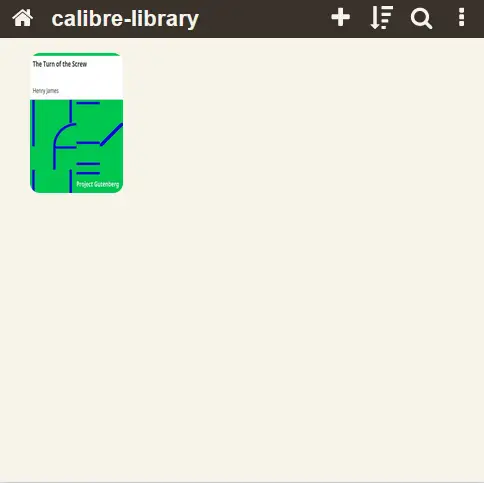
Click on calibre-library and you will see the book The turn of the screw you just downloaded.
You can stop the server by pressing Ctrl+C on the command line.
Calibre server uses the port 8080 by default. You can change it by modifying the command during launch.
$ calibre-server calibre-library --port 7530
You can then check by launching the URL http://<yourserverip>:7530 in your browser.
You will also need to allow the port via the firewall.
$ sudo ufw allow 7530
Create a service for calibre server
You would probably want calibre to run forever even after the server restarts. To do that, you will need to create a service for calibre that will start it automatically on boot.
Create a file /etc/systemd/system/calibre-server.service and open it for editing using the Nano editor.
$ sudo nano /etc/systemd/system/calibre-server.service
Paste the following code.
## startup service
[Unit]
Description=calibre content server
After=network.target

[Service]
Type=simple
User=<username>
Group=<username>
ExecStart=/opt/calibre/calibre-server /home/<username>/calibre-library --enable-local-write

[Install]
WantedBy=multi-user.target
Replace <username> with the actual system user on your Ubuntu server.
Save and close the file by pressing Ctrl+W and entering Y when prompted.
Enable and start the calibre service.
$ sudo systemctl enable calibre-server
$ sudo systemctl start calibre-server
You can check by rebooting the service.
$ sudo reboot
Wait for a couple of minutes and open http://<yourserverip>:8080 in the browser to ensure calibre is working.
Add User authentication to calibre server
For now, anyone who knows your server IP can access the calibre server. We can change that by adding user authentication to the server.
First, stop the calibre server.
$ sudo systemctl stop calibre-server
Start the calibre's user management script. You can specify the path where the user database will be stored. It is stored in the form of an SQLite database.
$ sudo calibre-server --userdb /home/<username>/.config/calibre/server-users.sqlite --manage-users
1) Add a new user
2) Edit an existing user
3) Remove a user
4) Cancel

What do you want to do? [1-4]: 1
Enter the username: howtoforge
Enter the new password for howtoforge:
Re-enter the new password for howtoforge, to verify:
User howtoforge added successfully!
Enter 1 to create a new user and choose a strong password.
Next, we need to edit the calibre service we had set up previously.
Open the service file.
$ sudo nano /etc/systemd/system/calibre-server.service
Add the --enable-auth flag to the end of the line starting with ExecStart to enable user authentication.
. . .
ExecStart=/opt/calibre/calibre-server "/home/<username>/calibre-library" --userdb "/home/<username>/.config/calibre/server-users.sqlite" --enable-local-write --enable-auth
. . .
Save and close the file by pressing Ctrl+W and entering Y when prompted.
Refresh the service daemon to reload the modified service file and start the service again.
sudo systemctl daemon-reload
sudo systemctl start calibre-server
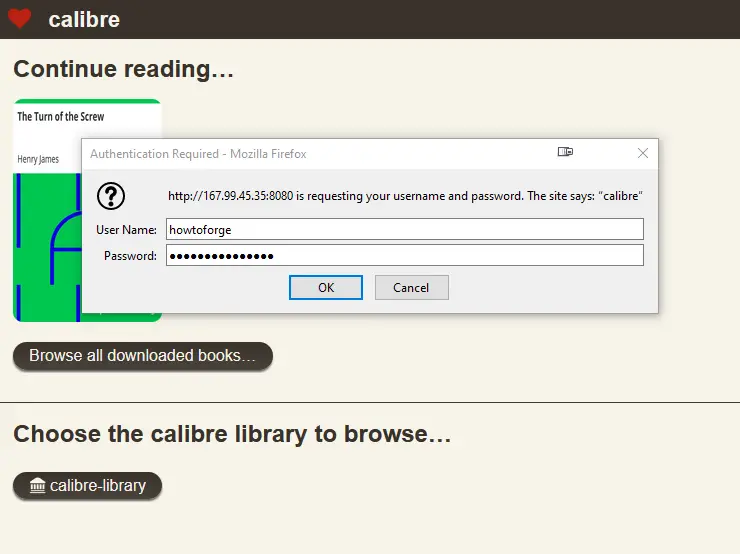
Next time, you launch the site, you will be asked for the username and password before accessing the library.
Automatically Add Books to your library
We can set up a watch folder which can be tracked by calibre server so whenever you add a new book to the folder, it will be added automatically to the Calibre library.
Create a watch folder and switch to it.
$ mkdir ~/watchbooks
$ cd ~/watchbooks
Download a new book to the folder using the following command.
$ wget http://www.gutenberg.org/ebooks/514.epub.noimages -o littlewomen.epub
Next, open the Crontab Editor.
$ crontab -e
Add the following line at the end.
*/5 * * * * calibredb add /home/<username>/watchbooks/ -r --with-library http://localhost:8080#calibre-library --username calibreuser --password YourPassword && rm -r /home/<username>/watchbooks/*
This script will add all the files in the directory /home/<username>/watchbooks to the calibre library and delete all the original files since they are no longer needed.
The cron job will run every 5 minutes. Wait for a few minutes and reload the calibre server site to see the book you just added appear in the library.
Install Nginx
In this step, we will install Nginx webserver to serve the calibre server over proxy. That way you can access it over a domain name for example, calibre.yourdomain.com. You also won't need to worry about specifying any port numbers. And having Nginx as proxy allows us to serve the site over SSL.
Run the following command to install Nginx.
$ sudo apt install nginx
Open the ports 80 and 443 and close the port 8080 since it is no longer required.
$ sudo ufw allow "Nginx Full"
$ sudo ufw delete allow 8080
Nginx Full is an application profile for the ufw firewall that will automatically open the ports 80 and 443.
$ sudo ufw status
Status: active

To                         Action      From

--                         ------      ----

OpenSSH                    ALLOW       Anywhere
Nginx Full  		   ALLOW       Anywhere
OpenSSH (v6)               ALLOW       Anywhere (v6)
Nginx Full		   ALLOW       Anywhere (v6)
Install SSL
We will install SSL using Let’s Encrypt service.
For that, install Certbot.
$ sudo apt install certbot
Stop Nginx because it will interfere with the Certbot process.
$ sudo systemctl stop nginx
Generate the certificate. We also need to create a DHParams certificate.
$ export LDOMAIN="calibre.yourdomain.com"
$ export LEMAIL="[email protected]"
$ sudo certbot certonly --standalone -d $LDOMAIN --preferred-challenges http --agree-tos -n -m $LEMAIL --keep-until-expiring
$ sudo systemctl start nginx
$ sudo openssl dhparam -out /etc/ssl/certs/dhparam.pem 2048
We also need to set up a cron job for renewing the SSL automatically. To open the crontab editor, run the following command
$ sudo crontab -e
The above command opens Crontab editor.
Paste the following line at the bottom.
25 2 * * * /usr/bin/certbot renew --quiet --pre-hook “systemctl stop nginx” --post-hook “systemctl start nginx”
The above cron job will run certbot at 2:25 am every day. You can change it to anything you want.
Save the file by pressing Ctrl + X and entering Y when prompted.
Configure Nginx to serve Calibre over proxy using SSL
We need to edit the Nginx configuration file to add the SSL configuration.
Run the following command to add a configuration file for the Calibre server.
$ sudo nano /etc/nginx/sites-available/calibre.conf
Paste the following code in the editor.
server {
    listen 80;
    listen [::]:80;
    server_name calibre.yourdomain.com;
    # enforce https
    return 301 https://$server_name:443$request_uri;
}

server {
    listen 443 ssl http2;
    listen [::]:443 ssl http2;
    server_name calibre.yourdomain.com;

    location / {
        proxy_pass http://127.0.0.1:8080;
    }

    # Use Mozilla's guidelines for SSL/TLS settings
    # https://mozilla.github.io/server-side-tls/ssl-config-generator/
    ssl_certificate /etc/letsencrypt/live/calibre.yourdomain.com/fullchain.pem;
    ssl_certificate_key /etc/letsencrypt/live/calibre.yourdomain.com/privkey.pem;
    ssl_protocols TLSv1.2 TLSv1.3;
    ssl_session_timeout 1d;
    ssl_session_cache shared:MozSSL:10m;  # about 40000 sessions
    ssl_session_tickets off;
    ssl_ciphers ECDHE-ECDSA-AES128-GCM-SHA256:ECDHE-RSA-AES128-GCM-SHA256:ECDHE-ECDSA-AES256-GCM-SHA384:ECDHE-RSA-AES256-GCM-SHA384:ECDHE-ECDSA-CHACHA20-POLY1305:ECDHE-RSA-CHACHA20-POLY1305:DHE-RSA-AES128-GCM-SHA256:DHE-RSA-AES256-GCM-SHA384;
    ssl_prefer_server_ciphers off;
    ssl_dhparam /etc/ssl/certs/dhparam.pem;
}
Press Ctrl + X to close the editor and press Y when prompted to save the file.
Activate this configuration file by linking it to the sites-enabled directory.
$ sudo ln -s /etc/nginx/sites-available/calibre.conf /etc/nginx/sites-enabled/
Test the Nginx configuration.
$ sudo nginx -t
You should see the following output indicating your configuration is correct.
nginx: the configuration file /etc/nginx/nginx.conf syntax is ok
nginx: configuration file /etc/nginx/nginx.conf test is successful
Reload the Nginx service.
$ sudo systemctl reload nginx
You can now launch the site via the URL https://calibre.yourdomain.com.
Conclusion
In this tutorial, you learned how to install and run Calibre ebook server and run it over Nginx along with user authentication and with the ability to add books automatically. If you have any questions, post them in the comments below.


