How To Configure SSH Keys Authentication With PuTTY And Linux Server In 5 Quick Steps

This tutorial explains how you can replace password-based SSH authentication with key-based authentication which is more secure because only the people that own the key can log in. In this example, we're using PuTTY as our SSH client on a Windows system.


1. Get the zip file with all PuTTY binaries

http://the.earth.li/~sgtatham/putty/latest/x86/putty.zip

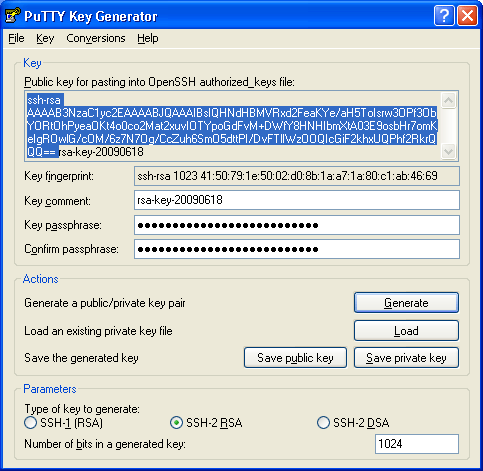
2. Generate a private and public key pair

Open PuTTYgen.exe, press Generate button, move mouse. Once the keys are generated, type your key passphrase (choose a "hard to guess" one). Save Public key. Save Private key.

Screen shot: PuTTY key generator

3. Configure your Linux server (create user, save public key)

For this guide let's assume you regular login name is autotimesheet (replace it with one that you use regularly).

As root, on the shell, type:

adduser autotimesheet --disabled-password

You will be asked to fill in some details such as the user's real name (empty string is fine).

Now type:

su autotimesheet
cd /home/autotimesheet
mkdir .ssh
chmod 700 .ssh
cd .ssh

Then in that folder, create and edit a file called authorized_keys2.

In there, cut/paste your public ssh key, on ONE LINE (That is very important!!!)

Do not add the [email protected] at the end of the line.
Do not add the BEGIN PUBLIC KEY or END PUBLIC KEY.
Do not add the rsa-key-20090614 at the end.
Make sure, there is ssh-rsa at the beginning.

It should be something like:

  ssh-rsa AAAAB3NzaC1yc2EAAAABJQAAAIBzPeFQv+295iKzuuPH0jA9449pSHVpCwXvCR9EstmYh... 

Type:

chmod 600 authorized_keys2


4. Add Private key to PuTTY SSH authentication agent

Start the PuTTY SSH authentication agent PAGEANT.EXE. When started, right-click its syspanel icon...

Screen shot: Pageant - syspanel icon

... and select "add key". Select your private key file, and type in your passphrase when you add the key. The Pageant works as a passphrase keeper.


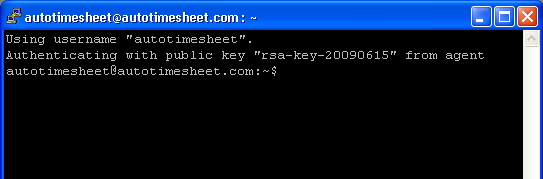
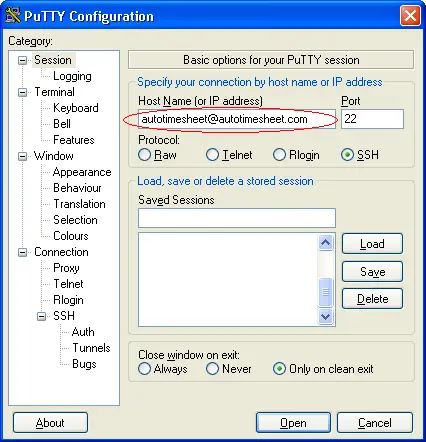
5. Use PuTTY to connect to your server

Open PuTTY and connect as [email protected]:

Screen shot: PuTTY - connect to a server

See that you log in without a password ...

Screen shot: PuTTY - Authenticating with public key from agent

Share this page:

25 Comment(s)

Add comment

Please register in our forum first to comment.

Comments

By: Suno Ano

Hi folks,

I wrote an article about PKA as well

http://sunoano.name/ws/public_xhtml/ssh.html#public_key_authentication

 Maybe someone might find it useful ...

By: Anonymous

http://www.ssh-key-authentication.com/

 i wrote anything you need to know and more at that site

plus : you get an automatic script.


enjoy

By: Suno Ano

Hi there ... 

Hints:

Your howto advices people to use scp to transfer the public key to the remote machine. This often causes permission problems. The prefered way is to use ssh-copy-id as shown here

http://sunoano.name//ws/public_xhtml/ssh.html#transferring_the_public_key_to_the_remote_machine

Also, just to stress the fact again, a keypair should always be protected by a passphrase i.e. "leaving empty for no password" should not be done:

http://sunoano.name//ws/public_xhtml/ssh.html#why_does_public_key_authentication_benefit_me


Monkeysphere:

Personally, I am now using Monkeysphere on top of PKA all the time now because it also solves the problem how to authenticate servers and users:

http://sunoano.name//ws/public_xhtml/ssh.html#monkeysphere

By: dhanesh mane

perfect article. Works perfect and steps are really explained properly. Only thing is I am using ubuntu so at 3rd step I used sudo su -l autotimesheet command instead of su autotimesheet

Thanks a lot for such a nice article.

By: Anonymous
By: wese

I believe you didn't set the owner right.

chown -R autotimesheet. /home/autotimesheet/.ssh

By: Tuye

If the folder and file were created by the intended user, then no need to change owner permissions. If however, the files and folder were created by another user such as the root, then you would have to change the owner permissions. In this example, it was not necessary. I hope that helps.

By: Nick

The authorized_keys2 file has been deprecated since the OpenSSH 3.0 release (2001).

See

http://marc.info/?l=openssh-unix-dev&m=100508718416162&w=2

By: Shoval

You seem to be correct, this didn't work for me using 'authorized_keys2', but worked like a charm using simply 'authorized_keys' as the file name. Using CentOS7.

By: Colin

Thank you very much for the nice introduction :-) I liked it a lot and I am glad to not retype my password every time I connect to my server

By: Anon

Should the == (with a space after) be included at the end of the key?

By: beentold

A noob question... I am using WinSCP to connect to my server via SSH. I went to Settings -> SSH -> Authentication and provided the path to the ppk file. Still WinSCP won't let me sign in without a password.Can anyone tell me, what else I need to do in WinSCP for this to work?

By: mike

Did you add a passphrase when you created the keys? You don't have to.

By: Frank

What about if you don't have root/su access?   In big companies, they might not allow this.


By: IGB

Many thanks for the simple How-To - works perfectly on my home setup.

By: Lila

Finally someone that explained it for home connecting to server! Saved my day!

By: manish

Hi,

I am able to login to the CSPC console using vm console but unable to access console using ssh/putty?

please help.


thanks,

Manshaw

By: John

Thaink you for the details of the tutorial !!!

By: Ganesh Kunwar

Thank you for sharing this important information.

By: Ruhel

Thanks so much from this!

By: Simran

I am getting Putty FATAL ERROR: No supported authentication methods available (server sent: publickey) on following all these steps.

Can somebody help? 

By: till

Check that you are using the latest putty version.

By: Steve

Same here -- thanks.

By: Pierre-emmanuel

Remarks :

Take care, it's not :

adduser autotimesheet --disabled-password

but

adduser --disabled-password autotimesheet

:)

ssh authentication browse bar not seen on my laptop what is the problem